Drawing patterns of leaves, branches and trees (birch, spruce, oak, male). How to draw a maple leaf with a pencil? Step-by-step instruction scheme how to draw leaves
Reading time: 3 minutes
Almost everyone, without exception, the children love to draw, but many parents because of their own laziness and excuses like "dirty himself and everything around will", "I do not know how to draw to show the sample, as you need to do," "he is too small These colors do not give the kids and paints, and sorry ... We hope our marathon of children's drawings on the autumn theme will inspire the work of all without exception. There is from what to choose, dear creators!
We tried to collect the most and ideas for drawing for you, more interesting to organize the child's leisure when it is time for rains, "sad charm" and sitting at home. The ideas of what you can do at home with a child in bad weather read.
Idea number 1

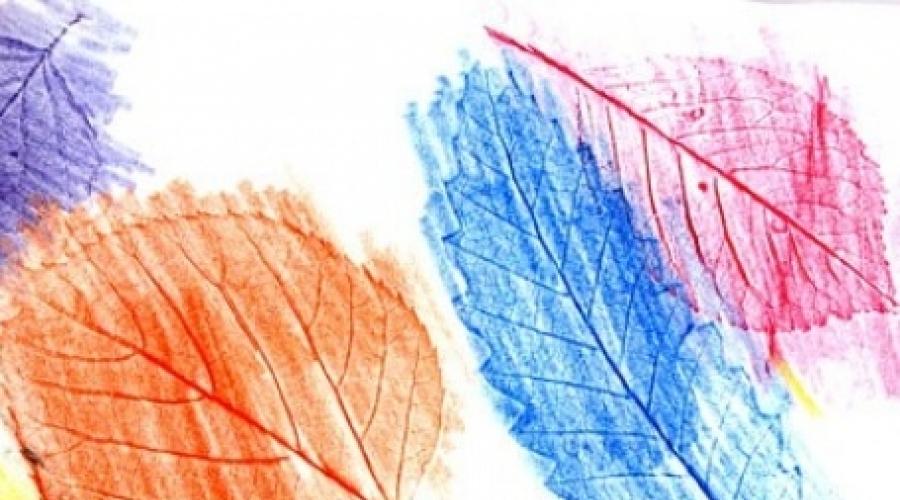
You need to attach dried leaves between sheets of paper, and then paint the sheet with solid strokes with soft color pencils or chalk. A sheet with all the streaks will appear on white paper. Using this method, you can compose compositions: a bouquet in a vase, autumn landscape, etc.
Idea number 2.

A similar way, only the leaves need to grasp wax (a candle or white wax shallow), and then covered with a watercolor sheet of paper. Large planes are conveniently painted with a wide squirrel brush or a foam sponge.
Idea number 3.

Paint is applied to the leaf from the resumption. Then the sheet is applied to the paper and the imprint is made. The effect will be different, depending on which paint to use.

You can come up with a lot of composite solutions: a large leaf imprint can become a crown of wood, if you draw a trunk; Several prints are a whole forest!

Speecually looking outprints made of white paint on a colored background. You can combine several techniques, draw the image with pencils or wovers.

Idea number 4.
 kokokokids.ru.
Blowing out the paint through the straw can be painted bizarre trees. This method gives limitless features for experiments! You can, for example, draw trees on a predetermined background.
Idea number 5.

Baby pour the background yourself or offer color cardboard. The crown of the tree and the fallen leaves let him draw a flip finger in the paint.
Idea number 6.

Croon looks like, if you make it cleaning from color pencils. Take the glue into the right places and sprinkle with small chips. The barrel and branches can be blown through the tube or draw in any other way.
Idea number 7.


Conveniently (and completely neado) draw the crown with a cotton waller. In the same way, you can depict the row of rowan, currant twig or other berries.
Idea number 8.

Very unusual picture can be made using foil. On the cardboard sheet, lay a jumped leaflet (you can somewhat) with streaks up. Cover it with a thin foil and carefully, so as not to break, scream with your fingers to stick out the drawing. Cover the dark paint foil (you can use the gouache, acrylic, Tepe, mascara) and let it dry well. Very carefully, sweat the picture with a rigid washcloth washing. The protruding bodies of the leaflet will be slaughtered, and in the recesses there will remain dark paint. Now you can make work in the frame!
Idea number 9.


Those who love invoices will probably like to fill various silhouettes with patterns. Draw or circle an autumn leaf pattern, divide it into small planes as stained glass. Let the child fill each piece with different pattern. You can do it with a gel handle, markers.

Idea number 10.
A similar task can be performed in the technique of routine (scratching). A sheet of smooth (rosged) cardboard paint and grasp wax (candle). You can use wax chalk background. Cove the surface with black ink and dry. Scratch the drawing with a sharp object.
Idea number 11.
Using a rigid bristle brush or toothbrush, make a spray paint. This method is suitable for drawing the crown of trees, creating compositions based on plant prints.
Summary: Autumn crafts for children with their own hands. Autumn drawings. How to draw autumn. Autumn leaves. Figures of autumn trees. Pictures on the subject of autumn.
What is the most notable in autumn? Of course, autumn leaves! In the fall, the leaves are not green, both in summer, but bright, multicolored. Leaves on trees, bushes that fell and lying on the roads, on paths, on the grass ... Yellow, red, orange ... At this time of year, even if you are not a photographer or artist, so I want to take a camera or brush With paints, in order to capture this wonderful time in our glory. We will help you with this. In the second part of the article "Autumn crafts for children: how to draw autumn" We will teach you to draw autumn leaves in different ways.
Autumn drawings. Draw autumn
Under the sheet of conventional paper for printers, put a sheet with streaks up, then stitch it with a wax chalk, located plastics. You will see how the paper is displayed on paper with all the smallest streaks.

To add a little magic, you just need to take a white chalk and spend it on white paper, and then give the baby to paint a sheet with a sponge. See link \u003e\u003e\u003e\u003e

By the way, there is an interesting method of staining with color corrugated paper. It is necessary first to draw the leaves on paper at first a white wax shallow. After that, pour into small pieces of corrugated paper of autumn colors (red, yellow, orange, brown) and, well wetting every piece in water, stick them into a drawing. Watch that there are no two pieces of paper of the same color. Let the paper dry a little (but not to the end!), After that, remove it from the picture. You will have a wonderful multicolored background. Leave the work to dry finally, then put it under the press.


An interesting autumn handicraft will turn out if leaflets put under a thin foil. Foil at the same time it is necessary to place a brilliant side up. After that, you need to carefully smooth out the foil with the pads of the fingers to stick the drawing. Next, it is necessary to cover it with a layer of ferrous paint (it can be gouache, mascara, temperatures). When the paint is driving, very carefully pull the picture with a metal washcloth with a metal washcloth. The protruding bodies of the leaved at the same time will be slaughtered, and dark paint will remain in the deepening. Now you can stick the resulting relief on the sheet of color cardboard.

Autumn leaves. How to draw autumn
Very simple and at the same time spectacular technique - to print the leaves on paper, which is pre-applied to the paint. You can use the paint any, just apply it to the one side of the leaves, where the accumulation is attracted.

Here is the prints of rowan leaves. And any kid can draw the berries of Rowan - they are made with a cotton wand with red paint.

Beautiful autumn pattern will succeed, if on a sheet of dark color cardboard prints leaves white paint. When the paint is driving, you need to paint with colored pencils. It turns out beautifully if some leaves leave white.


The background can be left as it is, or to make color, coloring with paints with a sponge. At the same time it is necessary to leave a small incentive space around the leaflets.


If you decide to make the background with color, then the leaves themselves can be left white at the same time.

How to draw autumn leaves. Autumnal crafts
To give the volume to your drawings, you can take advantage of the following interesting technique. You will need fine wrapping paper or corrugated paper white.

1. Narrify it to pieces of irregular shape and turn on a tight sheet of paper with the help of PVA glue. Try to work out with more "folds", "wrinkles", they subsequently give the pattern to the texture, volume.
2. When the adhesive will dry, using stencil, draw and cut three maple leaves from this paper (large, medium and small).
3. Color them with paints in autumn colors, then stir on a blackboard sheet of blackboard.
For more detailed instructions with photos, see Link \u003e\u003e\u003e\u003e
Autumn crafts do it yourself


Another original autumn drawing, made in warm and cold colors. The leaves themselves are drawn in warm colors (yellow, red, orange), background - in cold (green, blue, purple). To perform this work you will need a circuit.

1. Draw several leaves of different shapes on paper. 2. Now with a circulation, draw a circle of a small radius in the lower left corner of the paper sheet. Next, adding approximately 1 cm., Draw the circumference with an increasing and more radius, as far as the zirkul will allow. 3. Now all the same do in the upper right corner. 4. Finally, spread the autumn leaves with markers or pencils in warm colors (colors must be alternating successively), and the background - in cold colors.
Maple Leaf. Maple leaf pattern
Help the baby draw on a sheet of paper maple leaf. Divide it by streaks on the sector. Let the child color each sector of the leaflet in some special pattern.


You can combine two ways.


Autumn crafts for children
Another unusual autumn drawing.

1. Draw on paper leaves of different shapes. They must occupy the entire sheet of paper, but not touch with each other. Part of the leaves should begin with the borders of the paper sheet. Draw only contours of leaves, without residence. 2. Now, with the help of a simple pencil and ruler, you will read two lines from left to right and two - from top to bottom. Lines must cross the leaves by sharing them on the sector. 3. Select two colors for the background and two colors for leaves. Color them into selected colors in such a way as in the figure. 4. When the paint snacks, circle the outline of the leaves and the fired lines with a gold marker.
Figures on autumn
For the manufacture of this autumn craft, you will need a regular newspaper and paint (including white paint).
1. Draw on a newspaper sheet maple leaves.

2. Collect his paint and, after the paint dries, cut it out.


3. Take another sheet of newspaper and white paint. Draw and fidgeted a large square on it.

4. Enter your sheet on the paint and wait until it dry out.

5. That's what you should get in the end!

Autumn crafts do it yourself
Method 10.

Autumn drawings. Draw autumn
Method 11.
In the article "Easter postcards with your own hands" we talked about interesting drawing techniques using wax chalk. See link \u003e\u003e\u003e\u003e
In this way, autumn leaves can be drawn.

And here such an arrangement of autumn leaves are drawn by paints.


Finishing our review article on "How to draw autumn leaves", we will tell about two ways.
Autumn crafts for children
Method 12.
Spread the leaves on paper, after which with the help of an old toothbrush or spray guns for colors spray paint. In order not to stain everything around, you can do the above procedure in the bath.


How to draw autumn leaves
Method 13.
And finally, the stamps of the leaves with a roll from under the toilet paper. In this way, it is very cool to do with children a gift packaging.


Material prepared: Anna Ponomarenko
Other publications on this article:
Drawing with a pencil - a fascinating occupation. Following the tips of the masters, anyone, regardless of age and abilities, can learn how to create masterpieces.
What do you need to draw a pencil?
You can draw a pencil anything: animals and plants, people, buildings, animals, animal heroes. In general, everything that is enough fantasy. In this article, step by step is explained
For successful work at hand, the novice artist should be everything you need. Prepare good quality paper, sharply sharpened graphite pencil of medium hardness, soft eraser and memo "How to draw a maple leaf". In addition to the instructions, to have a good one and carefully consider several real maple leaves. At first glance it seems that they are very simple to draw them. However, in fact, everything will be a bit harder. It has a complex structure of several repeating elements. So you coped with the work, we will tell you how to draw in stages.
Step-by-step maple leaf drawing
Step 1. It is necessary to create the basis. To do this, it is necessary to draw a vertical and crossing its horizontal line. Then through the intersection point of these lines to spend another 2 inclined lines to the left and right. It turns out six intersecting lines, as shown in the figure.
Step 2. From large lines to carry out numerous small "twigs". They need to be located unevenly, which will make the finished work more natural.
In the first stages, the maple leaf of the pencil is drawn without pressure. The tool should be kept in hand gently, without tension. Lines should be easy and light.

Step 3. We have a pre-frame for the future drawing on paper. Now it is necessary to make the right outline. For this, scaffolding the grating from the twigs, as shown in the figure.

Step 4. With clear strokes, carefully draw the main skeleton and sheets of sheet. The figure shows that they should be slightly thickened compared to secondary branches. Their form resembles - narrowed from above and expanding books.

Step 5. Light small strokes add minor veins to secondary twigs. At this stage, we already have an idea of \u200b\u200bhow to draw a maple leaf. However, we are only a sketch. To obtain this picture, it is necessary to properly distribute the light and shadow on the sheet. Then it will not be just a picture, but the work of the artist.

Step 6. This is the last step. At this stage, you need to give a piece of realism. Make it necessary by catching sheets. Look at the "live" maple leaf through the eyes of the wizard. You should note which areas are more darkened, and what brighter. Such a game of light and shadow must be tried to pass on paper.

Now you know how to draw a maple leaf. To achieve the best result, we will give a few more general tips:
- at the beginning of work on the drawing, do not push the pencil strongly;
- contour Will, with a stronger pressure for receiving a clear line;
- sharch the drawing gradually, do not immediately make too sharp transitions from the light tone to the dark.
In this lesson I will show how to draw a maple leaf with a pencil step by step. This is a simple lesson with which even a beginner can cope.
Before drawing a complicated form, you must imagine how it is arranged from the inside. For example, a maple leaf is not a simple figure. But if you explore its structure, it will be much easier. Here is a maple leaf:
How to draw a maple leaf - a simple step-by-step drawing lesson
First, look at the maple leaf in the figure above. Think what is his basic form. Look at the stem. Pay attention to how it continues until the tip of the sheet. Look at the "Ribs" sheet. Think about the corners where they are encountered. Now you can portray the basic form. Always try to first see the basic form, and leave the details for later. Follow the step-by-step instructions below.
- Draw a square .... Put the stem passing through the center.

2. Look at the ribs of the leaves. Imagine the corners where they rest in the stem. Please note that they fold in the "V" letter in the upper and side parts of the sheet.

3. Now draw a sheet contour. You can navigate the square that you painted in the first step.

To make it easier for you, the main lines are highlighted below in gradually:
3.1 At the bottom of the sheet, draw the shape of the flatted letter "w". In the top draw the inverted letter "V".

3.2 Now we draw 3 letters "J" (2 are inverted).

3.3 Now draw the digit "7" to the right and the letter "z" in the left side of the sheet.

4. Now draw the outer corrugated form of the edges of the sheet.
Hello everyone!
Today we will talk about how to draw autumn leaves (and not only autumn). I will show you the pattern of drawing leaves.
So how to draw a maple leaf?
I offer several options and several schemes.
First, I want to pay attention to the fact that all major veins should go into a stalk.
Moreover, the middle veil divides the sheet exactly in half.
Draw a maple leaf (Scheme No. 1)
To draw a maple leaf, start with oval. Divide it in half the vertical line by running out two halves. Draw every half clearer. Add cloves on the edges of the sheet and get a maple leaf.
Draw a maple leaf (Scheme No. 2)
Start by displaying the sheet form. Please note that the maple leaf has five major veins that converge into one "node". Note every accommodation. Connect them with lines so that the sheet turns out to be smooth. Then draw gear edges.
Draw a maple leaf (Scheme No. 3)
Let's start with a square. We divide it in half, depicting the root. From the middle of the sheet, we draw three veins, as shown in the picture. And then around each resolution - the cloves.

Draw a maple leaf (Scheme No. 4)
We start with strey. We reinstate them, as shown in the figure. Points noted the deepest cuts of the sheet. Then draw the root. And after - the most speakers. We smoothly connect them with the intended dots and get a maple leaf.

How to draw an oak leaf?
Very simple. We start with a narrowed book oval. In the middle of oval draw a veil, which goes into the root. Then the edges of the sheet, which are similar to the waves.
Draw a oak leaf (Scheme No. 2)
We start with the form of a sheet and divide it in half, drawing a veil, which goes into the root. We form boundaries with a wave-like arc. Give it a clear shape and edge.
