Template for the crown of a snow queen. Crown for the Snow Queen: Make an Elegant Accessory for Little Princess
Each girl dreams of being a princess. To do this, she needs special attributes: a beautiful dress and shoes and, of course, a real royal crown. Crown or Kokoshnik will be useful for the children's New Year's matinee, a cheerful New Year's party, celebration of the birthday or family play.
Motherhood. Reloss secrets of manufacturing a real crown and kokoshnik for a small princess. We will look at different materials and techniques of manufacture: frame, knitted, patterns from ribbons, plastic, fabrics, barks and straws, beads, cardboard and even food.
Let's start with the most simple in the manufacture of royal hats for a festive masquerade, gradually moving towards more labor-intensive masterpieces.
Crown of paper, cardboard and cardboard cup
Simple and fast in the manufacture of the crown will be made from a piece of flat cardboard. In this case, you can use color and holographic cardboard. We apply an image of the crown, cut it out, glue along the edge of the compounds. We decorate sequins, paints, rhinestones, beads, nail polish. Permeate a thin haired rubber band. Now a small crown will reliably hold on to the head of a small princess.The same model can be made from the remaining roller from toilet paper. Then it will not need to glue.

Using a pressed paper cup for seedlings, you can make a stronger crown. Cut the upper part of the cup so that the teeth come out. Color the basis in white. Then a sponge for washing dishes applied lightly roving movements of gold paint. It does not need to be painted with solid gold. Light white lumens will give the crown more elegance and transparency. We decorate the crown by rhinestones and "precious stones". On the bottom, we glue the holder hairpin. Now you can pour it straight to the hairstyle!


From the colored paper you can glue a lightweight crown design. Cut the same paper squares. We make the bend diagonally. Now glue the resulting triangles, as in the image. Even small kids can cope with this simple option. Take the manufacture together!

Crown of finished semi-finished products: rim, three snowflakes, bright berries
We buy white rim, several ready-made plastic snowflakes, bright berries or beads for decor. We glue the basis of snowflakes and berries. If you will decorate the carved braid or lace, rhinestones, golden sprays. Instead of the rim, you can use a plastic wreath, hoop, cardboard blank.
It turned out to be an elegant diadem for a girl who performs the role of Snow Maiden, snowflakes, Metelitsa on New Year's morning.
Royal Crown of Lace
For the manufacture of such a crown you will need:Beautiful carved lace-tape with a length of 40-45 cm. Length depends on the desired finite diameter.
PVA glue.
Wax paper.
Golden, silver, bronze or other color spray in the canister. Or acrylic paint.
Glue crystal moment or thermoclay.
Sponge or cloth for applying and wiping excess glue.
We put our lace on the wax paper and laughing the plow glue 2-4 times to complete drying. After complete drying, stain a blank in the desired color. Each layer of paint should dry well. We glue the crown along the edge, combining the drawing. Use thermocles or glue crystal moment. We decorate the crown at your own desire. It can be gold or silver:


Or approach the tone of the royal dress: gentle pink, yellow, blue.

Crown of plastic
As a material for this crown, you can take a transparent packaging from children's toys or household appliances, a large plastic bottle. Cut out the basis of our crown. Apply a patterned pattern mockup. We spend on it a thick color gel with sparkles, paint, glue sequins or rhinestones, paint nail polish. And the crown is ready!
Crown of Mishura
The essence of the manufacture of this crown is in wrapping the wire base with brilliant tinsel. It turns out bright, shiny and volumetric. It can be made gold, silver or color.
Crown and Kokoshnik using focusing
You can make a crown completely in the focus technique - from intricate paper curls. At the same time, you can use colored paper and diverse design: winter flowers, snowflakes, curls. It is very beautiful and unusual, although the work is quite laborious.
You can easily facilitate your work, not at all slowly in the originality of the product. Cut the base of the cososhnik from colored cardboard. Making fastenings from satin ribbons or gates of suitable color. Now decorating the Dark Kokosnik with a snow-white pattern in a focus technique. It turns out a kind of frosty design.

See what such Kokoshnik is worn. This is "winter" snow-white fluffy cape, jewelry in Russian style.

Choosing a form for the kokosnik to a carnival costume, it is necessary to inspire the old paintings and photographs of Russian beauties in rational clothes.

Tsarist Crown of Wire and Ribbons
We make a blank from the wire in the form of the crown of the Russian Empire. We decorate it with white and gold ribbons, braid, large stones and pearls. Use the Basics of Macrame Macrame for Ribbons and Tips. Such a masterpiece will be remembered for all participants of the New Year holiday!
Corona from Berriest or Straw
Barriest and straw products are not only lapties, hats, caskets, but also crowns. Here, for example, a luxury crown in ecostel!
The essence of Kanzashi technology is the manufacture of masterpieces from tissue "petals". Petals are often made from satin ribbons, which are cut into 5x5 cm squares. Round petals are made, simple sharp open petals. Look a step-by-step master class for the manufacture of a red satin crown in Kanzashi technique.


In Kanzashi technique, gentle winter flowers are obtained, which can be used to make rims for hair, small or large crown.


Kokoshnik for the New Year holiday in Kanzashi technique is made of satin petals bonded with wire and threads. They are fixed on the rim. Look, what beauty gets!


Crowns in Macrame Technique
We all remember Kashpo, funny dogs and owls made in Macrame technique. However, this is not the limit of skill. From Macrame you can make a crown for a small or large princess.The easiest option is a weaving in the technique of Macrame rim-hoop for the crown and decorating it with additional details. It can be a finished flat crown, a wire layout with ribbons and beads.

These craftsmen will be able to perform truly royal works with gold threads, woven stones and beads, curly structures.


Crown of wire
The crown can be made from the "golden" or "silver" wire. At the same time, it is not necessary to overload it with decorations. It is enough to make an ornamental lace drawing and decorate several large stones. It turns out concisely and tastefully. But do not forget about security - all the tips of the wire must be perfectly bent.
Crowns of beads and stones
The royal crown can be made from the "golden" bead. To do this, we ride it on the wire and give a planned form.
The crown can literally "sleep with precious gems." Abundant decoration of beads, glassworks, beads, pearls will create an atmosphere of royal luxury. The crown can be made according to the color gamut of the festive dress.


The crown of beads and stones can be a gentle white. This is a great option for adding a New Year's carnival costume and for a wedding ceremony. Thus, after making a masterpiece, you can use it repeatedly.


The crown can be monochrome as in chess. On this topic you can arrange a party-tournament: "White against black". Come up with various contests: moving and intelligent, comic tasks. Such a meeting of the New Year will remember for a long time! Crowns Make a bizarre form.

Such black and white crowns will also be useful to create an image of Odeta and Odila from the "Swan Lake".
Knitted Kokoshniki
The craftsmen of knitting things should pay attention to the subject of the cososhnikov suitable for them. Crochet Slide individual elements in winter flavor - snowflakes, curls, flowers. They are starching them and attach to the rim-based or kokosnik with a wire basis.

Frame kokoshniki
Making the Kokoshnik framework from the wire, wind up its ribbon, sew a transparent tissue base. For example, tulle or fatin. We apply an ornament in the style of Gzhel. Such painting is perfectly suitable for winter topics. But other population paintings can be used. Coloring the ornament, decorate the bead ribbon along the edge, make a mount in the form of a hemisphere or satin ribbons. Close rhinestones can be glued to the tissue basis.

The original Kokoshnik-hat in the form of a green ate is an excellent themed accessory for a new year meeting. Extravagantly, stylish and in the case!

You can professionally to make Kokoshnika, according to the scheme: Make a wire frame, cover the fabric, stick to it, using paper clips, decorate the cososhnik with pearl thread, sparkles, rhinestones and glass, tulle.


You can combine frame kokoznnik with cardboard. Make carved ornaments in cardboard and glue translucent fabric over it. Decorate to your taste - and Kokoshnik is ready!

And this kokoshnik would have walked perfectly on the head of Nastya, the heroine of the fairy tale "Morozko".

A real suit for the snow queen is performed from the base-wire and tissue decor. In the same style decorate the outfit. Especially sparkled with large "cold" decorations.

Corona from food
It is practically anything to decorate the cardboard basis of the Kokosnik. It would be a desire to create! Great, small, "grainy" products are perfect: peas, corn, lentils, rice, beans, buckwheat, millet. We glue our future "stone" to the base. Coloring under pearls and precious stones.

And now we take for the work! After all, before the new year, you have to have time to build our own crown or kokoshnik design. We wish you creative inspiration and good mood!
Sources of photos:
Love Lisenkova
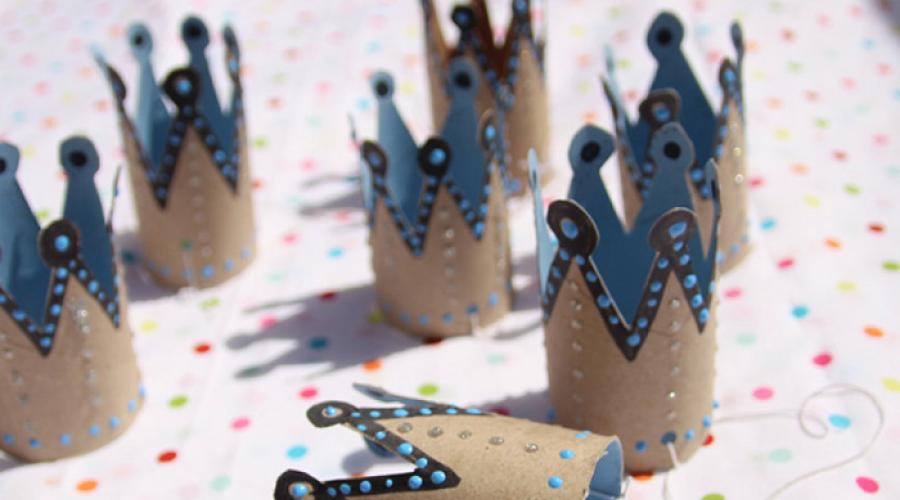
I bring to your attention a master class on making a crown for a snow queen.
To work, we need:
1. Paper dense (better cardboard or watman)
2. Self-adhesive film (ideally - silver, but you can and blue)
3. Glue gun
4. Glue for a pistol
5. White beads
6. Sequins pearl on thread
7. White snowflakes
8. White-white semobusins \u200b\u200bon adhesive basis
9. White glare on adhesive basis.
11. Scissors

Production:
1. Made the pattern of the crown on dense white paper.

2. Printed a self-adhesive film of blue (before the new year it could not find a silver color film).

3. Getting to design the crown.
4. By contour with the help of a glue gun, we stick pearl sequins on the thread.

5. Decorating the crown with snowflakes (can be ready, you can squeeze a figured hole)
6. Since the crown of the Snow Queen has corners, arrange them with white glue-based semi-graysins.
7. In the central part, I add white glands on the snowflakes on the rays on adhesive basis.


8. Introducing beads on a thread or thin wire and the resulting pendants glue to the crown.


This is such a crown.

Publications on the topic:
 I needed to work with the korona kids for my character. Long thought about it - from what and how to make so that it turned out.
Scenario of the holiday "Trucks of the Snow Queen" Purpose: create a festive mood to children and adults who came to the holiday; To form love for mother, respect for a woman; develop.
A summary of musical classes for children of a group of combined orientation of 6-7 years "Trucks of the Snow Queen" Trucks of the Snow Queen (children enter the music hall) M. R: I am glad to welcome you in the music hall. (Communicative is held.
Integration of educational areas: cognitive development, speech development, socio-communicative development, physical development.
 Purpose: New Year's decoration, attribute for the plot role-playing game, toy, gift. Purpose: Creating crafts in Origami technique. Tasks:.
Holiday script for children of the preparatory group "New Year's Adventures of the Snow Queen" Active persons Adults: Leading Snow Queen Santa Claus Children: Snow Maiden Gerd Kai Snowflakes (6) Three White Horse (3) Ataman Robbers.
New Year's matinee "Trucks of the Snow Queen" Leading. The day is wonderful. New year comes to us. Holiday laughter and clauses. Fairy tale holiday for children. How beautiful in our hall, we.
Draw with a child a heroine of the beloved children's fairy tale. Snow Queen.
The Snow Queen, a cold and beautiful woman who commands with frosts and stories, living in the Palace of Ice and collecting the word "eternity" from ice cubes. For those whom the snow queen chooses, the heart is also turning into a cliff, and they do not remember anything and live in ice silence and in ice eternity.
Let's try to draw this cold and heartless queen. We will try to do it beautifully. After all, in the famous cartoon, as in the most fairy tale, Andersen, the snow queen was cold, but beautiful.
In the cartoon she looked like.
How beautiful to draw a snow queen in a stages in stages for children?
Make the contours of the face of the Snow Queen. She needs her face clearly outlined.
- We draw her straight nose, expressive big eyes and closed, without emotions to mouth, slightly shifted to the brow's browse.
- You will not draw a queen's hair: she will have a crown on her head that closes her hair.
- The crown can be drawn in different versions as you like.


Portrait of a Snow Queen Pencil: Stage 2.

Portrait of a Snow Queen Pencil: Stage 3.

Portrait of a Snow Queen Pencil: Stage 1.

Portrait of a Snow Queen Pencil: Stage 5.

Portrait of a snowy queen pencil.
Next we will draw a snowy queen in full growth, so it will look more representative and impressive. She should have a fur coat in length in the floor, on which snowflakes and diamond ice floes sparkle. We also make it a fur edge of white fur.

Snow Queen in full height: Stage 1.

Snow Queen in full height: Stage 2.

Snow Queen in full height: Stage 3.

Snow Queen in full growth
IMPORTANT: Let the Queen have an ice staff in their hands, with the help of which she, touching, can turn things and objects into ice.
VIDEO: How to draw a snowy queen: instruction
How to draw a snow queen crown?
Now we pay special attention to how you can draw the crown of the Snow Queen.
- You can try to draw the Queen's crown as it was on it in the famous cartoon. Such crown well reflects the nature of this fabulous character.
- The crown must be decorated with diamond snowflakes.
- You can draw a crown made as if of ice cubes. By applying lighting from the crown, the volume will appear and as if shine.

Figure Snow Queen for Children
The evil and cruel snow queen can be drawn from these pictures.

Drawing for children to draw: Snow Queen.
VIDEO: The Snow Queen. Watercolor
The crown is a headdress, has long been symbolizing the monarch of one who put him. They existed in all centuries and many nations. Kings and queens, princes and princesses and in our time wearing crowns. Often these, I must say, the notable hats are decorated with precious stones, and they themselves are made of pure gold. They also award, for example, in beauty contests. Some brides at the wedding also put them on.
Several variants
How to draw a pencil crown? You can portray this attribute of power in several ways. It all depends on what and for whom you do it.
Question "How to draw a crown?" Specify the kids often, trying to portray "cartoon" characters: princesses, for example. In cartoons, of course, the crowns are shown quite schematically. And your arts will not require great knowledge in the field of painting. You can help the child and you need to pass this course with it.
How to draw a crown of stages
- Step one. On a sheet of paper, we supply a horizontal rectangle - this is the basis.
- Step second. Add two curved lines in the middle and above the figure.
- Step Three. Draw five triangles through the top line to the middle. On the tops of the figures - mug (these are future precious stones). They can be depicted on the basis of our crown.
- Step fourth. Draw contours. All excess sketch lines - erase!
- Pitch fifth. Color our royal (or princess) headdress: body - gold color, stones - red, blue, green (rubies, sapphires, emerald). Ready!

Now you know how to draw a crown. And you can cut it and attach to your head to your tea. But for this, it is originally necessary to take a large sheet of paper so that it fastens well around. Also, the headdress can be decorated with beads, gluing them around the perimeter, or by the New Year's rain. It turns out a great masquerade suit for small princesses.
Adult
If you think about how to draw a crown is not for a child, but for example, my husband for a birthday or for any picture, then you need more serious training. Here is a phased instruction.
- Step one. We start with the same rectangle. This is the basis of our drawing.
- Step second. Draw a convex curve that connects the left and right upper corners of the rectangle. We still have two similar curves inside it - separately from each other.
- Step Three. Zigzag line in the middle curve. Straight lines that will connect the mid-zigzags and the bottom curve, as well as small mugs on the vertices.
- Step fourth. Crown - the figure is geometrically correct. Remember this by drawing it. Draw mugs in zigzag form centers - workpieces for future jewels. Add the volume by drawing external circles.
- Pitch fifth. We wash unnecessary lines. Combede the drawing, drawing the details.
- Step six. Color our crown to your taste and color.

RESULTS
Now you know how to draw a crown in several ways - both for adults and children. On a friendly party will be very by the way such a headdress - for all kinds of contests and awarding winners. On the New Year's Masquerade - also to the place. Your child will be pleased with the new drawing, "folding" made with you.
By the way, there are many more types of crown, and not just such that I painted. But still, this is the figure of accurate forms, and it must be depicted symmetrically, with the help of geometry rules. Do not forget about it, drawing a crown. And on your headdress you can draw as many diverse jewels as you want! Or stick artificial stones-glassware to give it a more expensive view, and throughout the building!
The Snow Queen is one of the main characters of the famous fairy tale of the Danish Fairy Tale of Hans Christian Andersen. This is a powerful proud proud of the owner of the kingdom of eternal cold, ice and snow. She lives in the north and see it is given a little. She can make a man and turn his heart into a piece of ice. Then the person becomes indifferent to everyone, evil and thinks only about himself. So it happened to Kam's boy. He hit the Snow Queen Palace. And I found him there and saved the Herd sister from Char. We think many read this work. And if not, then be sure to read. And we will teach you how to draw a pencil phased portrait of a snow queen.
Stage 1. First, we will make an outline of the lines by which we will draw the face of the heroine. This is a cross consisting of two intersecting straight lines, located just to the middle of the middle of the sheet. This cross crosses the circle.


Stage 3. By horizontal line, draw the eyes of the heroine. Initially, we will make the top and lower eyelids, the turns of them quite thick cilia, especially on the upper eyelids. Eyes draw a bit elongated, elongated. The snow queen is satisfied with a beautiful woman, and her eyes should be cold and not expressing.

Stage 4. Between the centuries, show eyeballs with pupils. In pupils it is necessary to reflect the light reflections. From above, painting your eyebrows, their form is also elongated. Eyebrows shifted to the center.

Stage 5. Along the middle vertical line, draw the features of a thin long nose. The bridge is thin, the width of the nose itself to the nostril is also thin, but the nostrils are already slightly expanded to the sides. Under the nose we make the mouth of the heroine of our lesson. The upper and lower lip should be shown quite thin and slightly stretched. The Snow Queen almost never laughs, is always unhappy and therefore all the expression of her face should show discontent.

Stage 6. Now we rise above the forehead and draw the borders of the crown of Pissenge. The crown it is located on the head pretty high. Queen outdoor high forehead. The top edge of the crown is drawn by sharp ripplelines, they look like sloping slices of ice.

Stage 7. For triangles, the crowns draw as if the verge of ice crystals. They look like twigs of trees. This is the main feature from which minor secondary dashes depart.


Stage 9. For the crown, we draw up the bedspread faith of the Queen. It is long and descends from the head down to the drawing borders.

Stage 10. Here is such a snow queen resulting in a black and white version.
