Draw with children to the Day of Cosmonautics. How to draw a cosmonaut pencil phased
Read also
What to draw to the Day of Cosmonautics?
For the Day of Cosmonautics, of course you need to paint the rocket, space and stresses, planets. It can also draw astronauts.
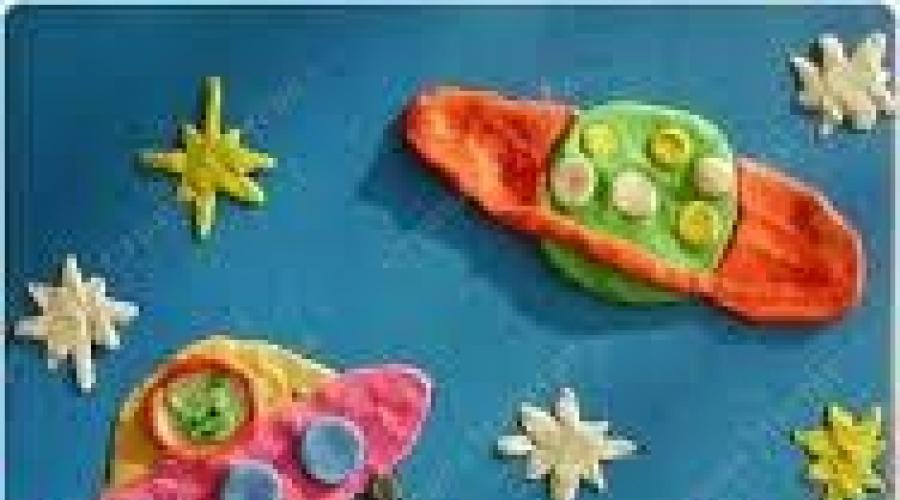
There is such a drawing, you can paint with plasticine or colored pencils.

It is possible to draw a drawing

there are such

And how to draw, you can see on video
By the Day of Cosmonautics, on April 12, you can draw astronauts, rocket, spaceship, planets, space, moon, doggies, and arrow, view of the planet Earth from space, artificial satellite of the Earth, space station.
For the Day of Cosmonautics, you can draw a rocket and decorate around not stars and planet.
Stage 1: We draw the rocket housing, spending 2 parallel lines up and connecting the line below;
Stage 2: At the top of the parallel lines connect with a triangle without base. Next, in the lower part, we draw 3 supports in the form of a cone;
3 Stage: Typing the case packages and the porthole (circle) on it;
4 Stage: Correct, we remove extra touches with an eraser, paint the rocket at your discretion. For colorful around you draw asteris and planet.
This is how about it will look visually on paper:

The holiday on April 12 in Russia is the day of cosmonautics, and therefore, respectively, we will draw something cosmic - either the space, planets, the stall sky, satellites, or astronauts, rockets. If you do not have experience in drawing, I suggest you use the schemes of phased drawing, use them as visual instructions. For example, you can draw such a drawing on the space theme - a rocket flying in space on the background of the stub and planet.

Having made a drawing in color, it will be much better. But the option of drawing a cosmonaut in the cartoon version:

You can draw a desert surface of some planet and astronaut on it. Good luck to you work!
April 12 - Cosmonautics. And you can definitely draw a rocket and astronaut to draw this holiday, you can still draw a portrait of the first cosmonaut Yuri Gagarin or landing on the moon. And you can draw the first dogs of the cosmonauts protein and arrow.
For the Day of Cosmonautics, you can draw a big inscription on April 12 or Cosmonautics Day Next, you can draw a rocket, stars, famous cosmonauts or glue photos of famous people who are associated with space. You can draw astronomy tutorial. The poster is best to depict Yuri Gagarin.
A cosmonaut is usually drawn to this holiday. So I also advise you to draw your astronaut what you see it. And it will help you in this video where step by step will be shown the entire process of drawing and steel painting of the astronaut.
Many options for example draw portrait of gagarin or draw space or moon.
Cosmonautics - this is primarily a technique, in our case it is a rocket. Simple, no frills and easy in drawing.


Rocket in the galaxy.

The drawings are easy enough to redraw their own.
In the picture for the Day of Cosmonautics, there should be sun, which is associated with space and man.
Planets, rockets, astronauts, stars. You can draw a figurative drawing that the sun in the hands of a person: palms hold the planet Earth.
On this page you can see photos crafts for the Day of Aviation and Cosmonautics April 12, 2020sent to our "gifts with their own hands", including new original work of the competition - 2019.
Photo Crafts for Cosmonautics Day - 2019
1st place
"Space trip". Queen Alena Vitalevna.
Carton boxes.


Collective work of children of the preparatory group dedicated to the Day of Cosmonautics. The teacher of Kocheryova Galina Vladimirovna.


Textile toy "My world is my universe." Romanova Darina, 14 years old.
The product is made in the technique of primed textiles (painted with acrylic paints). Baby -, beautiful toy that looks harmoniously both on the planet Earth and for its "limits" (the toy can be removed from the pocket).

"Crazy little prince". Garkushin Nikita.
Cardboard, yellow yarn, figured hole for stars, need yarn of different colors and hook on the figure.

"Journey through space." Akboris Nikita, 8 years; Yuzhakov Kirill, 8 years old.
The basis of the panel "Journey through Space" - Space missiles made of bright colors of felt. A manual stitches of contrasting color, decorated buttons are used as finishes. Images of "planets" are woven from jooty yarn and fastened in the form of a circle with manual stitches. The work used embroidery elements, decorative stitches.

"Parade of planets". Abdrakhmanov Alina, 9 years old.
The work is made in the technique.

"Flight to the unknown". Deliodenok N. V.
Drawing and design.

"Belka and Strelka". Gaynetdinov Salimer, 8 years old.
The work is made of cardboard and fabric.

"Cosmos of the eyes of children." Korchinsky Vladik.
Foam ball.

"Cosmos of the eyes of children." Lutikov Plato.
Work is made with your hands from cardboard, foam balls.

"Cosmos of the eyes of children." Setor Arseny.
Paper fantasies.

2nd place
"In space." Coethova Julia, 5 years old.
Application is made of liquid phoamyran.

"UFO". Chief Timofey.
Work is made of paper (triangular modules), CD discs, plastic sticks for the base and spancils for an antenna.

"A.G.Nikolaev before the flight." Andyushkin Alina.
The work is made in the technique of plasticography.

Mobile "Space Carousel". Mishchenko Victoria, 11 years old.
Mobile is assembled from textile figures - planets, stars and cosmic aircraft. The work was performed in the technique of primed textiles, painted with acrylic paints.

"It was on the moon." Koshkin Dmitry Ivanovich.
Our work consists of a box, the model of the moon we made from the pallet for eggs (we were covered with silver paint). The rocket is made of conventional bottles covered by silver paint. Aliens We made from boxes from "Kinder Surprise", and plasticine astronauts.

"Space meeting." Vakhitova Elizabeth, 11 years old.
Application is made of felt.

"Flight to the moon". Albutov Kirill Dmitrievich.
The rocket is made of a tube from the food film, the cosmonaut is associated with a crocheted from the yarn "Children's novelty".

"Life in space." The collective work of the creative association "skillful fingers", 7 years old.
The work was performed in the classroom of the "skillful fingers", in which children master various techniques for working with salt dough.
Working with a salt dough, the children blinded cosmonauts, a rocket, various inhabitants of other planets inhabiting space. Collected bright colors obtained figures and placed them on the cardboard basis of the panel. Pasta, jute thread, gouache, used as finishes.


"Solar system!". Nikolaev Sofia.
It took: a box, plasticine, toothpick, thread, stickers-asterisks.

"Marshow". Fedorov Vyacheslav, 3 "b" class, Shilyaev Victor, grade 6.
Macket of the Marshode is made in creative association classes »Technical creativity." The basis of the product is glued from cardboard. The trim used foil, corrugated cardboard, discs.

"Lunohod and cosmonaut". Kallaeva Anna.
Cardboard and plasticine, relief made by a ball for massage.
Cosmonaut - plasticine, packaging from eye drops, a piece of paper clips.
Moonport - plastic jar, details from broken toys, acrylic paint, thermopystylene.
Flag - Paper, Pencils and Scotch.


"Rocket". Kallaeva Elena.
Children's tea jars, plastic packaging, air balloon, double-sided cardboard, acrylic paint.


"Planets.". Nechaeva Zlata. 6 years.
Planet Earth, Mars and Venus are performed in the technique of Papier-Masha. To work, we used: three balloons, PVA glue, white paper, gouache.
All three planets were glued at once: the first day is three layers and the next day two more layers. Two days, balls need to dry. Readiness easy to determine - balls become light. Gently piercing balloons and get them. The finished balls were covered with white gouache, mixed with PVA 1: 1 glue. When everything dried, painted the gouache.

"Our Universe." Dubovskaya Irina.
Work from plasticine.
 "Meeting in space." Kuliyev Emil.
Work from plasticine, colored paper, cutting material.
 "Our Universe." Nikishchenko Maria.
The work is made of paper, cardboard.
 How to make a mock of a solar system of cardboard:
"The Amazing World of Cosmos." Lukyanchenko Dmitry.
Work from paper and cardboard.

3rd place
"Humanoid". Danileiko Maxim 6 years.
Humanoid is made of paper.

"Cosmos of the eyes of children." Mironenko Daria.
Plasticine, fantasy family.

"Cosmos of the eyes of children." Svrenko Sofia.
Paper mood.

"Cosmos of the eyes of children." Svorchavsky Matvey.
The work is made of balls on the Christmas tree and the inspiration of the family.

"Open Cosmos". Kovtor Ivan.
The drawing is made on paper gouache.

"Planet Earth". Group "Friendly Family".
Threads, paper.

"Space Topiary". Andyushkin Victoria.
The work is made in the technique of Papier-Masha.

"In Open Space." Turubarova cooking.
Appliqué and design.

"Flying on Rocket." Baryshov Vladislav Valryevich.
Work is created from cardboard and colored paper. Large rocket size looks very effectively. When creating this rocket, the whole family took part.

"Flight to the stars." Kalinina Lera.

"We are the children of the Galaxy." Baronenko Maria.
Work is made of cardboard, foil, colored paper, plasticine.

"Space flight". Nuriyev Alina.
Plasticography.

"How beautiful this world is." Gabdulin Artem.
The work is made of millet cereals: previously painted in the right colors, the contour of the picture drew on the blue cardboard. And then glued to the glue PVA Cropa, and our protein flew the explorer researcher. Then the work was put in the frame, and that's what we did.

"Flight to the moon". Group "Sunshine".
Cardboard, Watman, Velvet paper, foil.

"My vacation in space." Shvets Karina.
Figure A4 format. Drawn pencils. Such holidays would be merry and remembered for a long time.

Work 2018:
"Star way". Dunyukova Julia.
The installation of the Star Path consists of rocket and stars (made from cardboard), astronaut from plasticine, planet - ball painted by gouache. As background, pictures and one-time tablecloth are used. All objects of the composition are suspended using a fishing and scotch.

"Journey to the moon." Garkalova Alexander.
Crafts for kindergarten: cardboard, foil, cocktail tubes, capsule from kinder-eggs, plasticine.

"And on Mars there will be an apple tree blossom." Garkushin Nikita.
For work used primary and cast materials: capsules from sweets, wire, glue, cardboard.


Video, how to make a craft "Space ships" from girlfriend:
"Through hardship to the stars!". Stenina Sofya.
Volume application decorated with glitters.

"Planet Saturn". Polyakov Elizar 9 years, student 3 classes of Sharapovskaya school, Chekhovsky urban district. Class leader Aksenkin Olga Borisovna.
To seek a craft to school, I needed: a ball of foam cut in half, a computer disk, gouache, sparkles, a thermal power.


"Space trip". Educators: Alexandrova O.E., Kuzmina L.P.
Collective work with children for the competition, preparatory for school Group number 5 MBDOU №267 G. Izhevsk.
For the manufacture of astronauts, there was a sleeve from toilet paper, a gold and silver cardboard, double-sided colored paper, eyes, covers from the boxes from under the juice, a hole in the shape of a star, glue, scissors, children :).

Spaceship "East-1". Motorin Kirill.
The rocket is made of a bottle and painted with red acrylic paint. Stars are cut out of colored foil.

"First flight to space". Grachev Vyacheslav.
Work from color cardboard and colored paper.

Crafts "Our space." Topolnikova Nadezhda Viktorovna, GBDOU Educator Kindergarten No. 14 Sunct-Petersburg.
The basis for the work was a box from under pizza - a strong format cardboard, besides, the cannon is convenient for transportation. The box is saved with black paper, sprayed white, yellow and purple gouache - like starry sky. Inside the same space. Layouts of three rockets in Gzhel's styles (Decoupage with napkins), Khokhloma (ready-made cardboard) and haze (white cardboard painted under the Dimkovskaya toy) are glued on the right side - the bottom of the box, on the inside of the cover - the left side is our Space, made by my pupil.

Exhibition "Your Cosmos".
"To the flight is ready." Parents and children 1 younger group "Bee" MBOU "Semiizerskaya Oosh" pre-school department.
Works are made of colored cardboard and paper, plasticine, rebuilt and leather material.

"Mysterious Cosmos"
Latkin Bogdan, 12 years old. The applique "Mysterious Cosmos" was performed by April 12 - the Day of Cosmonautics in Plasticography technique. I am very interested in everything uncharted, new and I want to visit another planet. Crafts bright and colorful.

Poles Gleb, 4.5 years. "Rocket and aliens".
For rocket, we needed tubes from building materials, and from paper towels, as well as corrugated cardboard, gouache, thermoclay. For aliens - plasticine, disposable plates. This turned out to fake in the kindergarten.


Another interesting and useful handicraft - a lamp of a plastic bottle in the form of UFO:
"This Space World". Poles Elizar.
For rocket, a plastic bottle, foil, thermo-gun, tape, red corrugated paper and a plastic cap for the porthole were used.
For cosmonaut prepared foil, syntheps, threads, thermo-gun.
In the sky placed the rocket, aliens, cosmonaut, planets and stars.


Poles George, 3 years. "Rocket".
Used toilet paper bushings, cardboard and gouache.
Smart rockets themselves
Let's go over the forests!
Above the forests, above the fields,
And then back to my mother!


"Meeting earthlings." Ignatyuk Polina.
Box, foil, colored paper, gouache.

Musikhina Tatyana Yurevna. Methodological manual - layout "Planet of the Solar System".
MBDOU "Child Development Center - kindergarten № 24" Golden Fish ", Teacher-speech therapist, Perm Territory, Thusova.
The manual is made of balls (foam), painted as close as possible to the flower shades of the planets. Planets are located in the order in which they rotate around the sun. The holders of the planets are swivel, which allows children to demonstrate the movement around the sun. Each planet rotates around its axis. The dimensions of the planets are observed. The sun is made in the form of a star for better memorization of children, that this is not a planet. Flashlight, imitating the sun, lights up with a slight touch.

More video about the volumetric cosmic craft in the kindergarten:
"Panorama" Cosmos ". Stenina Kira.
The work is made of a box attached to color scotch. "Window" - file. Rocket - tube from under fireworks, glued with steel tape. Cosmonaut - from plasticine.

"Cosmodrome". Motorin Alexander.
Used color cardboard and paper, plastic container, plasticine.


Video "Space satellite" from plastic bottle:
"The dream came true ...". Shigerin Varvara.
Postcard, applique. The work was performed together with the daughter of 5 years, her dream - "Flight into space"! While we have implemented it in the picture ...


"Spaceship" East-1 ". Batalova Veronica.
The rocket is made of cardboard with the subsequent enclosure of holographic foil paper. The nozzle is decorated with lids from fruit puree.

"East - 2". Semenov Denis.
Space rocket is made of cardboard and colored paper.

"Rocket". Maksimov Dmitry.
The work is made of colored paper and cardboard.

"FROM COSMOS". Volodic Ilya.
Used color cardboard, foil and beads.

"Space Excursion." Korshunov Ivan.
Applique. Materials: plywood, paper, glue, paint.

How to make "Cosmos in the Bank" See in this video:
"At the start". Yelttsova Catherine.
Paper, cardboard, foil.


"Collective work" Farmable Cosmos ". Vorotyntseva Natalia Vasilyevna.
I work as an educator in 2 youngest group. For the development of shallow motility in children, I chose the non-traditional model of the modeling method, namely the modeling plasticine balls. Plasticine modeling gives children joy and pleasure. Technique modeling with plasticine balls is very simple. You need to tear the small pieces from the common piece of the color we need and roll small balls from them. Finished balls are laid out and slightly pressed on the background prepared in advance with the silhouette.

"Funny Cosmos". Menshikova Julia.
The picture is made in the Kinusayig technique ().

Galina Egorova: a gift to the son for a birthday. He was born on the day of cosmonautics. Technique of work "Motalka". Materials used: bottle, yarn, foil, satin ribbons, glue crystal, photography, braid, decorations for decor.

"Space rocket". Narvaat Gleb.
Cardboard, foil.

Postcard "Between Stars". Kallaeva Elena. Cardboard, adhesive pencil.

Postcard "108 minutes". Kallaeva Anna.
Cardboard, gouache, colored paper, scotch construction (rocket housing).


"Rocket in space." Kallaeva love.
Cardboard, gouache, pva, plasticine.


Ivanova Sofia Maksimovna, 6 years old, Moscow city.
Flying saucer with aliens.


"The car of the future" cosmol ". Rodionova Ulyana, 3 years; Rodionova Varvara, 3 years; Educator: Avetyan Evelina Zavenovna.

The work is made of recyclable (from garbage): plastic bottle; wheels, mechanism from a broken children's car; foil from chocolate; Plastic jar from lettuce; Plastic from under ice cream; colored paper; glue gun; aerosol paint; scissors. The most important thing is fantasy!

We prepared a plastic bottle and with girls began to collect everything that was found. The plastic jar from the salad was glued with a glue gun. The portholes from us turned out of plastic for chocolate chocolates. The finished product was painted with aerosol paint and added the last strokes: wheels from a large car, fire from red paper, and we planted toys for "cosmol".

"Happy Cosmonautics Day!" Levitskaya Alice.
The work is made of plasticine that attached to the finished picture.

"Space". Alexandrov Oksana.
Pictures made using the Plasticography technique. Made on the lid from the mayonnaise and the CD disk.

"If we want to go into space - we will fly on the rocket." Mishin Semyon.
The work is made of colored paper, the base of cardboard is black (space). The picture shows the planet Earth, the rocket flying past the earth, flying comet and stars.

"Space flight". Kirilenko Lisa.
Colored paper and cardboard.

"Space rocket". Murtzin Nikolay.
Color cardboard and paper.

"Space flight". Syanyakina Veronica.
Work is made of colored paper, cardboard, plasticine, plastic lid.

"Space rocket". Narvaat Gleb. Cardboard, foil.

"Rocket". Sinegyribov Mikhail.
To perform this work, I used cardboard and colored paper. You will also need scissors and glue.

Crafts 2017.
Photos of crafts sent to the competition "Above the sky", you can see
Crafts from Valyan Wool - "Alien", Limonova Elena Aleksandrovna, Pedagogue of additional education, School 37 of the cities of Sevastopol.

Works Kryukova Ilya, Bazarkina Ivan and Afonina Alena.


Skripnikova Natalia.: I did for the day of cosmonautics. space hours. They blinded the figurines of planets, stars and rockets from plasticine. And from paper I got a cosmonaut 🙂

Nitsuk Ulyana Sergeevna - 8 years old, Krivoy Rog, Ternovsky district. Embroidered picture "Infinity".
Leader: Lotash Galina Anatolyevna-Head "Vishivochka" Mug "Ternotsvіt"

Shuder Victoria Sergeevna -10 years old, the city of Krivoy Rog. Embroidered picture "Universe".
Leader: Lotash Galina Anatolyevna - Head of the Mug "Vishivochka" CDUT "TERNOTSVIT".

Snetna Evelina Yurevna, 12 years. From paper (3D origami).
nizhny Tagil, MBOU SOSH No. 1. N.K. Public.

Philasov Ivan., 3 years old, Zheleznodorozhny. Zimin Tutor Oksana Olegovna. Mom Filisova Natalia Sergeevna. Rocket in the Origami technique.

Spaceship in Origami technique - Fighter from the movie "Star Wars" in this video from YouTube:
Fedotova Polina Ivanovna, 6 years 7 months. Planet Earth. Drawing plasticine.
Samara region, S.Ivashevka. Ivashevsk branch of GBOU SOSH S.Treitsky. Leader: Educator: Davydova Ekaterina Sergeevna.


Sedova Maria, 5 years. "First in space."
MDOU Kindergarten Combined Type No. 128, Illipetsk, Illipetsk.
Educators: Unpoplavova Svetlana Dmitrievna, Bulatarova Nadezhda Alekseevna.


Pokhevatova Jan Andreevna, 5 years. "Luntik in his homeland"
Kindergarten "Sunny", senior group. Orenburg region, Kuvandyk.

Ershova Ekaterina, 13 years. "Martian Gosha".
Studio IOO and Ceramics "Sunflower", Center "Sunny", Rybinsk, Yaroslavl region. Leader: Timofeeva Anna Fedorovna, teacher of additional education.

Photos sent Valentina Obakova. Collective works of children 9-11 years old.:
1.Rocket from the tubes .Kollective work, children are 9 years old.

2.Layout. Master's development. Collective work.


Invidimov Karina, 4 years. "My friend from Mars"
MBDOU № 183 Group "Friden", city Krasnoyarsk. Educator Adam Svetlana Vladimirovna.

Gareev Glory, 5 years. "Space Dali" .
Madou number 97, Zlatoust, Chelyabinsk region. Curator: Ivanova Natalia Alekseevna, tutor.

Crafts for an exhibition in kindergarten:
Pihtovnikova Sonya, 5 years. "Way to Earth" .

Aikasheva Nastya., 5 years. "The first flight".
Madou number 97, Zlatoust, Chelyabinsk region. Leader: Ivanova Natalia Alekseevna, tutor.

Koreleva Masha, 5 years. "First cosmonaut"

Ilyin Semen., 5 years. "To space"
Madou 97 Second Junior Group, Zlatoust, Chelyabinsk Region. Leader: Ivanova Natalia Alekseevna, tutor.

Mashukov Matvey, 5 years. "Belka and Strelka"
Madou 97 Second Junior Group, Zlatoust, Chelyabinsk Region. Leader: Ivanova Natalia Alekseevna, tutor.

Collective work preparatory group №5 "Toptychki", MBDOU №267 G. Izhevsk: "We are future astronauts!" Educaters: Alexandrova Oksana Eduardovna, Kuzmina Lyudmila Petrovna.

Chalatov Alexander, 5 years. "Flight Yuri Gagarin"
MBDOU CRR D / s №5 "Thumbelina", Pushchino, Moscow region. Leader: Brickwood Elena Karlovna Pedagogue of additional education.

Adam Ekaterina, 6 years. "Towards the stars!"
MBDOU № 24 SEMITSVETIC GROUP, KRASNYARSK CITY. Leader: Adamovskaya Svetlana Vladimirovna, Mom.

Baeva Valentina Kuzminichna, GBOU "Gymnasium № 1797 Bogorodskaya" Pre-school department 4-3 "Rostock" Moscow. " First man on the moon«.

Galo Gordea Yakovlevich, 4 years. "Planets".
MBDOU "Kindergarten №159" combined species, a middle group. City of Vladivostok, Primorsky Krai. Leader: Basque Polina Viktorovna, teacher.

You can also draw your cosmos with the help of paints and toothbrush:

Magnet "Space discoveries" from girlfriend and plasticine
In anticipation of the day of cosmonautics, we offer you a cosmic magnet from girlfriend and plasticine. Our step-by-step master class will tell you how to make the original decoration for the refrigerator with your own hands.

To create a magnet with an image of a space landscape, prepare:
- set of color plasticine; Space background printing;
- plastic lid from dairy products;
- simple pencil;
- plastic stack;
- nail scissors;
- toothpick or needle;
- glue stick;
- glue gun, or durable universal glue;
- magnet.
Open job description
Take a clean plastic cover from sour cream or other dairy products. Print on the printer Beautiful space background. Note the circle equal to the inner diameter of the cover.

Cut the circle from cosmic printing and glue to a plastic cover.
Take plasticine brown, gray and golden color. Somob plasticine into the layer and impose three colors to each other.

Connect the colors so that it turned out an interesting combination with divorces.

Apply the reservoir of the received plasticine at the bottom background. Using stacks distribute plasticine and make an uneven edge.

Take the plasticine of brown, pink-purple and yellow, impose on each other, as in the picture.

From the resulting combination make a thin plasticine layer.
Brush the layer into small angular pieces. Mount the mountain range on one side of the planet.

Using toothpicks add relief to the mountains. Take gray, silver and pink plasticine.
Somob gray plasticine into the reservoir and cut the rocket with manicure scissors as in the picture.

Make turbines, portholes and vertex for rockets from silver plasticine. Take the details to the rocket. Make stripes from blue, white and pink plasticine and make a semblance of a flag on a rocket.

Toothpicks Make a pattern on the rocket.

Mix yellow, red and golden plasticine.
Fire flames emanating from rocket turbines.

Connect several colors of plasticine to make a beautiful combination. Purify the form of the planet with the plastic reservoir.
Take the planet to the top edge of the magnet.

Mix silver and golden plasticine and place the ring around the planet.
Select rings with toothpicks.

Connect brown and orange plasticine and make a comet. Of orange and purple plasticine, the flaming mark.

Make a thin black roller for the flagpole. Make the Russian flag and connect with the flagpole.

Take a round flat magnet.
Enclose the magnet on the back of the plastic cover.

Space magnet ready!
Fiction! What a wonderful magnet from ordinary available materials and plasticine from us turned out! Such a souvenir made by your own hands will decorate the collection of magnets for the refrigerator.


Volumetric Applique (Postcard)
Overline in the form of UFO from the old gramplasty:
And crafts of the youngest group of kindergarten, MCDOU "Ant", the village of Novophervomaysky Tatar District of the Novosibirsk region, the teacher of Knush Natalya Viktorovna: "I work in kindergarten. I have kids from 1.6 years to 3 years. On the eve of the celebration of the Day of Cosmonautics, we built from soft modules here such a rocket. The children were very satisfied with the result. "
Sergienko Olga Valentinovna, the village of Novopravomaysky Tatar District of the Novosibirsk Region: "With the children of the eldest group we built this rocket. Each of the children sat in the "Cabin" and presented himself as an astronaut. "
Gorovik Anna Vladimirovna, village Novopervomayskaya Tatar District of the Novosibirsk Region:
"I work in a kindergarten. With the guys of the second younger and medium groups, we made a layout of rockets. We called your missile "Star". "
Head of Gorovik Anna Vladimirovna.
So, at least the participants at this stage are not so much, but they are in vests of the skaters! The subject of the cosmos is truly limitless, and perhaps we will continue to develop it in a year 🙂
And now congratulations winner Our competition "Space-55. Master classes " — Timofeev, Anna Fedorovna! Her " Kid Aliens"I flew to us on the last day and not mistaken an address 🙂 In addition, Anna Fedorovna sent us another four works of their pupils in very interesting techniques, so the main prize receives deservedly!
The prize of visual sympathy gets Ilyina Elena Sergeevna For a truly magic cosmic candlestick.
In the nomination "Space-55. Crafts » Many original and beautiful works, so we decided to divide the seats in this way:
1st place:
Nitsuk Ulyana Sergeevna - 8 years. Embroidered picture "Infinity".
2nd place:
"Mastering Mars" - collective work, Children 9-11 years old, MBU to Syut No. 2. Teachers Obabkova V.I. and Korkuna G.V.
Sedova Maria, 5 years. "First in space."
3rd place:
Preparatory group №5 "Beat", MBDOU №267 G. Izhevsk. "We are future astronauts!"
Ershova Ekaterina, 13 years. "Martian Gosha".
Pokhevatova Jan Andreevna, 5 years. "Luntik in his homeland"
Congratulations to the winners!
Who did not take victory places, do not worry, memorable diplomas will get everything!
Form for sending work on the contest 2020
Before sending, please read and. Certain questions can be asked in the comments under the article.
Please carefully enter all the data that will be automatically inserted into diplomas!
We continue the topic of cosmic adventures. In this lesson I will tell. Interestingly, and when a person can fly into space? I mean not to jump out to the moon and back. And there - in the depth of the universe. Or at least for Mars! Something completely becomes closely on this planet ... Well, leave this case to scientists, and we will get up for drawing! As an example of a cosmonaut, I chose this picture: she fell a little, apparently, was taken from the old Soviet book. But it does not hurt us, because we ourselves can draw a beautiful picture, right? Take up for business!
How to draw a cosmonaut pencil phased
There are four steps ahead. Step one. In the top of the sheet, we will place a round big head. She is big - because in the helmet. Down will spend two curved lines - this is the body contour. We will draw astronauts in weightlessness. And it immediately sets his position. We carry out the contours of the hands and legs. On the scaffle - belt. Note a backpack behind my shoulders.  Step second. We begin to draw parts: helmet, fingers, all sorts of grazing on the "Suit". And all elements are quite large.
  Step Three. On the helmet, outline the eye of the eye, we will make it volumetric. Let's start drawing shoes. Show your pocket-bag on the belt. Carefully look at the picture and dorisite the missing on your sheet. Rivets, bends on the fingers and so on.
  Step fourth. On the belts show the horizontal hatching. Draw shoes: drawing on the sole, clasp. On the hip at the astronaut - a small electronic device. Now we will circle the basic elements of our drawing. Almost done. You can with the help of hatching "revive" our hero, or give color with the help of paints!
  I recommend even interesting lesson similar on topics.
The first journey of a person in space lasted only some 108 minutes, but they can say "turned over the world." Since April 1962 (more precisely, the twelfth), and celebrate the world since 1969.
As always, a bit of history
Which of us in deep childhood did not want to become a cosmonaut? And with whom to take an example? Of course, from Yuri Gagarin, whose name in 1961 rang on many languages \u200b\u200bof the planet Earth. Because they came true, finally, the cherished dreams of all mankind for many centuries - find out what is there, outside of our world, in space! And then, in 1961, all people were rejoiced and were proud for the achievements of Soviet scientists in this area. The Hero's Pioneer receives high government awards, and after a few months the second cosmonaut - makes a daily flight around our planet!
Today we know about space much more. A person not only conquers long-range orbits, but also learns to live there. And how many satellites robots are launched, which constantly fly over us, studying a variety of research!
What to choose, doing creativity with a child, to the Day of Cosmonautics? Figure, probably, first. So let's get up!
How to draw a drawing to the Cosmonautics Day?
Children's works on the space theme are always relevant. It is assumed to use various techniques attracting a child to creativity. But the most basic among all, of course, pencil! Because everything starts with it. Here is a step-by-step instruction, for the Day of Cosmonautics Pencil.

Other techniques
Having learned, first of all, for the Day of Cosmonautics with a pencil, you can try other, mixed techniques, such as "GRUTAZH" (from the French Gratter - scratching, scrubbing). It is also available to children-reoxoites. Begin!
- Take the paper dense, better - cardboard format A3. Coloring the entire plane with colored shallow (wax - better) in the free style, but a thick layer. All paper should be drawn. Attract your baby active at this stage of work.
- We mix dishwashing liquid (1 part) and black gouache (3 parts). Cover a smooth layer over chalks, paint everything!
- It turned out a black sheet. We give paint to dry. This process can be accelerated by an ordinary hairdryer! What is the entertainment to the child!
- We take a sufficiently sharp object (toothpick, the needle, but better - a special wooden wand) and scratch our drawing on a black background. Yes, at least the same astronaut and rocket! As a result, we get a very original work in the "GRUTAZH" technique.

More options?
And you can also celebrate this holiday along with the children in the style of "DIY". The topic of crafts is "Cosmonautics Day". This is from ordinary disposable, and rockets from plastic bottles, and much more.
Summary: Children's drawings on the subject of space. How to draw a drawing to the Day of Cosmonautics.
On the eve of the day of cosmonautics will be relevant to talk about children's drawings on the topic of space. In this article we want to tell you how to draw space using unconventional drawing techniques. Here we will look at the drawings on the subject of space, made in the equipment of the GRUTAGA, PASPARTU, "SPEA". You will also learn how to draw an unusual drawing to the Day of Cosmonautics using a shaving foam or an air-bubble film. The spaces described in the article are easy to perform and are available including children of preschool and primary school age.
1. Pictures on the topic Space in Engineering
The word "GRUTAZH" occurred from the French Gratter - scrubbing, scratching, so another name of the equipment - the equipment of the scratch.
To draw a drawing on the subject of space in the GRUTABT technique, you will need:
White high-density paper (or cardboard)
- Colored wax crayons
- Gouashe paint black or mascara
- dishwashing liquid
- Brush
- any acute subject (wooden spanchka, toothpick, needle, etc.)

Work plan:
1. Color paper with colored wax chalks in free style. Do not regret the crayons, they must cover the paper with a thick layer. Note: Even a small child can cope with this part of the work.

2. Mix 3 pieces of black gouache paint (carcass) and 1 part of the dishwashing liquid. Smooth layer cover the paper with the resulting mixture.

3. Give the paint to dry completely. You can speed up this process using a hair dryer. And now the most interesting! Take any sharp object and scratch your drawing on the topic of space. As a result, the original work on the Day of Cosmonautics, made in unconventional equipment drawing equipment

2. How to draw space. Drawing in the technique of "Pasparta"
This is a very unusual and exciting drawing technique. First, as in the previous technique, you need to paint a sheet of paper with colored wax chalk. As a result, you will get a bright, colored rug. After that, on the cardboard, draw the patterns of planets, flying plates, cosmic missiles, stars, etc. Cut patterns. On a dense paper sheet of black color Spread out the cut patterns in the form of a composition. Cut them with a pencil, after which cut silhouettes with manicure scissors. Note: This stage of work must perform an adult. Now impose a black sheet of paper with carved silhouettes to be painted with shallow "rug". Cosmos drawing in the "Pasparta" technique is ready. Link to the original source.

3. Children's drawings on the subject of space. Draw with shaving foam
For children in creativity, the process itself is more important than the result. We, adults, are interested in the final product of our activity. Today we want you to offer such a type of game with paints, which will satisfy the needs of both children and adults. The website Games-For-Kids.ru describes an interesting way to create a so-called. "Marble paper" with conventional shaving foam and paints (or food dyes). Taking advantage of the detailed instructions for the manufacture of "marble paper", described on this site, you can make beautiful drawings on the topic of space for Cosmonautics.

4. Pictures of the Day of Cosmonautics. Draw space for music
In 1914-1916, the English composer Gustav Cansto composed symphonic suite "Planets". Suite consists of 7 parts - by the number of planets of the solar system (with the exception of the Earth), known at the time of writing. We invite you to spend your next interesting occupation with the child, dedicated to the topic of space, on the acrimible of the day of cosmonautics.
Give the child a large sheet of paper and paint. Ask for a simple pencil to divide the sheet into four equal parts. Now let him take turns listening to any 4 pieces of suite (for example, Mars, Venus, Jupiter, Uranus). Listening to every part of the musical work, he should depict emotions and feelings on canvas that this music causes him. Children such work, as a rule, really like. This is what one of our students painted.

Of the resulting abstract paintings, then you can cut the planets and stick them onto a sheet of black paper. Drawing to the Day of Cosmonautics Ready!


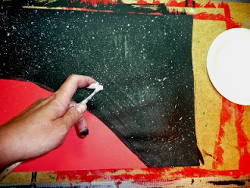
5. Pictures on the topic of space. We draw space with a toothbrush
We offer you to make a drawing on the topic of space in the so-called. Software "spray". With a toothbrush on a black paper sheet spray white paint. You will have a starry sky. Planets can be drawn with a sponge, smearing the paints of different colors. See what a beautiful drawing on the topic of cosmos turned out from us!


6. Children's drawings on space. Non-traditional drawing techniques
If suddenly you have a piece of air-bubble film, now it's time to use it for children's creativity. After all, with the help of this wonderful material, you can simply paint the planet. It is only necessary to apply paint to the film and attach it to the drawing in the right place.

The planet in the figure below is also made in this technique of non-traditional drawing. Additional prints are made using a cardboard roller from toilet paper and plastic tubule. Also, when drawing this picture on the theme of space was applied by the so-called. Technique "spray".


7. Pictures of space. Cosmonautics Drawings
An interesting project for kids for the Day of Cosmonautics has prepared the site MrBrintables.com. On this site you can download and print the Figure of the Moon. The moon is represented in three sizes: large (22 sheets), medium (6 sheets) and small size (1 sheet). Print the drawing, glue the sheets on the wall in the correct sequence.
Now suggest the child to dream, who lives on the moon. Let him draw her inhabitants, their homes, transport, etc.

8. Pictures on the topic of space. Children's drawings on the subject of space
These charming aliens are drawn using such non-traditional drawing techniques as paint blowing through the straw (plastic tube). What is this technique?

We apply with brushes (or pipettes) on a sheet of paper paint, diluted with water so that the sheet turned on the sheet. After that, we blow on the paint through the straw, it spreads into different directions and we have a stain of a bizarre form. When the paint is driving, we draw all the necessary details to our aliens.