Proper quadrangular pyramid drawing through cells. Mysterious portraits on Hoeop Pyramid
Compliance with your privacy is important to us. For this reason, we have developed a privacy policy that describes how we use and store your information. Please read our privacy policy and inform us if you have any questions.
Collection and use of personal information
Under personal information is subject to data that can be used to identify a certain person or communicating with it.
You can be requested to provide your personal information at any time when you connect with us.
Below are some examples of the types of personal information that we can collect, and how we can use such information.
What personal information we collect:
- When you leave an application on the site, we can collect various information, including your name, phone number, email address, etc.
As we use your personal information:
- We collected personal information allows us to contact you and report on unique proposals, promotions and other events and nearest events.
- From time to time, we can use your personal information to send important notifications and messages.
- We can also use personalized information for internal purposes, such as auditing, data analysis and various studies in order to improve the services of our services and providing you with recommendations for our services.
- If you participate in the prizes, competition or similar stimulating event, we can use the information you provide to manage such programs.
Information disclosure to third parties
We do not reveal the information received from you to third parties.
Exceptions:
- If it is necessary - in accordance with the law, judicial procedure, in the trial, and / or on the basis of public queries or requests from state bodies in the territory of the Russian Federation - to reveal your personal information. We can also disclose information about you if we define that such disclosure is necessary or appropriate for the purpose of security, maintaining law and order, or other socially important cases.
- In the case of reorganization, mergers or sales, we can convey the personal information we collect the corresponding to the third party - a successor.
Protection of personal information
We are making precautions - including administrative, technical and physical - to protect your personal information from loss, theft, and unscrupulous use, as well as from unauthorized access, disclosure, changes and destruction.
Compliance with your privacy at the company level
In order to make sure that your personal information is safe, we bring the norm of confidentiality and security to our employees, and strictly follow the execution of confidentiality measures.
Rectangle, square, triangle, trapezium and others - geometric shapes from the section of accurate science. Pyramid is a polyhedron. The basis of this figure is a polygon, and the lateral edges of triangles having a total vertex, or a trapezium. For a full view and study of any geometric object, layouts are made. Use the most diverse material from which the pyramid is performed. The surface of a multifaceted figure, deployed on the plane, is called its scan. Create a layout will help the method of converting flat items into bulk polyhedra and certain knowledge of geometry. Scan of paper or cardboard make not easy. The ability to perform drawings on the specified sizes will be required.
Materials and devices
Modeling and performing multifaceted volumetric geometric shapes - an interesting and exciting process. From paper you can perform a large number of all kinds of layouts. For work will be necessary:
- paper or cardboard;
- scissors;
- pencil;
- line;
- compass;
- eraser;
- glue.
Definition of parameters
First of all, we define what a pyramid will be. The scan of this figure is the basis for the manufacture of a bulk figure. Performing work will require maximum accuracy. With an incorrect drawing, the geometric shape will be caught not possible. Suppose it is necessary to make a layout proper
Any geometric body has certain properties. This figure has the basis and its vertex is proper in its center. As a base, this condition is selected determines the name. The side ribs at the pyramid are triangles, the number of which depends on the polyhedron chosen for the base. In this case, there will be three. It is also important to know the dimensions of all components from which the pyramid will be composed. Scan of paper are performed according to all the data of the geometric shape. The parameters of the future model are negotiated in advance. The selection of the material used depends on this data.
How is the scan of the correct pyramid?
The basis of the model is a sheet of paper or cardboard. Work starts with a drawing of the pyramid. The figure appears in the deployment. The flat image on paper corresponds to the pre-selected size and parameters. It has the basis of the correct polygon, and the height passes through its center. We make a simple model to begin. In this case, this is a triangular pyramid. Determine the size of the selected figure.

To build a scan of a pyramid, the base of which is the right triangle, in the center of the sheet, using a ruler and pencil, draw the base of the specified dimensions. Next, to each side of its side, draw the side faces of the pyramid - triangles. Now go to their construction. The sizes of the sides of the side surface triangles are measured by a circulation. The feet of the circulation put in the top of the drawn base and make a stitching. Action We repeat, moving to the next point of the triangle. The intersection obtained as a result of such actions will determine the vertices of the side faces of the pyramid. Combine them with the base. We get a drawing of the pyramid. For gluing a bulk figure on the sides of the side faces, valves are provided. Take a small trapezium.
Assembling layout
Cut with scissors performed drawing along the contour. Gently bend the scan on all lines. Valves-trapezings refuel inside the figure so that her face is closed. Lubricate them with glue. Thirty minutes later the glue dries. The volumetric figure is ready.
First, imagine how the geometric figure looks like, the layout of which we will make it. The base of the chosen pyramid is a quadrangle. Side edges - triangles. To work, we use the same materials and devices as in the previous version. Drawing perform on paper with a pencil. In the center of the sheet, blacksmith is a quadrangle with selected parameters.

Each side of the foundation is divided in half. We carry out perpendicular, which will be the height of the triangular face. Circular solution equal to the length of the side edge of the pyramid, we make on the perpendicular of the seed, setting it the leg into the top of the base. Both angle of one side of the base connect with the resulting point on the perpendicular. As a result, we get a square in the center of the drawing, on the edges of which triangles are drawn. To fix the model on the lateral edges, draw the auxiliary valves. For reliable fastening, a strip of centimeter width is sufficient. Pyramid is ready for assembly.
The final stage of the layout
The resulting pattern of the shape cut over the contour. According to the drawing lines bending paper. Collection of bulk figures produced by gluing. The valves are lubricated with glue and fix the resulting model.

Volumetric layouts of complex shapes
After performing a simple model of a polyhedron, you can go to more complex geometric pieces. The sweep of truncated pyramid is much more complicated in performance. Its foundations are similar polyhedra. Side faces are trapezoids. The sequence of performance will be the same as the one in which a simple pyramid was manufactured. The scan will be more cumbersome. To perform the drawing, use a pencil, circulation and a ruler.
Building drawing
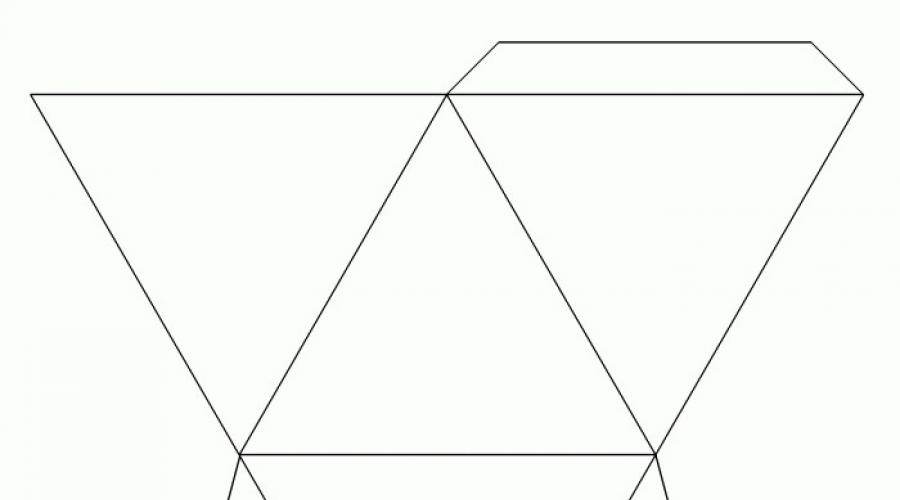
The sweep of the truncated pyramid is performed in several stages. The side face of the truncated pyramid is a trapezium, and the bases are similar polyhedra. Suppose these are squares. On a sheet of paper, perform a drawing of a trapezoid with the specified dimensions. The side sides of the resulting figure extend to the intersection. As a result, we obtain an equifiable triangle. It is measured by a circulation. On a separate sheet of paper we build a measured distance.

The next step is the construction of side ribs that have a truncated pyramid. The scan is performed inside the drawn circle. Circle measure the lower base of the trapezium. On the circle, we note five points that connect the lines with its center. We get four ineffective triangles. Circle measuring the side of the trapezoid drawn on a separate sheet. This distance is deposited on each side of the drawn triangles. Completed points connect. The side faces of the trapezoid are ready. It remains only to draw the upper and lower base of the pyramid. In this case, these are similar polyhedra - squares. To the top and bottom bases of the first trapezion, give the squares. The drawing shows all the parts that the pyramid has. Scan is practically ready. It remains only to draw the connecting valves on the sides of a smaller square and one of the edges of the trapezium.
Completion of modeling
Before gluing the bulk figure, the drawing along the contour is cut out with scissors. Next, the scan neatly bend along the drawn lines. Fastening valves refuel inside the model. They lubricate them with glue and pressed to the glands of the pyramid. We give the models to dry.

Making different models of polyhedra
Performing volume models of geometric shapes - a fascinating occupation. To make it thoroughly learn, you should start with the fulfillment of the most simple sweep. Gradually moving from simple crafts to more complex models, you can start creating the most intricate designs.
In this lesson you will learn how to draw the right three-dimensional pyramids with a pencil phased. I always dreamed of going to Egypt and climb the ancient pyramid. And you?
We will draw a pyramid using the following concepts: overlapping, horizon line, shadow and shading. This lesson will also help you practice in applying smooth one-sided shadows. Since the sides of the pyramid are flat, they require consistent shading in contrast to cylinders, flags and other curvilinear surfaces that require decisive shading from dark to light. Let's proceed.
1. Draw a straight vertical line.
2. Tilt the sides of the pyramid down, keeping the angle between them the same and making the middle line just longer.

3. Representing the compass of the directions, draw the bottom of the pyramid in the directions of SZ and SV.

4. Slap the pyramid on the sand using the horizon line. Place the light source and draw the lines in the SOUTH direction for the incident shadow.

5. Now add one-photon smooth shading on one side of the pyramid opposite the light source.

6. You can stop at it, you have a great pyramid! And you can add a brick texture, with sprinkled edges and chopped stone fragments and you have ruins. I think about adding doors. Strange? Stupid? Sketch the position of the doors.

7. On the door to the right - the right side, on the door to the left - the slope to the left. Draw slopes on the right side.

8. Now on the left.

9. Complete the shading on the sides of opposite from the light source. Remember, this is a flat surface that implies smooth monophonic shading without Rastune. However, inside the curved door of the right side, the parties need to be made of decisive because on the curved surfaces you should always decide the shadow from the dark to the light, and on the flat - add a one-photo hatch on the sides turned away from the light source.

Lesson 19: Practical Task
It all depends on how much time you can highlight on this wonderful scene with many pyramids. Please note how one pyramid is below the horizon level and several pyramids at a distance, beyond the horizon. Very interesting notice in the drawing laws that the overlap always wins before the other eight laws. Look, the size does not play the roles in this picture. Usually, the items that we draw more appear closer, and which are less - further. However, in this picture, even though a huge pyramid eclipses small, it still looks further, deeper in the picture. Why? Due to the overlap force. Small pyramids are drawn ahead large, thus creates an illusion that gigantic further.
Would you like, what could be complex or wrong in the image of the pyramid? Is it really here a tutor in mathematics does not work out without special techniques and techniques? Only 4 points are noted (any 3 of which do not lie on one straight line) and are connected by six segments. And that's it. What to discuss here? But even in such a simple situation, the tutorial in mathematics has to be corrected by student Oshibi. Not even so much mathematical as strategic. What kind? The drawing on which it is impossible to consider or show the elements of the spatial body, to sign the values \u200b\u200bof the values \u200b\u200bon which it is not unfolded with additional buildings, it is better to redo. This should understand any tutor and at the beginning of the preparation course for the exam spend some time on training the rules and culture of the drawing. In addition to the requirements for its accuracy and the convenient location of information from the condition of the problem there are also mathematical laws of its implementation. Consider them in more detail.
Rule of image method.
The image method is a separate subject, the study of which on the Mathematical Faculty of the IPGU is given a whole semester. What we draw on paper is traces from the projections of the parts of the body on some plane. It depends on it, what segments and which sections will be clearly visible, and which will be "crawling" on each other or hidden. When the tutor in mathematics decides, which is the pyramid to draw a student, it determines the location of the plane and the direction of projection.
There are geometric laws of projecting the simplest stereometer objects. The lengths of non-parallel segments, for example, as an image, can change the ratio of their lengths (the teacher is better to pronounce "distort"). If in reality one of them is more than the other, then in the projection it can be all exactly the opposite. The same with the corners. The straight angle can be projected both in acute and stupid. In order for the mathematics tutor to convince the student to twist an ordinary square in front of his eyes. However, the ratio of the lengths of segments lying on parallel or coinciding straight lines does not change and, in particular, are distorted by the middle of the sides of the polygons (the faces of the pyramid). This explains the law of the base of the height of the correct triangular pyramid: it should be the intersection point of its median (center of gravity). There is also no parallelism. If there are parallelism between direct, it is preserved between their traces. Therefore, the image of the base of the correct quadrangular pyramid is selected by parallelograms.
Readyness drawing.
It is important to place the pyramid so that all of its parts are not just visible, but would allow the further complication of the drawing: the holding of apochem, traces of sections, etc.
To do this, build, for example, the right pyramid is desirable down up Through the height (as it is used in almost all tasks). At first, the tutor in mathematics draws the base of the pyramid, then its center and from this point restores perpendicular. Its belief is chosen so that all inclined ribs are quite removed from each other. If you build in reverse order can be missed with the center of the polygon. Of course, it is not critical to solve problems for the correct triangular Pyramid, but still unsightly for perception. The middle should be displayed by the middle.
Building a base.
Regardless of the type of the base of the tetrahedron, it is depicted with an acute-angular triangle and stretch to the left or right. What for? If it is equally chaped, then one of the side ribs will close the height (unless of course its base is correctly located). This is shown in the figure. 
Front image of tetrahedron. Tutor rule.
Which edge is best to portray the pyramid? That is, how to optimally choose a projection plane? Some teachers and tutors in mathematics, unfortunately, do not pay attention to such a "trifle" as the frontal arrangement of the pyramid. And in vain. There are two types of drawing: "Corner of the base to us" or "Corner from us" Consider a drawing with the "ABC corner of us":
We restore the height from the bottom up and select the position of its end (the peaks of the pyramid) with the calculation of the ABP side acceptable span. For this, the most important thing is not to get the point P per line of AB. Otherwise, we will not see the face. A significant deviation from the intersection point (in the image) of the AB and OP lines causes a rather small deviation of the AP beam from the AB beam and therefore, to achieve a scope of the ABP faces, it is necessary to choose the point P or very low or very high.  The latter can excessively consolidate the drawing, pulling the pyramid up (reducing the space for the solution itself), and the low point makes the picture small. Therefore, I do not recommend tutoring in mathematics to work with such a front. It is best to turn the ABC triangle to us.
  Note that now the position of the point P does not affect the readability of the ABP verge of the ABP and if it is not an isolated and "strongly acutely", and the point O is its center of gravity (i.e. o not at the height of the base), the height of the pyramid will not be closed by the BP rebel With which the layout of the peak P.
  In this case, the tutor in mathematics receives a certain freedom to choose the peak of the pyramid, which is extremely important to improve the readability of further constructions in difficult tasks.
Drawing invisible lines.
The tutor in mathematics, of course, can do without dasheds. However, that Russian is good, then the German Sich. A student - it is important to perceive the body from that side with which he sees a tutor. Especially when working with edges. I advise the teacher of mathematics more often to call the verge of no vertices, but according to their natural location: "near", "long", "left", "right". If a child's image of the object is formed in the head of the child, then there will be problems with a description of the course of additional constructions, reading the drawing and even with an explanation of the incomprehensible moments of solutions.
on the construction of a quadrangular pyramid.
The base of the correct quadrangular pyramid should be depicted as a parallelogram. Why? Of course, it is possible to place the square to the project plane so that direct angles are preserved (and we will get a rectangle), but then the apothem of the two neighbors will close the height of the pyramid. I do not find another explanation of the established standards of images.
Alexander Kolpakov, tutor in mathematics in Moscow. Preparation for the exam.
If you are interested in how to make an ideal forms and faces, a pyramid of paper exists a specific scheme with dimensions so that the correct figure is in the end. Paper pyramid can be an original gift made by hand or just an interesting handicraft.
How to make a pyramid from paper. Step-by-step instruction
Thanks to the ancient artwork, origami has the opportunity to recreate almost any shape of the paper, including the pyramid. There are several ways to create an ideal figure with clear edges. For beginners in this case there is a light step-by-step advice, how to make a figure from cardboard. This instruction will be understandable to both adults and children.
Step-by-step guide, how to glue a pyramid from cardboard:
- On a paper sheet, you need to draw one smooth square and three triangles. Each side of the square should be about 15 cm. The width of the triangle should be done the same, and a height of 27 cm.
- Scissors cut blanks without contour, but with an indent 3-4 mm, in the future it will be necessary when gluing the figure.
- Lubricate glue all parts, let him dry a little and fold all the details into a single design.
- Give a completely dry by hand and can be proceeded with the decor.
How to decorate the pyramid - there may be any will of fantasy. For example, it can be pasted on the figures, wrap foil or paint with special acrylic paints.
Materials and devices
How to make a pyramid from paper scheme with dimensions - not the only main components in the manufacture of the figure.
For the convenience of execution of origami, you should prepare in advance The necessary materials and devices so that at the time of work they were at hand:
- For the manufacture of faces Most materials may need. You can use not only cardboard, but also plastic, metal, fane, glass, or make a wire frame. If the figure is created with any esoteric promise, then the paper pyramid is advised from the inside to attach the foil. This is necessary in order to accumulate and the positive energy is accumulated in the figure. If you put several small magnets inside the pyramid, then the product will have magnetic energy.
- For craft It is worth getting a high-quality glue that you can buy in the stationery store.
- Create sharp scissors, to cut smooth blanks For future figures.
- We also need a ruler, pencil and eraser just in case.
For the execution of the figure, many materials are not required, all devices for the pyramid will be found in almost every home.
Determine the parameters
In order for the product to be neat and beautiful to specify clear parameters in the manufacture of blanks for the future pyramid. For each part, a separate piece of paper may be needed. You can download ready-made schemes, but they are also just painted independently.
The main thing is to know that the width of the triangle should be equal to each length of the square of the square.
The height of the geometric shape can be chosen any, but recommended length, so that it is more than 10-15 cm blank width. It is with such a ratio that the figure will look harmoniously.
Build drawing
To make it easier to learn how to make the perfect pyramid of paper or any other materials there is a diagram with dimensions. The drawing is the basis for further gluing components for the future one-piece figure. There are several types of pyramids for each of them their drawing.
But there is one simple way that is suitable for children and beginners in this matter:

Completion of modeling
Carved shape, you need to glue along the folds of the folds. Before connecting the parts into a full model on the bends, you need to apply glue and leave it a little to frozen so that it is better grabbed. After the product is ready to leave it for half an hour, so that it does not accidentally worried when designing it. The final stage of modeling includes designer design work.
You can decorate the pyramid with acrylic or shimmering paints, draw on it shapes.
The product can be placed in foil or paper for gifts. Also for those who believe in the mystical power of the pyramid stands on her to glue natural stones, which will approach the sign of the zodiac to whom this figure will be presented. In the orphanage, the pyramid can be turned into an animal, sticking to her ears, tail and draw the features of the face.
Method 2
Such a pyramid scheme involves the use of the finished billet, which can be downloaded and print on the printer. This option is the easiest, since you do not have to draw figures yourself. The main thing to prepare all the necessary tools and beautify the product originally at the decoration stage.
Method 3.
There are quite a lot of tips, how to make a pyramid from paper, A certain scheme with dimensions is an integral part in the execution of origami:
- The square sheet is folded so that the angles were opposite to each other, cut off the excess paper with scissors. In this way, you can make a smooth square.
- Billet Collapse one diagonal, disclose and fold on another and deploy again. So the necessary lines are scheduled.
- Take half of the square, turn from it a triangle in two layers. To the center fold two corners from the base. Similarly, repeat from the second side of the shape.
- Bend corners to the center on one side and on the other.
- Take a rhombus on each side, the corners can be sent inside.
- The pyramid needs to begun so that it turns out a star with four edges. Figure take two hands for different ends and give her shape.
Gradually, giving the object the form, the pyramid will begin to get. It is very important to know that at the last stage you need to act neatly, trying not to break the cradle.
Method 4.
Required tools for crafts:
- paper sheet
- triangle,
- scissors,
- pencil,
- glue,
- eraser.
Performance:
- Cut square. Bend blank in half in different directions to form folds.
- The diagonal of the triangle is applied to each of the sides of the square and the folds to make marks.
- With lines to connect a triangle with vertices. For accuracy, it is recommended to use a ruler.
- Mark a pencil line gluing sides.
- Figure cut and apply glue on the gluing line.
How to make a pyramid from cardboard?
You can make a figure from cardboard with your own hands quickly and simple. You can use any coloring paper, but the best color of gold is best suited, beige,  light brown.
In order for the product more realistic, it is possible to produce horizontal and vertical on the paper blank.
This will create the effect of a real mini-pyramid from Giza.
According to the above step-by-step methods, you can create a figure with edgies. The cardboard pyramid is made according to the same principle of both simple paper.
But there is a big plus that it can be decorated, for example sugar sand:
- The product can be covered with completely transparent glue and apply sugar sand on it. In this way, you can create an interesting shiny effect.
- Also, the pyramid can be sprinkled with sand, after improving it with glue. The figure will acquire the effect of realism.
Golden section in the proportions of the pyramid
The standard of the perfect pyramid is certain proportions. The key to creating the correct figure is the coefficient and figures 7.23. The number that matters in the science of mathematics and geometry, also these figures are important in architecture and even medicine. 
Cut length 7.23 must be multiplied by the coefficient of 1.618. The resulting number 116, 981 should be rounded up to 117 cm. This length is the base of the pyramid.
Also for obtaining large models, this number can be multiplied several times. Thus, the length of our pyramid is obtained 117 mm, and the height is 72 mm.
On the Pythagore Theorem, you can determine the length of the triangle faces. It turns out the number 92,769, it must be rounded to 93. These data are adjusted under the ideal proportion of the "golden section".
How to make a quadrangular pyramid scan?
For the manufacture of a quadrangular figure will be required:
- dense paper or cardboard
- simple pencil
- line
- scissors,
- glue.
Stages:
- First you need to make a pattern in which the base will be 8 cm, and the height is 6.5 cm.
- On a sheet of paper, you need to draw a smooth square, mark on each it face the middle.
- Perpendicular to the square from the middle points perpendicular to the square, 6.5 cm long - they should turn out 4.
- From each vertex to spend two lines to the corners of the square, so that triangles come out.
- Cut the workpiece and fold triangles so that they come together into a single vertex. Glue figure.
The quadrangular figure is easy to make yourself. Also, based on this step-by-step instructions, you can create pyramids more in size.
How to scroll correct pyramid?
 To understand how to make a pyramid from paper, you need to know the diagram with dimensions.
 If I wonder how to make a pyramid with a paper sweep, there is not one diagram with dimensions that will help correctly perform the figure. At the time of designing the sweep as the basis, the right triangle is taken. The side surface is represented as a flat drawing consisting of faces and polygon.
To begin with the natural value of the foundation and the true size of all edges (can be made using a circulation). After the three sides were found found the base and side face. An arbitrary point is taken and an arc is carried out equal to the length of the side edges of the workpiece. On the arc there are four segments equal to the base of the pyramid.
All lines are connected, including with an arbitrary point. Square, which is equal to the base of the figure to one of the resulting triangles.
Sophisticated Figures: Volume Layouts
The figures of this type are made to obtain skills in working with bulk paper products and in order to teach children initial abases of geometry. From these models, you can make the original gift packaging. Sometimes it is difficult to develop the correct scan, it is recommended to have at least minor knowledge of the drawing.

But there are ready-made stencils that can be printed from the printer.. Layouts are used not only at entertainment purposes, but also in training. The child can clearly show what the same figure looks like. Sophisticated models can be: cube, octahedron, dodecahedron, Ikosahedron and others.
Before starting to perform the drawing of the figure, it is worth presenting it in a 3D format, how much it has faces and measurements.
On a sheet of paper, you need to draw the edge, so that they are correct to each other. Each figure has its own specific type of face. Ribs should also be the same length so that non-stalks do not appear when bonding. If the layout has the same sides, then at the time of the drawing, you can draw the template and draw the rest of the workpiece. 
3D layouts are important when teaching children: they give students the opportunity to hold the figures in their hands, consider them and better understand the structure. Also, when studying some theorems (Euler), a visual manual is recommended.
Simulation of various polyhedra
To learn how to perform more complex models, it is worth starting with Azov, for example, with 3D triangles. Gradually, improving the skill in creating simple layouts, you can proceed to complex models. Complex figures require skills and honed skills when performing, for example, at the time of sweep or giving the shape of the figure, you need to act so that it does not accidentally break.
When performing the drawing, you should carefully apply markup and be able to draw shapes.
If there is a question how to make a high-quality pyramid of paper, there is a detailed scheme with individual sizes. It is only worth attaching a little effort, and then will be difficult to fulfill the beautiful and high-quality work that will delight the eye.
Thanks to the above methods, you can easily create various pyramid layouts. It is not difficult to learn how to perform these techniques, the main thing to observe all the steps gradually and carefully.
Video about how to make a paper pyramid
How to make a paper pyramid, find out in a video clip:
Scheme of the volume of the bulk pyramid: