Portraits of lung girls. Paint a pencil portrait of stages
In order to fully learn how to draw portraits with a pencil, you need to study the foundations of the drawing and the proportion of a person, as well as to pay enough practice time.
If you are a beginner in drawing, then you should not immediately "rush into the pool with your head" and try to master the whole portrait of the whole. First you need to fill your hand performed by individual parts: eyes, nose, mouth as well as ears and neck. Learning to draw all these elements can be in separate lessons on our website.
Phased girl portrait with pencil.
The first stage.
Starting to draw a pencil portrait Carefully look at the portrait, determine the shape of the face and cheered, trace the slope of the lips and determine which of them is wider, as the external and internal corners of the eye are located relative to each other. Then draw oval suitable in shape to a specific person.
Stage second.
We divide our oval into four parts. For this, it is strictly in the middle carrying out a vertical and horizontal line. Next, we divide the resulting horizontal parts of the lines again in half, marking them with small serifs. The bottom of the vertical line is divided by five equal parts. Remember that these lines carry auxiliary character and when our portrait of the girl with a pencil will be almost ready, they will need to erase, so they do not press them on the pencil, drawing them.

Stage Third.
We have the center of each eyeball right above the partition points of the horizontal line. The base of the nose base is drawn from the second one in the account of a batch from above the bottom of the vertical axis, and the mouth line is in the second sex area below.

Stage fourth.
We depict the upper eyelid line and draw lips. It should be remembered that the distance between the eyes is equal to the length of one eye. Middle of the ears should be on the same level with demolition. Ensure lines note the contour of the hair.

Stage fifth.
Starting a more detailed person drawing a pencil styled pencil. We depict the upper border of the upper eyelid and the visible part of the lower century. We add several eyelashes at each upper age. Draw lines of eyebrows and brigade.

Stage Sixth.
To give the volume to our portrait with a simple pencil stroke lips and hair, highlighting dark and bright places, add shadows.

Thus, drawing several persons, you will see that they differ from each other. Continue to draw a pencil portrait styardly until you achieve maximum similarity.
We can now carefully look at the details. And let's start with the face. The person's face is the first thing that we pay attention to in any situation, and this is also definitely applicable to art: the observer will first of all consider a person with your characteristic features. The transfer of the face on paper, especially the drawing of living expressive expressions, undoubtedly worth the effort.
In this lesson we will get acquainted with the main components face drawing - proportions, features and angleAnd in the following lessons already we will analyze a variety of expressions of individuals.
1. Proportions of the face
Full face:
In this position, the skull will be a flat circle to which the outlines of the jaw are added, which in general forms the shape of the egg, pointed below. Two perpendicular in the center of the line divide the "Egg" into four parts. To distribute face features:
- Mix the middle of the left and right half of the horizontal line. At these points will be eyes.
- divide the vertical lower line into five equal parts. The tip of the nose will be at the second point from the center. Write fold will be at the third point from the center, for one current below from the tip of the nose.
- divide the upper half of the head into four equal parts: the growth line of hair (if a person has no bald) will be located between the second and third point from the center. The ear will be located between the upper century and the tip of the nose (in the event that the face is on the same level). When a man looks up or down, the position of the ears is changing.
It is useful to know that the width of the face is the width of five eyes or a little less. The distance between the eyes is equal to the width of one eye. For people, it is uncharacteristic to have widespread or too closely related eyes, but it is always noticeable (widespread eyes give a person an innocent children's expression, and narrowly delivered for some reason excite suspicion in us). The distance between the bottom lip and chin also equals the width of one eye.
Another criterion measures is the length of the index finger over the thumb. In the diagram below, all lengths are marked according to this criterion: the height of the ear, the distance between the level of hair growth and level of eyebrows, the distance from the eyebrows to the nose, the distance from the nose to the chin, the distance between the pupils.

Profile:
From the side, the shape of the head also resembles an egg, but pointed to the side. The central lines now share their heads on the front (face) and rear (skull) parts.
From the skull:
- Ear is located right behind the central line. According to its size and location, it is also located between the upper century and the tip of the nose.
- the depth of the skull varies between two separated dots lines (as shown in step 4).
From the face:
- The features of the face are located in the same way as in Afas.
- The deepening of the nose or coincides with the central line, or is located just above.
- The most outstanding point will be the level of eyebrows (1 point from the center).

2. Facial features
Eyes and eyebrows
The eye is built from two simple arcs, in shape resembling almonds. There are no strict rules here, since the shape of the eyes can be completely different, but there is general recommendations:
- an outer corner of the eye above internal, and not vice versa.
- If you compare the eyes with the almond, the rounded part of the pupil will be on the side of the inner corner, decreases towards an external corner.

Details of the eye
- Rainbing eyes partially hidden behind the upper age. It crosses the lower eyelid only if the person looks down or pushed (the lower eyelid rises).
- The eyelashes bend outward, and they are shorter in the lower eyelid (in fact, it is not necessary to draw them every time).
- If you want to portray the oval of the tears in the inner corner of the eye, as well as to show the thickness of the lower eyelid, it completely depends on your preferences; Excess details does not always look appropriate. Adding such details in proportion to the complexity of drawing.
- The same can be applicable to drawing the folds of the century - it adds expressiveness and looks less alarmed. I think it is better not to add a fold if you perform stylized pattern or your drawing is too small.
The eye into the profile reminds on the form of the tip of the boom (the parties can be concave and convex), with a slight designation of the upper eyelid and, selectively, lower. In life, we do not see the iris in the profile, but we see the eye protein. When I worked on the lesson, many said that "it looks strange," so the iris must still be designated.
As for the eyebrows, the easiest way to draw them after the eye to repeat the bending of the upper eyelid. Most of the eyebrows length looks inside, and her tip is always a bit shorter.
In the profile, the form of eyebrows changes - it becomes like a comma. This "comma" continues the level of eyelashes (where they bend). Sometimes an eyebrow seems one whole with eyelashes, so you can also draw one curve for the top of the eye and the eyebrows.
The nose is usually a wedge-shaped form - it is easier to visualize and give three dimensions before complementing the details.
The partition and the sides of the nose are flat, which will noticeably on the finished figure, but already at the stage of the outline it is necessary to designate them to subsequently distribute the parts. In our wedge, the lower flat part is a truncated triangle, connecting the wings and the tip of the nose. Wings are bent towards the partition, forming nostrils - note that if you look at the bottom, the lines forming the side partitions are in the foreground, in parallel to the face. The partition protrudes below than the wings (if you look straight), which means that during anonymous ¾ the far nostril will not be visible, respectively.

The most difficult moment during the drawing of the nose can be the decision-making, which parts of the nose are better not to depict for a natural look. You will not always have to fully draw the wings of the nose (where they are connected to the face), and in most cases the picture looks better if you simply draw the bottom of the nose. The same applies to the four lines of the nose partition, in the place where they are connected to the face - in most cases it will be better if you draw only the bottom of the nose (wings, nostrils, partition) - you can alternately cover the line to make sure . If the head is turned to ¾, it becomes necessary to draw the bridge lines. You will need to observe a lot, by the method of trial and error to recognize the unique features of the nose. Caricaturists have this feature - it is necessary to carefully consider the outlines of noses to understand why they are depicted. We will return to this issue in the following lessons.

Lubs
Tips on the image of the mouth and lips:
- First you need to draw a lip fold, as it is the most stripped and dark of the three almost parallel lines that form the mouth. In fact, it is not a solid straight line - it consists of several implicit curves. In the figure below, you can see hyperbulous examples of the movement of the mouth line - note that they repeat the top lip line. This line can be "mitigated" in several ways: the hollow over the lip can already be (to distinguish between the corners) or so wide that it becomes invisible. It may be the opposite - the lower lip is so complete that he creates a feeling of inflated lips. If you find it difficult to stick with symmetry at this stage, try starting from the center and draw one line on each side.
- The upper corners of the lips are more noticeable, but you can soften them by portraying two wide curves, or soften so that they will stop being noticeable.
- The bottom lip is definitely reminds the usual curve, but it can be almost flat or rather rounded. My advice is to designate the lower lip of at least a conventional dash under the bottom boundary.
- The upper lip is almost always lower, and it is less represented forward. If its outline is encountered, it should be brighter expressed, as the lower lip and so stands out with his shadow (in size should not exceed the size of the lip).
- The lip profile resembles the arrow tip form, and the protrusion of the upper lip becomes obvious. The shape of the lip is also different - the top is flat and is located diagonally, and the lower more rounded.
- Looping in the profile is deflected down, starting with the crossing of the lips. Even if the person smiles, the line goes down below and rises again in the area of \u200b\u200bthe corners. Never lift the line level if you draw a profile.

Ears
The main part of the ear (if it is drawn correctly) has the form of the letter FROM From the outside and the form of an inverted letter U. On the inside (the border of the top cartilage of the ear). Frequently paint smaller U. above the ear of the ear (you can make your finger to your ear), which goes on to a smaller letter FROM. Ear details are depicted around the ear hole (but not always), and their forms can be completely diverse from different people. The drawing can be stylized - for example, in the figure below the ear in its general form resembles the elongated "@" characters.

When the face is turned into an Afas, the ears are depicted in profile, respectively:
- The glass, before the designated letter U is now visible separately - the same when you watch the side of the plate and then see her bottom, as if it was closer to you.
- on the shape of an ear hole resembles a drop and stands out on a general ear background.
- the ear thickness from this angle depends on the proximity to the head, this is another individual factor. Nevertheless, the ear is always issued forward - it happened during the evolution.
If you look at the back, the ear seems separate from the body, mostly this is a glass connected with his head with the help of the channel. Do not understand the size of the channel - its function is that the ears come forward. In this perspective canal weighing the lobe.
3. Rackers
Since the head is based on the circle, where the contours are indicated by the facial features, changing the head of the head is easier than it seems at first glance. Nevertheless, it is even more important to observe the position of people's heads in different angles in life to remember all the protrusions and depressions, superimposed on each other as an unexpected way. The nose, undoubtedly, significantly retreats from the head (also appear eyebrows, cheekbones, lip center and chin); At the same time, the sockets and the sides of the mouth form some of the depressions on our "circle".
When we painted my face in the Father and in the profile, we simplified the task to a two-dimensional image, where all lines were flat. For all other persons, we need to rebuild our thinking into a three-dimensional world and realize that the shape of the egg is actually an egg, and the lines we used before to arrange the features of the face, crossed this egg like the equator and meridians on the globe: at the slightest Changing the position of the head we will see that they are rounded. The location of the facial features is just the drawing of intersecting lines at a certain angle - now there are three of them. We can again share our heads on the upper and lower parts, "cut" our "egg", but now it is necessary to keep in mind: the most close to us components look thicker. The same applies to face drawing in a raised or lowered state.
Man looks down
- All the features bend towards upwards, and the ears are "rising".
- Since the nose is issued forward, his tip falls below the original mark, so it seems that he is now closer to her lips, and if a person drops his head even lower, then Mr. partially brings her lips. From this angle it is not necessary to draw additional details of the nose - there will be enough bridges and wings.
- Eyebrow arcs are fairly flat, but they can be curved again if too strongly tilt their heads.
- The upper eyelid eye becomes more expressive, and just a little change the position of the head, so that they completely hid the eyes orbits.
- The upper lip is almost invisible, and the bottom increases.

Man looks up
- all lines damn face seek down; Ears are also moving down.
- The upper lip is visible in full (which does not happen in the Afas). Now the lips seem to be inflated.
- eyebrows bend stronger, and the lower eyelid rises, because of what the eyes seem fair.
- The lower part of the nose is now completely visible, both nostrils are clearly displayed.

Man turns out
- When we see a person almost completely unscrewed, abrasive arcs and cheekbones remain from visible traits. The neck line is superimposed on the chin line and is located next to the ear. When a person turns, we also see eyelashes.
- Also when turning, we can see part of the eyebrow line and the protrusion of the lower eyelid; The tip of the nose also appears right due to cheeks.
- When a person turns almost into profile, eye apples and lips appear (although the fold between the lips is small), and the neckline is merged with the chin line. We are still visible part of the cheek covering the wing of the nose.

It's time to practice
Use the method of fast sketch, throwing the expression on the paper that you notice around yourself in a coffee shop or on the street.
Do not try to detail all the features and do not be afraid to make a mistake, the main thing is to transfer the traits from different angles.

If you are difficult to draw in the amount, take the present egg (you can cook it, just in case). Draw three lines in the center and add separating lines. Watch and drucribe an egg with contour lines from different sides - so you will feel how the lines and distances between them will behave in different angles. You can outline the features of the face on the surface of the eggs along the main lines and trace how they change in the amount when the egg is rotated.
Drawing a human face is one of the most difficult tasks. It is very difficult to keep all the proportions. But, using simple rules, almost everyone will be able to draw a human face.
Before you start working on a portrait, it is recommended to prepare everything you need:
Paper;
- eraser;
- Simple pencil.

When all the necessary prepared, you can start drawing:
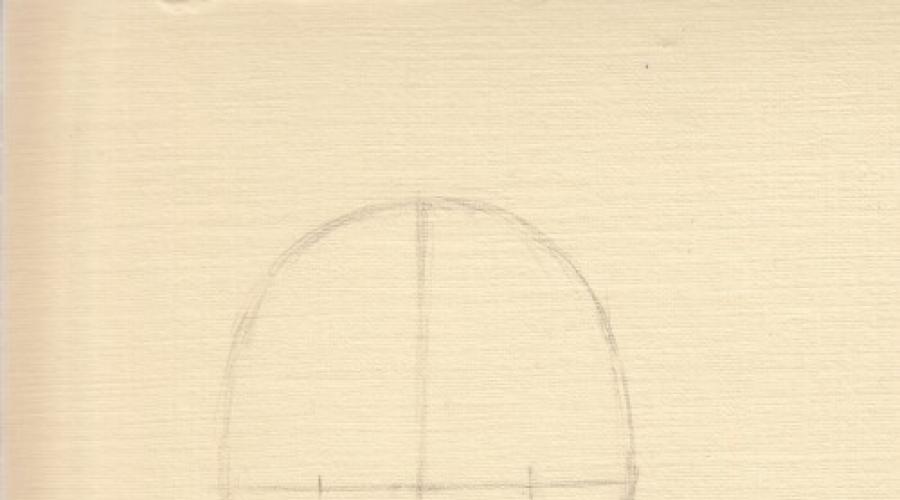
1. Instruct a vertical line on a sheet of paper, dividing it into two equal parts. Then draw the outlines of the head, which in shape resembles an inverted egg. Note that the widest part of the face is the forehead area, not cheek;

2. Divide the oval into four equal parts, reading the horizontal line, as shown in the figure;


4. The segment width is equal to the size of one eye. At the second and fourth segment, make the outlines of the eyes. Mark the place on the face where the nasal tip will be located. As a rule, the tip of the nose is located at a distance equal to one and a half glaase from the center of the oval. The width of the nose at the bottom is equal to the length of the eye;


6. Note the location of the mouth. From the tip of the nose, retreat the distance equal to half the length of the eye - the upper lip will begin at this place. The width of the mouth is also equal to half the length of the eye, and the width of the upper lip is about a third of the entire width of the mouth. Mouth corners are located under eye pupils, as shown in the figure;


8. Now it is necessary to check the correctness of the oval of the face. The distance from the bottom line of the mouth to the tip of the chin should be equal to the length of one eye. The distance from the corners of the mouth to the side of the chin should also be equal to the length of the eye;

9. The distance from the chin to the middle of the eye should be equal to the distance from the top of the middle of the eye. The distance from the chin to the tip of the nose should be equal to the distance from the tip of the nose to the middle of the eye. At the same distance there is an end of the forehead and hair growth line. In accordance with these parameters, you will adjust the oval of the face and erase the extra pencil lines;

10. Draw ears. Their upper part is at one level with the upper eyelids, and the lower - on the same level with the tip of the nose;


13. Draw pupils. Remember that with bright light, pupils are narrowed, and in the dark, on the contrary, expand. Do not forget that the pupil should be a small glare. Light strokes mark the hair;


15. Start the right side of the face. In this case, the light falls on the face on the left, it means that his right side will be a little more darkened than the left. It is not necessary to circle with a pencil any parts of the person, it is better to designate their outlines with strokes;


17. Strike to the left side of the face less intensively, since it falls on it. Light strokes Stop portray hair. Remember that the hair is discarded on the face shadow;
Portrait completely ready. If desired, the person's face can be drawn by any paints, as well as a handle, pastel or colored pencils. Drawing a portrait from nature or by photography, remember that each person can have their own anatomical features of the structure of the face. For example, he can have closely planted eyes. Therefore, when drawing people to achieve external similarity, it is necessary not only to follow the general rules, but also to be extremely attentive to detail.
This lesson is devoted to how to draw a face girl Without pronounced emotions with soft features.
In this lesson we will need:
- album for drawing;
- pencil HV;
- eraser-Klyachka;
- line.
I know that in this lesson a lot of time is given to the measurement. In my opinion, at the initial stage it is necessary, especially if you are new. When you master the proportions and leave a hand on drawing female people, you can repeat this lesson without spending time on the metrics. Ready to practice? Then let's start!
How to draw a girl's face. Step 1: Face form.
Draw a circle and draw a small horizontal line at the bottom, half the diameter of the circle. It is important to comply with this rule, since the circle was drawn by hand.
In women, chin is less than men. An increase in the chin will give the masculine to a female person.
After that, draw the cheekbones by connecting the chin with the circle. Forms of female faces are extremely diverse. As an example, I will use the image of soft cheekbones.
Then swipe the vertical line exactly in the middle of the future face.
How to draw a girl's face.Step 2: Wealthing proportions.
Measure the length of the face and divide into eight equal parts. Indicate each part by a sequence number or letter, as shown in the figure. Then, with the help of the ruler, spend direct horizontal lines through points marked as Sentter Line, 2.3, A and C.

If you have completed this lesson several times and want to try to draw a face without the help of the line, draw the lines in this order: Sentter Line, 2, 3, B, A, C, breaking the lines each time in the middle again and again.
How to draw a girl's face. Step 3: Eyes.
Divide the central line inside the face into five equal parts. Remember that women's eyes are wider and more open than men.

How to draw a girl's face.Step 4: Nose.
To draw a nose, spend two vertical lines down from the inner edge of the eye to line 3. These lines will limit the nose in width. Then draw a small circle just above the line 2. My nose will be short and narrow, with a narrow bridge.

How to draw a girl's face.Step 5: Eyebrows.
In the picture on the left, I inscribed a surprise arc to show the organic position of the brow itself towards the arc. In the figure on the right we see that the eyebrow is located under the line C. To portray the surprised facial expression, the eyebrow will need to be further closer to the line C.

How to draw a girl's face.Step 6: Lips.
To refer to the boundaries of the lips from the middle of each pupil, it will be necessary to carry out a perpendicular line down to the line 3. Then draw a triangle whose start will go from the tip of the nose. The base of the triangle must be inside the square. The top of the triangle should be located strictly at the tip of the nose. As mentioned earlier, this example is characteristic of a person who does not express bright emotions. If you want to portray the smirk on the face, as if the girl bluffs in the process of the classic version of the well-known card game, position the bottom of the lip just below. Mark teeth by spending several perpendicular lines.

After you drew lips, you may want to lengthen the chin. Or, on the contrary, make it shorter that the proportions look natural. It's quite normal. I constantly correct these proportions.
How to draw a girl's face.Step 7: Ears.
The borderline lines for the ears are the central line and line 2. To practice in the image of realistic ears, we recommend contacting this lesson (not yet translated).

The central line and line 2 limit ears from above and below.
How to draw a girl's face.Step 8: Hair.
When you draw women's hair, remember that the female forehead is usually smaller than the male. On my example, the hair line begins below the line A. Also, I draw my hair on both sides of the temples, but I follow that the hair is not too close in the eyebrows. Do not forget to give hair volume, leaving a small space between hair and head. For more detailed instructions for the image of realistic hair, I recommend contacting one of.

Before you erase all auxiliary lines, check again how harmonious facial proportions. If after checking you have been satisfied with the result - you can safely wash them.

Well, after you have mastered the lesson on the image of a female face, it is time to experiment and perform several exercises without a ruler.

The article is translated from the site.rapidfireart. com.
How to figure out a pencil portrait: Tips from experienced artists
You want to draw a portrait, but you can't do something? Explore yourself and tons of paper, but not the desired result? Do not rush to despair!
In this article, specifically for you we have collected advice from experienced artists of the Aquamarine drawing school, allowing you to quickly master the technique of drawing a portrait of a pencil.
One of the main secrets of a phased drawing of a portrait of a pencil
One of the main secrets of experienced artists is that they begin to make images from the whole to private, that is, gradually moving from simple to complex. While newcomers are preferred immediately in detail to draw the mouth, nose, eyes and other parts of a person.
Thus, our first is simple, but very important, the Council comes down to the fact that you first need to draw a portrait so that your face depicted by you has a unclear outline, as if the person is in the fog.
At the next stage of the work, the imaginary haze will gradually disappear, and the face features will become more distinct, this we will draw them in detail.
Also in the initial section of our article we will add another valuable information. It is no secret that a person in the portrait can be depicted in three angles - in the profile, anfas and the sessorate (seen three quarters of the face).
What kind of angle is better to start the work of a newbie portrait painting? Experts School Drawing "Aquamarine" advise to start a pencil sample from the profile, and then go to the sessorate of the face. When such a technique is mastered, it will be possible to take it on the most difficult to depict a person's face in the face.
It has been proven that a person is easier to draw from the photo than from nature. And here too, you need to think about your strength. To get a great result in the end, and it's good to deal with how to draw a portrait of a pencil in stages, it is wiserfully to move on the principle of simple to complex, that is, first learn to draw a person's face from a photo or another image, and then go to nature.
Making the basis for a portrait of a pencil
The basis or frame of the portrait is headed head, as well as points showing the location of the nose, eye, chin, ears and so on. And at the very beginning of work, such contours need to be placed.
As an example, we propose to consider the portrait of a pretty girl who goes like an illustration of this article. Let's analyze, what is her shape of the head? Round or ovoid? Or maybe her head is oval with a square chin?
After we analyze the shape of the head of the object, you will depict it on paper. It will be a circle or oval. Then, on this basis, it is necessary to place points pointing to the location of the eyes, the mouth, ears and so on.
If you draw a portrait from the photo, then simply arise the ruler, and first notice the approximate height and width of the head, and then measure the remaining parameters of the face and specify their points on the sketch.
If you draw a specific face from nature, then pull the model towards the model and on the pencil visually, to approximately measure the distance from one point to the other, and then transferring the segments on the paper with the desired scaling.
So, you will first need to note the estimated distance between the top of the head and the chin, then the width of the face, and then the remaining points showing the greater detailing of the elements.
From the anatomical features you will notify that the head width is usually equal to the three quarters of its height. This is a standard from which deviations of 1-2 centimeters are always possible. But the formula is given to make you thoroughly checked the ratio of the dimensions you specified.
It is better to use a pencil NV to work. It is necessary to strive for the outlines of the face at the initial stage were barely noticeable, light and gentle.
Do not hurry. We are so created that every person is individual, and you need to catch and correctly reflect the unique features of the face on paper. If you unreasonably left a place for the image of the nose, then in the end it will be bloated, like a pig, and if you have little space left under the eye, they will also be powered small. But we do not want to offend anyone.
At each stage, refer to the basis of the portrait with the original. Notice face features. Maybe it will be a big nose or wide cheekbones, and maybe a little mouth and big eyes. If you wish to figure out how to draw a portrait of a pencil in stages, these moments are very important.
Paradise portrait drawing stages.
Standard face
The standard of faces is the golden portrait rule. It is in it that are commonly accepted proportions that allow you to immediately depict one or another person.
The standard of portrait includes the following points:
The eye line passes exactly in the middle of the line coming from the head of the head to the chin.
The nose line goes strictly in the middle of the segment located between the eyebrows line and the end of the chin.
The lip location must correspond to such a proportion. If the line between the nose and the chin is divided into three equal parts, then the end of the upper third will serve as the upper boundary of the lips, and the upper boundary of the bottom of the segment will be the lower boundary of the lips. This is a standard, and the rest depends on the individual proportions of a person.
Brow line is determined by this. The distance from the head of the head to the end of the chin is divided by 3.5 parts. The upper share of half of the part is left on the hair growth line. For it, measure one part and carry out a line, which will be the line of eyebrows. From it, I dwell another part, and the new feature will indicate us on the bottom point of the nose.
The width of the lower jaw is calculated as three quarters from the widest part of the head.

If you make an image of a face in a semolutement, then look at the presented illustration how to draw such proportions to draw such proportions.

First, the imaginary line divides the head vertically in half. Then it is worth considering that your face is visible only in two quarters. Therefore, at half past the artist, half of the face will have two thirds of the image, and one third will remain to the rest of the person, which is visible only in half-trip.
Portrait Creation Stages: Hard Head
Hard head is a human head presented in a simplified form. It is the "hardware" novice portraits are studied in professional art institutions.
We suggest you, too, try to draw the model head of the model: only your head, without other elements of the shape.

At the second stage, the image of the human head should be noted the features of the sizes of a particular person. In particular, in the picture you need to designate:
- relief cheekbone, their thickness, flowing and discovering parts;
- nose, nasal base, its width and length;
- eyes with width and height distances;
- lips with size in width and height;
- bending eyebrows, their thickness and direction;
- chin triangular, square or other shape.
Now let's dwell on how to draw the main elements of the face. All this, too, naturally enters the process, how to draw a pencil portrait styardly.
Phased face drawing. Eyes
Eye shape is a round sphere, so on a sheet of paper this roundness is important to emphasize. To the eye was a spherical shape, the volume of the eye protein is attached to various intensity with shades.

It is possible to determine the proportions of the eyes for the face. This is: it is necessary to divide the width of the head into five parts, which will be the second part to represent one eye, and the fourth is different.
If you draw a person in a semolothip, you first need to mention the eye cavity located next to the temporal part of the head. Then it is necessary to measure the distance to the farthest eye, which will be two times less in size than the closest to you. Then on paper, you need to specify the distance between the eyes and chain the outline of the second eye on the sheet.

At the next stage, with the help of segments, show the pos position. Any eye has upper and lower eyelids. At the same time, experts do not advise the lower eyelid to do too dark, but it will be on the tone yet the darker protein of the eye. Also look at the presented illustration, how to show its thickness.
Phased face drawing. Nose
The nose takes up quite most of the face. To porter it correctly, pay attention to the following points:
The location of the wings of the nose can be outlined if you spend two parallel lines from the inner corners of the eye.
Creating a face in the floor turnover, a line that comes from a long eye will be hidden behind the bridge.

In general, the nose has the shape of a trapezoid, draw it and it will be the base of the nose. Lines highlight the lateral parts of the nose. Put the vertical pencil, parallel to the nose, remember the angle between the side of the nose and the strictly vertical feature, reflect it on paper.
Phased face drawing. Lubs
The image of the lips is also starting from the definition of the size and drawing of the contours. First, the height of the head is divided by eight parts. Fifth line, if you go from top to bottom, and will be a lip line.
On this line, we draw a cylinder, which in a detailed drawing and must subsequently turn into your mouth.

The division into two lips is made as follows. The height of the lips is divided into three parts, of which one upper part falls on the upper lip, and the two seconds are on the bottom.
Another interesting detail from experts: the lip width will be equal to a segment, which is the distance between the centers of eye pupils. But when a person is drawing to the floor turnover, the width of the lips will need to be measured by photography and adjust to the scale of the pattern.
There is another way to determine the width of the lips on paper: Measure your eyes, multiply the resulting value by 1.5 and you will get the size of the lips in width.
Phased face drawing. Ears
It is possible to determine the location of the ear in the drawing like this: its top will be equal to the lower line of eyebrows, and the bottom - the bottom line of the nose. On the illustration presented to you, it is clearly visible how you can draw the "right" ear.

As a picture of the face in the profile and in the half-turn, we draw only one ear, the second with such an angle is not visible. Just do not forget in the drawing ear to portray a little with a slope to the head, it will be anatomically more true.

The angle of inclination is determined to the eye or with the help of a pencil that we apply to the photo.
Detailing
At the last stage of the process, how to draw a portrait of a pencil stepmate, you need to learn how to make a detailed drawing. It is to draw all the elements of the face, depict all its roundedness and smooth lines.
To achieve similarity with the source photo or model, you need, naturally, to be painful and attentive. After (or in the process) drawing an extra contour lines should be deleted.

At the final stage, a portrait hatch is made.

First, the darkest parts are shaped, and then it comes to the brightest. Then you need to put bright stains for some details, for example, make glare on pupils, at the tip of the nose and on other sites.

Drawing ready!
But some portraits can be done without hatching. It will already be a linear portrait on which only lines are used as means of image.
We suggest you see how this way you can draw the face of the girl.


A portrait of a child can be performed according to the scheme proposed below:


Considering the advice from experienced artists for proportions, detailed drawing and hatching, you can also successfully draw different people in profile, anfas and half turn. Draw, train, come to classes to school drawing "Aquamarine" and every time you will get better and better!