What can be pulled by canvas. Canvas with your own hands: Tips for making
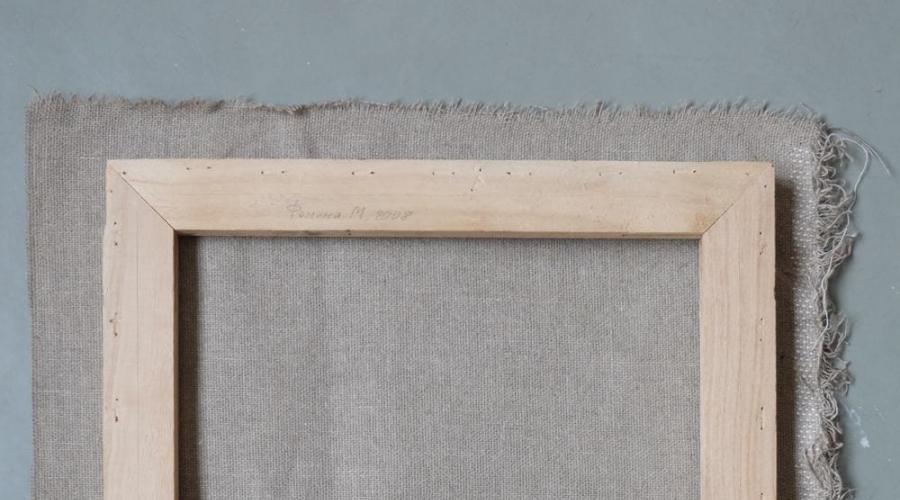
Subframes are divided into two types: modular and ready. Ready can be bought immediately in the store, and the modular will have to be collected. Ready to use better for small paintings (30x40 cm).
Pluses of a modular subframe - in the case of a canvas sagging in the subframe grooves, wedges are hampered (which can also be bought at the art store) and stretches the cloth. Moreover, such a need arises for paintings of large formats.
The side of the subframe with a removal or spose is called the facial, it is made in order to the canvas not adhere to the frame.
Canvas stretches on the front side. If you decide to assemble a modular subframe, then it is better to secure the stack in the joints as many as brackets.
To stretch the canvas on the subframe we need:
- canvas,
- stretcher,
- furniture stapler
- tongs (optional),
- a hammer.
Canvas should be stretched to an elastic condition, without wrinkles and sagging.
At the finished subframe, you need to soften the angles a little, so that the canvas does not break through, for this, knocking a little side of the hammer in all four corners.
Then cut the cloth for several centimeters more subframe so that after the canvas. 
The figure below schematically shows a rectangular subframe, and also indicated and numbered points - in which sequence to score brackets.

We start with a longer side - we find the middle and two brackets attach one of the sides of the canvas.  Next, you need to score the bracket into the second point, i.e. We stretch the canvas to the left, holding the edges of the fabric by all your fingers (so that it does not break and stretched evenly).
In general, the pulling of the canvas requires strength and patience. Try to do it together - one pulls, the other scores the staples stapler. The fabric should be strongly stretched, but at the same time - do not overpower, otherwise it can break.
Point 3 - also stretch and drive two brackets. 
Then go to the drump side of the canvas and score 4 and 5 point, while pulling the canvas vertically. I use nippers to pull - it is comfortable and then they do not hurt the fingers. 
Point 6 does not require any effort - only slightly pull.
But 7 - very hard to pull! 
Next - 8 and 9 - also by pulling all your fingers, but not much, because 11 and 12 points are not clogged yet. The direction of tension is vertical. 
After follow 11 and 12. 
After returning to the short side with a point 6, we drive away the extreme points without a special tension, we turn over and, already pulling it hard, drive around the edges of the bracket. Further - evenly, with tension, clog the brackets. The interval between the paper clips is 4-6 cm. So we act on all sides of the subframe.
Long side: 
Short: 
Corners are fixed in nailed, two brackets. 


If on the finished stretched canvas pat with palm, then there will be a feeling like from the drum.
Ready product. 

The lumen of the fiber must be perpendicular. I do not quite ideally)), but it is desirable to strive for this. 
After stretched the cloth, it should be prepared for the primer. For this we need gelatin. Divorced it in a 1: 6 ratio (gelatin: water). Water should be hot (boiling water), but in front of it to gelatin you can pour a little cold water for 10 minutes. After mass stir and cool. It turns out on the consistency of almost jelly or a little albeit. It is necessary to cover the canvas twice. Tassel is better to take a large (painted). The interval between the coatings is 12 hours. After drying the second coating, it is necessary to break the canvas in a slightly sandpaper (without fanaticism). Then can be coated soil. The soil is bought in the store and divorced with cold water to the state of sour cream. They also need to be covered twice, only with an interval of 30-40 minutes.
After these procedures, the canvas is ready for work.
One of the activities of the workshop is stretching on the subframe of canvas, tapestries, etc.
Few know that the stretch of the canvas on the subframe is responsible, time-consuming and quite complex process. It requires maximum accuracy and attentiveness. Movements should be jewelry accurate to avoid possible damage to the image or canvas. Without a special tool and relevant experience, such work is almost impossible.
Registration of artwork determines the final form of the picture, so it is better to trust the professionals. The qualifications and experience of specialists of the art workshop of Baghet will solve any, even the most difficult issues of forming an external appearance of a unique product.
Canvas stretching 2 types: gallery and simple
An embodiment of a simple stretch involves mounting the canvas to the outer side of the subframe with a stapler. This method is the easiest and most economical.Due to the fact that the fastening brackets on the ends of the frame are visible, it is supposed to further framed the picture in the baguette.

Gallery design implies cloth to climb to the back side of the subframe.Staples for fastening are on the reverse side and become invisible. This method allows the picture to exist independently, without registration in the baguette. The canvas stretched on the frame is ready for exposure. The image is harmoniously moving to the end of the subframe, the general view of the picture becomes bulk and finished.
For example: the cost of making a subframe and a simple canvas stretch with a size of 50x50 (cm) is 800 p., And the gallery is 1000 p. For wholesale customers, flexible conditions and discounts are provided.
Pancarton roll
Our bagent workshop provides commissioned services for foamarton photographs, posters, cards, posters, posters and other printed products. This happens as follows:
the posterior or other professional glue is applied to the foamarton, cutting on the appropriate size, after that the wizard rolls the image to remove air and level the base. After the poster of the poster on the focarter, the image is ready for a further framing.
Experienced masters carefully and qualitatively make your work as soon as possible. And professional workors will help in choosing registration. By the way, a permanent guarantee is provided for all work in our workshop!
To pull the canvas on the subframe, you will be needed: a clean smooth surface, a pencil,
Long line and / or roulette, mall, hammer and furniture stapler.
Before ordering a frame and a subframe for your picture, it needs to be correctly measured.

To measure the canvas, put it on a flat surface image up and measure the width
And the height of that part of you want to see facial.

The remaining part of the canvas will go to the ends of the subframe and on the rear bengles. This residue should be
At least 3 cm wide on each side. If the residue is less, then pulling the canvas will have to
With the fixation of the bracket in the end of the subframe, which will negatively affect the quality of the tension.
As an alternative option, it is worth considering a decrease in the size of the facial part of the picture with partial
An image at the ends.
The resulting size of the facial part of the picture will also be an internal size of the frame and its
It will be necessary to voice when ordering it.

Next, go to the assembly of a modular subframe.
His set includes perimeter planks, transverse strips (if necessary, increasing Ryube
rigidity for paintings of large sizes) and wedges for fixing the corners of the subframe.
For assembly, you will also need a roulette and a cive.

Connect the corners of the side of the subframe, gently inserting the spikes into the grooves. Make sure that
The side of the subframe in all the planks was on the one hand.

If the subframe kit is transverse or longitudinal planks (employees to increase
Ryubel rigidity of large-sized paintings), they should be installed before final fixation
The last period of the perimeter.

Maximize all the joints using the Cyanka. Make sure that the planks are stuck
Strictly perpendicular. Apply the blows of the image is not particularly strong so as not to split the planks.

To check the assembly correct, measure the roulette diagonal of the subframe. With proper
Assembly they must be equal. If the diagonals are different, align them with the help of a queen.
We remind you that when assembling and aligning the subframe, avoid strong blows and do not use
hard hammer not to break the perimeter strips.

We proceed with the tension of the canvas on the subframe.
Put the canvas on the clean smooth surface of the image down.

With a simple pencil, mark on the back of the canvas of the place where the corners are
front painting.

Put the subframe on the canvas side down. At the same time, the corners of the subframe must coincide
with pencil marks.

Slightly pulling the canvas, wrap it in the center of the side plank of the subframe and come up with furniture
Stapler. First on the one hand, then with the opposite.

Make sure that the canvas did not move, if necessary, slightly tighten it and fix it with a stapler
In the center of two other sidewalls of the subframe.

Send the canvas stapler to the subframe from the center to the corners throughout the perimeter. At the end neat
Wrap and fix the corners.

Insert the wedges in the grooves in the corners of the inside of the subframe and achieve an acceptable tension
Canvas, carefully driven by a wedge with a hammer in a circle. If the subframe has longitudinal planks,
Under them, you also need to score wedges.

In the center of the top plank of the subframe, screw the screw-toothed hanging plate with screw-screws.

The painting on the subframe is ready, you can now form it in the baguette.
Probably, the artists will understand me if I say that I will write the same etude, much more pleasant on the canvas, who he himself pulled onto the subframe, reloaded to his specific tasks. After all, when you buy a ready-made used canvas in the store and then pull it onto the canvas, then the tension is not always good. And the soil himself, unfortunately, often comes across poor quality. Once I bought such a canvas in the cabin for a lot of money. And when I started writing, the colorful layer began to be frown. This is when the paint darkens, ceases to be rich in color, and when it loses gloss. The perfect canvas must be stretched so that a small drum effect is created (this is after the primer). If the canvas saves, then it is already bad. Soil should not crack. He must keep paint so that it does not look out with time. Well, and the colorful layer should not be frown, i.e. the soil should not excessively absorb the oil from the colorful layer. All these tasks can be solved at home, with their own hands. Next, I will consider the first part of the tasks assigned: this is how to pull the canvas to stretch on the subframe? (I wrote about the designs of subframes).
So, how to pull the canvas on the subframe? Tightening canvas follows with special tongs with wide "lips". But, I must say, I rarely use them. Basically, I do everything with your hands. Canvas is attached to the subframe or small carnations or a stapler. Hats may not hold the fabric, so the carnations should not knock into the wood of the subframe completely. Drink half. And the rest, bend the hammer.
You need to start with the middle of the subframe rack. Watch the first nail in the middle. Then, pull the fabric from this carnation to the edge to the edge, to the corner of the subframe - now leak the second nail, next to the first. The distance between the carnations should be an average of 5 cm. Next, in the same way to drive, the third nail. When three nails are drunk, you can move to the opposite side of the subframe. To the side that opposite the first. The first nail in the middle is also driven. Just before you drive should try to pull the tissue well. When the canvas stretches and the nail is drunk, you can start adjacent to the neighboring cloves from this triple. But under them, canvas need to pull not only on itself, but also to the sides.
When we pulled the canvas between the first pair of opposite sides of the subframe, you can start up to the remaining two. As a result, we will have a cross-shaped tension of the fabric.
So, we did the foundation. Now we continue to pull the canvas from each triple of nails to the corners of the subframe. It is better to do it first on the left, then on the right. Again on the left, then on the right. So it turns out a more uniform tension. Canvas, now, you need to pull not only to yourself, but also to the corners of the subframe.


The meaning of the entire procedure consists in uniform tension of the canvas yarns. And so that the tension is sufficient. After sizing and primer, the canvas should not be saved.
So, if everything happened and you have achieved your tasks, then I can only congratulate you on the successful first experience in the preparation of the canvas to painting!
Alexey Epishin.
_______________________________________
ProBably, The Artists Will Understand Me When Say That Writing The Same Essay, Much Nicer On The Canvas, Which You Yourself Pulled on a Stretcher, He Primed for their Specific Tasks. After all, WHEN YOU BUY READY-PRIMED CANVAS IN THE STORE AND THEN PULS HIM ONTO THE CANVAS, THE TENSION IS NOT THAT ALWAYS GOOD. Yes, And The Ground Is Unfortunately Often Come Across Poor Quality. Once I Bought the Canvas in the Cabin for a Lot of Money. AND WHEN I BEGAN TO WRITE, Paint Layer Became Dry Up. This Is When The Paint Darkens Ceases to Be Saturated in Color, And When Loses Its Luster. PERFECT CANVAS TO BE STRETCHED SO AS TO CREATE A SMALL EFFECT OF THE DRUM. If The Canvas Is Slack, Then IT IS Bad. The SOIL SHOULD NOT CRACK. HE SHOULD KEEP THE PAINT SO THAT IT DOES NOT FLAKE OVER TIME. Oh, and a Layer of Paint Must Not Dry Up, t. E. The SOIL SHOLD NOT Unduly Absorb The Oil from the Paint Layer. All of These Problems Can Be Solved At Home, with His Own Hands. Next, I Will Discuss The First Part of the Tasks: IT IS - How to Pull The Canvas on a Frame?
So, How to Stretch Canvas On a Frame? Pull The Canvas Should BE Special Forceps with Wide "Lips." But I Must Say, I Rarely Use Them. Basically, Do Everything by Hand. Canvas Is Attached to the Subframe or Small Nails or Staples. The Cap Can Not Hold The Fabric, So Cloves Should Not Be Driven Into Wood Stretcher Completely. Drive a Half. And The Rest of The Bend Hammer.
Should Start from The Middle Rack of the Subframe. Hammer The First Nail in the Middle. Near the first One of The Second Drive in The Second DRIVE IN THE EDGE, TO THE SECOND TO THE SUNGER TISSUE From This Stud to the Subframe. The Distance Between Nails Should Be An Arasege of 5 CM. Further, The Hammer in The Same Manner, The Third Nail. When the Three Nails Hammered, You Can Move to the Opposite Side of the Subframe. To The Side Opposite The First. There Are Also Hammered The First Nail in the Middle. Just Before He Should Try to Drive Well to Pull The Fabric. When the canvas is Stretched and Hammered A Nail, You Can Begin to Adjacent Studs of the Trio. But for the Canvas Not Only To The Sides.
WHEN WE PULLED THE CANVAS BETWEEN THE FIRST PAIR OF OPPOSITE SIDES OF THE SUBFRAME, YOU CAN PROCEED TO THE REMAINING TWO. As A Result, We Get A Cross-Shaped Tension Fabric.
SO, We Made The Foundation. Now Continue to Pull The Canvas from Each Triple Nails to the Corners of the Stretcher. Better To Do It At First Left, Then Right. AGAIN THE LEFT, THEN RIGHT. SO Get a More Even Tension. Canvas, Now Need to Pull Not Only to Themselves But Also to the Corners of the Stretcher.
The Meaning Of The Whole Procedure Is Uniform Yarn Tension Of the Canvas. And So The Stress Is Sufficient. After Sizing and Priming The Canvas Should Not Sag.
SO, IF Everything Worked Out and You Have Achieved The Objectives, Then I Can Only Congratulate You on the Successful First Experience in Training Canvas for Painting!