How to draw pine oiled branches. How to draw pines with pencil and paints? Phased guide for adults and children
How to draw pine.
Pine-present coniferous tree. And, since the fir is also coniferous and in winter and in summer in one color, they are often confused. That is, I know that my students do not see a special difference. And she is. Now we will deal with. We will deal with the lesson "how to draw a branch of pine".
Drawing on the branch scheme. Branch -Muchnya. It is the side twigs grow not alternately, but several pieces from the nodes.

The needles ate - one ranks and short, they are sharp and, usually, rather straight. They grow on the branch ordered and smoothly (as a lawn))). Pine needles grow in pairs, they are long and can be straight, but it is rarely - they are arcuate or completely winding. The direction of growth of needles is approximately the same, but at the same time they are in the forest to the wood, they are non-stroke.

Will you draw exactly how you see - the needles are suspended? - So draw:

Do not give in temptation to draw needles flattened and neat, draw as in truth. And for this, it is best to have before your eyes not only the lesson "how to draw pine trees", but also in the soster they live, if honestly.
When an adult or child wants to try himself as an artist, the questions often arise. Often people prefer to start exercise their talent from the pictures of nature. At such moments there may be a question of how to draw pines, birch, chestnuts and other trees. Regardless of what time of year, a person plans to portray, there can always be forever green trees - pines.
What materials need to draw pine?
In order to fully prepare for pine drawing, it is necessary to have the following materials at hand:
- sheet of paper or album;
- several pencils;
- sharpener;
- eraser;
- sample image.
If all materials are ready, before drawing pines, you need to consider the total composition of the drawing. It will help to gain an incentive and create a real masterpiece.
How to draw pines with paints?
If the child wants to try himself as an artist, mothers, dads, grandparents, you need to be ready to tell the chad all the nuances. The sequence of actions should be as follows:
- To begin with, the child in his fantasy should submit a ready image.
- Then you should make a sketch, applying future pines with a simple pencil.
- After that, you need to make a drawing clearer.
- Then you can begin to decoke in the artwork of paints.
Even if the child did not really work out the first time, he should praise him for the efforts. Next time, everything will turn out. And if the picture came out quite decent, then it should be placed in a frame and hang in the room.

How to draw a pencil pine?
Adults or children with experience in artistic art will certainly want to draw a pencil pine. Before drawing pines, it should be understood in what order you need to do. To get a good drawing, you should:
- Determine the location of pine in the image.
- Then draw the contours of the trees.
- Apply an image of the barrel on the sheet of paper.
- Then draw twigs.
- Pictulate needles on branches.
In any case, even if the image did not work out, as I wanted initially, you should try again. Only persistent it turns out to achieve high results.
Draw pine is not so difficult. It is just enough to treat items carefully. For those people who seek to achieve goals, will certainly succeed, and the drawings will be at all worse than the real works of famous artists.
Spruce? It is very difficult to find a person who never had a tree in his life. But if you do not know how this is done, our article will teach you to this simple case.
Spruce - holiday symbol!
Spruce - which is certainly associated with everyone with the holiday, Happy New Year! This is an evergreen coniferous beauty for children becomes a real green fairy, pleased with them in the morning of January 1 gifts hidden under branches. Does your child asking you to draw a Christmas tree? Or perhaps you need to make some song with her for a children's holiday or matinee in the garden?
We will gladly provide you with a few simple workshops who will teach you how to staten fir.
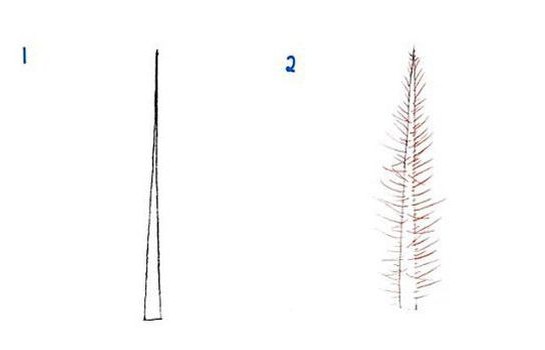
Method number 1: from top to bottom
The first way we consider in our article will be based on the drawing of the tree from its top. Learn to portray such a fir. And then it will not work for you to create a whole forest on a sheet of paper!
So, how to draw spruce, starting from her top? Everything is very simple!

Method number 2: bottom up
The first image of the image was awesome, but, agree, it is much more convenient to draw from the bottom up, and not vice versa. So much easier to adjust and plan the height of the tree.
How to draw fir from bottom to up? Now show!

Method number 3: easier than a simple!
How to draw spruce the easiest and simple way? We know him and will definitely share with you. With this method, painted the Christmas tree even a small child.
How to draw a branch ate
And what if you do not need the whole tree, but is necessary, for example, only one of her branch? Well, we will tell you about it. Arm yourself with pencil and paper, we proceed!

Drawing ready!

Now you know how to draw a branch of the branch yourself. You can even teach this, for example, your child.
With the help of the described methods, you can draw a branch of a coniferous tree or a felt felt pencil itself, markers and even paints. The tool in this case does not matter. Draw, create yourself and together with children.
Already painted +21 I want to draw +21 Thank you +. 70
Step 1.
So, as usual, at first looking at the object in the photo, we try to portray the basic shape of the pine and its branches with thin lines of the HB pencil. Immediately throw those branches that you most want to show. It is absolutely not necessary to draw those branches that I painted, because You must develop your drawing vision, and not copy mine. And all the more you do not need to draw all branches, copying the photo. We draw only what you, as an artist, want to show the viewer. We draw only the main forms and location of the branches.
Step 2.
At the second stage, we enhance the pressure of the pencil and pass on the trunk and each branch, more clearly defining the details and contour of the pattern. We draw small twigs, broken swings, show the connections of the branches with a pine tree. As a result, we obtain the clean outline of the object in a simple pencil. Such a drawing is called linear or, as they write in some literature - linear, i.e. Drawn with lines.
Step 3.
The next step is to add tonal spots that determine the lighting light of the object. The same pencil HB is passing through dark areas of pine crust, showing shadows from the branches. And also hatching the area around the pine tree trunk, showing the depth of the space that will give a picture of some expressiveness. Further on the region around the tree trunk we pass the mouth, softening and smoothing the stroke of the pencil so that the background is more like a spot, and not on the touches. You can also slightly undergo the mouth and shadows from the tree branches. Such a drawing is made in mixed technique, because The lines and strokes and stains were applied.
Step 4.
Next comes the most interesting. This stage is sometimes introducing into a certain state of meditation, when you see how a bright image begins to gradually appear from the pale drawing. At this stage, we take a soft pencil 4b and begin the drawing of parts on each branch. In dark places peculiar flakes show the texture of the tree. Enhance the shadows of branches and falling shadows. If somewhere you need a shadow, it is better to take a HB pencil so as not to overdo it and do not cross the drawing. The rear branches draw a lighter pressure, the front is tougher and clear. To make it easier to draw small twigs and cracks in the cortex, more often drag the pencil 4b, because Soft pencils are rapidly stepping. Places where the light falls in the picture is left unburned.Master class for children 4-6 years old: "Drawing pine in watercolor technique"
Author: Book Anna Nikolaevna, Senior Educator.
Place of work: MBDOU "Kindergarten №3" Smile ", Kalach - on - Don.
Work description: I offer you a master class: "Drawing pine in the technique of watercolor for preschoolers. The material can be useful to educators, educators of additional education, teachers, children and their parents.
Purpose: Figure will serve as an excellent gift, you can use for interior design.
Purpose: Drawing pine in watercolor technique.
Tasks:Develop creative thinking and imagination;
Teach children to portray pine, accurately passing the structure of the trunk and branches; Continue to fix the ability of children to draw a dry brush, tilers;
Raise accuracy during operation;
Improve the skills and techniques of work with watercolor paints.
Pine.

Pine loved in Russia is no less than Bereza. Static, harsh it stands on all winds. Pines are always from us not far away. If there are no pines in the nearest forest park, it is only worth a little away from the city, and here it is a faithful beauty. It is worth, pulls its branches and thin needles to the sun, and quietly swayed in the foot of the wind.
Pine is considered a genuine "tree of life", which and in very revealing age always looks green and fresh. It is highly appreciated as a symbol of long life and unchanged marital happiness. Special attention is paid to the Chinese art as a symbol of inviolability and resilience, because even in a cold winter it retains its needles, and the fact that they always appear in a pair means life together as it happens in marriage.
Pine is ancient leak. Her healing needles included in therapeutic compositions another five thousand years ago. Pine extract for baths, essential oil, ointment for burning burns are obtained from the needles.
Pine is a very valuable forest breed. Gives a circulating wood. Wood pine is permeated with resin moves, as if impregnated with a resin that protects the tree from rotting. It is used to obtain the gils from which turpentine and rosin. Fresh grooves get cellulose.
Pine forests are great at any time of the year. Mighty trees with highly towering over the ground crowns, with slender trunks covered with a reddish bark, entail under their seagl. Beauty of pines - a source of inspiration of many artists, poets and writers.
Materials and tools:
- watercolor paints;
- Tassels number 12, №2, protein;
- paper for drawing a-4;
- simple pencil, eraser;
- watercolor paints;
- Palette, Non-Falivka.

Stages of work:
A simple pencil on a vertically located sheet of paper is drawing a pine trunk. The trunk of pine is high and straight.

Next, we draw branches from the barrel up and a little to the sides.

Around the twigs we plan a silhouette of a tree crown, in the form of clouds. The lower twig will leave without the crown - dried down.

Add the horizon line.

Wide brush, paint the sky watercolor blue sky.

Light green watercolor paint the ground, and the emerald pine crown.

Brown watercolor paint the trunk.

Dark green watercolor paint the grass in the foreground and edges of the crown.