How to convert GPT disk in MBR without losing data? Conversion of disk sections in various ways. How to convert GPT disk in MBR without losing data
After the release of Windows 7, the new type of hard disk partitions saw the light, as a result of which the users must make a number of additional actions when reinstalling the operating system, namely, the GPT conversion in the MBR, which must be executed when installing Windows 7. An interesting fact that faced with the need Conversion You can also perform other steps with OC, but most often happens when installed. We are going through the steps to disassemble for you the process of transition from GPT in MBR the most well-known methods and list the most suitable funds for this.
An ordinary user can understand that it needs to change the disk conversion when Windows is installed 14 version. Often, the problem is in the absence of UEFI on the computer (instead of it stands outdated BIOS), which is necessary for the new version of the OS. The user faces the problem during the transition to the disk separation screen, bumping into a message that prevents further process. The message warns that the GPT disk is used, instead of the required MBR. In this situation, everything that is available to you is the "OK" button and the interaction menu with existing discs. The "Next" button in this situation will be unavailable. The opposite situation may also happen, at which the installation will require not GPT from you, but MBR. Be that as it may, we will tell you about the process of changing the type of hard disk, and in the future any of you will be able to remake Windows 7 disks in both directions, both from GPT in MBR and in the opposite direction.
Conversion during Windows installation via the command line
The command line is an integrated tool of any Windows that can arrange local discs and change the GPT on the MBR. It is capable of converting GPT in the MBR and in the opposite direction, provided that the disk to be transformed is not divided into partitions.
The use scheme is as follows:
- Click "Start"\u003e Enter the "Command Line" and launch it with the privileges of the administrator;
- We enter "diskpart" and click "input";
- We enter "List Disk" and click "Enter";
- We enter "SELECT DISK N" and press "input". Instead of "n", you must install the disk number to be changed (for example, "disc 0");
- We enter "Clean" and click "Enter" to remove partitions or volume on a disk that was selected;
- Enter "Convert MBR" and click "input", after which the change in the GPT on the MBR will be completed.

The way is quite controversial because it entails the removal of all information on the carrier. That is why, before the conversion procedure, we strongly recommend reserving the information you need on removable media, and then restore it.
Conversion using Windows Disc Control System
Disk management is a tool integrated into Windows 10, which allows you to make changes (creation, deletion, increase, reduction) of partitions, converting them to GPT or MBR.
Here, how to use it:

Programs for conversion without data loss
There is also a certain number of utilities that allow you to transform discs without losing the data. To use them, you do not need to delete all sections. But it is worth saying that the probability that the data will be erased, is still present and you should be ready for this, since this possibility is present during all operations with a partition and / or disk. In this regard, I highly recommend you before using some of the programs to make the reservation of the necessary data on removable media.
So, if you have done all the necessary preparations, then let's stop at the three programs that are most suitable for manipulations with disks.
Aomei Partition Assistant Standard Edition
A wonderful and freely distributed utility that allows you to produce manipulations with carriers. With it, you can make a couple of clicks to change the file system, partition size, cloning, etc. And most importantly, most of the operations are made with the preservation of your data (this is the main plus before standard system utilities).
Unfortunately, most recently the ability to convert MBR in GPT starting from the 7th version of the utility has become paid (it is free of 6.6th version, so as an option you can install it).
On how to download and install the program should not stop, everything is standard. By running the utility, in its starting window you will see information about which of your partitions are converted to GPT, and which in the MBR (see picture). 
For example, we will analyze the MBR conversion in GPT.

Notes!
If necessary, perform a system disk conversion (i.e. that disk to which Windows installation was made and from which you currently and you work) - you will not get it in the usual way. With these circumstances, you need:

Easeus FREE PARTITION MASTER
Another program for converting MBR in GPT is Easeus Free Partition Master. The program is the same as the previous one will save all your data, in mastering it is a little more simple for users and regularly receives updates from the publisher.
If you decide to stop your choice on this utility, here is the procedure for making conversion with its help:

Paragon Hard Disk Manager

The Paragon Hard Disk Manager program functions exclusively in the operating system itself, therefore, you should not remove the OS, simply formatting the system partition. First convert the disc, and then you can already perform the necessary actions.
The utility is paid, but there is a trial version that you basically are enough. To download the program, simply register on the official website, the download link will be sent to your mail. It remains only to download and install it.
- After starting the application in the same click dialog box, select the editable GPT disk, at the top of the window click "Hard Disk". In the context - "convert to the basic MBR disk", confirm the actions by pressing the green tick.
- In the window that appears, click "Convert".
- At the end of the transition process with GPT in MBR, Paragon will show the "All operations completed" window.
- After that, close the program and continue to use your PC.
Video: Conversion GPT disk in MBR
So, what is better than GPT or MBR? The answer to this question cannot be recognized without considering the requirements that are presented to each technology in a particular case. The MBR and GPT perform the same function - storing information about the structure of the disk structure and ensuring the operation of the operating system. In many ways, these technologies are similar, but there are differences between them. At the moment, the MBR is supported by almost all operating systems, however, GPT has many advanced features. In addition, in some cases, it is impossible to do without installing GPT, for example, when using disks with a volume of more than 2 TB.
If you have decided on what technology will be used and realized that you need conversion, then here you have a video showing all this process without losing data using the Paragon Hard Disk Manager program.
Found a typo? Highlight the text and press Ctrl + Enter
Good day to everyone!
It happens sometimes so that when you are trying to install Windows to your computer, you can see the error of the form: "Windows cannot be installed on this disk, because On the disk uses the MBR partition table. On Windows EFI systems can only be installed on the GPT disk" . And it is possible that your system simply does not see the disk, the size of which is more than 2 TB.
In these cases, you need to convert MBR to the GPT partition table to eliminate this problem. You can do this in different ways and ways, in this article I will consider how it can be performed without data loss (see method 1 and 2)!
As a remark!
The difference between MBR and GPT. MBR supports sections with a volume of up to 2 TB. If your disk, let's say 4 TB (which is no longer uncommon), then when using MBR - 2 TB on such a disk, it will be listed as an unloaded area (and will not be used).
How to convert MBR to GPT
Method No. 1: By steps in the program Aomei Partition Assistant Standard Edition
Aomei Partition Assistant Standard Edition
Excellent and free program for working with hard drives. Allows literally in 2-3 clicks of changing the file system, sizes of partitions, cloning, etc. Moreover, many operations are performed without losing information (which is not enough tools embedded in Windows).
Supplement (from 10/11/18): The option for converting MBR in GPT in the 7th version of the program was paid (in 6.6th version it was free, and it was on it that I was based on writing an article).

I do not consider the download and installation of the program - it is standard. After starting, in the main window of the program you can immediately find out which of the existing disks in the GPT system, and which in the MBR (see the screenshot below).

As you noticed, "Disc 3" I have MBR, and I convert it to GPT.
To do this, just right-click on the disk itself. (where it is directly written that it is "disk 3", see screen below), And in the menu that appears, select "Convert to GPT disk".


After that, in the left corner of the screen, you need to confirm all the commands that we gave the program in the current session: click the "Apply" button.

To perform the current operation, you will need to restart. Therefore, first of all, save all your open documents, and then click on the "Go button" in the program window (see Example below).

Last barcode: agree to reboot ...

After restarting the device, instead of downloading Windows will be launched. Conversion utility (see example below). Literally within a few seconds, my disk for 1 TB was converted to GPT (once again I note: without data loss).

Here, in fact, all actions.
Addition!
If you want to convert a system disk (i.e., that disc on which you have installed Windows and from which you at the moment are loaded) - then you will not work out. In this case, there are two options:
1) Remove the disk from the PC / laptop, connect it to another device and perform the transformation operation;
2) Create a bootable flash drive (can be made in the same Aomei Partition Assistant Standard), and already downloading from it to carry out the operation.
Make boot CD, master

Method # 2: Using the MINITOOL PARTITION WIZARD utility
Multifunctional program for working with hard drives. Allows you to split, format, change the size of partitions of hard drives. The free version of the program supports conversion from MBR in GPT (what we need).
Perhaps one of the significant minuses for the majority will be the absence of Russian language.
Note: Screenshots in the article are executed from version 10.3.
After starting the program, it will be a list of all drives connected to the system (HDD, SSD, USB flash drives, etc.). Please note that its partition table (MBR, GPT) is specified next to the disk name.
To convert from one to another: just right-click on the desired disk and select "Convert MBR Disk to Gpt Disk" (sample on the screen below).


Then another warning will pop up, after confirming the execution of the operation, the disk will be transformed. If you are not converting a non-system disk (i.e., not the one on which you have installed Windows) - then the operation takes 1-2 minutes. (See Screen below).

Method number 3. On the command line or drive control
Important! In this case, all your data on the disk will be deleted!
If you encountered a mistake "In EFI Windows systems can only be installed on the GPT disk" When installing Windows: then in order to open the command line, press the button combination SHIFT + F10..
In other cases, to launch the command line, open the task manager (CTRL + SHIFT + ESC buttons combination) , click "File / New Task" And enter the team Cmd. (Tick the checkmark that the task must be executed from the administrator!).

Windows also has another good job tool to work. He is just so called - disc management .
To open it, you need:
- press the combination of buttons Win + R. ;
- enter the command diskmgmt.msc. And press ENTER.

To find out which disk marking (MBR or GPT), simply click on the Right Mouse button on the disk (in the place where "disk 0", "disk 1", etc., see the example below), and open properties .

- "Section table with GUID ..." is GPT;
- the MBR markup will be indicated directly.
To convert the MBR to GPT - you must first completely delete all partitions on the disk (Important! When deleting a section - you will lose all data on the disk!) . If the sections are not deleted, then the "Conversion to GPT" button will simply not be active (as on the screen below).


I have everything today.
Who else knows what the difference between GPT. and MBRI recommend reading this. Modern versions of Windows and other operating systems can use as. This is how you can find out, which of these standards is used on your computer, and change one of them to another.
These are simply different ways to store partition table on the hard disk. GPT is a more modern standard required to download Windows B systems. The MBR, in turn, is required to load old Windows systems in BIOS mode, although the 64-bit version of Windows 7 can be loaded in UEFI mode.
How to check which table of partitions uses your disk
If you want to know which partition table uses a disk, you have two options: you can use the display-built wheels or command prompt in Windows.
First option: Use the disk management tool
This information can be viewed in the Disk Management Tool. To get access to it, right-click on the Start menu or use the Windows + x key combination and select "Disk Management". In addition, you can press the Windows + R keys to open the Run dialog, enter into the "diskmgmt.msc" text field and press ENTER.
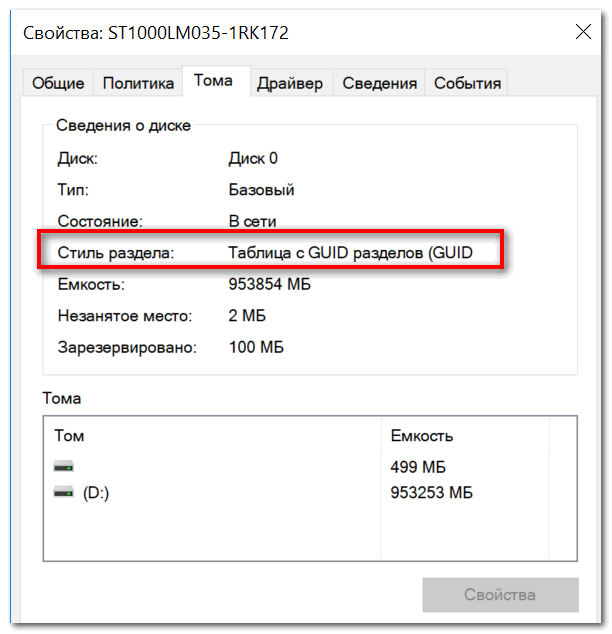
Find the disc you want to check in the disk management window. Click on it with the right mouse button and select "Properties".
Click the Tom tab. In the section "Style section" you will see either " Main boot record (MBR)" or " GUID SECTION Table (GPT)", Depending on what uses your disk.
Second option:
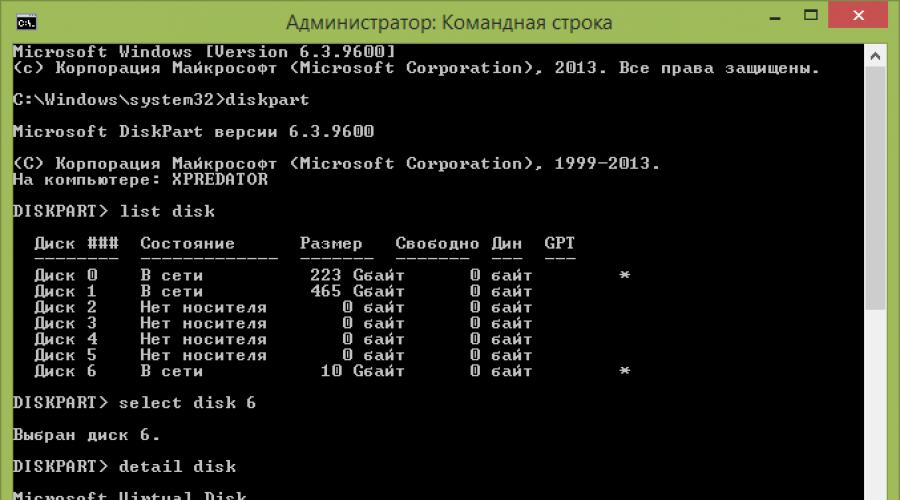
You can also use the standard DiskPart command in the command prompt window. First, run the command line on behalf of the administrator by clicking on the Start button right-click or pressing the Windows + X key and selecting "Command Line (Administrator)". In addition, you can find the command line icon in the Start menu, click on it with right mouse button and select "Run on the administrator name".
Enter the following two commands by pressing ENTER after each of them:
diskpart.
lIST DISK.
You will see a table with a list of connected disks. If the disk uses the GPT in the GPT column will stand stars (symbol *). If the MBR standard is selected, the GPT column will be empty.
For example, the screenshot below disk 0 and disk 1 use GPT, and the disk 2 is a disk with the MBR.
How to transform between MBR and GPT: Make a backup of the data and format your disc
Before switching to MBR to GPT or with GPT on the MBR, you need to clean your disc. First, make backup copies of all data stored on it. In the process of disk conversion, all data and partition tables will be stranded, and then a new section scheme will be applied to the disk.
Technically, this is not the only way to convene. Some third-party partition management programs promise you to perform MBR converting GPT and GPT to MBR without losing data. However, they are not supported by Microsoft, and you still stand just in case to make a backup copy of your data before you start working with similar utilities.
We recommend simply making a backup of the entire disk, format it, and then copy the important data back. Of course, it will have to spend some time on it, but you are guaranteed to save your information and you can avoid problems with sections.
First option: Use Disk Management
Do not forget make backup copies of your files before you continue! This process will cleanse the disk that you will convert!
To convert one standards of partition table to another, find the disc in the disk management utility. Right-click on any part of it and select "Delete Tom" or "Delete Section". Repeat this operation for each section of this disk.
When all disk partitions are deleted, click on it with the right mouse button and select "Convert to GPT disk" or "convert to MBR disk". These options will be available only after cleaning all sections.
When the conversion is completed, you can create new partitions on the disk directly from the disk management window. Just right-click on unallocated space and create one or two partitions. Then you can transfer your data to one of these sections, if you want.
Second option: Use the DiskPart command
All this can also be done using the DiskPart command in the command line window. In some cases, this method will be preferable, since the Clean command allows you to modify partitions and discs that seem blocked in the graphical interface of the disk management utility.
Remember that you need make backup copies of data before proceeding to disk conversion! In the conversion process, the disk will be completely cleaned!
First, run the command prompt on the administrator. Then perform the following commands one by another:
diskpart.
lIST DISK.
You will see a list of disks of your computer. Remember the number of the disk you want to convert. You can distinguish one disc from the other by their volumes.
Now, enter the following commands by pressing ENTER after each of them and replacing the "#" to the disk number that needs a conversion. The "Clean" command will erase all data and sections from the disk, so try not to make a mistake with the disk number.
sELECT DISK #
clean.
To convert a disk from MBR in GPT:
convert GPT.
To convert a Disk from GPT to MBR:
That's all. Now you can use the disk management window to create partitions. The same can be done on the command line, using other DiskPart commands. If you wish, you can transfer predetermined data to new sections.
As we mentioned, there are methods for converting MBR in GPT and on the contrary without losing data. At least in theory. But we cannot confirm the reliability of these third-party tools in each possible situation. So, it is better to use official methods that include disc cleaning. You will spend more time, but guarantee the safety of your data.
On the computer discs, GPT or MBR sections are used. The modern computers use the GPT partition table in Windows 10 or Windows 8.1 operating systems (Windows 8).
The GUID Partition Table (GPT) partition table is part of the EFI interface that came to the BIOS shift. The BIOS uses MBR (Master Boot Record) - the main boot record. Gradually, computers with MBR disks are replaced by computers with GPT disks, SSD or HDD discs are not values.
The main difference between the partition tables is as follows: On the disks with the MBR you can create 4 main partitions, drives up to 2.2 TB, on the disks with GPT the number of partitions is practically unlimited (depends on the operating system used), disks are supported in size over 2.2 TB, a faster system loading is happening.
The advantage of GPT is that its data is stored in different places on the disk, unlike the MBR located in one place. In GPT, in case of damage or failures, data can be used from another location, on disks with MBR, in this case, the download will be impossible. The advantages of the GPT styles are mainly implemented in the 64-bit version of Windows (supported by Windows 7 x64).
How to find out what kind of GPT or MBR drive? You can find out the MBR or GPT disk format using the Windows operating system using third-party programs designed to work with disks. The article considers the Aomei Partition Assistant program, other similar programs are suitable.
How to find out GPT or MBR in "Drive Management"
The easiest way to find out the style of the disk partitions is to enter the "Disk Management" snap.
In Windows 10, right-click on the Start menu, select Disk Management. In Windows 7, right-click on the "Computer" button, select the Control menu item "Control", in the Computer Management window, select the "Disk Management" section.
You can enter the wheels in Windows in Windows: Press the keyboard to "Win" + "R", in the "Run" window, enter the "diskmgmt.msc" command (without quotes), and then click on the "OK" button.
After that, the "Disk Management" window will open, which displays all the discs connected to this computer.
At the bottom of the snap window, you will see all the physical disks connected to the computer, which have notation: "Disc 0", "Disc 1", etc. Please note that on one physical hard disk there may be several partitions (disks "C "," D ", etc.).
Right-click on the disk name, in this case, to "Disc 0", and in the context menu, select "Properties".
In the "XXX Disk Properties" window that opens, open the Tomas tab. In the "Disc Information" section you will see the "Style section: Table with GUID section (GUID)". This means that this disc has GPT sections style.

After I entered the properties of the "Disc 1", and opened the Toma tab, I saw that the MBR table was on this disk - "section style: the main boot record (MBR)."

How to find out the GPT or MBR hard disk on the command prompt
Run the command prompt on behalf of the administrator. In the command line interpreter window, enter the command:
Diskpart.
LIST DISK.
Click on "ENTER".
In the command line window, all physical disks connected to a computer will appear.
One of the displayed parameters is indicated as "GPT". The disk that has a GPT style is marked with an asterisk ("Disc 0"). So, the rest of the discs where there are no stars, have the style of the MBR section.

How to find out the markup of the GPT or MBR disk in Aomei Partition Assistant
Aomei Partition Assistant Program (FREE VERSION - Aomei Partition Assistant Standard) is designed to work and manage disks. The program has convert (convert) GPT discs in MBR and MBR in GPT.
After starting the program, the Aomei Partition Assistant disks are displayed in the main window. At the bottom of the application window, under the name of each physical disk, the type of marking is shown: GPT or MBR.

Conclusions Articles
What type of markings of GPT or MBR have discs on a computer, you can learn using the "Disk Management" snap-in, command line and third-party software: Aomei Partition Assistant.
For many users, the GPT conversion in the MBR when installing Windows 7 is the necessary procedure.
Recently, it has not been so easy to reinstall the hard drive as before.
The fact is that simultaneously with the beginning of the release, hard drives with a new partition style began to appear on the market.
The complexity lies in the fact that to install such a disk, the style must be converted to the usual MBR.
It can simply be done in several ways.
general information
In fact, the procedure of such a transformation can be useful in various situations. But - the most frequent and popular one.
Often, by purchasing a laptop with the pre-installed "eight", the user wants to change the updated and changed OS on the "seven" familiar to him.
And faces what it is impossible to do it.
What do these formats differ?
- MBR - Standard and usual hard disk format. All users worked with him until the Windows 8 operating system was released, which became fundamentally different. Therefore, earlier problems with reinstallation did not arise;
- GPT. - A fundamentally new and unusual user format for placing tables on hard disk partitions. For the first time disks such a style appeared when you move to a new type of BIOS - UEFI. The format is used on relatively new operating systems - "eight", "dozen". Therefore, reinstalling with replacement to the older OS is difficult.
The need for such a transformation occurs in several stages of working with a hard disk. But when reinstalling is most often.
GPT format is much more preferable in operation. With its availability, the operating system is loaded faster, external and internal drives can be maintained even very large volume. The system acts faster. However, some users still have the need to convert the disk format. It should be penalted that all GPT positive parties will be lost.
Problem
What is the essence of the problem. In the initial stages of the installation, the user does not detect any differences from the standard procedure.
It inserts the disk into the drive or inserts a memory card, and loads from them. After that, the language selection menu appears, where you can also select the system language unhindered.
The user then specifies the partition to which the installation wants.
The standard user response to such a notification is to remove partitions and disk formatting. But these actions do not bring the result.

The essence of the problem
You can solve this problem only in one way - the conversion of the outdated format to the new one. It is easy to do it. No additional software or special abilities. The only thing for this is necessary - the installation disk with the new operating system.
Command line
One of the easiest ways to convert. In order to spend it, act according to the following algorithm:
- Run the installation program again;
- Insert the installation disk;
- Boot from it;
- Choose the language of the system;
- When a new OS installation selection window opens, clamp SHIFT and F10 at the same time (without choosing a section);
- This action launches the command line;
- We enter the command diskpart.This utility helps to cope with many problems arising when installing the OS;
- We enter the command lIST DISK.As a result, the list of disks will open, each of which will be assigned a number;
- Remember the disk number you want to convert;
- Now enter the command to the command line sELECT DISK. #, where # is the number of that hard disk (on the list), which will be transformed;
- The next step will delete all existing data on your hard disk - you need to remember!
- Enter into the command prompt team Clean.which will completely clean the specified disk from any information;
- You can save data from the disk only on an external drive, if they are moved, for example, to a D disk, it will not bring results (they will still be deleted);
- Wait for a while until cleaning is completed, and proceed directly to the transformation;
- Dial convert MBR on the command line;
- The process of converting an outdated format in the updated will be launched;
- Wait for the completion of the process (usually, it appears almost instantly).
As soon as this process ended, the hard disk has acquired the usual format. It is necessary to exit the converter utility. To do this, in the command prompt, I will write EXIT. It turns out in a different way, for example, turning off the computer, not desirable.
After that, connect the installation disk again. Install the usual way. Now the problems at the selection stage will not arise.

Working with a command line
You may be interested:
Without data loss
In some cases, the loss of data stored on the hard disk is unacceptable. At the same time transfer them to removable media, and then back to the computer - for a long time.
Sometimes the amount of data does not allow this to do or removable carrier of the appropriate volume is absent at all.
- Purchase live CD boot disk | DVD. Carefully examine its assembly, since the Paragon Hard Disk Manager will be required to convene the conversion. It is not in every disk assembly, but without it, the partition formats cannot be converted;
- Install the boot disk or memory card in the computer. Load and run the system from it. Wait until the desktop appears before you;
- In the standard way, open the Start menu and find the section there. HDD and USB utilities. Click on it and in the list, select the Paragon HDM 2010 PRO program;
- Run the program;
- After starting, the program window will open in which all hard drives will be reflected. Choose a basic GPT and press it once with the left key;
- Now click on the "Hard Disk" button, which is located at the top, in the header of the program window;
- A small menu will open in which you want to select the section. "Convert to MBR". Click on the command. After that, confirm the process by pressing the green tick in the pop-up window;
- A window opens with parameters and settings conversion. It cannot be changed in it (sometimes such an opportunity is present). Just click on the button "Convert" at the bottom of the window;
- Now the conversion process is running. In the window that opens, you can observe the process of a gray strip filling process with green. The process is not as fast as in the first case. Usually, the transformation by such a type takes a few minutes.