How to draw a drawing on the topic of winter winter. Unconventional equipment Drawing on the topic: Winter in kindergarten
In winter, adults and children spend a lot of time at home, so more opportunities appear in order to work in creativity. Winter is a very beautiful time of year. Try to convey the beauty of this season in the winter drawings. We will share with you simple drawing techniques, with which you can independently teach a child to draw beautiful drawings on the topic of winter. From this article, you will learn how to make a bulk snow paint, learn how to draw winter drawings in the spray technique. When drawing drawings on the winter topic, we will use all sorts of additional materials, and not just brush and paint. You do not even suspect that you can draw winter with a plastic film or salt, air-bubble film or shaving foam.
1. Winter drawings. "Volumetric Snow Paint"
If mixed in an equal volume of PVA and shaving glue and a shaving foam, then a wonderful air ink paint will be. She can draw snowflakes, snowmen, polar bears or winter landscapes. For beauty, you can add sparkles into the paint. When drawing such paint, it is better to designate the contours of the picture with a simple pencil, and then paint it already to paint. After some time, the paint will freeze, and it will turn out a bulk winter picture.

2. Winter drawings of children. Use tape in children's creativity
On the English-language blogART PROJECTS FOR KIDS it is shown how with the help of conventional tape or scotch you can create beautiful winter landscapes. Read more about this technique. See the article"Using tape in children's creativity" . Use: To create winter drawings in this technique, it is desirable to use dense glossy paper, with which it will be easy to remove the pieces of tape, without damaging the paper.

A. First, make a frame from the tape from the perimeter of the leaf. After that, cut the strips with uneven edges from the tape (wide - for trunks, narrower for the branches of trees). Stick them on paper. Cut and stir the moon.
B. Now apply dark blue paint. While the paint is wet, you can sprinkle her salt. Then interesting patterns will appear (than glossy paper, the more beautiful there will be divorces).
B. When the paint gets dry, shake the salt with paper, carefully remove the polenta.
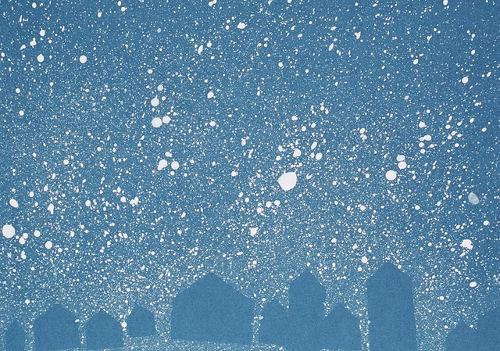
G. Blue paint Apply narrow shadow strips on the trunk and branches of trees, transverse stripes on trees trunks. With a thin brush or cotton wand, draw white paint or smear falling snow.
3. Winter drawings. Figures on the topic of winter
If the snow window, then you can depict it with a cotton stick.

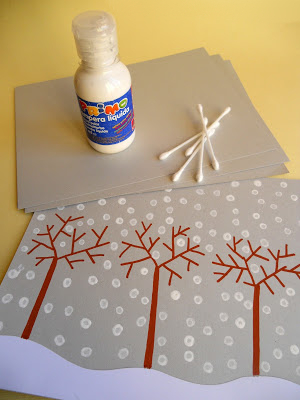
Or put it with a tassel on every twig.

11. Winter drawings. Figures on the topic of winter
An interesting idea on the topic of children's winter drawings offered by the author of the blogHomeschool Creations. . She painted snow on a transparent film. Now it can be imposed on any winter drawing or applique, imitating falling snow. They left the film on the picture - snowfall began, filmed a film - the snowfall stopped.

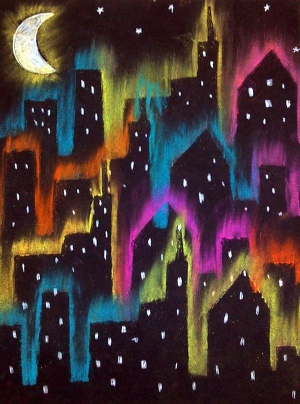
12. Winter drawings. "New Year lights"
We want to tell you about one interesting non-traditional drawing technique. To draw New Year's garland as in the photo, you will need a sheet of thick paper of dark color (blue, purple or black). You will also need an ordinary chalk (the one that is painted on asphalt or chalkboard) and still stencil bulbs cut from cardboard.
On a sheet of paper with a thin marker, draw the wire and cartridges for light bulbs. Now apply the stencil light bulbs in turns to each cartridge and boldly blaming it with chalk. After that, without removing the stencil, smear the chalk on paper with a piece of cotton or straight with your finger so that the rays of the light. You can replace the small color pencil graphite.


Not necessarily to use stencils. You can simply paint the light bulbs with chalk, and then neatly rub the chalk in different directions to make rays.

With this technique, you can draw another winter city, for example, or the northern lights.
13. Figures Winter fairy tale. Winter forest drawings
On the site already mentioned aboveMaam.ru. you will find an interesting master class on drawing winter landscapes using templates. You will need only one main color - blue, brush with a coarse bristle and a white sheet for drawing. When cutting templates, use the cutting method from the paper folded in half. Look at what a magnificent illustration of the winter forest turned out to be the author of the painting. Real Winter Tale!


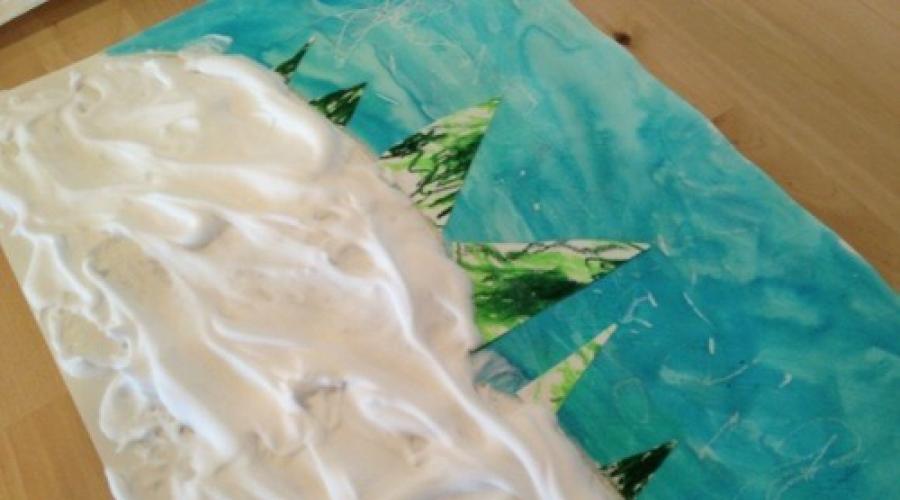
14. Winter drawings. Figures on the topic of winter
You probably will be very impressing to find out how a wonderful "marble" Christmas tree was drawn in the photo below? We tell everything in order ... To draw such an original drawing on the topic of winter you will need:
Shaving cream (foam)
- Watercolor paints or food dyes of green shades
- Flat plate for mixing foam for shaving and paints
- paper
- scraper

1. A uniform thick layer apply a shaving foam to a plate.
2. Mix the paint or food dyes of different shades of green with a small amount of water so that the saturated solution is.
3. With brushes or pipettes, you hammer the paint to the surface of the foam in an arbitrary order.
4. Now all the same tassel or a wand smeared paint over the surface, so that it forms the bizarre zigzags, wavy lines, etc. This is the most creative stage of all work, which will enjoy the children.
5. Now take a sheet of paper and gently attach it to the surface of the resulting patterned foam.
6. Put the sheet on the table. You can only scrape all the foam with a sheet of paper. For these purposes, you can use a piece of cardboard.
Just amazing! Under the shaving foam layer, you will find stunning marble patterns. The paint managed to quickly appreciate the paper, you just need to give it to dry for a few hours.
15. How to draw winter. How to draw winter paints
Finishing our review article dedicated to winter drawings for children, we want to tell you about another interesting way, how can you draw winter paints with the child. To work, you will need any balls of small size and a plastic cup (or any other object of a cylindrical shape with a lid).
We have the winter so dry that under the snow there will be pedestrian crossing transitions, and machines clearly need anti-gravity rims for flight over the level of snow. I'll tell you how to draw winter pencil. So many holidays and fun, first the Santa Claus will serve us with his big red cap, and his eternal girlfriend Snow Maiden also will not disappear, comes running all in the snow, late, as always. And we will just go out to the street, look at the snow, dismantled with snowballs, and it is already near the unknown snowbabs. Then let's go home, and there the entire table is covered, the Christmas tree sparkles the rainbow, who has a fireplace in the house - the luck is complete. There is no better time to get together with relatives or friends in cozy warmth, dream of summer, remember the past times. Let's try to draw one of the wonderful landscapes that can be seen in the winter.
How to draw winter pencil phased
Step one. I draw a long path leaving the horizon, right above it is small, but noticeable, the moon, and the horizontal line of the mountains will spend.  Step second. Create a small winter town. We need several houses with sharp roofs, a few trees and, in the very center, their leader is an unfounded and shiny tree.
  Step Three. Strikhum all mountain terrain on the background, as well as walls of houses and the trunk of each tree. In addition, we will add a small snowman on the right side.
  Step fourth. Now you need more lively painting. More tightly at home and mountains, sketch lines on a path, look more detail for each noticeable tree, and around the snowman will circle a small fence.
  Pitch fifth. Do not forget for the moon. We turn it into a small glowing ball in heaven, as well as end with matters on earth. And Dorisuham another big tree sticking in the upper right corner.
  However, those for drawing winter landscapes there is an infinite set. For it is enough to go outside and see the picture created for us by nature. Do not get sick and perfectly spend the winter time, do not forget about DayFun and continue to draw. On the page for comments, leave the wishes, I will always be glad to see you. Come more often. Some more interesting lessons specifically for you.
Oksana So
Hello, dear friends and guests of my page!
I bring to your attention a photo report with exercising on unconventional drawing on the topic "Winter"
"Penguins" - Ottisk Vegetables (potatoes)
Means of expressiveness: color, stain.
Materials: Potatoes cut in half, saucer with gouache, dense paper.
Method of obtaining an image: The child is dipping potatoes in a saucer with paint and inflicts on paper.
Flooring from potatoes - cut potatoes in half, make on the workpiece - a comfortable "handle". For each child, two seats are different sizes.
For those toned in advance, the lips are applied to the foam sponge snow, drifts. We make black prints, then white, then draw all other parts of the body, in the end you draw with cotton chopsticks snow.


If after the impression there are not scratched places, paint the tassel.


And also painted as last year, some works that very much like children (but already other children)
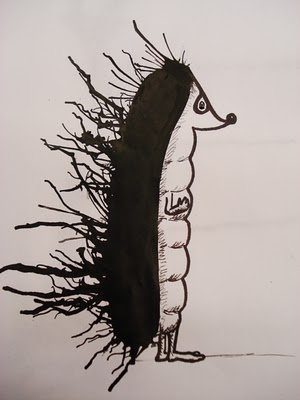
"Fairy Tree" In Mixed Technique: Tree - Cleaxography with a tube, snow - a stitch rigid brush, snowflakes - cotton chopsticks, owls - Finger painting
Objective: To introduce children with a new drawing of drawing - a kleaxography tube; Develop imagination, fantasy, interest in creative activity.


"Polar Owls"- technique of foam sponge


"Filin"- Palm painting

"Winter in the village"with elements of non-traditional drawing - cotton chopsticks.
Objective: Teach children to transfer the picture in the village in the picture in the village, fasten the ability to draw different houses and trees. Learning to draw different techniques using classic technique - brush, drawing with cotton chopsticks - Snow. Develop a figurative perception and figurative views, creativity.


"White Bear and Northern Lights" - Drawing with appliqué elements
Purpose: to clarify and expand the knowledge of children about natural phenomena of the Far North.
Learning to create a northern radiance image with watercolor - in the technique "on wet"
Consolidate knowledge of children about climate features;
Develop creative imagination, fantasy, small motorcy;
Continue to teach children carefully cut bears, pre-folding the sheet in half
Educate in children interest in natural phenomena


Publications on the topic:
Dear colleagues! We did not have time to meet the summer, as his golden middle came. Flowers are fragrant with their beauty and home,.
Unconventional drawing - consultation Unconventional drawing - art is depicted, not based on traditions. Drawing with unconventional methods, fascinating, fascinating.
Dear colleagues. Unconventional drawing - leads to the development of imagination, creativity. Each technique is a small game.
Topic: "Chicken" software content: Continue to acquaint with different ways not traditional drawing - finger. Move.
Drawing for children is one of the most favorite activities. There you can reflect everything - your mood, your impressions, desire, etc. and drawing.
"Reflection of trees in the river" (monotypia) Objective: to acquaint children with unconventional equipment of the image of the landscape - monotype; show her.
Learning to draw a winter landscape.
Huge white drifts, fluffy snowflakes, snow-covered trees - the beauty of the winter landscape inspires to draw such a picture not only professional artists, but also lovers.
About how to portray the winter landscape on paper, this article says in detail.
How to draw a beautiful winter landscape of nature with a pencil phased for beginners?
First of all, you prepare:
- Pencils of different colors
- Elastic band
- Pencil simple
- White sheet of paper for drawing
Getting to work:
- Making sketches of Sugobov
- Add a large oak outline, with squeezed branches

First step
- Near the majestic tree, throw three circles of different sizes as descending to each other. So we form the figure of the future snowman

Second Step
- Ening the snowman: I draw him eyes, nose, mouth, handles
- Head decorating a hat
- On clothes picked off

Third Step
- Draw a trough
- Put the birds there
- On the twig we will define another bulk

Fourth Step
- Draw the basis for Christmas trees behind the snowman, in the form of a triangle

Fifth Step
- Form beautiful branches on the Christmas tree
- Add a bright bullfiner

Sixth Step
- Back plan fill in the Christmas tree
- On the forefront put a fucking bullfinch

Seventh Step
- Erase the contour lines of the tree

Eighth Step
- Color branches ate with green pencil
- Blue color bite greens in a snow raid

Ninth Step
- Remove excess contours
- Draw a trunk of a tree with brown pencil
- Snow paint blue and blue flowers

Tenth Step
- Back plan fill in a blue-green palette
- Ate paint like already painted Christmas tree

Eleventh Step
- Oaks we will have brown, and the resilience will highlight the dark brown

Twelfth Step
- Pain the Sky Dark Blue Paluit
- Add volume with blue, lilac and purple shadows on snowdrifts and snowman

Latest strokes
How to draw a beautiful winter landscape of nature with paints, watercolor, gouache stages for beginners?
We prepare in advance:
- Watercolor paper
- Paletrum
- Beliches brushes, size 4 and 9
- Any paints
- Simple pencil
- Eastern rubber
Begin to draw:
- Simple pencil wealth all the details of the landscape
- On the trees we allocate fir paws
- Lines indicate the horizon and mountain hills
- The contours should be slightly noticeable. So that they do not shine when painting

- Now go to the most responsible stage - coloring
- Dilute blue watercolor water to a gentle blue shade
- Draw a brush of the sky
- On the raw drawing, add pink and yellow shades in the sky
- We get smoothly passing, from one tone to another, heavenly background
- A little dried leaf

- Mountains and drifts, on the left side, illuminate sunlight. To do this, mix the yellow paint with water, and make a soft shade, as shown in the picture

- Blue paint color hills, and partially foreground
- Blue with blue cloths under the trees. After all, there can not be reached the winter rays of the sun

- Pale okra and gently pink tones Snowball Snowballs on the Christmas trees that are illuminated by the sun on the left side
- On the right side of the branches will make cold blue shades

- Add greens on branches free from snow
- Dropped places make dark green, sunny - on tone lighter
- Thin brush draw the details of the christmas trees. To do this, take a gentle green palette
- In the foreground, draw thin branches of the shrub. We do it with a tight brushes
- Dark blue shadow places under the tree. Some places add mixed green and black colors

- Dorify the contours of the branches with dark green

- Add density shrubs

- We plan a brush that is muted, the green mass of trees behind the big firs
- I compare it
- Fill in the clean sky flying birds

Video: Draw a winter landscape of gouache
How to draw a light landscape in winter pencil for beginners?
Even children of preschool age will cope with these drawings.
- Making sketches of snow hills. Lines can be arbitrary shape, because the drifts do not have strict boundaries

The first strokes
- Duplicate the outlines of the submissions of the second line to give volume

Add airiness snow
- Draw contours of simple trees, along the snow hills

We plan the main elements
- We write shaggy celestial clouds
- Small strokes, in the foreground, give pomp snow

We complement the landscape
- We erase extra lines
- Complete clear contours drawing
- Color drawing at your discretion

Give colored brightness pencils
Video: How to draw a winter landscape with a pencil and a swirl?
Simple and lightweight and beautiful winter scenery: drawings for drawing
If there is a certain drawing experience, take beautiful pictures as the basis, and just draw them.
Snowfall

Easy landscape paints

Starry sky in a forest village
- Step-by-step drawing lessons make it possible to get the first skills without much difficulty.
- With the help of simple drawings, you can create a postcard with your own hands, and give mom's gift.
- And if the drawing turned out to be very successful, then you can put it on the contest.
Video: Winter Landscape
Already painted +5. I want to draw +5. Thank you +. 37
Winter is a very cold time of the year. It is impossible to say that it is not as beautiful as spring, summer or autumn. Winter has its own features and beauty. Snow-white drifts, crisp snow under legs and small snowflakes, which fall straight from the sky. Well, isn't Charm? Today we will be in the village in the winter season. The frozen river, the roads are covered with snow, small houses are in the distance, and behind them the silhouettes of the winter forest. This lesson will answer us the question of how to draw a winter landscape.
Tools and materials:
- White sheet of paper;
- Eraser;
- Simple pencil;
- Black pen;
- Colored pencils (orange, brown, blue, blue, dark brown, green, dark yellow, gray).
Draw a winter rustic landscape
- Step 1
In the middle of the sheet we draw two houses. It should be borne in mind that they will be in the background, so we make them small. On the right there will be more than the left, and has a window. They will stand in the snow, so we draw a slightly wavy line.
- Step 2.
Silhouettes of bushes and trees are visible on the sides of the houses. On the right of the house there will be two trees on a high and thin trunk. The horizon line is wider.

- Step 3.
On the background add silhouettes of trees. We make them different, but the edge of the trees should decrease. A little draw the foreground, making a small recess.

- Step 4.
In the recess in the middle, draw a small fence, covered with snow. We add drifts on the sides. The center will be placed river, so in this area the drifts should decrease. And in the very center of the river (and leaf) there will be a large stone.

- Step 5.
In the foreground on the sides of the snowdrifts will be visible trees. They will be absolutely bald that only the trunk and branches are visible.

- Step 6.
Black handle draw contours. Do not highlight the black handle only the background of the pattern on which the forest is located (at home).

- Step 7.
The front of the houses make orange. Side and under the roof Draw a brown pencil.

- Step 8.
Under the house I drew blue and blue snow, adding a frosty tint to drawing. The middle of the drawing will be blue, and the edge is blue.

- Step 9.
Trees, hemp and fence need to draw brown and dark brown color. On the right side of the trees add an orange shade.

- Step 10.
River Make the middle of the blue, and closer to the ground - blue. Snow in the foreground Draw gray to give it volume.

- Step 11.
Forest on the background of the pattern Draw three flowers - gray, dark yellow and green. Color Apply, without specifying contours. Since the trees are in the background, they will be blurred a bit.

- Step 12.
We refine the drawing by adding a blue color to the sky. Now we know how to draw a winter rural landscape.

How to draw a simple winter landscape with a pencil phased


Draw a winter landscape with a Christmas tree and a snowman
- Step 1
At first, with the help of light pencil lines, mark the approximate location of all objects on the paper sheet;

- Step 2.
Start drawing a winter landscape in more detail. To do this, first outpace birch branches, and then draw the outlines of the forest away. Load the house by portraying it the roof, pipe and windows. Draw a path leaving in the distance;

- Step 3.
Next to birch, depict a Christmas tree of small sizes. And on the other side of the road, draw a snowman;

- Step 4.
Of course, understood how to draw a winter landscape with a pencil, you should not stop there. It is necessary to paint the pattern. Therefore, outlines a laundry landscape;

- Step 5.
Using eraser, remove the original sketch;

- Step 6.
Christmas tree paint the green pencil. Barza Barza Share. Strips on birch, as well as her branches, cover with a black pencil;

- Step 7.
Forest in the background. Take the green, and the house - pencils of brown and burgundy colors. The windows are filled with yellow. Smoke shadow gray shade;

- Step 8.
Coloring a snowman using a variety of tones for this pencils;

- Step 9.
Personal snow with pencils of blue-blue shades. Yellow stroke those places where light falls out of windows;

- Step 10.
Pencils of gray tones fasten the sky.

- Step 11.
Figure is completely ready! Now you know how to draw a winter landscape! If desired, it can be paint and paints. For example, for this purpose, the gouache or watercolor will fit perfectly! Also, such a drawing can be drawn with a simple pencil by applying hatching. True, in this case, it will not look so bright, festively and impressive.

Draw a winter landscape with a lake

How to draw a winter forest landscape
Each day of the year, the forest is converted. In the spring, he begins to revive, shelting trees with young foliage and melting snow. In the summer, the forest fragrant not only with flowers, but ripe berries. Autumn paints forest trees into various warm colors, and the sunshine lands the last rays. Winter offets the branches of trees and shelters a white snow cover, freezing rivers. It's hard to keep in order not to pass this beauty in the illustration. Therefore, today we will choose the last course of the year and learn how to draw a winter forest landscape with color pencils.
Tools and materials:
- Simple pencil;
- White sheet of paper;
- Eraser;
- Black helium handle;
- Black marker;
- Colored pencils (blue, orange, blue, gray, green, green, brown, dark brown).
- Step 1
We divide the sheet into four parts. First draw a horizontal line in the middle of the sheet. In the middle of the horizontal line, draw a vertical cut.

- Step 2.
Draw the background part of the picture. On the horizontal line, we draw two mountains (the left will be more right.) And in front of them will make trees silhouettes.

- Step 3.
From the horizontal line, we retreat a small portion down (the river will be here). With the help of the line curve, we draw the land, or rather, a break.

- Step 4.
We retreat even down and draw pines. Their feature in the long trunk and thin branches. At the base of the trunk will add small drifts. Trees left have some foliage.

- Step 5.
In the foreground, draw a deer. An animal should not be too detailed, because the main task of the drawing show the winter landscape. Add more snowdrifts in the foreground.

- Step 6.
Circuit contours of the picture in the foreground with a black handle. On the branches of trees will be snowing.

- Step 7.
We begin to draw color from the background part (from above). We define that there will be a sunset, so there is an orange color between the mountains, add blue and blue. We make transitions between flowers smooth, applying upwards. Mountains will be gray, but correct the contrast by press. Trees in front of the mountains are made in monophonic green.

- Step 8.
For the river we use the usual blue and blue color. Closer to the mountains add green and gray shade into the water so that it looks more picturesque.

- Step 9.
The trunk must draw using orange, brown and dark brown. Trees on the left have a few sheets that make green.

- Step 10.
Add shadow from trees with a gray pencil. A little let the cold drawing drawing the foreground with a blue color.

- Step 11.
Body deer covered brown hair. And between the snowdrifts add a blue color. So we learned how to draw a winter forest landscape.

How to draw a winter mountain landscape in phasing
Often you can see incredibly beautiful mountain landscapes on postcards or find a similar on the Internet. Strains the stone giants, covered with snow. At their foot, there are blue spruce frozen from the cold. And around neither the soul, only blue snowy flicker. Is it possible to keep in order not to go to the lesson and learn how to draw a winter mountain landscape with a pencil phased? The lesson is perfect for novice artists who will be able to portray this beauty of the icy mountains from the first time, if they closely follow the stages.
Tools and materials:
- White sheet of paper;
- Simple pencil;
- Eraser;
- Black marker;
- Blue pencil;
- Blue pencil.
