How to draw autumn leaves. How to draw autumn leaves with a pencil? Dorisuj leaves
Reading time: 3 minutes
Almost everyone, without exception, the children love to draw, but many parents because of their own laziness and excuses like "dirty himself and everything around will", "I do not know how to draw to show the sample, as you need to do," "he is too small These colors do not give the kids and paints, and sorry ... We hope our marathon of children's drawings on the autumn theme will inspire the work of all without exception. There is from what to choose, dear creators!
We tried to collect the most and ideas for drawing for you, more interesting to organize the child's leisure when it is time for rains, "sad charm" and sitting at home. The ideas of what you can do at home with a child in bad weather read.
Idea number 1

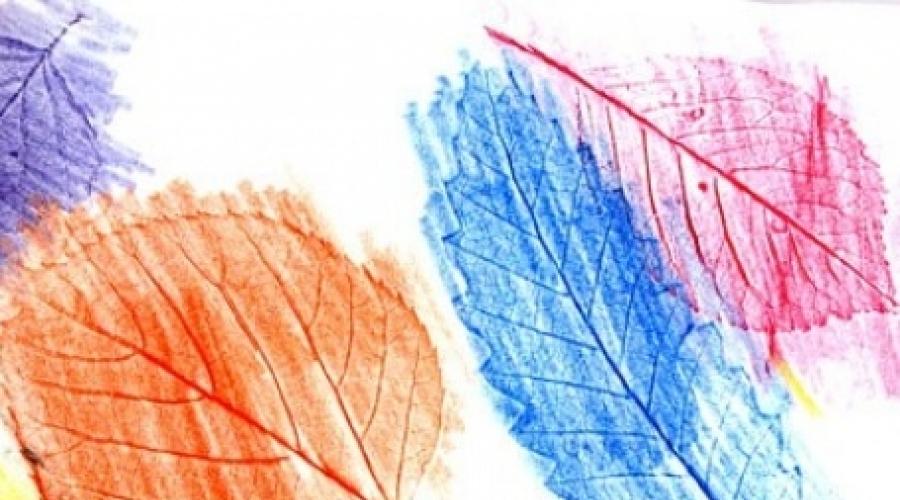
You need to attach dried leaves between sheets of paper, and then paint the sheet with solid strokes with soft color pencils or chalk. A sheet with all the streaks will appear on white paper. Using this method, you can compose compositions: a bouquet in a vase, autumn landscape, etc.
Idea number 2.

A similar way, only the leaves need to grasp wax (a candle or white wax shallow), and then covered with a watercolor sheet of paper. Large planes are conveniently painted with a wide squirrel brush or a foam sponge.
Idea number 3.

Paint is applied to the leaf from the resumption. Then the sheet is applied to the paper and the imprint is made. The effect will be different, depending on which paint to use.

You can come up with a lot of composite solutions: a large leaf imprint can become a crown of wood, if you draw a trunk; Several prints are a whole forest!

Speecually looking outprints made of white paint on a colored background. You can combine several techniques, draw the image with pencils or wovers.

Idea number 4.
 kokokokids.ru.
Blowing out the paint through the straw can be painted bizarre trees. This method gives limitless features for experiments! You can, for example, draw trees on a predetermined background.
Idea number 5.

Baby pour the background yourself or offer color cardboard. The crown of the tree and the fallen leaves let him draw a flip finger in the paint.
Idea number 6.

Croon looks like, if you make it cleaning from color pencils. Take the glue into the right places and sprinkle with small chips. The barrel and branches can be blown through the tube or draw in any other way.
Idea number 7.


Conveniently (and completely neado) draw the crown with a cotton waller. In the same way, you can depict the row of rowan, currant twig or other berries.
Idea number 8.

Very unusual picture can be made using foil. On the cardboard sheet, lay a jumped leaflet (you can somewhat) with streaks up. Cover it with a thin foil and carefully, so as not to break, scream with your fingers to stick out the drawing. Cover the dark paint foil (you can use the gouache, acrylic, Tepe, mascara) and let it dry well. Very carefully, sweat the picture with a rigid washcloth washing. The protruding bodies of the leaflet will be slaughtered, and in the recesses there will remain dark paint. Now you can make work in the frame!
Idea number 9.


Those who love invoices will probably like to fill various silhouettes with patterns. Draw or circle an autumn leaf pattern, divide it into small planes as stained glass. Let the child fill each piece with different pattern. You can do it with a gel handle, markers.

Idea number 10.
A similar task can be performed in the technique of routine (scratching). A sheet of smooth (rosged) cardboard paint and grasp wax (candle). You can use wax chalk background. Cove the surface with black ink and dry. Scratch the drawing with a sharp object.
Idea number 11.
Using a rigid bristle brush or toothbrush, make a spray paint. This method is suitable for drawing the crown of trees, creating compositions based on plant prints.
Drawing is a fascinating and useful occupation, which not only develops your artistic taste, shallow motorcy and logical thinking. The creation of even a simple drawing trains memory, increases attentiveness and develops imagination.
Autumn time is pleased with us not only rich harvest, but the riot of paints. Bright decorations that are "dressing" trees, few people leave indifferent. Save the autumn particle and on the winter day will help colorful images of autumn foliage. How to create them?
Draw autumn leaves: Maple
To obtain a maple leaf image, you can use multiple receptions.
Scheme 1.
- Draw oval.
- Cut the vertical line separating the image in half (line A).
- On each half, you pave 3 lines, dividing each of the sectors to 4 unequal parts. All lines come out of one point located in the lower third of the line A.
- With the help of chaotic teeth, connect the intersection points of the lines and oval.
- The bottom third of the lines and turn into the base of the sheet.
Scheme 2.
- Works start with the drawing of the leaf of the sheet - the central line and 2 side, overlooking it.
- Then proceed to the contour in the form of a toothed line that makes a short distance from the streak.
- Add smaller details.


Scheme 3.
- Picture a square with a focus on one of the vertices.
- Vertical line divide it in half. Line continue a little down the square.
- At each of the half, depict 3 accommodation.
- Around each of the resilors draw soft teeth.


Draw autumn leaves: oak
Scheme 1.
- Start with an image of an oval, narrowed on one side.
- Through the middle of oval, spend a winding line, and from it - smaller strokes.
- The wavy line draw up the edge of the sheet (within the oval).
- Excess contour remove.


Scheme 2.
- Draw the contour sheet in the form of an elongated hexagon.
- Separate it in half and from the line of the middle, spend smaller streaks (3-4 on each side).
- Around them form a wavy contour.

Draw autumn leaves: Lipa
Lime sheet is one of the most simple graphic images.
- Cut the vertical, but with a slight inclination, the line is a central venue.
- From it you do 2 - 3 strokes on both sides. From them you can spend even smaller bodies.
- Decore the contour of the leaf in the form of a rounded triangle. In the place of attachment of the tail contour of the sheet, depict in the form of 2 converging arcs.


Unusual autumn leaves drawing
Stencil
- On the working surface, lay the autumn sheet.
- Put the paper on top of it.
- Tight pressing paper, light strokes pass over the surface of a wax chalk sheet.
- You will see how not only sheet contours are manifested on paper, but all its streaks.


Lady print
If working with a pencil bought and want to master new techniques for creating autumn motives, prepare foliage and paints. It is best to work with a gouache, but if it is not - watercolor is also suitable for these purposes.
- Apply the paint to the sheet, pay special attention to the living. Use several colors to get brighter and bizarre patterns.
- Combine leaves make a mark on paper.
If the leaves are large enough, then you can get not only colorful foliage, but also whole trees.

As you can see, draw the leaves is quite simple. A little patience and skill and autumn paints will burst bright fireworks.
1. When drawing leaves, please note that the vein goes into a stalk. Note also that the average vein of some sheets divides them exactly in half.
To draw a sheet, first draw oval. Then swipe the middle line and slightly take both halves. Check the drawing accuracy, and then draw half more clearly. Now add cloves on the edges.
Coloring sheet, remember that the veins are lighter than the leaflet itself.
2. Oak leaf can be started to draw with a narrowed book oval. In the middle of the oval passes a vein, turning into a sheet of sheet. The edges of the oak leaf remind the waves. 
3. Drawing the maple leaf will begin with the display of its shape. Then you need to find the knot of all vehicles of the sheet (the maple leaf has five major veins, around each of which is a separate leaflet) and outline their direction. Then draw the toothed edges. 
4. Now let's try to draw a branch with leaves. First consider it: how much the leaf on the branch, as they are located relative to the branch, what size they are, whether they are all visible entirely, what the leaves have a form, what leaves seem darker, what are the lighter, the same color leaves? Having answered these questions, proceed to the drawing in the first diagram.
Getting Started by the second stage, trace the direction of veins and edge zagnin on each sheet.
Painted drawing, display with light and shadow volume and color of leaves. 
5. Drawing of wood needs to be started from the barrel. The trunk is the thick of the tree. From above, the trunk is thinner, and below is thicker. The branches are located along the barrel and are directed upwards. The closer to the top of the tree, the shorter the branch of the tree.
After the trunk, we draw large branches of the tree. They are drawn just like the trunk: at the top thinner, closer to the barrel - thicker. The branches on the trunk are at different distances.
Then draw small twigs that depart from large. A lot of them. Small branches are drawn the same thickness - they are thin, but also many trees stretch up. 
6. One of the common trees with us is birch. Before drawing it, look carefully on it. A feature of bark branches is that they are pretty thin, bend, hang down, and the branches are softened to even thin twigs. In the wind, the bark branches swing from side to side. 
7. Silhouette of the tree resembles a triangle. Drawing it, it should be remembered that instead of the leaves of her needles. 
8. When drawing trees in the landscape, it should be noted that being away from the tree, we see only its shape, which you need to portray. 
A detailed lesson will help you learn how to draw leaves in a phased pencil. Leaves are an indispensable element of any summer or autumn landscape. Nature on our planet is incredibly diverse, and therefore there are many varieties of leaves, so they are always very interesting to draw them. Drawing leaves is quite simple, if at your disposal there is quite a bit of time, as well as suitable materials. We will show how to draw the leaves with a pencil in stages. Try to draw with us, and you will also like the process, and the result.
A simple way to draw a maple leaf of 6 steps:
Draw a simple autumn leaf. This lesson will be useful if you draw a detailed tree. Please note what colors we use and what are their transitions.

Draw a oak leaf in four simple steps. Here it is not even necessary to use the eraser, so simple!

And now - more detailed lesson on drawing leaf.

So, to draw the leaves, we need a blank sheet of paper, a simple pencil and eraser. First of all, we will make a sheet, depicting the foundation so that in the future it was easily and convenient to draw. In this case, we draw a beautiful maple leaf, so the base will look like this. You will need only four lines to draw the basis for the sheet.

Now we need a sheet form so that further drawing is taken carefully and beautiful. Focusing on the previously shown lines, we begin to emerge the cone-shaped figures, we all should have five.

Next, begin to draw the contours of the sheet over the sketch. The bases of the foundation must be barely noticeable, otherwise the pattern of leaves will be dirty and ugly. The gear outline of the leaves draw quite easily if you try. If it does not work first time, use the eraser, you can practice on the draft, until it starts to go pretty.

Gradually draw the entire contour of the leaves. You should get something like this. Next, it will be necessary to arm the eraser again and remove all the extra lines, leaving only the contour.

In order for drawn leaves to look natural, you need to draw a twig and bodies. Residents will not be smooth, so just draw from the hand, it is not worth using a ruler.

The final stage will be coloring. You can draw leaves using color pencils, watercolor paints, gouache and other materials, you can choose exactly those you like more. As a result, we got like this.
The following picture shows how to draw beautiful tropical leaves in the shape of a heart.
- First draw the basis reminiscent of the heart. In the middle, we draw it line.
- We start drawing edges. At the edges of such tropical leaves there are excavations, they must be denoted.
- Residents draw a double line, here they must be neat and repeated the form of the sheet. Also, I add a few holes on the surface of the leaves.
- Coloring drawn leaves in a tropical style. I use a turquoise-green cold shade, you can get it, mixing green with blue. At the edges I add warm shades - they are easy to get, mixing yellow and green. Do not forget to leave holes impaired.

There are many more ways to draw leaves. For example, if you are quite a beginner, you will like the doodle technique. For drawing such leaves you need paper and handle.

By the way, there is an interesting method of staining with color corrugated paper. It is necessary first to draw the leaves on paper at first a white wax shallow. After that, pour into small pieces of corrugated paper of autumn colors (red, yellow, orange, brown) and, well wetting every piece in water, stick them into a drawing. Watch that there are no two pieces of paper of the same color. Let the paper dry a little (but not to the end!), After that, remove it from the picture. You will have a wonderful multicolored background. Leave the work to dry finally, then put it under the press.

Method 2.
An interesting autumn handicraft will turn out if leaflets put under a thin foil. Foil at the same time it is necessary to place a brilliant side up. After that, you need to carefully smooth out the foil with the pads of the fingers to stick the drawing. Next, it is necessary to cover it with a layer of ferrous paint (it can be gouache, mascara, temperatures). When the paint is driving, very carefully pull the picture with a metal washcloth with a metal washcloth. The protruding bodies of the leaved at the same time will be slaughtered, and dark paint will remain in the deepening. Now you can stick the resulting relief on the sheet of color cardboard.

Autumn leaves. How to draw autumn
Method 3.
Very simple and at the same time spectacular technique - to print the leaves on paper, which is pre-applied to the paint. You can use the paint any, just apply it to the one side of the leaves, where the accumulation is attracted.

Link
Here is the prints of rowan leaves. And any kid can draw the berries of Rowan - they are made with a cotton wand with red paint.

Link
Beautiful autumn pattern will succeed, if on a sheet of dark color cardboard prints leaves white paint. When the paint is driving, you need to paint with colored pencils. It turns out beautifully if some leaves leave white.


The background can be left as it is, or to make color, coloring with paints with a sponge. At the same time it is necessary to leave a small incentive space around the leaflets.


If you decide to make the background with color, then the leaves themselves can be left white at the same time.

How to draw autumn leaves. Autumnal crafts
Method 4.
To give the volume to your drawings, you can take advantage of the following interesting technique. You will need fine wrapping paper or corrugated paper white.


Method 6.
Another original autumn drawing, made in warm and cold colors. The leaves themselves are drawn in warm colors (yellow, red, orange), background - in cold (green, blue, purple). To perform this work you will need a circuit.

1. Draw several leaves of different shapes on paper.
2. Now with a circulation, draw a circle of a small radius in the lower left corner of the paper sheet. Next, adding approximately 1 cm., Draw the circumference with an increasing and more radius, as far as the zirkul will allow.
3. Now all the same do in the upper right corner.
4. Finally, spread the autumn leaves with markers or pencils in warm colors (colors must be alternating successively), and the background - in cold colors.
Maple Leaf. Maple leaf pattern
Method 7.
Help the baby draw on a sheet of paper maple leaf. Divide it by streaks on the sector. Let the child color each sector of the leaflet in some special pattern.


You can combine two ways.


Autumn crafts for children
Method 8.
Another unusual autumn drawing.

1. Draw on paper leaves of different shapes. They must occupy the entire sheet of paper, but not touch with each other. Part of the leaves should begin with the borders of the paper sheet. Draw only contours of leaves, without residence.
2. Now, with the help of a simple pencil and ruler, you will read two lines from left to right and two - from top to bottom. Lines must cross the leaves by sharing them on the sector.
3. Select two colors for the background and two colors for leaves. Color them into selected colors in such a way as in the figure.
4. When the paint snacks, circle the outline of the leaves and the fired lines with a gold marker.
Figures on autumn
Method 9.
For the manufacture of this autumn craft, you will need a regular newspaper and paint (including white paint).
1. Draw on a newspaper sheet maple leaves.

2. Collect his paint and, after the paint dries, cut it out.


3. Take another sheet of newspaper and white paint. Draw and fidgeted a large square on it.

4. Enter your sheet on the paint and wait until it dry out.

5. That's what you should get in the end!