Like watercolor draw flowers. Phatepno
Kasatat, Cockerel, Royal Lily is all about him, about gentle and mysterious Iris. Learning to draw your favorite flower of gods and kings.
Before drawing to drawing, look good for your floral model. Pay attention to the location of the petals. Three stretch up, forming a kind of tube around the core. These petals are called standards. Three lower, large enough, the petal with a bend descend down. These petals are called fouls. Each foul has a kind of beard from thick Village at the base. For the lower rods of irises, the presence of dark thin veins is characteristic.
The leaves have a sword-shaped, flat and long. Stem smooth, high.
Determine for yourself what basic geometric shapes (circle, oval, rectangle, triangle) You are guessing in the outlines of the flower.
Option 1
Let's try to draw a single flower.
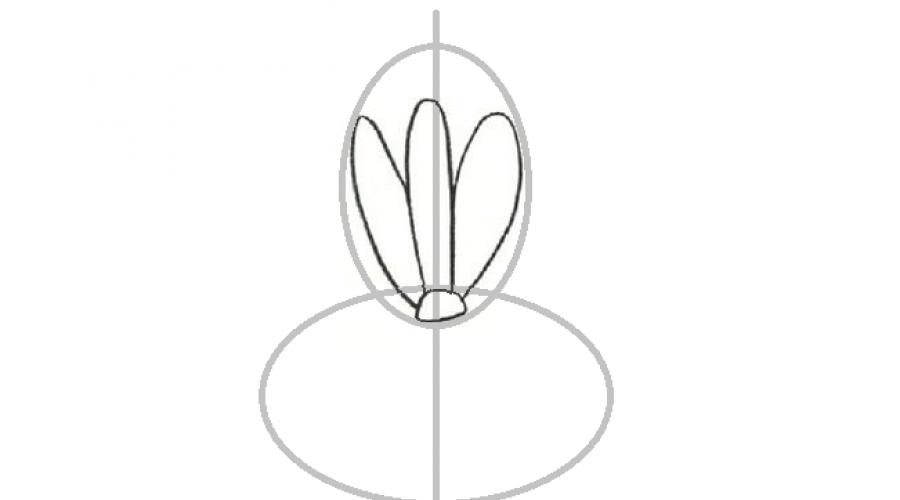
Draw two oval, placing them as shown in the photo below. Be sure to spend the vertical axis of symmetry. Lines must be thin and easy, it is easy to wear it easily. These lines will draw up the borders of the future drawing.
In the upper oval, draw three standards. Drawing Start by drawing a central petal.

Draw two elements creating a beard effect.


Focusing on the auxiliary lines, draw two side petals.


Draw the lower central petal, stem and narrow sheet. Erase the auxiliary lines. Color the drawing at your discretion.


Option # 2.
If you disassemble the previous drawing technique, it means that it is completely mastering and the technique proposed below. Thanks to carefully drawn petals, Iris looks more naturally.


How to draw a bouquet of flowers of irises with a pencil?
Using the hints and techniques described at the beginning of the article, you can easily draw a few irises, making a gentle bouquet of them.
Option 1
Think over the future composition. With the help of light lines, make a drawing sketch. Working on drawing flower petals, do not forget that Iris is far from perfect symmetry and it is in this charm.


Be careful, working on drawing details. Do not forget about the characters characteristic of Iris and residents. Do not neglect the application of the shadows. The presence of shaded sites will add the drawing of depth and contrast, make it more alive and voluminous.


Option # 2.
Below is another, simple enough, the way to draw beautiful irises. Pay attention to the color solution of the pattern, because the irises is characterized by a constant movement of color.

How to draw a flower Iris watercolor in stages?
Irises and watercolor are created for each other. Professional artists claim that it is difficult to work with watercolor, however, how to draw irises. However, this article is designed for those who make the first steps in visual arts, which means the techniques that are offered to the reader do not require a high professional level.
Important: Use appropriate paper to work with watercolor paints. Ordinary album sheets are not suitable, because, watercolor paper has a rough surface and is better holding paint.

 Watercolor "Irises"
 Think your composition. If necessary, make a light sketch, indicating the colors heads, stalks and leaves.
Determine the color gamut of the future drawing. The specks on the diagram below are ideal, from the point of view of professional artists, combinations of colors.


Watercolor loves water! And even special sheets of paper are prone to deformation in the process of drawing. To minimize the effects of deformation, the sheet should be fixed on the surface with painting scotch (around the perimeter).
Well moisten the watercolor sheet using a spray gun.

Excess moisture remove with a clean sponge. Look carefully on the surface: the sheet should not shine. If you notice the shine, getting blocked the surface with a sponge again.


Start drawing. Write easily, without effort. The paint will divert softly, creating a blurred edge.


Having mastered the technique, proceed to creating a masterpiece.


Give the drawing to dry.
Draw contours and details with a head handle or a special liner, if you see the need. Several clear lines in the picture below turned blurry watercolor blots into elegant flowers.

 Watercolor "Irises"
 "Wet" technique does not limit the flight of fantasy and allows you to create unique floral images.

 Watercolor "Irises"
 The combination of wet and dry equipment gives stunning, in their realism, images.

 Watercolor "Iris"


To minimize the effects of deformation from moisturizing and subsequent drying, a sheet lock on the working surface by painting tape (around the perimeter).
Make a light sketch, noting for itself location, shape and size of colors. With a waxy pencil, hover the contours of the image. Lines must be thick and clear. Their destination is not to give paint to spread and save the boundaries of each individual element.

Draw the leaves and stems (wax pencil).

Lightly moisten the middle of one of the petals with brushes and clean water. Color the petals by working with two combined colors (see the scheme above). As a result, you will get a beautiful and natural gradient inherent iris. Purple and blue paint are used in the photo.

No painted areas of petals Moisten with clean water. Coloring pale yellow or lemon watercolor. Closer to the base of the petal thin brush drip the colors of the colors of the ocher. Wet watercolor will start moving, creating an interesting transition. You can also strain yellow. Color leaves. Give the drawing to dry. Draw fine veins on the leaves.


Gently toned background. And draw thin veins on the petals.

Video: Iris Watercolor. Detail video Tutorial. Lesson. Iso-studio Tuta-ka!
The end of May is that it's time when nature has already come to life after a long winter sleep and now begins to bloom, illuminating the world with paints. At this time, there are many sources of inspiration everywhere, you need to capture everything that you see. Below you learn how to display a watercolor world as you see it with all the accuracy and brightness of shades. We will learn on this bouquet of tulips, which can be found in the spring in almost any house. 
You can take other flowers that like. The main thing is that the bouquet is alive and "juicy." Always draw from nature - so you can fully see even the smallest changes in shades. From this lesson, take into the piggy bank of your knowledge of the principle of work in order to understand in the future, how to create similar images.
The scheme of our work will be divided into several stages:
Sketch
Light
Watercolor test
Figure itself
The sketch is very important when painting watercolor, because it is on it all the image is based on it. In our example, watercolor paper was used, which allows "play" with shades, due to the fact that the paints dry out longer and it is interesting to mix several different colors. Learning simple techniques for drawing flowers with a pencil:
Place the position of all the flowers from the bouquet on the paper. We try to gently convey at least the general shape of each of them. Proportions Keep at the expense of the sight method. To do this, take a pencil, put it on an elongated hand horizontally and measured the width of each bud. After that, we put the pencil vertically and look at how many times the width is in length. Thus, the size of the buds will continue, the drawing will acquire realistic. Our flowers are still circles and ovals - do not focus on the details. 
Carefully consider flowers, count the petals, turn a look at the structure of the cups. In this case, we have 4 red-orange tulips with folds in the middle of smooth petals and 1 yellow with fringe at the edges. On the red bunches of the petals are located in one layer, overlooking each other in a circle, they bloom in two rows. 
We begin to draw parts from the "bones", around them we build the petals themselves. Such buds look like hexagons. From the "guides" will depend, in which direction one or another leaf will be bent. All our tulips are different, because we draw each individually. Remember that depending on the time of day and temperature, flowers can change their shape, so do not stretch the outline for several hours. The bloom phase is also important, so it needs to be able to properly display. Our bouquet has a very successful three buds located at different phases. 
The lower yellow tulip we display the disclosed so that not only petals are visible, but also the inner part with stamens. 
It remains to trim the leaves. For all the hours of work, do not overdo it with the eraser so that in the future the watercolor does not roll in the "Substigi" places. 
You can immediately start applying paint, but we recommend that you first make two small sketches on small pieces. The first will display how the shadow falls - it will be easier for us to distribute the paint in the desired way: 
Next, watercolor determine which colors are suitable for our big creation, and which you can immediately reject. To do this, draw something about such a picture, without accuracy and additional details: 
In the color of the sketch, it is important to see how the background will look like, whether it is worth it brighter or darker. Determine the darkening rate on the shadow sides and the brightness of the flowers themselves. After this work, you can safely take watercolor paper and be taken for the drawing. Choose better imported cotton paper, not smiling artificially. It has a grayish shade, compared to a conventional sheet. On the white wallpaper, however, it will not look in the best way, so it is preferable to choose another background for your masterpiece.
Distinctive features of watercolor paper in its heterogeneity and the rate of drying moisture. While one layer is not drying, you can still wash a few more tones, which creates volume. For example, the petal is poured with a yellow-green mixture and carefully drip over the scarlet, and the bottom of dark green paint, we sneak a little. 
Also pour each petal on flowers, we undress, distribute the shadow. The heterogeneity of the tones will only emphasize the realism of the drawing. 
Single-layer technique makes the drawing alive and bright. Look at the unscrewd bud - you agree that such a huge amount of shades can create only nature and ... We: 

While the buds dry, write one leaf. We mix green tones and experiment with brightness. While the watercolor did not dry, you can notice such a beautiful shine: 
Now go to the central orange-red flower. Fill with background color - in this case, rich in yellow, then draw red streaks, mix the paint to create overflows. 

We emphasize the shadow on the right side by light cold shades. Stem flooded with light green paint, and a dark shadow we carry out a thin tassel. 
The second sheet is starting to fill from the outside, then go to the darker inner. Plots for convenience can be divided into as many fragments as far as it is convenient for you. 
We proceed to work on the left blossomed tulip. The most jewelry work is a middle, we leave finally. 

In the process of work, your table may look something like this: 
It is important to determine where what petal to individualize each fragment. Please note where the edge is brighter, and where it has dimming. 
Visitally revive our flower with stamens. Yes, in nature they are black, but we depict them Umbra. Each stitch refers to his petal, and the pestle in the middle complements the composition - they draw it especially thoroughly, we follow, but we act carefully so that there are no stains. 
Next to the queue is the most beautiful and catchy - yellow flower. The core of the lower row is separated by dark shades - this is not a shadow, but part of the petal, so we express it especially neatly and accurately. We decide on the edges of orange paint so as to emphasize the whole range of colors on a separate leaf. 
The second row is darker, add a little more reddish warm shades. 
Gently highlight the core: 
Now it's about the leaves. You need to portray them as accurate as possible. We pay attention to the incident light, emphasize the reflections on glossy surfaces with neat lines. We undertake the resulting parts and combine different colors. 

Now a few tips, summarizing our large master class:
More samples. Use different paper, brushes, combinations of colors and brand of paints to find those that you will continue to use in the future.
Whatever paper, create on it that you are, so only from you and your mood depends on how original and bright will be your work.
We start drawing colors we are always with sketches. We summarize them to simple contours, and inside the geometric figures already enter the details.
Carefully look at every flower separately. The task of the artist is to study the object of his inspiration, notice the smallest game of light and natural overflows of tones.
We definitely do the shadow and watercolor sketches to "scatter" the shadow on the future "finishing", and not to be mistaken with tones.
We emphasize your attention on the structure of items that we draw. It is the "anatomical" details often become the basis of the design, as the core of our petals, for example.
Do not be afraid of heterogeneity and stains - imperfections are often a sign of realism, and absolute symmetry and uniform tone eliminate in the drawing of the liveliness.
Drawing watercolor - a fairly complex technique requiring thoughtfulness and accuracy. Unlike oil and gouach, it does not forgive misses. But as amazingly beautiful landscapes and paintings written by watercolor - they are like air and light! You need to master such fine technique gradually. Learning to draw watercolor flower is not so difficult, and it will be an excellent start of a long and interesting way.
Choose accessories
Watercolor paints are best choosing based on beeswax. Only they will provide beautiful bright colors, and they are actually inexpensive. To learn them on the shop window, you need to carefully examine the cover - "Honey" should be on it.
The next step is the choice of brushes. This is the main tool that depends on how paint will fall on paper and how much the result will match the planned. The optimal option for watercolor - brushes made of protein wool. Why? They are very soft and perfectly pick up paint. The tip of the brush should be pointed. It is important to pay attention to how well the wool is fixed at the base. To draw flowers in watercolor, you will need brushes №1, 2, 4, 6. Thinner will help draw small details, and those that are sewn - fill out the background and the main part.
The palette for mixing paints is also useful - it can be made from a sheet of very tight paper. Just do not forget to adjust the edges so that the paint does not flow.
The paper on which the drawing will be applied, should also be more dense. Watercolor is diluted with water, so the thin base can soften and spread. There is a special thick paper for this technique with a rough surface.
Creating a sketch
Consider how to draw flowers in watercolor in stages.
The first thing to start is to create an outline with a simple pencil. You can do this in different ways depending on the skills and skills to draw.
Not all at the initial stage can draw a sketch of a flower themselves. The easiest way to find the picture you like and circle its contour. You can find and print an ready-made sketch. If you want the flower contours are clearer at the final figure, it will be best to circle them with a handle filled with aqueous or alcohol ink. When we start painting the flower with watercolor, in the first case, the ink will be blurred slightly, in the second - will remain unchanged.
For those who want to make a sketch on their own, it is recommended very thin and barely catchy to lay a sheet on the sector, that is, to spend the vertical and horizontal line in the middle. This will help keep symmetry and make the position of the flower in the figure more harmonious. Avoid using an eraser, since after him there are katsoves.
Draw flowers watercolor. Background
After the sketch is ready, on the future picture you need to fill the space around the main object. If the oil or gouache is applied to the canvas with smears, then watercolor is a layer.
The background is written first, because it should be more transparent and cold, focusing on the main thing - flower.
Watercolors tend to spread around the canvas. To fill the background completely, avoiding the collapse of the paint on the flower circuit, the masking fluid is used (Masking Fluid). If it is too thick, it can be diluted with water. The mask is simply applied to the image of a flower with a brush. If necessary, it can be stretched by matches in sharp and small corners. Now you need to wait when it dries. Do not worry because of the dropped droplets, just remove them. But it is better to wash the tassel immediately after use, since the dried mask tightly grab the fur.

Make a background of this color, which you want. Use the palette for mixing the paints until the desired shade is obtained. It is not necessary that the layers fucked hard, otherwise the clear boundaries will appear, and here it is superfluous.
Drawing petals
The flower is drawn by watercolor flower in a staminous layer behind the layer and only after the background is the background, otherwise the paint from the stems and petals will wash it off. Do not rush to immediately start painting, first work out to create smooth transitions.
Roses petals have darker shades. Take a brush thick paint and draw a bold line on a separate sheet sheet. Below, spend the strip simply with water, and the same - in the middle. So it turns out a smooth transition from a darker shade to lighter.

Each petal needs to be drawing separately. Water here use less than when filling out the background. The very first layer is applied very transparent yellow or red - depending on the petal. Seeing it well so that there are no rods. Let each layer shine the previous one, as a result, the final drawing will glow. Where color is deepened, use red. Carefully apply blue, its shades should be barely catching. Excess water from the drawing can be removed with a dry clean brush. Remember that each layer should be very transparent!
Stems and leaves
When we draw flowers in watercolor, we need time and patience. After the petals are ready, you can proceed to stalks and leaves.
The same principle of multi-layered is observed. In order for the drawing to be volumetric, shades should change and flow into each other. Do not dial too much paint, as it will spread. And always definitely wrap it with water. Green can be mixed with yellow to get brighter shades.
Since the first layer is always the most transparent, the color should be very light. Only the final layer is written dark green. The darkest areas will be in color lies and around the edges.
First, it is better to fill the stems with the color, then proceed to the leaves. All additional details are drawn later. Each new layer, if you need a change in the shade, first try on the palette. Draw a flower watercolor - a rather painstaking job.
Add details
In order for the drawing to be more realistic, you need to deepen the colors where it is necessary, and drawn streaks on the petals and leaves. This stage is no longer so monotonous.
Building color on leafs of petals and the edges of the leaves is also carried out by layers. Each of them should be good to dry. After all shades fell into place, you can go further.

To draw accommodation, take the finest brush. But here it is also not recommended to use undiluted paint. Let the shade be slightly darker in this place. For petals it will be red or yellow, for leaves - green. The easier they look at the finished picture, the more flowers will be alive. If on your sketch initially accommodation on leaves were drawn in ink, it will be easier for you. Add jazbins with thin strokes.
Create shadows
Drawing watercolor flower, it is important not only to correctly apply layers, but also to be able to play details that strongly affect the final result.
The picture will look at voluminous and alive thanks to the shadows. As a rule, to make them, the darkest shades are taken - blue and mixture of black with green. Where should the shadow be placed? On the petals, under them, on the leaves. Before applying the paint, leave excess on the palette, otherwise the shadow will turn into a growing spot.

Blue color shadow on petals, dark green - on the leaves. If the shade is taken dark, it means that it does not need to be strongly diluted with water. The most important thing when applying the layers of watercolor is their transparency. Shadows are drawn closer to the completion of work. It is important to dry all previous layers.
Do not hurry. Look carefully on the drawing, maybe you missed some detail. The upper leaves always discard the shadows on the lower, as well as the weapons of petals. Drawing flowers in watercolor - subtle art.
And finally ...
When the work is close to completion, all the streaks on petals and leaves are drawn, shadows are created, deepened colors, it's time to return to the background again.
Where the flower is lighter, the background should be darker, and vice versa. This will give the figure volume. Here you can additionally draw divorces from the mixtures of the paints, which the flower was drawn, and just spots. So the picture will look more likely, and the game shades will balance the main object with space around it.
Closer to the contour of the flower. Add a mixture of paints green, yellow, ocher. Far leaves should not necessarily be clear, they can be simply smeared as a background.

To give work a type of real picture, make a passent. You can insert the finished picture into it or delay the workspace from the very beginning.
So we looked at how to draw watercolor flowers, stages to play this technique precisely because of its completion. So, observing all the recommendations, making work with love and pleasure, it is quite possible to master it yourself.
Watercolor - complex technique. Its feature is that the color transitions and mixing are often not on the palette, but directly on paper. In order for this process to go successfully, you need to spend some time watching how paint behaves when drying. Especially it is necessary to take into account the decrease in color intensity, about a third, however, it is unlikely that the deficiency. Gentle shades are distinguished by painting the property has a calming effect on the viewer.
For example, you can consider the process of writing a flower, for example, Parrot grade tulip. The theme is eternal - this miracle of nature always pleases, in a bouquet or on a garden flower bed. Such joyful emotions will be delivered by watercolor painting, hanging in the living room or bedroom.
It is important to remember that each smear must contain the optimal ratio of paint and water. If it is dry, its excessive clear outlines will spoil your idea, and the abrasion of moisture will not allow to keep the shade within the outlined circuit - the element of a composite solution of the work.
In order to write a flower with watercolor, you should either put this "tooltar" in front of yourself, or stock by its photos. Lighter tones are located in the foreground, and the saturated core of the bud allows you to look inside.

So, the step is the first. On dense paper, a general composition of the flower depicted is drawn. Then the selection of paints begins. In this case, the mixture of warm red and cool Alizarino-pink creates the effect of pulling the smooth transition of the shades. At that moment, when the surface is still wet, it is time to add Indian yellow paint - it will organically fit into red.

Step second. Without waiting for a complete drying of the layer, you need to work methodically on each petal 20th brush. If the paint flowed in some unwanted direction due to an excessive bold smear, the case can be corrected by tilting the sheet and sending it to the opposite direction. In general, depicting flower with watercolor, it is necessary to show a certain squeamishness, because the drawing is the display of the author's emotions, and do not hold them back.

Step Three. Now is the time to give a picture to dry, decide on the intermediate result after creating a common composition and compare with the original flower. Watercolor, divorced not very generously, shadows are created. Gamma is purple, with a small content of indigo, such a ratio of color components will make it possible to give volume and bulge, especially if it is allowed to cover the stamens.

Step fourth. In order to emphasize expressiveness, it is worth adding a contrast and deep background. Write a flower with watercolor and leave it not shaped around the edge, but so it will look brighter. After all, the shades of this paint are gentle, and the picture can just be swollen on the wall.
So the picture is ready. This artist enjoys the process of creativity itself, and he is always dissatisfied with the result. If someone from the friends of the flower, written in watercolor, liked, it is worth pleaseing to please such a gift. The next picture will get even better!
P of stacking flowers and simple and difficult at the same time. A wide variety allows not particularly looted on the rules for transferring forms. But the incredible beauty and saturation of the colored gamps are a big headache for meticulous artists. After all, it is very difficult to convey this beauty with the help of ordinary paints. Talk about how to draw flowers watercolor. This tool is most suitable for the transfer of the charm of flowers, which is found in nature.


Features of watercolor colors
If the word "watercolor" translate from Greek to Russian, then we get "water paints". The keyword "water" explains the transparency of watercolor beauties, their inimitable charm, fabulousness, airiness. With regard to them, you can rephrase a well-known proverb: "Watercolor will not spoil the water!". Indeed, the more water, the more beautiful watercolor works.
The technique of writing "on wet" is very popular for them. This is when color strokes are applied to wet paper, in contact with each other. From this they are mixed with an unimaginable way, creating unique combinations. Another feature of watercolor is its incredible transparency. No matter how much layers you impose, every previous layer will still be viewed. Thanks to this quality, many Watercolor painting masters seek the wonderful effects of overlaying different colors on each other.
Do you already want to try this chavernitsa in business? Do not hurry. Otherwise, the first failures can be very disappointed. Although watercolor paints are one of the most common among beginner painters, they are the most difficult in development. That's why:
Watercolor does not tolerate errors. Having left the wrong smear, it cannot be corrected if it is not completely washed before it dries.
It is very difficult to achieve color purity. This requires very extensive experience in their use. When mixing more than three colors, dirt turns out, and not a color shade.


When using multilayer painting, it takes a lot of time. It is necessary to wait for a complete drying of the last layer to prescribe a new one. Not everyone has enough patience for such science.
For these colors, you need good paper and high-quality brushes. Unfortunately, not everyone has the opportunity to purchase them. Yes, and good quality paints themselves are not so easy to find in some circumstances.
However, you should not stop all these difficulties. After all, having mastered the basics of letters in watercolor, you can create any paints. And the charm inherent only in watercolor wizards will delight you and your admirers.
Draw flowers watercolor gradually
Start learning letters in watercolor is best with color exercises with pouring spectral strips. By drawing a sheet of paper on the squares on the principle of a chessboard, squeeze all horizontal lines with the main colors. After they are dry, creep the vertical strips with the same colors. As a result, you will immediately know which shades give them combinations.


Now you can proceed to still lifes of colors. You can go on nature and write from nature, and you can rush a bouquet and bring home. Immediately prepare the easel or sketchik, paints, brushes and special watercolor paper. For the palette, it is better to use a plastic plate, but the easiest way is the dense white paper, the best of all the same on which you draw. So, everything is ready. Let's proceed:
We plan a drawing. Yes Yes! It is, we plan, the drawing is made a slightly noticeable pressure of the pencil, the smaller the lines, the better. Eraser, preferably not to use at all.
We begin to attach the basic colors. To do this, select them on the palette. Important note: You should start with the brightest places and it is very important to get into the color from the first time.
We prescribe a half, then the shadow parts of the colors.
In addition, the method can also be used and the popular technique "Wet" for the image of colors. At the same time, in the second stage, wet the sheet with water and begin to prescribe the main colors on the low paper. And after drying, it is proceeded to the following steps in the given sequence.
The scheme is simple, but very complex performed. Do not despair if you do not immediately succeed. Do not give up! Try again and once again, the more you will work with watercolor, the more obedient it will be in your hands. Do not forget that any perseverance and hard work is rewarded.

