• Formatting paragraphs. Formatting text in Microsoft Word Document
Read also
Formatted text Can attract the attention of the reader to specific parts of the document and emphasize important information. In Word you have several options formatting text , including font, size and color. You can also configure text aligning to change the way it is displayed on the page.
Font size change
Font
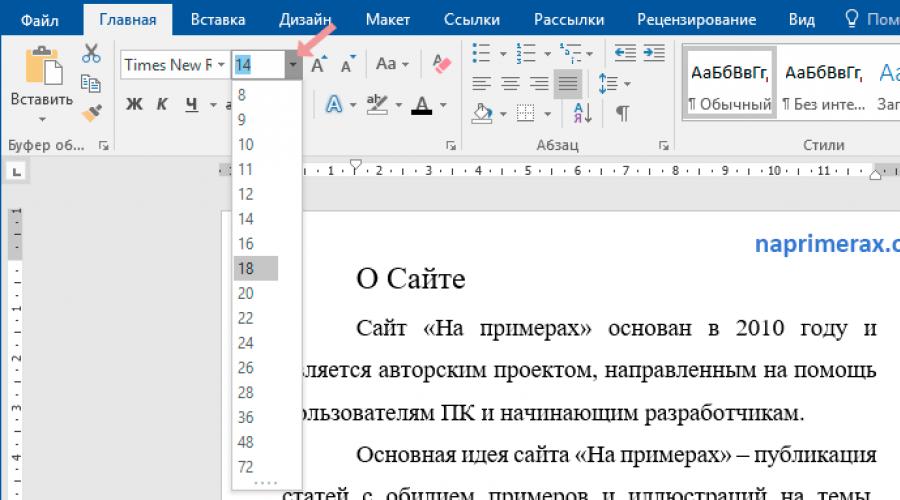
- On the Home tab, click the arrow of the font size drop-down list. Select the font size in the menu. If the desired font size is not available in the menu, you can click the Font size field and type the desired size, and then click "ENTER".

Formatting text in Word - changing the size of the font
- The font size will change in the document.

You can also use commands " Enlarge font size"And" Reduce font size"To change the font size.

Formatting text in Word - increase or decrease font size
Change font
By default, the font of each new document is set to Calibri. However, Word provides many other fonts that you can use for formatting text .
- Select the text you want to change.

Formatting text in Word - selection of text for formatting
- On the Home tab, click the Arrow of the drop-down list next to the Font field. The font styles menu appears.
Select the font style you want to use.

Formatting text in Word - font change
- The font will change in the document.

Formatting text in Word - Formatting text by changing font
Font color change
- Select the text you want to change.

Formatting text in Word - selection of text for formatting
- On the Home tab, click the "Text Color" arrow. The menu appears.

Text formatting in Word - text color change
- Select the color of the font you want to use to format text. Font color will change in the document.

Text Formatting in Word - Formatting Text Changing Text Color
Color selection is not limited to the drop-down menu. You can choose "Other colors ..." at the bottom of the menu to open the Colors dialog box. Select the desired color and click OK.

Formatting Text in Word - Color Window
Using a bold, mean and underlined inquiring
Commands bold, italics and underlined can be used to help attract attention to important words or phrases.
- Select the text you want to change.

Formatting text in Word - selection of text for formatting
- On the Home tab, select the command "Sea" (g), "italic" (k) or "underlined" ( C.) In the "Font" group. In our example, we press the bold.

Formatting text in Word - bold stroke
- The selected text will be changed in the document.

Formatting text in Word - text formatting
Change textual register
When you need to quickly change the text file, you can use the "Register" command instead of deleting and re-entering text.
- Select the text you want to change.

Formatting text in Word - selection of text for formatting
- On the Home tab, click the "Register" button in the Font group.
The drop-down menu appears. Select the desired option.

Text Formatting in Word - Change Text Register
- Text register will be changed in the document.

Text Formatting in Word - Formatting Text Change of Register
Text selection
Selection can be a useful tool for formatting an important text in the document.
- Select the text you want to highlight.

Formatting text in Word - selection of text for formatting
- On the Home tab, click the Arrow of the drop-down list " Color selection of text" The Backlight Color menu appears.

Formatting text in Word - selection of text for formatting
- Select the desired backlight color. The selected text will be highlighted in the document.

Formatting text in Word - text formatting backlight
To remove the selection, select the selected text, then click the arrow of the drop-down list " Color selection of text" Select "No color" in the drop-down menu.

Formatting text in Word - Remove the selection by color
Leveling text
By default, Word aligns text in new documents on the left edge. However, you may need format text In the center or on the right edge.
- Select the text you want to change.

Formatting text in Word - selection of text for formatting
- On the Home tab, select one of the four leveling parameters in the "Paragraph" group. In our example, we chose " Align in the center».

Formatting text in Word - text alignment in the center
- The text will be aligned in the document in the center.

Text formatting in Word - text formatting alignment
This will be completed. Now you know exactly how to change formatting text in Word Simple but efficient tools.
Also on the topic text formatting in Word We can advise the following articles.
So, if you have already completed the very tedious part of the work - they scored the text and kept it, now go to a more interesting part of the work - it is beautifully formatted by this text.
Microsoft Word 2010.
Let's start with the appearance of the Microsoft Word text editor. In the new versions of Microsoft Word, starting from 2007, all toolbars have placed in tool tape. Switching between tabs, we get quick access to various text processor tools. In each tab, the tools are combined into groups, as if separate toolbars.
In this picture presented appearance Editor version 2010 and above. In the top line (a) we first see several buttons of the quick access panel and the name under which we saved the document.
Below (b) there is a ribbon from the menu with different tabs. Each tab has its name and contains various Toolbars (C). The first tape tab is called a file. Here are collected commands to work with the document file.
In this case, we see the contents of the active tab. the main (C). It has the tools that are most sought after set and editing text.
Basic groups of this tab:

Below the tool tape (Fig. 1) is a ruler (D) (D) (D) highlighted). With the help of markers (triangles) on the line you can quickly format in paragraph. For example, install a red string or a string protrusion, set the boundaries of the text area on the page.
Next, we see the sheet on which the text is printed and at the bottom of the window is a status string (E) (highlighted by a brown frame). This line contains information (Fig. 4) about the current location of the cursor (highlighted by a brown frame) and the total number of pages in the document. Nearby displays the number of words in the text (highlighted with a dark green frame).
Next is the area of \u200b\u200bspelling check (highlighted by a red frame) and the current language dictionary. The next zone (light green frame) is the display modes of the current document. The drawing is poured the markup mode. And the last part of the drains (highlighted in a blue frame) is a tool to change the scale of the visible area of \u200b\u200bthe sheet.
At the beginning of the development of Word 2010, I discovered with horror that the tool tape disappeared and how to continue, I did not know. Pay attention to the button next to the question mark (highlighted in a blue frame Figure 3) folds and turns the tape with the tools.
I will tell you a secret: the question mark button is the Word Reference System, and it contains answers to edit and format text with detailed instructions. And also, if you delay the arrow of the cursor on a tool, you can see a text prompt about the purpose of this button.
Microsoft Word 2003.
Let's start with the appearance of the Microsoft Word text editor.
 Fig. five
In the top line (a) we see the name under which we have saved the document.
Below (b) is a menu string.
Under it toolbars. In this case, we see the standard panel (C) and the formatting panel (D). At the beginning of the master of the computer, I discovered with horror that the formatting panel disappeared and how to continue, I did not know. You, in secret, I will say: you yourself can add new and hide unnecessary panels.
To do this, hover the mouse over the toolbar and right-click. The entire list of toolbars opens. Put a tick opposite the desired panel - it will appear, remove the tick - the panel will disappear. In this case, the drawing panel appears at the bottom of the window, and the remaining panels above or in the middle of the window. If some panel is located in the middle of the window, you can take it with the mouse cursor, drag up, and it will "stick" to the rest of the toolbars.
Let's stop by formatting panels (D).
I draw attention to the fact that you can format only selected text.. That is, you first allocate the letter, the word, the offer, paragraph or the entire text that is going to format.
How to highlight? The most common way: Put the mouse cursor ahead of the selected text, press the left mouse button and drag the cursor over the text to the right (if you allocate the word or offer) or right-down (if you select multiple paragraphs). At the same time, the left mouse button is not released until select the desired piece of text.
Now, if your text is selected, as I have in Fig. 5, you can "motive" above it. Let's start by S. Leveling text (five ). Here we see 4 buttons. Click them in turn and you will see how the location of the selected text will change.
(The remaining text will remain unchanged).
Alignment on the left edge (So \u200b\u200bthe text is aligned by default).
CENTER - So, usually, align headlines.
On the right edge - So epigraphs write.
By width - So align the main text of books and articles.
We now move on to the font allocation buttons (4). Press the button Well and the font will become bold. Press this button for the second time andthe font will be ordinary again.
Press the button to and the font will be stationed in italicslet go - will become common.
Press the button C.- The font will become emphasized.
And if you press all 3 buttons, then the font stand out by borrowed italic.
In the window 2 You can choose from the drop-down list any fontBut when printing documents, Times New Roman is usually used. So that the font options "fell" are pressed not on the name of the font itself, but on a small triangle to the right of the font name.
In the window 3 also choose from the drop-down list font size. Documents typically print 12 or 14 size.
Using the button 6, you can change the interval between the rows by making it double, triple, etc.
By pressing the 7 button, you can highlight the text in any color (select).
By clicking the 8 button you can set the color of the font.
If you want to set a certain, pre-installed, style Text, you choose from the drop-down list 1, for example, heading 1 (the largest), header 6 (the smallest), numbered list, etc.
Consider the most necessary buttons. Standard panel. Press button Cut 9, you delete the selected text. But at the same time it is stored in the clipboard. Put the mouse cursor to the place where you want to insert the cut out text and click the button Insert 11 And please - the text appeared in a new place!
If you do not want to delete text on the old place and, at the same time, you want to add it to another place, then press the button Copy 10, and then act as in the previous paragraph.
Button Cancel 12 Interesting to the fact that it can cancel one, or even a few previous one. For example, you inadvertently pressed some button and disappeared a piece of text or the text accepted the ugly appearance. Do not panic ahead of time! Press the button cancel And you can return a few steps back, right up to open the document. And you wish to come back again, then click the button Returnwhich is to the right of the button to cancel.
In the window Scale 13 You can set this page size so that the text is the desired size and does not spoil the vision when reading. I draw attention to the fact that you change only the size of the image on the monitor screen. The written document itself will not change in any way.
At the bottom of the window on the left there are buttons specifying view modes. I broke the red pencil Magnifier mode. This mode is used by me constantly. It allows you to see the page in its true form, as it will look when printing. Look the remaining modes for interest. They are used much less frequently.
Hello everyone. Formatting text in Word is the first tool, without which you will not create a really good, readable project. No matter how perfect is your text, until it is done properly, it remains only the text. But the qualitatively decorated work is worth a lot. Readers will be grateful to you if the document is decorated and readily readily.
Therefore, let's immediately learn how to format characters and already apply it in your practice. And so, what are the opportunities for text formatting? At least such:
- Change the font used
- Changing the size of characters
- Changing the color of the text
- Selection of text sections
- Various ways of drawing
- Application of a variety of effects
- Change register
- Creating a fellow and editing signs
- Change distance between letters and others.
To perform such manipulations, the developers have provided several ways:
- Application hot keys
- Pop-up menuwhich appears after you have allocated text
- Group of Fonts on tape

- "Font" dialog boxwhich can be caused by a Ctrl + D key combination. It largely duplicates the commands on the ribbon

And now about everything more. All examples I cite for Microsoft Word 2013, in other modern versions, the functionality and interface can be slightly different.
How to change the font in Microsoft Word
No special skills need to change the font. If you want to type text with a specific font, open the drop-down menu on the tape in the Font group. There, select the appropriate font and start the set.

Note, in the list of font names look like your text looks like. Convenient, isn't it?
If you need to change the font of the already scored text - select the desired area and select the appropriate font in the drop-down menu on the tape or in the pop-up menu. Please note when you hover on the name of the font, it will temporarily apply to the selected text. So, you can choose the most suitable font without prolonged busting.
If there is no suitable font in your system - download and. Remember that not all fonts support Cyrillic characters
By the way, Calibri, Times New Roman, Arial, Verdana and some other others are considered the most "readable" fonts.
Changing the size of characters in the Word
To change the size of the characters - select them with the mouse and select the desired size on the tape in the Font group. In the drop-down menu, the font size is indicated in points. Item is 1/72 inches, that is, approximately 0.35 mm. Then the font 11 PT will be 3.88 mm high. Most often, no one uses these calculations, but sometimes it is necessary to choose the physical font size, then we apply the reduced ratios.

The same can be done in the drop-down menu.
When hovering on the size in the list, it is temporarily applied to the injected font. So you can visually assess the changes before they are taken into force.
You can choose one of the suggested sizes, or record a more accurate value from the keyboard.
Also, you can step by step to increase or decrease the size of the characters. To do this, press the "Zoom font size" buttons and "Reduce font size" button.

Or use the key combinations: Ctrl + Shift + 1 to increase by 1 step, CTRL + SHIFT + 9 - to reduce.
How to change the color of the text
The color of the text is often modified for the placement of accents and the allocation of important segments, terms. Highlight the desired area and press the arrow near the "Text color" button.

You can choose a color from the proposed palette. If you use the color of the theme, when changing the topic, the color of the text will also change. It's comfortable. When you hover on the color in the palette, the text will be painted for preview.
If the proposed colors are not enough, click "Other colors ..." just below the palette. In the window that opens, on the Ore tab, you can choose from a wider list of colors.

Or on the "Spectrum" tab, ask an arbitrary color by clicking on it with the mouse. There you can also specify a manual RGB ratio (red, green and blue).

An interesting effect can be used by the application of the gradient color of the text, but I never applied it in my practice. To set the gradient, select the color and click "Gradient" under the palette. Choose one of the gradient variants.

How to make the selection of text in the Word
It happens, you need to set a background for text, as if it is highlighted by a marker. Often this is noted by controversial moments in the project of the future document.
Highlight the desired text and click on the text of the text selection color. In the window that opens, select one of the color options.

To delete selection - in the same window, select "No color".
How to change stacking in Word
Under the draw, you should understand the thickness (fatness), the slope of letters (italics), underscore, crossing characters. These parameters can be set separately or together with each other. For example, bold italics or underlined index.
How to make text fat
So that the text is fat - Highlight it and click on the tape button "Sea". Or use the Ctrl + B key combination.

How to make italic
So that the characters were contract - Highlight them, click "Italic", or the Ctrl + I combination.

Text underscore in Word
To emphasize Text - Highlight, click "Underlined" or Ctrl + U.

You can change the shape and color of the underscore. To do this, click on the arrow near the "Underlined" button, select View Line. Go to the "Stress color" item to select a new color.
List of text in Word
The crossed text is rarely applied. It is avoided, because such a drawing does not comply with the rules of the business letter, and it just looks unattractive. If you have an idea to apply a cripping - I recommend thinking three times before using it.
If you firmly decided to cross something - select the desired text and click "Crushed".

Application effects to Word text
To give the painfulness to your works, use the built-in effects. Select not too beautiful text and click "Text Effects and Design".

In the drop-down menu there will be some "pre-installed" effects, or you can configure individual character components:
- Stretcura - Customize the outline and pouring letters
- Shadow - we achieve volume due to the use of shadows
- Reflection -effect of reflected from the surface of letters
- Illumination -letters seem to be highlighted from behind the selected color
- Styles of numbers - We choose various ways of drawing numbers (rarely applied)
- Ligatura - Special signs formed by the association of two or more characters. Often, a certain semantic load is carried out or simply save the place on the sheet, improve the readability of the text. Transcription marks are an excellent example of the application of ligatures. Work for OpenType fonts.
Combine these options, experiment with "deep" settings to get the best, in your opinion, the effect.
Change the symbol register to the Word
Everyone knows: To print the symbol of capital - you need to pre-hold Shift. To make up several letters in a row, Caps Lock are pressed before a set. In addition, the Word automatically makes the first printed symbol after the point. And what if you need to quickly correct the register in the already typed text? Do not even think to do it manually. Select a block of text to fix, click on the register tape and select one of the options proposed:
- As in suggestions - Title only the first letter of supply. The remaining line;
- All lower case
- All registered
- Start from capital -each word has the first letter - the title
- Change the registermake up capital, and lowercase registration

I have always grabbed such a set of teams. And you, I think, enough.
Alpine and editing signs in Microsoft Word
If you need to make a substitting symbol (index) - select it and click on the Ribbon "Substituing Sign". Or key combination Ctrl + \u003d

Similarly, to create a superscript (degree) - you will have to press "Pasting sign", or a combination of Ctrl + Shift + \u003d

Consider, such symbols are fine enough, sometimes it is difficult to read it.
Changing the distance between the letters in the Word
To make the text more stretched or compressed - highlight it and press Ctrl + d. In the "Fonts" menu that opens, go to the "Advanced" tab. Here we will find a group of teams "Interpal interval", where you can make such settings:
- Scale - increase or decrease the scope of the display relative to the set font size
- Interval - Set the distance in points between characters
- Bias - shift of the selected text down or up relative to the baseline (in paragraphs)
- Kerning ... - Intelligent text compression to save space. Do not perform it for too small font, where letters can merge with each other.

Sample format
It happens, I want to copy formatting, made earlier, and apply it to another section of the text. For this, there is a "sample format" tool.

Set the cursor to the text whose format must be copied. Press "Sample format" on the tape, formatting is copied. The image of the brush will appear on the left of the cursor. Highlight the plot to which the format must be applied. When you release the left mouse button - formatting applies to it.
Cleaning formatting in the Word
It happens, you need to "reboot" formatting, i.e. Clear the format and apply a new one. To remove formatting - select the desired text and click on the Ribbon "Delete Formatting. This method will fully clear the text settings.

To clean only manual formatting, select the text and press Ctrl + space. At the same time, it will be saved.
Friends, thank you for reading this long post to the end. Be sure to test all the techniques outlined here, so they will be saved in your memory. And on this formatting in the Word does not end. In the next article I will talk about. The information there will be no less important, read and let your works applaud all!
Formatting paragraphs in Word. In any document, do not do without formatting text. We looked at you in the past lesson, now it was a queue to disassemble the issue of formatting paragraphs in Word. The main semantic unit of the text is usually paragraph. Therefore, the alignment and formatting commands are designed to change the appearance of individual paragraphs. Without paragraph, the text will not look beautiful, and it is also suitable for reading. You probably were convinced of this? On sites where the text goes with a solid wall, the eyes get tired very quickly. And no matter how interesting it is, visitors are thrown to read it on the half-word and go. That's why the competent web designer necessarily breaks the text into small paragraphs. Books written without paragraphs lose their attractiveness and most often remain unexplored.
Therefore, paragraphs must be necessarily. In the Word there is an opportunity to facilitate its work from paragraphs. For this you must configure the text editor "for yourself".
Paragraph formatting B.Word.
Note
Setting up the formatting of paragraphs in the Word for all versions of the program is the same, so you can not bother on this.
To fully format a paragraph use a dialog box "Paragraph " Enter the menu -Format and select - Paragraph –
or right-click on the document field and select the item in the drop-down context menu. Paragraph .
![]()
- In the window that opens " Paragraph »On the tab" Indents and intervals "Configure Alignment paragraph
- on the left edge
- in the center
- on the right edge
- in width
- In the drop-down list Level You can set the semantic paragraph level in the general text structure.
- Panel Indent Defines the right and left border of paragraph with respect to the right and left borders of the page.
- In the drop-down list First line You can set the presence and size of the "red string" (paragraph retreat).
- Panel Interval Allows you to set gaps between paragraphs, as well as between the lines of this paragraph. The enlarged interval between paragraphs often replaces the paragraph indent.

- Tab Position on the page Designed to format paragraphs falling on the border between pages. Here you can prohibit one line from paragraph, to demand that the paragraph is located on one page entirely, "attach" the next paragraph to this or start a new page with a current paragraph.

Note:
Using the window Paragraph Very easy to format, but it is not worth it. It is useful for studying formatting techniques, but it is better for practical work.
Now let's consider more effective ways of formatting paragraphs in Word.
There is a way - formatting paragraphs using a ruler . Many do not use a ruler at all. And in vain, it is also pretty a powerful tool in skillful hands, and you will soon make sure of it.
Paragraph formatting with a ruler
Rule In Word, not only provides information on the markup of the document, but also is a powerful formatting tool. It allows you to control the side boundaries and the tabs of the tabulation of the current paragraph. The boundaries of paragraphs are set by moving (dragging) special markers.
How to turn on the ruler inWord.
In Word 2003. The ruler turns on in the menu - View . Just need to install a check mark in front of the recording Rule .

IN Word 2007/2010 The line is also in the menu - View - block show and hide - line.

Note

- The triangular marker located on the left at the bottom of the line (with the edges up) sets the left border for all lines of paragraph, except first.
- The inverted triangular marker on the left at the top sets the line of the first paragraph of the paragraph and allows you to form a paragraph indent.
- The square marker under the ruler is a control, always located directly under the triangular marker of the left border of the paragraph. When dragging it, both markers of the left border move together, while maintaining their relative position. Such registration of paragraph can be used when formatting epigraphs, especially important fragments text, quote etc.
- The triangular marker, located on the right, sets the right border of the current paragraph.
- Line also use to task tabulation positions . It will already be formatting paragraphs with tabulation . Tab positions are used when the string consists of several fields, for example, in a simple table. By default, the tab positions are located every halfual and are marked on the line with short vertical serifs.
- The symbol denoting the tab position is located on the left line. It has the form " corner" By clicking on it, you can change the type of tab symbol and, accordingly, the method of displaying text.
The selected tab symbol is set by clicking on the line. In the future, its position can be changed by dragging. To remove tab symbol It is dragged outside the ruler.
After installing the tab position, manually all the tabulation positions specified by default and arranged to it are deleted, i.e. All your subsequent documents will already with this new formatting paragraphs.
∟ Position tab with alignment to the left edge. The text is located on the right of the specified position, starting directly from this place;
┴ Position tab with alignment in the center. The text is symmetrically relative to the specified position;
┘ Tanning position with alignment on the right edge. The text is placed on the left of the specified position, ending in the specified place;
Types of tabular markers:
Position tab with alignment by symbol. Allows, for example, to arrange a column of numbers of different lengths so that decimal commas are located in each other.
Note:
For transitions between tab positions use keys Tab. and Backspace. .
That's how much new we learned with you today, and what is , and as include ruler B. Word. and what is tabulation B. Word. . I hope that these new knowledge will be useful to you.