Sketches of clothing models from dress designers. How to draw trendy sketches
This lesson will teach you the basics of building proportional Slender Figure for Fahion Sketches. It contains basic knowledge that will serve as the basis for other lessons where the models are depicted in various poses. Basically, we will deal with the torso and legs themselves. I'll show you, how to draw model figures Height of 8, 9 and 10 heads. If you want to know how to draw your head and face, look this.
First of all, the model sketch is not part of realism. Of course, model sketches are similar to ordinary people, since in most cases they serve to show clothes on real human figures. However, the proportions of the sketches are far from the real proportions of the body. So the commentary of the type "real women does not look like that", addressed to Fahion-sketch, compare with the "This Unreal World" commentary, addressed to the paintings of Salvador Dali. Fashion sketch is an abstraction.
Before developing your own drawing style FAHION-IllustrationsYou can practice working with "standard" body proportions that use most fashionable illustrators. So let's get to work!
Draw a girl's figure for a fashion sketch
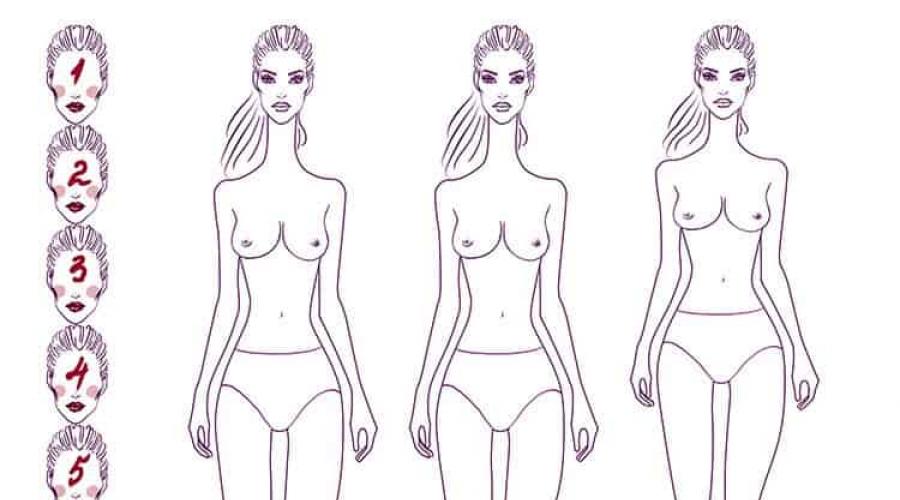
Look at the image below. These three figures have different proportions and they produce different impression. The first figure is really elongated and looks untrue. The third sketch looks most natural. Nevertheless, all three figures are built in the same way.

As a rule, we draw a head of 2.5 x 1.5 cm. I'm going to use these numbers in this example. Thus, the length of the head is 2.5 cm (on the third example 2.2 cm). In all three examples, the length of the body (from the chin to the bikini line) is equivalent to the height of three heads, that is:
Head Length x 3 + 1 cm \u003d Tog's Length
2.5 x 3 + 1 \u003d 8.5 cm
HEAD
Neck and shoulders
Step 1. From the chin, count 1 or 1.5 cm and find the neck cutout, the failure between the neck and the clavicle. Draw two lines.
Step 2. Draw two vertical lines on the neck (width depends on the type of figure - thin or sports) and two horizontal lines for the shoulders (the width of the shoulder \u003d 4 cm).
Step 3. Curved lines circle body contours.

CHEST
Step 1. Determine the armpits. There should be enough space to accommodate a small circle between the corner of the blade and the crap armp.
Step 2. Sample 1 cm down from the neck cutout. We begin to draw the bottom contour of the chest. For me, he looks like a tent. But this is only one type of breast, of course, both forms and sizes vary. The outer contour looks like a letter S.

Waist and hips
According to our calculations, the length of the body from the chin to the hips is equal to 8.5 cm. The width of the hips is equal to the width of the shoulders.
In order to draw the shape of the "Hourglass" body, swipe two intersecting diagonal lines connecting the shoulder points with the opposite point of the thigh. In this way, we plan a body shape, as shown in the image.

Well, back to the image with three pieces and heads. As you can see, the lengths of the legs for all three models are equal to 6, 5 and 4 heads, respectively. All you need to do is calculate:
Head Length x N \u003d Foot Length
Figure 1: 2.5 x 6 \u003d 15 cm
Figure 2: 2.5 x 5 \u003d 12.5 cm
Figure 3: 2.5 x 4 \u003d 10 cm
If divided this length to 2, then get your knees. In our case, it is 15 cm / 2 \u003d 7.5 cm.
Step 1. Calculate 7.5 cm down from the crotch and find the knees. You need to draw them as two closely arranged circles. Draw the inner contour of the knees, as shown below (green).
Step 2. On both sides of the perineum, just above drew two circles. Connect them with your knees.
Step 3. In order to draw the inner muscles of the thighs. Draw one circle under the crotch and another circle above the knees (in the figure is marked as 3 and 3 ').
Step 4. Draw the thigh contour, as shown below.

Step 5. To find ankle, count 7.5 cm down from the knee point. You can designate them with smaller circles. The arrangement of them should be a little closer to each other than the knees.
Step 6. Draw the ICR circuit. Pay attention to the muscles shape shown above.
FEET
Under the "foot length", we mean the total length from the ankle to the tip of the thumb.
Head Length \u003d foot length
2.5 cm \u003d 2.5 cm

Step 1. Remember that the inner bone on the ankle is located higher than the external one.
Step 2. Draw the inner foot surface. It is stronger than external. In this example, we draw legs on high heels. Length 3/4 head length.
Step 3. Draw an external foot outline.
Step 4. Depending on the shape of the nose of shoes, draw your legs.
Use a template for fashion sketches
You can download a template for all three types of figures and use it for your projects, as well as as the basis in the following Fahion-illustration lessons.

Video instruction
This video lesson is devoted to drawing a figure of 8 heads. However, here I use another approach. Look, he may seem more convenient for you.
Planning and design
The designer has no right to indulge his own desires. He must try to create commercially viable clothing. In this article and in subsequent publications of this section, it is described how to develop a single collection and plan the clothing line, providing the buyer to the maximum choice. You will learn how to adapt the design for the needs and specificity of the target client, learn how to work within the framework of budget and seasonal restrictions. The article is also devoted to the effective use of the color palette in the collection, working with the fabric and the creation of the desired silhouettes.
To achieve commercial success, designers (for example, John Galliano) must develop such a collection that would have caused a worried interest in a variety of choice.
Creating a single collection
Fashionable designers are developing a whole series of related ideas that help to create a number of models that can function not only separately, but also as a collection. The sequential use of such important factors such as color, shape, fabric design and proportion helps. It is the consistent development of ideas that makes the designer to think comprehensively and extract the maximum benefit from each concept. Practice and experience will teach you not to be content with the first idea that it came to mind, and scrupulously develop a whole series of related images. moving away from the initial stage and mastering new ways of creativity, you will soon be surprised by the result. The collection by you naturally forms a single whole, since it will be formed from similar adjacent objects. You will understand that invent not individual things that are not related to each other, A coordinated clothing line. In this process, it is important to learn not to be shy to think out loud and express yourself on paper. This means that you should without embarrassment to record your ideas and make sketches for a series of models. Pretty your drafts. Pushy sheet of paper often inspires fear and A beginner designer begins to worry so much because of the appearance of draft sketches, that the process of creating models goes to the second plan. With practice, you will find confidence and will become more calmly refers to the flow of your ideas. Remember: You only develop your thoughts, and do not strive to create a masterpiece. The quality of the drawing of drafts does not matter, they are intended for you only, nobody should evaluate them. The only, which is really important, is to understand their abundance of ideas. Do not perceive the draft too seriously, use a more prosaous way of expression - a diary. You can combine sketches with log cuttings. You can also always wear a notebook with you to record or sketch ideas as they occur. With time you will understand what kind of way it comes For you.
Characteristic details - to achieve the unity of the collection, you can use decorative parts. Different nature of the details of the finish adds a variety of collection based on a single theme.
Thoughts out loud on paper - this page with sketches is a good example of how to plan a line on paper. Do not worry if the very first drawings are too inaccurate
The importance of outlines
It's time to begin to think like a real designer! The quality of your sketches depends on how much you can relax and stop worrying about someone else's opinion about them. Remember: You still do not create final sketches and do not even try to tell about your ideas to someone else. You just set out your thoughts on paper. If the type of clean sheet scares you, try to make a list of words and fix your thoughts in them. First, determine the appearance of a potential buyer and the type of clothing that you could develop for it using such adjectives as "exquisite", "feminine", "round", "soft" and so on. Then you will no longer be afraid to start the drawing. Models on sketches can be drawing volumetric (on the shapes of the figures) or using a two-dimensional scheme. In any case, mandatory compliance with the proportions.
PROJECT
Choose a topic and approximately define the first ideas for the clothing model, especially mindfully thinking about what inspired your research. Stay at the most important idea and develop it using a notebook. Recall the most first visual images and make a series of sketches, changing one element in each new figure. The result is a series of variations on the topic.
TARGET
- Create a series of models folding into the collection.
- With the help of draft sketches, develop an initial idea.
- Develop an individual style.
- Evaluate ideas as work, select the best models.
Think carefully about the color palette, textures, forms, fabric patterns, symbolism. Write down the ideas on paper with words or in the form of quick sketches. Developing the most successful ideas, perform the outline of clothing models in notepad. It is better to take a notebook with translucent paper: so you can see one model over the other (if you work the felt-tip pen Do not press it too much so that the color does not hide). Pull out a sheet with a ready-made outline from a notebook and put it under clean on which you can improve the previous design. Make a lot of variations, with each new pattern by changing some element and step by step laying a series of related models. So you will really think as a real designer creating a single collection. Your goal is approximately 20 draft sketches. During work, do not forget that inspired you at the very beginning. Inspect all the drawings laying them out next to (you can copy the pages of 6 blocks and decompose the drawings in the line, if necessary). Select five best models for your portfolio.
Stay on those that most accurately reflect the source of inspiration and add up to the collection. Then these sketches can be improved to create complete sketches.
A variety of forms - first explore various forms of clothing using two-dimensional schemes and not forgetting about your goal: to create a collection from a variety of types of clothing, but perceived as a whole.
Working with figures - transferring two-dimensional patterns of models on the schemes of figures, it is clearer to present the proportions and outlines of clothing. Suitable layers - draw in notepad, portraying clothes on the figure or, as shown here, in the form of a two-dimensional scheme. Tracking how the models lay alone on top of the other, you will be able to develop ideas, while maintaining the community of silhouette.
Different perspectives - the model must be represented not only in front, so think also about the view of the rear.
Self-satisfaction
Did you manage to record ideas on paper confidently, without constraint?
Did you move away from the original source by creating a unique design, or went on the obvious path?
Did you choose the best of drafts?
Are there five selected models in a single collection?
Creating outline is an important element of the creative designer process, especially if he wants to endow the collection with a characteristic single style. Sketches are needed that all the interconnected ideas about the source are transferred to paper. Only after that, you can objectively appreciate these ideas and decide which of the models will best look in the collection and should be used at the next stage of the project. As can be seen from the examples presented, successful outline of clothing function independently, but at the same time well coordinated with the sketches of other models, as they are combined by general design elements. The presented models similar details and the silhouette, but each of them is interesting and unique in itself. Detailed development of ideas on the way from draft to the final sketch makes progress in the design of models, thanks to which the collection does not copy the source, but acquires a peculiar character.
The creative basis is as always, the successful development of ideas is supported by a clearly selected color palette and a collage that develops the general topic (in this case is Asian).
Overall theme - on these patterns, the model looks like a single collection: they are combined by the Asian theme and elements (swans, silhouette, color gamut).
The first sketches - first in the outline the silhouette and proportions are determined, decorative parts is added to it later. Ideas setting - finite sketches represent the silhouette of models in a more western version, but retain a thin connection with the Asian theme of sketches. Easy ways - any idea, such as soft tissue drapery You can apply for the model of the same silhouette in different ways.
Ornament, color, silhouette - a single appearance sketch will give the ornament and color of the fabric as well as the silhouette of the models.
Step 1
First you need to determine what you are going to draw and then I can hardly help you. The best advice is to look in search of inspiration. Look at the gallery on Deviantart.com, you do not need to draw, but perhaps you will find some cool compositions that will pump you on the idea.
In this case, I already knew that I want to draw a girl in a fiery ring, as my heroine had a pyronesis!
Therefore, first thing I sketched an approximate sketch as I saw this drawing. If you look at my little bargains, you can see that I drew a figure in the fire ring and added a view direction, and also pointed from where the lights will fall from.
This is the so-called small sketch. It is quite simple and I am confident that you will handle it. It doesn't matter how old you are: 6 or 76. It is not difficult.
(You can draw it even holding a pencil with fingers of the legs)
Step 2.
Hurray I painted my head. Seriously, it is quite simple. Just draw the figure reminiscent circle or oval in shape. The "grid" helps me with the orientation of the face. The horizontal line is the eye line and it should be located about the center of the head. The vertical line is the middle of the face (there is a nose!). For drawing at this stage, it is not necessary to be exclusively talented.
If you want to turn your head in another direction - just move the grid. (Example is shown in red).

At this stage, the drawing begins to look rather enough. To begin with, I sketched several circles, which indicate the location of the shoulders. Depending on your drawing style, you may want to place them away from the head. If you look straight, then they must be at a distance equal to the width of one head on the left and to the right of the head, but since the body of my heroine will be slightly turned, then this distance will be somewhat shorter in the picture.
The triangle below the chin determines the neck area. In most cases, the "fossa" or in the neck is located approximately at a distance equal to half the length of the head or 3/4. (It all depends on how long the neck will be). Please note that the neck muscles in the width are about equal to the width of the head, and closer to the wpadink - they are sharpened. This is because there are two tendons here, which allow you to turn your head in different directions. In most cases, these tendons are shifted through the skin (they are especially noticeable when they turn the head), and you need to at least partially draw them.

Step 4.
At this stage, nothing special. I added a transverse line on the shoulders and the bottom of the "depressing" in order to designate the location of the clavicle. I also added lines that go straight from the jaw line to the clavicle. This is the outer shape of the neck. -_- My form is ridiculous depending on the position in which my character will be. Do not try to do everything perfectly right during the creation of a sketch. Most of the pattern will ultimately be changed, so do not pay attention if some lines are not displayed. The most important thing is that you have to learn by the artist - the ability to make the inner voice of criticism to silence. This is the part of your brain that looks into the drawing and says "what a damn ... Arrr! You have to fix these lines" Do not listen to him. Bear cookies and click on the "ignore" button.

Step 5.
CHEST. Sorry, I just needed to voice it. For a start, I added the chest line. Usually I draw the chest above its normal anatomical position. But do not repeat after me. Or if you want to do just like me, do, but remember that it is wrong. We all have their own quirks :) If it is anatomically correct, the nipples should be located at a distance equal to the length of one head from the chin. That line, which I painted, is ideal for the nipple line. But I will not follow the anatomical rules and this line will not be so. This is just a way I use I, accept this. ^^

Step 6.
What is this line, which I just painted? This is the line of the middle of the body. The body of my heroine has a little curved shape, so the line of the middle of the body is also bent. If you are anatomically accurate, then the belly line (first after the chest line) should be at a distance of approximately equal to the length of one head from the nipples, and this last small line (paha line) should be located at a distance equal to the length of one head from the navel. Nevertheless, I draw my heroine in accordance with the prospect, since its body is curved towards the background (her head is closer towards us than her legs), therefore in my drawing - the lines are short.

Step 7.
Now we do sketch of the chest. It should not be perfect, but pay attention to the fact that the bottom of the chest is located closer to the bottom of the chest than the shoulders. Also, do not forget that the chest is sharpened to the bottom, that is, in the area of \u200b\u200bthe navel it will already (a little) than in the area of \u200b\u200bthe shoulders. The chest is drawn in the same place as the shoulders. Many young artists first paint the chest, and then try to draw the stomach in such a way that it reaches the bottom of the chest - and as a result, the chest simply disappears. Do not do so.

Click on the picture to see the image in full size and 100% quality.
Step 8.
You probably ask why I drew a ball. "Well, this ball is her belly!" In general, the stomach should be only a bit of an already chest. I found that the draft sketch in the form of a ball allows you to maintain the correct proportions. (Especially for such a strange posture). Without it, I would most likely squeezed her waist too much and would look like that if there was a corset. This that makes the waist very very narrow, about 10 cm. Fuu.

Step 9.
This is her hips. The hips perform the function of a kind of storage for the storage of internal organs, which protects them on these organs dangle somewhere in the knee area. The groin in an anatomical sense is just the bottom point of this "repository", and the hips are a little already. In general, very thin people can see how the pelvis bones stick out from under the skin.
The "ball" belly must close to the "repository". Do not forget that men width width are approximately equal to the width of the chest, while the female women have a little wider (but already the width of the shoulders). Many artists say that the hips should be equal to the shoulders in width, and since they are almost right you do not need to take it for a fact, because the shoulders change depending on muscle mass.
The female thighs are slightly wider than men, since they are wider than the pelvic bone (and has a more rounded form), which allows them to enter and give birth to children. It gives them such a cute roundness)

Step 10.
Here you can already notice that I began to throw the sketch of the hands and legs. Since my heroine's knees will meet at one point, I cut some lines and connected them in the knee area. I know that she looks like absokobot. (Does anyone remember it? Look on the Internet).
Elbows should:
a) get to the chest
and
b) reach the macushk (or be slightly lower).
In this case, the angles of folding hands are slightly different, therefore one of the elbows is slightly lower than the other.
The forearm in the general same size as the shoulder parts of the hands from the bottom of the blade to the elbow (only for the forearm is the distance from the elbow to the wrist). If her hands were lowered down, the wrists would be on the same level with steamed.
The size of the femur bone (the distance from the groin to the knees) is approximately 1.5 of the length of the head (although here I painted them connected to the pelvis bones). Once again I remind you that mine is shorter due to the prospects.
Note: I do not use absolutely straight lines.

Step 11.
I draw sketch of femoral bones. Pay attention to the fact that the thighs are narrowed towards knees and groin, unlike the middle of the hip. They are a little represented in the middle. If you draw them one width, they will look very and very strange.
And although this drawing shows it not very clearly, do not forget that in normal or thin characters the bone of the pelvis will write a little more than the stomach or hip and will form a small "tubercle" on the bend of the pelvic bone.

Click on the picture to see the image in full size and 100% quality.
Step 12.
Nothing special at this stage. I tried my chest and wrote a little hand.

Step 13.
I sketched a sketch of hair. When drawing the hair, you must remember that you do not need to perfectly draw them. Hair fluttering and tend to confonse in strands (strands, not a group). Therefore, when you draw your hair, try to apply strokes as easier as possible, the groza. They just have to lie in one direction - do not worry about the details or accurate lines location. If you display the lines at this stage, your hair will look very hard, as if someone covered with rubber glue. Believe me - in the end, the shreds and strands will take the right form, you do not need to pay so much attention to this.
Children love to draw their mothers, sisters of other children and therefore in this lesson we will deal with how easy it is to draw a gradually for children. It may seem that the dresses are drawn on a very complex technique, but this is if you look at the drawings of professionals. In this case, a lot, folds, light, the figure of a person and other things that do not need to know the child are taken into account. Well, let's start drawing :)
Let's start with the simplest Dress drawing option, you will submit a picture below, and even lower you will see a description of drawing stages. 
Stage 1
To begin with, we look at the figure of our future dress: the skirt in the form of a triangle and a blouse similar to the figure of an uneven rectangle.
2 stage
After the base of the dress is embarking on the detail: we draw two circles at the edges of our rectangle - it will be sleeves, we draw the waves from below - it will be folds of dresses.
3 stages
We continue to detail, draw the folds with ordinary lines, draw a collar, strap, give the shape of the sleeves and draw folds on them.
4 stages
We wash all the auxiliary lines that you painted a pencil.
5 stage
We draw hands, leg and do not forget about the head. The drawing is ready and if desired, it can be painted with colored pencils, paints or woven.
Second way drawing dresses

The second way is a little more complicated, but you will definitely cope :)
Stage 1
We begin to throw out the basis of the pencil. We draw the lower part in the form of a triangle, and the upper-like rectangle, pay attention to the bends between the figures, is our future waist. 
2 stage
At the second stage you need to share the top of three vertical stripes - these are folds of dresses. 
3 stages
Detailing our dresses, in some places give it a crumpled form, and the left you need to erase a little, because then there will be a bow. 
4 stages
Paradesome draw a bow and belt. Well, the dress begins to look like a dress? :) 
5 stage
Now draw a bow tilt and draw folds throughout the dress. 
Start your way to success along with the author's course from Lydia Eliner
"ABC drawing for clothes designer"
There is a delusion that the technically developed sketches of clothing is difficult and long for drawing on the figure. In fact, this is an interesting and fascinating occupation, where there is a detriment of your imagination and creativity and on the course you will be convinced.
The course is suitable as professionals who wish to improve their skills and those who make the first steps in the design of clothes or sees only an exciting hobby in it.
If you are a creative nature, overcrowded by ideas in the world of fashion and design and already realized that sewing and design of clothes is your vocation
You want to improve or develop the design skills, drawing sketches of models, schemes and drawings of clothing. Perhaps you already draw sketches, but you want to give them a "professional gloss". Or do the first steps in the world of clothes design: you want to draw as a professional designer, but do not know where to start.
If you see in the design of clothes a fascinating hobby
Perhaps you still live a princess that dreams of luxurious outfits and evening dresses and you want to try yourself as a fashion designer of your own wardrobe. Whatever you do, if you feel that "clothes designer" or "fashion designer" is your vocation, and the desire lives in you to learn and create.
Course "ABC drawing for designer of clothes" for youbecause this is a course of 15 simple and visual lessons that are useful to those who already work with clothes and are available to the one who first took the pencil.
If you want to see how learning is underway, you can buy a separate lesson for the topic of interest to 750 rubles. At the same time, you will receive a discount on this amount on any of the full course options.
| Name | Description |
|---|---|
| Before proceeding with the modeling of clothing, it is necessary to study the basics of drawing. In the first lesson, we will look at how to draw a fashion figure, learn how to create a basic pattern. | |
| In order to learn how to draw clothes on a person's figure or model, it is necessary to master the rules for drawing the main poses. These simplest postures will help you feel more confident when drawing clothes. | |
| In this lesson, we have a difficult task. ☺ We will draw foots, brushes and face features. Very often it becomes one of the most difficult tasks for the designer. Even professionals do not all know how to do it well, so you always need to find ways to image hands of hands that will allow you to make it quickly and efficiently. | |
| This lesson is devoted to the study of basic forms of basic dresses. We will learn to distinguish them between themselves, to understand the features of each of them and something even draw. For designer of clothing Drawing a base dress can be compared with the study of the alphabet, without learning to draw basic simple forms, it is impossible to go to complex shapes and details. | |
| In this lesson, we draw a shirt with a short sleeve, a shirt with a smell, a shirt without a collar and a basic shirt on buttons, which will help you even more confidently feel in drawing sketches. | |
| In this lesson, we draw a skirt with the smell, the skirt, the skirt to the fold, the skirt-bell and two skirts on one basis. | |
| The prototype of modern trousers can be considered fur and leather sides of the Scythians that protected the body during riding. In the civilized countries of the ancient world, pants were not in the go. In the Roman Empire, they were considered an element of a costume of barbarians, for the wearing of which was punished. Only in the Middle Ages pants, finally, prescribed in the men's wardrobe. | |
| In this lesson, we draw a jumper with a round neckline, a sweater with a high throat, a knitted jumper with a V-neck, a sleeveless sweater dress and a polo dress. | |
| In this lesson, we draw a coat-Chesterfield with you, a coat coat, a coat and coat and a coat with a tube. | |
| In this lesson, we draw a single-breasted and double-breasted jacket with you, a jacket with a sled collar, a jockey jacket and a jacket with bat sleeves. Historically, the jacket is considered the subject of men's clothing. For the female option, the word "jacket" is usually used, although you can often find a combination of "Female jacket". | |
| Today we have the most interesting occupation, thanks to which we will learn to draw the main types of shoes, bags and accessories. There is a huge variety of models of shoes and boots, but despite this, any shoes consist of the same structural elements. |
After passing the "ABC drawing for a clothing designer", you:
make the first steps in the field of clothing design;
take a comprehensive training system in the field of technical drawing for clothing design with a simple pencil and sheet of paper;
learn to draw sketches of models, schemes and drawings of clothes;
i will understand how to draw clothes on the figure with the help of simple materials (simple pencil, rubber bands and the most conventional drawing album);
we will master the receptions for creating the first technical sketches that you can use, both in the modeling and design of clothing and when sewing clothes to order;
learn to draw a person's figure in fashionable poses, you will be able to portray clothes of a different range, you will understand the difference in drawing between the Skinny trousers and wide jeans;
we will master the receptions of drawing clothes using a template;
create the first designer sketches that will form the basis of your professional portfolio;
increase customer stream;
increase professionalism in your business.
Using knowledge gained in the course, future designers will be able to competently convey thoughts to the clothing designer. Those who are considering the design of clothing, as a hobby will learn to draw, and perhaps will disclose the artist's talent and want to seriously take up design or drawing.
Or watch the first module of our course on the technical drawing "We draw women's blouses and shirts"
Studying foreign languages, it is important to overcome the language barrier and fear "I do not know how to talk", and with drawing fear: "I do not know how to draw" prevents your potential to reveal, and the course "ABC drawing for designer clothes" helps to overcome it.
Start right now and make your first sketch with our video lesson!
7 reasons to choose a video course on drawing clothes in electronic form:
Suitable absolutely to all.
Does not require any basic knowledge. People of all ages will be able to find something new for themselves (Believe me, I know what is available to everyone, but a little known)
Easy to perceive.
All information is set forth in simple and understandable explanations available to each person, easily absorbed and remembered.
Vividly.
All techniques in action you will see in exciting video tutorials supplemented by special training materials.
Convenient schedule.
At any time, at your request, you can set up, as you comfortably, and enjoy a pleasant viewing.
New hobby.
Which can go to the paid profession of the freelance designer.
Profitable hobby.
Which will increase your income, increasing the number of orders.
My personal consultation and support in this course.
If you have any questions after the course passing, my consultation or customer design services will need, I will be glad to help you.
On the structure of the course "ABC drawing for designer of clothes"
The course consists of 15 classes and is designed for 1 month, during classes 3 times a week for 2 hours, but you can deal with such an intensity to which you will be convenient. Several times a week I will send you a course materials with video tutorials and homework. After completing your homework, you will send it to me, just photographing your work on a regular phone or a camera, and I will send you my comments and comments.
Possible 3 learning options:
| Learning option / which includes | Light | PROFI | Expert. |
| 5 basic video lessons drawing for novice designer clothes (Drawing a fashion figure, poses, basic dress, brushes, hairstyles, etc.) |
|||
| 10 video drawing lessons For designer clothes, expanding your opportunities in clothes design (Drawing shirts, skirts, trousers, coats, jackets, knitwear, etc.) |
|||
| Catalog "50 templates for designer clothes" | |||
| Feedback according to the first lesson You send a photo of work on the first lesson and get detailed comments |
|||
| Feedback for each lesson You send a photo of your work for each lesson and get detailed comments |
|||
| 3,900 rubles. | 5 900 rub. | 16 500 rubles. | |
| Buy Light |
Buy PROFI |
Buy Expert. |
.
So far we have one way of instant payment through Yandex.Money. Select in the drop-down menu method of payment "Yandex-money", there will also be possible payment by all major types of bank cards .
Fill out the form and pay the course convenient for you. After successfully payment, you will instantly come to download the course of the course lessons in which there will be information about the most valid work.
So far we have one way of instant payment through Yandex.Money. Select in the drop-down menu method of payment "Yandex-money", there will also be possible payment by all major types of bank cards .
Optionally, you can choose any option and speed of learning. In my opinion, the second option is preferable, and this technology is the most optimal, as only when performing a homework, you can move forward and get a guaranteed result. But the choice remains yours, because everyone himself can perform tasks optionally and guaranteed to receive lessons.
Step by step, in understandable video tutorials, we will develop the basics of drawing clothes and its elements, new materials and techniques.

The course consists of detailed video tutorials complete with detailed learning materials to each topic.
Immediately after payment of the course, an email address will come to your email address with the first lesson in which there will be a small video with a task, several pages with a lesson and abstract.
You will need to study the materials, and perform your homework, which will be in drawing fashionable poses and basic elements of clothes right on the figure (dresses, skirts, trousers, coats, blouses, knitwear).
After completing your homework, you need to take pictures of your drawing, on a regular phone with a camera or a digital camera and send me to my email address.
Having received the completed task, I will write you a commentary, (and tips, how to improve work, given the shortcomings) and your wishes, I will point on those, or other errors, and then send materials to perform the second lesson.
So, step by step, performing tasks, and exercises you can consistently master the material and get new skills that in the future will help you become a master of your business.
Choose an option to "ABC drawing for clothes designer", which you want to pass.
| Pass the course Light (3 900 rubles) |
Pass the course Profi (5 900 rubles) |
Pass the course Expert (16 500 rub.) |
Fill out the form and pay the course convenient for you. After successful payment, you will instantly come to download video lessons.
So far we have one way of instant payment through Yandex.Money. Select in the drop-down menu method of payment "Yandex-money", there will also be possible payment by all major types of bank cards .
Fill out the form and pay the course convenient for you. After successfully payment, you will instantly come to download the course of the course lessons in which there will be information about the most valid work.
So far we have one way of instant payment through Yandex.Money. Select in the drop-down menu method of payment "Yandex-money", there will also be possible payment by all major types of bank cards .
How the course appeared
I, Lydia Eliner, engaged in design clothes and drawing technical sketches for more than 15 years. This is my key competence. I work as the main designer in the company "Stayer" (production of sports clothing), as well as I teach at the Institute Computer Graphics Designers of Clothing (Associate Professor of the Chair "Design Costume" SPbGEU), Member of Designers Union since 2003. Most recently, my tutorial "Computer design in clothing design" was released, in which the main material of my course for students studying in the specialty "designer of clothes" was structured.
I offer my author's course that will help everyone mastering the basins of drawing clothes on a person's figure, learning how to draw basic poses of the model, a different range of clothes, make up your first portfolio of designer clothes.
On the way to getting the profession of clothing designer, I have passed a lot of difficulties, thanks to which I enjoy my profession every day. Since childhood, I was interested in inventing outfits for dolls and make my first sketches of clothing, but in order to enroll in the institute and get a profession of clothing designer, you needed to do a huge way with sleepless nights and many hours of teachers. I still remember how my mother gave all his salary to the teacher in drawing, so that I could go to Muh (in the St. Petersburg State Art and Industrial Academy named after A.L. Stiglitsa) for the office "Design of the costume", attempts to enter during 3 years to the institute only harden me and I realized that the design of the clothes exactly what I want to do in my life.
Barely dream loud and start acting now.
With the help of the course, I will help you make the first professional steps, we will give the cut to your talent!
It happened to me - you get with you!
The choice is yours!
Invest in your development, in a guaranteed constant result that expects you in the near future.
In my opinion, for a woman the theme of clothing, fashion and beauty, these are your favorite classes that always make it possible to dream a little and relax.
I wish to penetrate these knowledge to the maximum so that tomorrow has become the beginning of a new life for you!