Construction of a brick wall: brick laying technology. How to put brickwork - step-by-step took
When lining the walls brick requires a certain skill, because the laying must be perfectly even and neat. To do it yourself, you need to study in detail how to lay a facing brick, which laying methods are how to properly perform the extender. Finishing such brick is very valued for the external attractiveness of L and durability.

| Brick parameters | Hypersed brick | Clinker brick | Silicate brick | Ceramic brick |
|---|---|---|---|---|
| Compressive strength, kg / cm² | 150-300 | 300-500 | 75-200 | 100-175 |
| Frost resistance, cycle | 75-150 | 50-100 | 35-50 | 15-50 |
| Moisture absorption,% | 6-8 | Less than 6. | 6-12 | 6-8 |
| Thermal conductivity, W / m ° C | 0,7-0,8 | 0,7 | 0,3-0,7 | 0,3-0,5 |
| Weight at 250x120x65., Kg. | 4 | 3-4 | 3,8 | 3,5 |
For high-quality facing, appropriate tools are needed:
- construction level - without it, lay the brick with smooth rows will not work;
- kelma - the solution is applied, the surplus is removed, lifting the brick when laying;
- kirka's hammer - applied to splitting facing material;
- bulgarian with diamond disks - used for cutting bricks;
- square metal twist with a cross section of 10x10 mm - to form the same seams between the rows;
- round rod with a diameter of 10 mm - for the bunch.
Additionally, you will need a slim construction cord or durable thread, anchor and knitting wire for ligament masonry with a bearing wall.
Masonry varieties

By the location of the brick, several types of masonry are distinguished:
- facial (bed) - brick laid so that the widest side is visible;
- spoonful - outside the long narrow side is visible;
- tychkin - Outside the ends of bricks are visible outside.

In addition, masonry are divided into decorative species:
- the masonry "In Polkirpich" - vertical seams of spoonful or bed masonry are shifted horizontally on half the brick length;
- stacking - vertical seams between bricks are located on the same line;
- flemish - spoonful and tyrochy masonry alternate in one row;
- "Americana" - spoonful and pumping masonry alternate with rows.

In the absence of experience, it is better to start with standard spoonful masonry to the Polkirpich, and as you can try other ways as skill increases. It should be noted that the stacking masonry is the most unstable, therefore it is used exclusively in decorative purposes.
Technology facing bricks

Step 1. Preparation of the base
The facing brick must be stacked on the base, so when pouring and insulation the foundation includes a protrusion of the base around the perimeter of the house on the thickness of the facing masonry plus 2-3 cm for the air gap. Before starting work, check the basis by the construction level to eliminate possible throughout. If any irregularities are detected, they are eliminated with cement mortar. After that, the surface must be carefully enjoyed.
Step 2. Sewing solution
For brick facing masonry, the solution is prepared from cement M500 and pure fine sand. The components are mixed in the ratio of 1: 4, water is poured into small portions. The finished mixture should be homogeneous, sufficiently thick; If the ball of the ball does not break down and keeps the form, the consistency is considered correct. Water for the kneading is sure to take clean, with a minimum amount of salts, otherwise there will be non-psychic whiten spots on the facing - the supremes, remove which is not so simple. An important point: knead the solution is needed in a small volume, since the process of laying takes time, and the solution dries quickly.
Step 3. Laying the Lower Row

Next to the workstation put a container with water and soaked in it bricks. Experienced builders recommend laying a lower row without a solution. Since the length of the perimeter of the house is not always a multiple length of the brick, in certain places it is necessary to cut a brick and choose the optimal location of the seams. If you put the first row to the solution, the trimming will be problematic. Work starts from the angle: With the help of the level, each brick is laid from above on the base and align the seams. Between the bearing wall and facing, 2-3 centimeters of free space for ventilation are required.
Step 4. Staying the corners

Now you need to lay out the angles to the height of 4-6 rows. Square rods are put on the lower row along the outer edge, they type a little solution and carefully apply it gently. Slightly rouring the solution, the brick is stacked on top, bother to the knob of the Kelma so that it comes into contact with the rod. Check the location of the level, if necessary, be bought yet. Carefully remove the rods, wipe the crumbs of the solution, and then repeat the same thing on the other side of this corner. When laying the following bricks, the correct dressing of the corner is followed: the ends should be alternate with long faces on both sides.


Step 5. Facing the walls
When all the angles are posted, proceed to facing the walls. Between the angular bricks of the second row stretch the durable thread, putting it from above and fixing with something heavy. Now put on the edge of the first row of the bar, cover the surface of the masonry with a solution. Bricks intended for this series are set vertically on Earth, they put a little solution to the ends, and then neat movements are placed on the solution. They make each of them, focusing on the thread, take out the rods, check the row using the level.


Step 6. Binding a facing to the wall
If the brick facing was not planned initially, it is necessary to perform the binding of the facade masonry to the bearing wall. Do it in two ways: with the help of anchors and dowels with knitting wire. In the first embodiment, the anchor is driven into the wall of the building, leaving the second part between the rows of facing. Anchors are better to take galvanized, with a diameter of 6 mm.
The second option: the holes are drilled in the wall, the dowels are inserted, the knitted wire is fixed on them. The wire should go to the brick, but not to go out for its edge. Standard fasteners are installed through 4 vertical rows and at a distance of 70 cm horizontally. One square meter of the surface requires about 5 mounts. Around the openings, the distance between the dowels is reduced by about a third.


The remaining rows are performed on the same scheme: stretch the thread between the angular elements on the height of the row, the rods are placed, then the solution and bricks. It should be noted that the width of horizontal seams should be 10-15 mm, and the vertical is slightly less - from 8 to 10 mm. Such a laying will look most attractive. Near the door and window openings, the brick is cut and fasten so that on the other side, the row is not interrupted, then the masonry pattern will remain correct.


Step 7. Laying of slopes
For greater decorativeness, the slopes are laying out of the brick of another color. On the perimeter of slopes, the facing is performed by a twitch method; The resulting columns width in one brick can slightly play over the edge of the walls of the walls. The slopes must be strictly vertical, so the construction level is controlled when laying.
Step 7. Extending


As soon as the solution clings, you can proceed to the laying extender. The surface is wounded, remove the crumbs of the solution, moisturize the masonry with water. Prepare a working solution: mixed in equal parts of cement and lime, and then sand is added. Sand ratio to cement is 10: 1, water is added so much so that the mixture has acquired a paste consistency. After that, the sutures are filled with a solution and begin to form them using the bunch. The first form vertical seams, then expand horizontal.

Laying at a time more than 6-7 rows can not, since the masonry can be deformed from a large load. Every 3-4 rows check the level to achieve maximum verticality. It is impossible to fill out the gap between the facing and the wall of the building, the air layer is necessary for the ventilation of the surfaces, besides, it performs and thermally insulating the E function. Outflowing can be performed immediately after laying, so that you do not rearrange the forest twice.

Video - How to put facing brick
Currently, brick houses use as high demand as before. Therefore, in the construction service market, you can easily find specialists who will help you build a house. Many come exactly that way - trust professionals. But, complex at first glance, the technology has already been known for many years, and with certain knowledge you will achieve an excellent result yourself.
Types of brick masonry
Brickwork is a durable and high-quality wall. Also laying walls of brick has both aesthetic properties. From different color bricks, you can create a variety of drawings. Naturally, the more difficult drawing, the harder it is to put the wall. Consider the main types of brickwork:
- Chain. The meaning of this type of masonry is alternating a series. The row is the tile and spoonful. Vertical seam of spoonful rows must necessarily coincide.
- Cross. This type of masonry is performed first viewing with spoonful horizontal seams.
- Dutch. It implies an alternation of the tile and mixed row. At the same time, the mixed row is stacked, alternating spoonful and twitch brick.
- Gothic. This laying brick consists of mixed rows.
- English. In this form, put the brick is needed with a dressing of two bricks. It alternate the tile and two spoonful rows.
- Well. This is the most economical and simple type of masonry. It is necessary to put the wall in it according to a specific technology: two walls in half bricks, and then combined them with a bridge (vertical or horizontal).

Proper laying of bricks
Beginner bricklayers, with its first laying, are usually hampered in two cases:
- how to put a brick in a straight line on the same level;
- how to remove vertical straight corners.
In order to lay the wall correctly, you need to comply with some conditions:
- The main condition is to put the first row of bricks you need as soon as possible. To do this, use a long profile, rack, cord or laser level. Bricks are not close to the guide, but at a distance of about 3 mm so that the solution squeezed does not knock it off.
- The horizontal of the masonry is also checked by the level.
- Check during the laying adjacent bricks. Watch out the horizontal and vertical planes.

Necessary equipment
To lay a brick, you will need the following tools:
- kirka hammer (for pelpensing products);
- kelma (apply the solution, customized and leveling bricks);
- bulgarian;
- plumb and level;
- row (to remove corners);
- protective glasses;
- roulette;
- capacity for mixing the solution.

Preparation of solution
If you decide to complete the brickwork with your own hands, then you will not make a solution for it. It is preparing on the principle of a conventional concrete mix: from sand, cement and water. You can add washing powder or clay. These additives will provide fluidity and plasticity.
Important ! The use of such a solution is prohibited if you put the hollow brick, since the filling of emptiness will lead to the loss of thermal insulation properties.
To prepare the composition, mix sand with cement, in proportion 5: 1. Next, the mixture is diluted with water to the necessary consistency.
If you are planning to lay a brick with a partner, it will be advisable to rent a concrete mixer. The cement brand is better to use 300 or 400.

Laying corners
When observing professionals, you probably paid attention, which is before laying the wall, they bring angles. Alternately, angles are removed, a slightly large middle of the walls of the wall. For even laying and determining the height, tightly stretched cord, not saving during operation. Periodically conducts a beacon bricks.
Attention ! 50% of the correctness of the entire structure depends on the accuracy of laying the corners.
Forming rectangular rows, use the order. This is a tool, outwardly looking like a square, allowing you to make a tag styling lines. The first 2-3 bricks can be put using the rule, then it is placed and fixed by the brackets of the order. The vertical is regulated by a plumbing or laser level. Made on the order of the tag will help to hold the cord-moor.
Professionals do not consider it necessary to use the order, relying on their experience. But if you decide to put brick for the first time, do not try to do without this tool.

Stevov execution
When several of the corners are somewhat laid, the cord is stretched between them. Next, a solution is applied to the foundation, and you can put the brick of the main masonry. To keep abreast of all the nuances of brick masonry, you need to learn about the main types of masonry seams.
- Powder. In this case, the solution is not squeezed out, and vice versa remains the slots used in the future for shuttering.
- Convex. Such seams are decorative, form them with a special tool or dried along the pipe.
- Concave. To obtain such a seam, you will need a wand or tube, it is not difficult to perform it.
- Smooth. Such seams are completely filled with a solution and leveled the surface. They combine masonry for fireplaces or chimneys so that the soot do not accumulate on the irregularities.

Main masonry
After the angles are derived, you can start laying the walls. Corners will rise as the walls are erected. The cord stretched between the erected angles should not be saved. A solution is applied to the foundation, and the first brick is placed on the end of which the solution is applied. Brick laid tight to the corner. Subsequent bricks are also stacked, constantly checking themselves with the level and plumb to avoid irregularities. The gap between the rows should be no more than 3 mm.
For the convenience of work, purchase or take to the rental of the Bulgarian, it covers bricks perfectly, you only need to find the right discs. If it is not possible to use this tool, then split bricks can pick up.
Attention ! Tensioning the cord is needed strictly at the top level of bricks.
In order for bricks to be tightly to each other, the solution falls more, and each brick is embarrassed by a trowel. At the same time, the string alignment occurs. The excess solution is collected by a trowel. Be prepared for the fact that if you decide to lay a brick for the first time, then, most likely you will not get everything right right. Perhaps the first rows will have to shift. But after some workout you can cope faster and carefully.

Strengthening masonry
Before thinking about strengthening the wall, it is necessary to put the foundation. So, if the base has cracks or breaks, then vertical cracks will pass through the brickwork over time. It is necessary to repaired the foundation, and then strengthen the wall. If the foundation is in order, then you can strengthen the wall. For this, wire fittings and plaster are used. Thanks to these measures, you can be confident in the strength of your wall.
Required materials and tools for strengthening brickwork:
- rabitz;
- watching solution (dry mixture or components for the selected composition);
- trunks;
- nails or dowels;
- wire.

Wall Strengthening Technology
First of all, it is necessary to clean the water-strengthened wall from dust, dirt and lifters. At the next stage, you need to clean the seams, at a depth of about 10 mm. Next, nails or dowels are clogged in such a way that their hat performs by 20 mm above the wall surface. The distance between the nails should be about 80-100 mm.
The selected chain grid must be with a cell of 70-80 mm. Place the grid on the wall, and well tie it to the Hats of nails with wire. It is necessary to do it very carefully, tightly tie the grid to each nail, the strength of the subsequent shocking will depend on it.
When strengthening the wall, you can do without a chain grid using a wire cross section of 2 mm. Such a wire is wounded between nails, thus forming cells. Corners to strengthen increased attention.

Attention ! Avoid the grid breaks on the corners. The angular part of the wall, as the most basic part of the design, should be monolithic.
After the end of the reinforcement, you can apply plaster. The mixture is prepared from cement and sand for it, in proportion of 1: 3 or 1: 4, and is divorced by water to the necessary consistency. The sand acts as a placeholder, and cement - as the binder component. The aggregate is needed to give a solution of strength and protection of it from cracking. Before preparation, it is desirable to sift the components of the mixture through a construction sieve, to avoid the appearance of lumps, choose which is inconvenient from the finished mixture. The use of the composition is permissible for an hour, so do not knead too much. Plaster need to put such a layer so that it hides all nails and the grid.
For shuttering, modern dry building mixes are used. They are produced with additives of polymers, which makes the composition more plastic, sticky and durable. Also, such mixtures passes air and do not destroy from moisture.
No less popular cement-limestrine for plastering. It is moisture-proof, and is used for the base part of the wall.

Conclusion
If you first decided to lay a brick, do not hurry, carefully calculate the number of rows that plan to fold, the number of bricks in them. Make a plan and brick laying diagram, prepare materials and tools. It is recommended to try your hand to start - put a brick without a solution to practice and not spoil it. When you have an idea, how to put the brick, you can safely apply the solution and start to the masonry.
In more detail about how to lay a brick and make seams perfect, learn in the following video
Brick for a long time is one of the most popular artificial building materials in our country. Many buildings and structures are made with it, so almost every self-respecting builder is obliged to know how to put a brick. This material is in demand not only as the main one, but also applies to the decor of certain elements.
Brick Masonry Tools
The construction site is put on a brick in workwear and using construction tools. It is recommended to use dense long sleeves clothing so that the particles of the solution do not fall on the body. They can have a negative effect on the skin. Eyes protect the glasses, and protect hands easily with tight mittens / gloves on a rubberized basis.
Making a masonry at an altitude of more than one and a half meters without a special platform or forests will not work, so they need to take care of them in advance. They are made of wooden beams and boards.
Build a brickwork with the help of anxulated staircase or a stepladder is strictly prohibited!
Mandatory will be the minimum set of devices and tools:
- kelma / triangular triangular triangular;
- level, it is desirable to have one short to half a meter in stock and one long at least meter;
- cord long no less than the length of the wall;
- fixture for the seam sharing;
- kirk for brick cutting;
- plumb;
- roulette;
- corolnic
In many operations, Kelma is involved. It is convenient for applying a cement mortar and to remove its excess. The back side of her handle bricks on a wet solution.
Preparation of cement mortar
Proper laying of bricks is not possible without the preparation of a high-quality water solution of sand and cement. It is customary to take the ratio of bulk substances from 1: 4 to 1: 6. If there is an inscription 400 on the cement packaging, no more than 4 portions of sand are added to one portion. In the "five hundred" brand adopted 5 servings.

With manual stirring, it will be more convenient to mix them in a dry form, and then, pouring several liters of water, to form cassea from the entire mass. As a result, a mixture is obtained that can be kept in the form of a cake on a trowel, then relatively easily subjected to plastic deformation when pressed.
When working with the hollow material, the solution in the brick cavity is not allowed. This is capable of reduced thermal insulation properties of the construction. One specialist should not be melted over 40-50 liters of solution one, since with an average consumption, a large mass can quickly dehydrated and stroke in the prepared container.
If you put a brick wall, there will be several people, then the concrete mixer will help them. Its volume is selected in accordance with the professional capabilities of attracted specialists.
Variety of brickwork fixtures
Most often, smooth walls are placed out of the brick, it is less common to form figure structures. Therefore, the most sought-after its form is a bar of standard sizes with smooth edges and straight corners. Manufacturers offer two large groups of products that differ in composition:
- silicate brick group (based on lime with sand);
- ceramic group (they use an exhymed clay).
The material on a clay basis is divided into such types:
- facing (facial) brick;
- ordinary (construction) material;
- special (heat-resistant).
An ordinary blocks are made to remove the walls to which subsequently it is supposed to apply a finishing material, for example, a layer of plaster or decorative trim. The facing type is made in advance, uniform color with a high quality surface. The material has a higher cost and does not assume the presence of an additional outdoor skin.

For facing bricks, a solution is prepared with the addition of a kole, so that the wall looks homogeneous
Special blocks are made to lay chimneys, furnaces or fireplaces. Refractory properties allow you to form a firebox into one brick, isolating it from the outer surfaces.
Several types of dimensions are used. The most popular is the same format (250x120x65 mm) and one-time dimensions (250x120x88 mm). Construction is used both full and hollow blocks. The second type of quality works for thermal insulation.
For reference! What isolate brick chimney? Asbestos-cement sheets are used for non-residential buildings. Compared to conventional plaster, this material has thermal insulation properties higher than 2.5 times, they are not going to condensate and the sheets are not lit. The disadvantage of such a method is the selection of carcinogens when heated. For residential buildings it is recommended to use metal sheets that also interfere with fire. To increase the thermal insulation, the non-flammable insulation will need.
Video: Bugs of beginner bricklayers in brickwork
Varieties of masonry
Put a brick in several ways. From this will depend on the thickness of the wall or room partition.

Brickwork is a design, a brick laid in a certain order and bonded with a solution
Traditionally use several techniques:
- a quarter of a brick - the bar is installed horizontally axes along the wall, leaning on a smaller side of the side, while the width of the wall or partition will be minimal 65 or 88 mm, depending on the type of material;
- pollikirpich will provide a wall width of 120 mm, which is enough for summer buildings or as a decor to the wall of the slag block;
- the masonry in one brick is used for outer walls, it will be 250 mm;
- width of the wall in a half brick will provide better heat insulation, as it has 340 mm;
- for a two-story building we put a wall wide with a width of at least 510 mm in two bricks.
Putting the brickwork is necessary at temperatures above 5ºС, since at a lower value, the solution may not provide a high-quality coupling.
Direct factories
Before you put the brick, it is necessary to wait for the full frosting of the foundation. This will not allow the walls in some sections, which can lead to the destruction of the structure. Under the first layer, waterproofing is laid out in the form of double Lena from the rubberoid. It will create a moisture barrier and will not allow the walls to get into the walls, absorbing the water from the soil.
_small.jpg)
In the construction process, it is necessary to control the horizontal line for laying and vertical angle. In the first case, it helps stretched lace along the whole wall and level, and in the second - use a plumb.
The initial row, stacked on the foundation, sets the tone of the whole wall, so it is important to approach its stacking, not allowing distortion. A solution is placed between bricks, which should provide a gap of 5-6 mm. Rows have the same seam at 7-8 mm. The first rows are preferably monitored after each block using a level. A small amount of solution must be applied to the sides of the bars stacked.
Before making the wall, you need to designate the angles, bringing them to the height of three or four levels. Vertical seams should not be through, for this, each bar is shifted along the axis relative to the previous row. Eliminate the bulge (the protrusion of the laying area relative to the whole wall) or the depression can be in advance, applying the level vertically to the front side of the wall.
To the place under the laying of a trowel or celma put a solution. It forms a "bed", and when laying on it, a brick will be a gap of several millimeters. We grab the handle of the trunk along the top surface until the block sees the level measured by the height of the stretched lace. The protruding solution is collecting a trowel from all sides.
It is more convenient to pick up a lot of bucket, and next to have a brick stock. It saves time and strength. Every 4-5 rows we recommend putting a metal mesh for the reinforcement of the layer. Such an approach minimizes the possibility of shrinking cracks.
To lay the corners of the brick after the fifth row use a metal corner. It is fixed from the outside, and then injected from the inside the corner of the brick before the touch. This ensures verticality.
Before working in dry weather, bricks are often soaked in water so that they are soaked in moisture.
The soaking process takes about an hour and allows not to pull quickly moisture from the solution. Summer frozen will be held under normal conditions. If there is no time to wait, it is enough to pour the material with water from the watering can.
Video: How to display angle of brick
Selection of seam
There are several types of seams that are chosen on the basis of possible further work with the wall.

- Sublica
The mass of the solution is evenly distributed, occupying all the space between adjacent levels. A smooth and smooth surface is ensured throughout the area. The technique is in demand when erending the inner surface of furnaces and fireplaces. The lack of relief on the inner surface does not allow in the seams to accumulate soot. Designers rarely apply this type for decorating.
- Convex / concave
Used exclusively in decorative purposes. Provide such a relief helps a device made using a 8-12 mm diameter circumcised along the axis of a short tube. Depending on which side to use it, we obtain the U-shaped seam.
- Pustose
The solution is put on the platform so that it does not be over the brick boundaries, providing a technological slot of a small depth. Such relief is needed relevant for surfaces left under the plaster. Hooking for the texture, the finish will be better to stay.
The required amount of brick is calculated on the table. It is advisable to harvest 10-12% more on the formation of complex angles and joints.

Before proceeding with the masonry, you need to lay out the first two rows without a solution to determine the sizes. During the construction of the walls, it is not necessary to use trimming or residues for window and doorways. And the latter, what you need to remember - before a solution, the brick should dry.
Video: how to put a brick. How to make perfect seams
Reading time ≈ 4 minutes
Today, the word "builder" has many values \u200b\u200band includes many different specialties. Previously, such a word as the "Mason" was equivalent to the builder, since, if a person could not build a house from stone (brick), he could not be called the builder.
The main type of brick masonry
For a person who decided to build a brick house, you need to know how to put a brick with your own hands. This is very important, since if all the rules for the reliability of the whole design can not be said. Any laying of bricks is possible only when the foundation is strong and frozen. Before you begin the construction of the wall, it is necessary to put a backrueroid to two layers on the foundation.

To make a brickwork with their own hands beautifully, it is necessary to choose her look. Here it is necessary to take into account that the wall should be not only strong, but have aesthetic look, have your own drawing. The easiest way to enjoy many builders is a chain masonry, when each row alternates, and exists in half a difference.
The process of masonry bricks

To know how to put a brick, you should familiarize yourself with the information. First, you should decide whether the wall will be erected into one brick, one and a half or two bricks. Here a big role will play a bunch between the rows. If you look at the video of the video, how to put a brick, will be much easier to know where to start and how to bind the rows among themselves.

Special tools will be needed for both: a trowel, a construction hammer, a square, the level is vertical and horizontal. As well as tools for kneading the solution. The solution must be stirred so much to have enough for several hours of operation. Before learning to lay a brick, you need to learn to knead the solution, since the solution of the solution will depend on how hard the wall will hold.

Before laying a wall of brick, you should post the corners. This must be done using a vertical and horizontal level. If you fail to lay out the angles by level, then the wall will be a curve. But the angles should be lay out in several rows. When the wall is raised, then the corners should be raised higher.

When the angles are laid out in several rows, the cord (fishing line) is stretched from one angle to another, and the solution is placed on the foundation. And after that, the cord is put on a brick.

If the cord does not stretch well, then how to put exactly brick is the question. Before each brick put on the wall, a solution is applied to his face, and only after that it is placed back to another brick on the wall.

The cord must be stretched along the top level of bricks. So that he lies tightly to each other, it is necessary to put a slightly more solution on the wall, and tapping the bracket to the brand, aligning it under the level of the cord. The protruding solution is selected by a trowel.

If you practice a little, you can quickly understand how to put a brick laying to be smooth. Of course, not everything will immediately get acquired, and 1-2 rows will have to re-stack, but after 1-2 days you can already do everything faster.
Man always needed a roof over his head. At first he took what the nature gave him - caves, holes, then began to take the material from nature by the force, which was suitable for construction. Chalashi, hut, dugouts, wooden teremes came to change the caves. And then one day, a person discovered that there is no more durable material than a stone, and eventually began to produce a stone himself.
Brick - Artificial stone created by man. He is not mined in careers, but produced on the factories.
He has two main properties that distinguish it from other materials, it is:
- Strength. It can even serve to build multi-storey buildings. Where concrete begins to crumble, he can easily withstand the load.
- Frost resistance. Even in the northern part of Russia, he withstands frost. In addition, frost resistance affects its service life. Withstanding heavy loads and exposed to severe frosts, he still can serve for many years.
Application area
With such properties, the scope of use is very wide and includes:
- Foundation. Due to the frost resistance of the brick and (with proper masonry) of its resistance to the effects of wet soil and groundwater, it is a very suitable material for the construction of the foundation. In addition, he is able to withstand a big weight.
- Base That part of the building, which lies on the foundation, can also be made of bricks.
- Walls. Brick of certain species (just those used for walls), heat-resistant and can provide good sound insulation. Thus, the inner premises of the building will always be warm, quiet and ideal for life.
- Garage and utility rooms. It will allow such structures to sleep for a long time, will hold the cold and extra noise. In addition, his peculiar unacted design can become an original feature that will make a garage aesthetically attractive place.
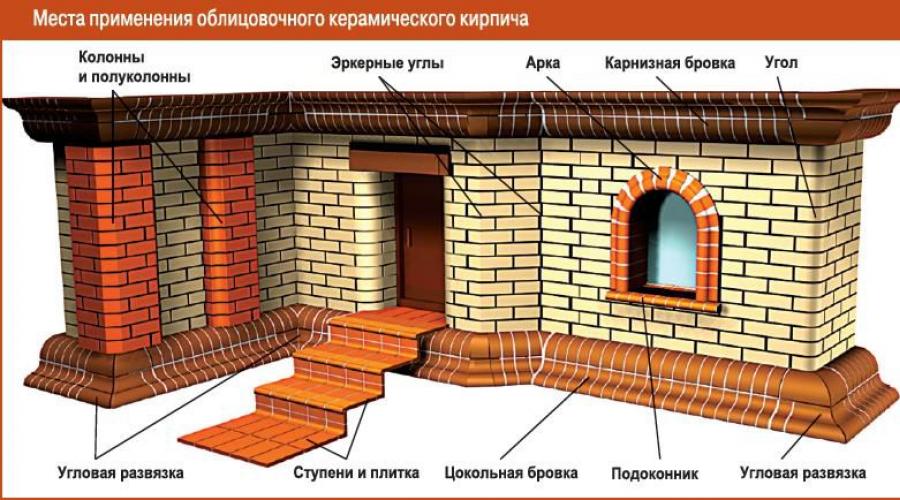
- Facade. Facing this material is a bold artistic solution that can be very successful, especially given that there are many colors, forms, and a solution that fastening the masonry may be multi-colored and beautiful.
- Fireplaces and ovens. Facing fireplaces and furnaces is decorative, but by virtue of the resistance to high temperatures and fire, the brick can also be used to directly erect.
- Columns and pillarsSupporting buildings. For the "house on the piles" it is also perfect.
Advantages and disadvantages

Like all the material, the brick has its pros and cons.
Among the advantages:
- Strength. The house will be durable, and it definitely does not fail with the roof time. No corrosion, no cracks - live at least a hundred years.
- Durability. The house is able to simultane without repair 100-150 years, which is a good indicator. By building a cottage house, you can expect that they will also be used grandchildren.
- Ecology. Brick consists of sand, water and clay - more natural ingredients are difficult to come up with. It does not pollute the environment, easily passes the air and moisture (in sufficient amount to provide the necessary conditions for a person, and in insufficient to turn out to be a flood), and also does not rot and does not mold, it is advantageous to be distinguished by the tree.
- Frost resistance. In Claus, the brick house does not make anything that in conditions of harsh Russian winters - an extremely useful property.
- Universality application. You can build a house of any form (even round!) What designers and architectors do not get tired. This is a very plastic material from which any capricious can be created.
- Fire safety. Does not burn. If a zipper will suddenly hit the house, or the owner will fall asleep with a cigarette in the teeth, it can burn the furnishings - furniture, curtains - but the house itself will remain standing and the fire will not spread on the walls.
- Noise isolation. No noisy neighbors passing cars and inability to play drums at three o'clock in the morning. Well chips extra noise, because the garage is from it - a great place for the rock band rehearsal.
However, there are also cons:
- Small size. The construction with its use is a troublesome business and a long because it is necessary to manually put on the proper place every brick, melt a row with a solution and continue. No simple designers, as with concrete blocks 2 by 3 meters.
- Cement. When working with brick masonry, you will have to bring water to the section and knead the solution. In winter it is difficult to do - at low temperatures, the solution will simply freeze.
- Large weight. Brick, with its size, weighs decently and requires considerable effort during transportation.
- High price. You will have to get out (and on KAMAZ, which will deliver material to the house).
Faces and Masonry Methods

Any brick is a parallelpiped with six faces:
- The lower and upper face, on which it lies in the masonry process, is called bed.
- Narrow side face call a stick.
- Wide side face call spoons.
And all these names - according to GOST.
Before talking about ways, you need to learn the main terms:
- Spoonful masonry - With which spoons are facing the outside of the wall.
- Tychkin - Similarly, only the audience is addressed to the outside.
- Verst - The top row of styling (external and external, depending on the location relative to the facade).
- Okunt - part of the masonry, laid out between the outer and external versts.
The methods are the following:
- Let's use The brick takes to the hands, tilge and the face will enjoy a little solution, after which they press to the brick, which was laid before him and laid.
- Iniquit A small amount of solution is moved to the laid brick and press a small amount of solution, put a new brick, pressing it to the trowel, and take a trowel. Brick itself presses to a row.
What is a gleaming and extending seams?

Normal:

Delivery - The way to keep the brickwork is one whole.
It happens one-row and double row:
- One-row It implies the laying of tychk and spoonful rows alternately, with the lower and the top row be sure to lay the tilers, and the components of the upper row are required to overlap the vertical seams of the lower row.
- Multi-rowit implies the laying of spoonful rows with alternation with twitch every six rows. At the same time, the lowest row of the twitch, the second spoon, the following four is also spoonful with a dressing in Pollockich (that is, the vertical seam of the lower two bricks should be in the middle of the top brick), and the seventh is the twin, overlapping a quarter of the brick.
The joints of the seams is the way to compact the solution in the seams and at the same time give it a form. For this, it is pressed until the formation of a clear form is a triangular, concave, convex, rectangular or rounded.
Laying with your own hands
 The solution is mounted manually or using electrical tools.
 Instruments:
- metal tank for kneading a solution;
- bucket for solution;
- soviet blade;
- trowel;
- cord;
- exercise;
- level;
- order;
- pick;
- plumb;
- corolnic;
- template for control of seams;
- gloves;
- solution, you need to buy cement and mix it with sand in the proportion indicated on the package, add water, mix thoroughly, allow you to stand and mix again so that there is no hint on the lumps;
Step-by-step instruction:
- Check. To begin with, the materials are laid out on the foundation of dry, to estimate how much you need, and we need half, a quarter and a third.
- Laying. When laying the first row, it is necessary to carefully check how much the bricks fall as far as the solution is spent evenly and how even angles are obtained.
- When the first row is laid completely, begged to the rest. At first, the solution is laid, it is laid onto it (taking or ourselves) laid a brick, the cells are removed over the solution, the extender, without waiting until the solution is driving, produce a decree throughout the row.
Important:
- First, you should not hurry. Accuracy, slowness and thoughtfulness. It is more important that the wall was smooth, otherwise what was done quickly, you will have to redo.
- Cement mortar is smeared by two bricks With a fabulous mile and four with a tychkova.
- The bandage must be vertically - There should be no long vertical seams.
- If you plan an additional wall decoration - The extending is still needed, because it increases the strength of the masonry.