Ways to gradually draw a Christmas tree with a pencil: easy and beautiful. How to draw a Christmas tree for the new year is easy

Spruce? It is very difficult to find a person who has never painted this tree in his life. But if you do not know how to do this, our article will teach you this simple matter.
Spruce is a symbol of the holiday!
Spruce is the one that everyone associates with the holiday, the New Year! This evergreen coniferous beauty for children becomes a real green fairy, delighting them on the morning of January 1 with gifts hidden under the branches. Does your child ask you to draw a Christmas tree? Or maybe you need to make some composition with her for a children's party or a matinee in the garden?
We will be happy to provide you with some simple master classes that will teach you how to draw a fir tree step by step.
Method number 1: from top to bottom
The first method, which we will consider in our article, will be based on drawing a tree from its top. Learn to portray such a spruce. And then it will not be difficult for you to create a whole forest on a sheet of paper!
So how do you draw a fir tree starting from its top? Everything is very simple!

Method number 2: bottom to top
The first way to depict spruce is not bad, but, you see, it is much more convenient to draw from the bottom up, and not vice versa. This makes it much easier to adjust and plan the height of the tree.
How to draw a fir tree from bottom to top? Let's show you now!

Method number 3: as easy as shelling pears!
How to draw a fir tree in the simplest and most unpretentious way? We know it and will definitely share it with you. Even a small child can draw a Christmas tree using this method.
How to draw a spruce branch
But what if you do not need the whole tree, but, for example, only need one of its branches? Well, we'll tell you about that too. Arm yourself with pencil and paper, let's get started!

The drawing is ready!

Now you know how to draw a spruce branch yourself. You can even teach this, for example, to your child.
Using the above methods, you can draw a branch of a coniferous tree or the spruce itself with a pencil, felt-tip pens and even paints. The tool in this case does not really matter. Draw, create yourself and with your children.
New Year 2018 is coming soon, which means that each of us will receive gifts, even small, but made with love. Of course, surprises from parents will be much more "weighty" in every sense than funny children's drawings, but the latter will be able to warm with the warmth of their sincerity and childish efforts. Well, what can boys and girls portray in winter? Of course, everything related to the New Year holidays - Santa Claus, spruce, Snow Maiden, snowman, forest covered with snow. If your children are still small and do not know how to draw a Christmas tree easily and beautifully, watch with them the video and photo of the master classes presented here. They show how even a beginner, using pencils and paints, can gradually depict a Christmas tree decorated with garlands and toys. A carefully executed, neat, bright drawing will win a prize in a creative craft competition in an elementary school or kindergarten.
How to draw a Christmas tree with a pencil in stages is easy and beautiful - Master class for beginners
If you want to learn more about how to draw a Christmas tree with a pencil step by step easily and beautifully, use the tips of the master classes for beginners presented here. Similar work can be done with felt-tip pens, but a simple pencil should always be used to create a sketch of a drawing.
Ways to draw a Christmas tree with a pencil: examples in the photo

The Christmas tree is one of the simplest designs, but you can create it in different ways. A selection of these photos will help you understand how to draw a Christmas tree with a pencil step by step easily and beautifully, and you will find a master class for beginners in the video.
The first method is a tree made of cones
Take a close look at the step-by-step drawing of the fir tree. Start depicting her by drawing a cone skirt. At the end of the work, when all the auxiliary lines are erased, the Christmas tree can be decorated with garlands and toys.

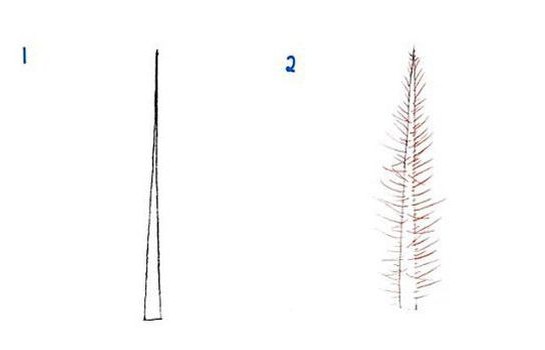
The second method is a tree-stick
Here you need to start your artistic creativity with the image of a single vertical stick. The branches of a tree and its foliage - needles - are already "attached" to it.

Method three - a Christmas tree on a stand
In this case, the basis of the picture is a triangle on a "stand" - a horizontally located rectangle. Small wavy triangles are attached to the large triangle on the sides - the paws of the spruce.

How to draw a Christmas tree step by step with paints - Photo and video master classes for beginners
The brightest, realistic looking Christmas trees are obtained by artists who use paints in their work. Undoubtedly, aspiring creators first use a pencil - such sketches are easy to correct by erasing them with an eraser. And yet, a drawing made in watercolors or gouache always attracts more attention. These photo and video master classes for beginners will tell you how to draw a Christmas tree step by step with paints.
Draw a Christmas tree with paints - Photos with explanations

Even the most inexperienced artists can learn to draw a Christmas tree with one stroke without using pencils. Learn how to draw a Christmas tree step by step with paints: photos and videos of master classes for beginners will tell you how to work with a brush.
Herringbone zigzag paint

Here the artist, using brushes of different widths, drew a zigzag line gradually widening downward. After that, using paints of a different color, he "hung" balls on the tree.
Herringbone-broom paint

First, the artist drew a straight line from top to bottom - this is how he depicted a tree trunk. To the left and right of him, he applied strokes with paint in different shades of green, yellow, and then, and white. Strokes were applied in layers of different colors - from bottom to top so that the Christmas tree at the bottom turned out to be wide, and at the top - pointed.

After that, the master painted snow on the Christmas tree with white paints.
How to draw a Christmas tree with toys and garlands for elementary school and kindergarten
Before the onset of 2018, many children will want to know how to draw a Christmas tree with toys and garlands for school and kindergarten. Of course, most of them already know how to depict Christmas trees in the form of a stick and branch branches, but this master class will teach them a slightly more complex drawing technique.
How to draw a 2018 Christmas tree with decorations in stages

The schematic drawing located here will help you figure out how to draw a Christmas tree, decorate it with toys and garlands, and submit your work to the drawing competition in elementary school and kindergarten.
- Start with the image at the bottom of the sheet of a small square and a triangle "planted" on its top edge.
- Add paws to the tree by drawing small zigzags on the sides of the large triangle and finishing the skirt of the tree.
- Start decorating the tree by placing a garland diagonally and hanging balls on the branches.
How can a child draw a Christmas tree in stages with watercolors or gouache
If you want to know how a child can draw a Christmas tree in stages in watercolor or gouache, check out the master class presented on this page, watch a video tutorial explaining the features of working with paints, in the end, invite your daughter or son to depict the New Year tree together.
We draw a Christmas tree with gouache or watercolors - Master class with a photo

After you have read everything about how you and your child can draw a Christmas tree in stages, using watercolor or gouache, get to work. Prepare everything you need for this:
- Paints;
- Whatman;
- A jar for water;
- Brushes of different sizes;
- Palette;
- Simple pencil;
- Eraser.
- Sketch the base of the tree, the stick to which you will attach the branches.

- Finish drawing the "skeleton" of the Christmas tree.

- Mix blue, white and green paints on the palette. Begin to "string" the needles onto the tree with strokes.

- Draw the thorns carefully, not forgetting about a single branch of our future Christmas tree.

- If you want to make the fir more fluffy, add more branches, covering them with needles, as described in the previous paragraph.

- Draw the trunk of the tree with brown watercolor or gouache, with blue - fill in the entire space of the sheet that is not occupied by the drawing.

We hope that now, after you have learned how to draw a Christmas tree with a pencil or paints in stages, you and your child will depict the 2018 New Year tree with toys and garlands. The master classes with videos and photos posted on this page are also designed for novice artists of all ages.
How to draw a Christmas tree: drawing a Christmas tree with felt-tip pens with children
The master class is conducted by Vera Parfentieva, a reader of the Native Path website, a technology teacher, head of the children's creativity circle, a participant in our Internet Workshop of developing games “Through the game - to success!”.
Invite your child to draw a New Year's card with elegant Christmas trees, balls, beads, beautiful toys as a gift for a friend, loved ones, relatives!
Before drawing, consider the Christmas tree in the picture with your child: it has a trunk (what color, shape it is), there are green fluffy thorny branches. The crown of the Christmas tree is prickly, with needles, it is similar in shape to a triangle: at the bottom it is wide, and at the top, at the crown of the tree, it is narrow. The branches do not go from the very bottom of the tree, but start a little higher, so below at the ground we see the trunk of the tree.
We draw a Christmas tree with children with felt-tip pens: materials and tools
To work you need:
- white album sheet,
- markers,
- a simple pencil,
- ruler.
We draw a Christmas tree with children with felt-tip pens: a step-by-step description
When drawing a Christmas tree this way with young children, give your child a ready-made template. Have him circle it (instead of step 1 and step 2).
Step 1
Fold the album sheet in half. Draw an isosceles triangle in the center.
To do this, draw a thin vertical line in the center of the postcard, barely visible to the eye. At the top of the line, put a point - the top of the triangle. At the bottom of the postcard, draw a horizontal line, on which, from a thin line to the left and right, set aside equal segments, for example, 4 cm each. Connect their ends to the top. Thus, we get an isosceles triangle, i.e. a triangle with two sides equal to each other with a base of 8 cm.

Step 2
Draw a rectangle or square of your choice under the Christmas tree, also focusing on the central thin line - this is the trunk of the Christmas tree.

Step 3
In the background, behind the Christmas tree, draw two more triangles.

Step 4
And now the most interesting work begins! You need to dream up and come up with outfits for the Christmas trees. In the article we give examples of Christmas tree outfits, you can think of other Christmas tree outfits.
Divide the central Christmas tree with inclined stripes. As a result, we get such cells.

Step 5
Select markers of green shades and paint over the resulting cells with green markers of two shades in a checkerboard pattern.


And you can first draw on a white background in each cell, for example, balls, beads with bright felt-tip pens, and then paint over the remaining places in the cells in green. We will test this option in the next step.
Step 6
Draw circles of different sizes on one Christmas tree. And on the other - wavy lines going from top to bottom.

Step 7
Color the circles according to your idea. And paint over the space in the triangle between the circles with a green felt-tip pen of a different shade so that this tree does not merge with the first.

Step 8
Color the wavy lines with green markers of different shades. Draw circles, diamonds, stars between the lines - whatever your imagination tells you.

Step 9
Paint the distance between the wavy lines with different shades of green. Paint over the barrel with brown felt-tip pens 2 - 3 shades. Draw the lines from top to bottom. Decorate the central Christmas tree as your imagination tells you. Or you can glue multi-colored sequins.

Our postcard is ready! We admire the beauty and put the postcard in a gift box for the New Year! Such outfits for Christmas trees were invented by seven-year-old Nastya.

Creative task:
- What techniques can be used to design such a postcard?
- Draw triangular Christmas trees and paint them with paints or pencils. And you can combine several methods at once, for example, paints with felt-tip pens, or crayons, or all methods together. Imagine!
- Make triangular Christmas trees using colored paper applique technique and decorate them with sequins, beads, beads, rhinestones. You will learn how to make an original application of a triangular Christmas tree for a postcard from the article.
- Learn with your child poems about the Christmas tree for the New Year's holiday. A selection of 38 poems about the Christmas tree for children from 2 to 7 years old can be found in the article.
Good luck with your creativity !!!
How to draw a Christmas tree: ways to draw a Christmas tree with paints and pencils
There are a lot of ways to depict a Christmas tree. Below in the pictures you will see some of them. But you can come up with your own method based on the data below the tables and pictures. Imagine, try, don't be afraid to experiment! Think of what character your tree will be, how you will reflect it in line, in its shape, color.
Draw a Christmas tree with paints and pencils: the first way to draw

We draw a Christmas tree with paints and pencils: the second way of drawing

Less than a week is left until the most important holiday of the year, so more and more people are engaged in creativity and create a New Year's mood for themselves. And it is for such people that several master classes are presented below, how to draw a Christmas tree step by step with a pencil for novice artists.
Before starting work, you should get the following things in advance:
- A4 white sheet or even more;
- simple soft pencil;
- eraser;
- sharpener (just in case);
- colored pencils or paints as desired.
And here are the main stages of work:
A large triangle is drawn on the sheet - it depends on its size what the future Christmas tree will be like at the very end. If necessary, you can use a ruler to keep the lines as straight as possible.

After that, the top of the future tree is drawn in the form of wavy lines, as shown in the figure below.

Now it's worth drawing the branches below in exactly the same way. They do not have to be a single whole, but as if they go scattered.

At the next stage, the most lush part of the tree is drawn and the auxiliary triangle is erased. This should be done as carefully as possible so as not to erase too many necessary details. Of course, after they will need to be finished again.

Straight lines draw a short but reliable tree trunk. Since the Christmas tree is New Year's, it is not on the street, but transplanted into a pot, which appears on paper at the same stage.

Now for the fun part. The tree needs to be decorated with garlands, as shown in the example below. But you can also turn on your imagination and decorate the Christmas tree at your discretion.

At the last stage, New Year's toys, snowflakes and any other New Year's attributes are drawn at the discretion of the artist.

It remains only to decorate the resulting drawing so that it becomes "alive" and looks more interesting in a frame on the wall.
Now you know how you can draw a Christmas tree with a pencil in stages, but this is not the only lesson for beginners in our article today.
Little herringbone
The next option is a little lighter than the previous one, and the holiday tree looks very cute and attractive. Even children can cope with such a pattern.
So, in order to show all your possibilities in drawing, it is enough to go through the following steps:
A4 sheet is placed vertically and a straight vertical line is drawn in the middle of it. Its size will correspond to the height of the future Christmas tree, so this moment should be thought out in advance. In the same way, you can draw several small Christmas trees on one sheet.

At the very top, just where the depicted line ends, a Christmas star is drawn. It will become the main decoration and should be quite large. You can also draw eyes or a funny face on it for fun.
If I may say so, the tree will have three tiers that complement each other. At this stage, the top level begins to appear on paper in the form of a mountain with jagged ends.

After that, the next part of the Christmas tree is drawn. Everything is done in exactly the same way as in the previous step, only this time the "mountain" should be slightly larger.

The penultimate stage is a detailed drawing of the lower part of the tree. Of course, it will be bigger and more magnificent than all the previous ones. Now we need to finish drawing the visible trunk and the horizon line at the bottom so that the tree does not “hang in the air”.

At the very end, all kinds of New Year's decorations and garlands are drawn, which will sparkle with multi-colored lights.
Most often, for novice artists, it is important not only how to draw a Christmas tree step by step with a pencil, but also what colors it will be presented in. So it's time to pick up pencils and trust your inner voice.
Christmas tree from the cartoon
In Soviet times, many holiday cartoons dedicated to the New Year were released. And we all probably liked the festive spruce, whose branches were crushed by snow and decorated to such an extent that at times dazzled in our eyes.
It is very easy to draw a similar Christmas tree yourself. And this can be done in just 4 steps:
In a familiar pattern, a triangle is drawn on a piece of paper. An auxiliary horizontal line is neatly drawn from the very top. With its help, it will be possible to harmoniously finish the tree trunk, stars and a stand for the spruce.

It's time to start drawing the left side. To do this, smooth lines with pointed tips are drawn on paper. Sometimes they bifurcate, sometimes they remain fused. This will make the branches look more harmonious. At the same stage, a pointed star is drawn on the top of the tree and its lower branches.

In the same way, the right side of the Christmas tree appears on paper and both sides are connected with wavy lines. It remains only to finish drawing the trunk and stand, as well as New Year's toys or a small amount of snow.

After the step-by-step principle of drawing a Christmas tree with a pencil for beginners has become clear, all that remains is to erase additional lines and paint the resulting masterpiece with paints or pencils.

Such a drawing can be a good basis for a homemade New Year's card or for a gift to parents. You can also hang it in a frame on the wall or send it to a creative competition for young talents.
The last holiday version of the picture
So that it does not seem there at the very beginning, but there is nothing difficult in drawing a Christmas tree on your own with a pencil. How to do this in stages will be shown below for novice artists.
All you need is a pencil, paper, an eraser, a little time and self-confidence. And even if it does not work out the first time, this is not a reason to quit creative pursuits.

So, let's start with the simplest:
- A flat horizontal line is drawn in the middle of A4 or A1 sheet. To do this, you can use the ruler.
- Based on the example below, an asterisk is neatly drawn, which will become the main decoration on the festive Christmas tree. It can be supplemented with interesting elements.
- Now two arcuate lines are drawn from the star - they should smoothly diverge to the sides and connect with each other in a zigzag strip. You shouldn't rush at this stage.
- A similar element is drawn below, which should start from the second zigzag on the right, and then on the left.
- The third part of the tree is drawn according to the same principle, but differs in a large size. After that, a trunk visible from under the branches is drawn.
- It remains only to decorate the New Year's beauty with green paint and the drawing will be complete. For harmony and an "interesting look", it is recommended to paint the upper part of the tree with light shades, and everything else with dark colors.
- As soon as the paint dries, you can paint festive toys on the branches of a tree with multi-colored paint, as well as depict a beautiful background with snow.
Now everyone can draw a Christmas tree and even use different variations for this. But don't stop there - use your imagination and don't be afraid to be original.
The long-awaited New Year can be imagined without sparklers, streamers, and even without sweets. But it is in no way impossible to imagine a magical celebration without a magnificently decorated Christmas tree. Alas, in recent years, thousands of people refuse to buy a living tree, following humane motives, and they cannot afford an artificial beauty due to the high cost. We invite everyone to learn how to draw a Christmas tree with toys and garlands on a large canvas with pencils, watercolors and gouache. To beautifully decorate the whole house, a school class or a group in kindergarten with bright illustrations for the New Year 2018. We have collected the best step-by-step master classes for beginners on how to draw a Christmas tree easily and quickly in our own selection. Choose the one that suits you best and get started with fun creativity.
How a child can draw a beautiful Christmas tree for the New Year 2018 in stages with a pencil and paints
Kids, no less than adults, are in a hurry to dress up the room for the onset of the holiday and the arrival of an important guest - Santa Claus. The guys are everywhere pasting tinsel, placing curly candles and figurines, hanging their own crafts. Thousands of kids are trying to find out how a child can draw a beautiful Christmas tree for the New Year 2018 in stages with a pencil and paints. To surprise your kind grandfather with a homemade gift after a short creative lesson. Let's help the kids learn a new useful lesson. It is easier to teach preschoolers such drawings using checkered paper, but even on an album sheet, the process will be easy and fun.
Required materials for drawing "Herringbone" in pencil and paints for the New Year 2018
- a sheet of landscape paper
- pencil
- eraser
- watercolors or gouache paints
Step-by-step instructions for creating a bright herringbone pattern for a child using paints and pencils
- Start your bright drawing with a picture of Santa Claus. On the left half of the horizontally placed sheet, draw the character's oval nose. Then add the mustache, eyes and face outlines.
- Place a fur-trimmed cap on your head. Don't forget your grandfather's long beard.
- Proceed to the torso: draw a long-sleeved fur coat for the hero. Try not to make sharp and too straight lines. Let Santa Claus with his constant companion - the Christmas tree - be frivolous and partly cartoonish.
- Draw a scent line on the fur coat, draw a strip of the bottom fur trim. Draw similar details on the sleeves. Don't forget about felt boots and mittens.
- Slightly to the right of the head of Santa Claus, put the top point of the Christmas tree. From it, move to the left and right along one curved line representing the branches of a tree.
- Then, in the same way, draw a second tier of branches, exceeding the first in width. Finish the Christmas tree with the last widest tier of fir branches.
- Just below the tree, draw the outline of a gift bag. Give it a slightly sloppy shape.
- Erase all unnecessary lines. Draw slanting wavy garlands with round lights on the tree. Place several Christmas tree balls between the garlands.
- Draw all the folds on the gift bag, paint shadows on the face and outfit of Santa Claus. Use small parallel lines to shade the floor at the feet of the character and at the foot of the tree.
- Color the illustration with traditional New Year colors: red, green, white, gold, etc. Using this wonderful master class, any child will draw a beautiful Christmas tree for the New Year 2018 in stages with a pencil and paints.
How to draw a Christmas tree with toys and garlands for kindergarten and school
With the arrival of December, children in kindergarten and at school are given interesting New Year's tasks. And extracurricular drawing of thematic pictures is one of the most popular. After all, you can add ready-made children's illustrations to a thematic exhibition in an educational institution, decorate boring corridors and create a festive mood in bright classes and groups. In addition, drawings of a Christmas tree with toys and garlands in kindergarten and school are not just a decorative element created by the hands of children, but also part of a compulsory educational program.
Necessary materials for drawing a Christmas tree with toys and garlands for school and kindergarten
- thick sheet of white paper
- sharpened pencil
- ruler
- eraser
- colour pencils
Step-by-step instructions for drawing a Christmas tree with a garland and toys for school and kindergarten

How easy and beautiful to draw a Christmas tree with bullfinches in pencil: a master class in stages for beginners
It's never too late to learn how to beautifully draw a Christmas tree with bullfinches with a pencil in our master class in stages for beginners. For both children and adults, such an activity will bring a lot of pleasure, and the finished result will be the best reward for their work. In addition, drawing perfectly calms the nerves, agitated and disturbed by the pre-holiday bustle.
Necessary materials for drawing a spruce branch with bullfinches with colored pencils
- a sheet of thick landscape paper
- regular soft pencil
- colour pencils
- eraser
Step-by-step master class on creating a drawing "Christmas tree with bullfinches" in pencil for beginners
- Place the landscape sheet horizontally on your work surface. Draw the location of the future spruce branches with thin soft lines.
- Using your imagination, draw out the outlines of the snow caps covering the branches. Use small ovals to outline the places for bullfinches, cones and other small objects.
- Start drawing the top bird: detail the head with eyes and beak, wings, tail and abdomen. Then do the same with the rest of the bullfinches.
- Draw large bumps and hatch them with a grid of cross lines.
- Take out the red and black pencils and paint over the bullfinches. Leave white highlights on the wings and tail, darken the barrel of the abdomen. Draw the needles on the branches with a green pencil.
- Using a brown pencil, paint over the fir cones. With darker browns, give each bud the desired texture.
- Use blue-blue shades to darken the edges of the snow caps. Feather the transitions to make the cover appear more realistic. Supplement the needles with other tones of green so that the branches come out bright and lush.
- Shade the background with any color you like and place a bright congratulatory inscription "Happy New Year!" It's so easy and beautiful to draw a Christmas tree with bullfinches with a pencil according to the master class in stages for beginners.
How to draw a Christmas tree with paints in stages for beginners and experienced artists
As in any other fine art technique, in drawing a Christmas tree with paints in stages, it is important for beginners and experienced artists to correctly draw up a graphic frame. Contours and auxiliary details should be thin so that they can be easily removed at the end. The sketch may be sloppy and not entirely clear. But the final painting with gouache or watercolor should be started only after all the previous stages have been completed.