School desk drawing with a pencil. How to draw school, teacher and class pencil or paints (for beginners)
School ask a lot of stupid tasks. In particular, according to visual arts. That's what I have already drawn for you:
And then it will be about how to draw a student. If it is fair, then the student will draw himself. You can take a photo of a classmate who do not love very much, or a classmate that you like. But in the second case, you must try well. With my tips, you can make a good drawing of the student.
How to draw a pupil with a pencil phased
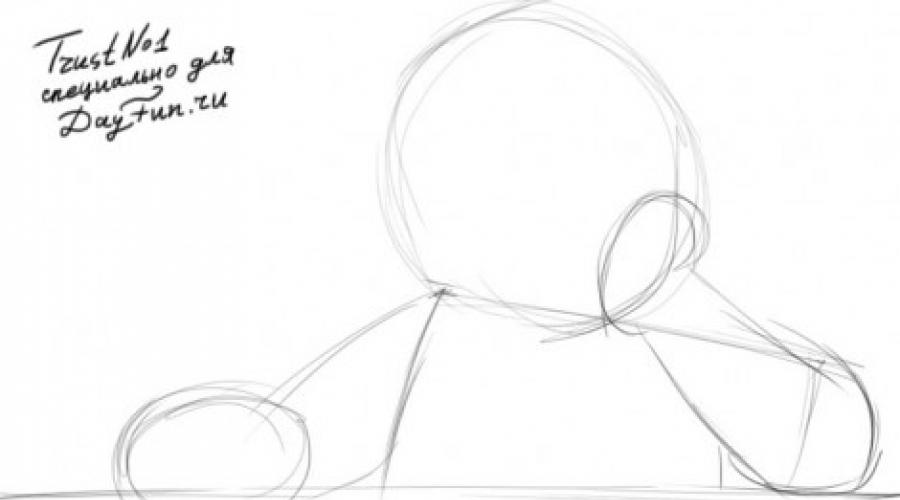
Step one. We draw the middle of the sheet of a flat line. You can from hand as I or take a ruler, it will be a desk. Circles I designated the head of the student and fists.  Step second. Now I draw a face and hairstyle of the guy.
  Step Three. I paint the eye and add details on the clothes.
  Step fourth. Hair that is closer to the face always seem darker. Stripping them and add shadows on clothes:
  If you draw this student, the top five is guaranteed. Only do not tell anyone where you found a hint, come more often on this site and get five always!
Everything is possible in our time. And this is the same. Let it begin, first you need to cook everything you need for drawing. You need a sheet of paper that position horizontally. Decide to decide which side will draw the school building. Came of a simple pencil make a sketch, but a ruler At the same time, it should not be used, this is a drawing, and not the drawing. Horseing the facade of the school, it must be located below the middle of the sheet. You can see the porch, doors, windows. For this, pay attention to the size of the sizes. When you turn to small parts. On the drawings are shown all the steps For gradual school drawing.


To draw school pencil stages, a lot of time and diligence are hardly needed. Draw school is not more difficult than drawing a plain house.
And so, for starters, draw a general contour of the school. Following the stairs, windows, doors, roof and so on.
You can also draw a school building itself, but school years. Here you have to strain fantasy.
More detailed instructions in the video below.
What to do if the child was asked homework - to draw school, and he does not know how to draw a firm twice in a quarter of a quarter. How to learn to draw? It is good that today there is an Internet and people are divided by a variety of useful information, including how to draw school.
Generally draw a school building Not so difficult. But before you start drawing a school with a pencil, you need to foresee all the nuances so that the building looks more realistic.
Decide exactly exactly draw a school: From the facade or perspective, how to lay a piece of paper to fit better. So, draw school. First do sketch. You do not need to use the school line for this. You need to draw school, and not make her drawing. Probably you will choose a way to draw school from the front side. Then the main rectangle of the facade should be placed below the midline of the sheet. Next should be based on the location of trees and other objects. The next stage is proceeding with the drawing of the building itself. I reserve first porch, then windows.
See how to draw a school on the video:
Already then we pay attention to the smallest objects - this is a roof, a school plate with a number, we decorate the windows, border. Go to the surrounding objects. Draw a path, a track for school, school fence and schoolchildren themselves. Having finished, you can draw quite small details, such as tile or curtains in the windows. All unnecessary details after that we wash the eraser and apply a light hatching, denoting the shadows and decorating the drawing.
It is often about the fact that some building is a school, only those who study it are known. It can be a converted residential building, an administrative building, something else if the school is old. Buildings of modern schools are not much different from educational buildings of other educational institutions. Therefore, simply draw something like this and say to yourself: this is a school. I will draw the mouse.
First, the general outlines of buildings (do not forget about the laws of perspective).

harnessfully; Windows and add other details.

Add schoolchildren and improving the appearance of buildings.

Everything is perhaps.
I offer you a gradual drawing of the school such that even a rib will cope with him.

As can be seen from the picture, you first need to draw a rectangle with the roof, then give the roof a noble look.
Then give the 2nd floor with the bell, draw the windows, doors. Then make an entirely beautiful.
So it turned out a beautiful school, it remained only to paint.
This question may imply not only the school building, in my opinion.
The school can be shown what is called, from the inside.
I don't know how to draw, so I would pee tipquoto; When performing a task in the Internet.

Or such an option with the teacher:

School attributes can also be presented in Figure School

The learning process in the picture looks like this:

To draw school, you will need a sheet of paper, pencil, eraser and ruler. To begin with, we draw a simple geometric shape.

We divide it into parts.

Draw the door.

Dvorisu a couple of steps.

We start drawing windows.


Draw a roof.

We remove the extra lines. Drawing ready.

Draw a school You can use a simple pencil, colored pencils, markers or a variety of paints.
To do this, take a blank sheet of paper, pencil, put a picture or open an example of a school drawing and srop it yourself.
Parta is a special type of table and chair. Usually they are connected to each other. As in my example in the photo: This is done not only for fun, but has a practical goal. Young school creatures (read monsters) are very violent. In my school years, any chair could fly over the heads of students, if it was not very firmly brittered to the ground, or soldered to the party. And move such structures is extremely uncomfortable. First, they are heavy, and not every schoolboy is able to lift the desk with a chair alone, so he will not be able to throw it away. Secondly, they are calculated on the average student. From such a parties suffer from high and very thick guys. It is impossible to configure it. I personally, they seemed very comfortable, especially well in the middle to put a portfolio or put a third. At the Institute, I also had such parties, but already more authentic. There were five students sitting there, or one lying. Very comfortable thing for a student. Let's draw now:
How to draw a steppot
Step one. You take a ruler and feed the distance of each angle, ribs, racks. Transfer lines on paper. Remember that the part that is from us further will look less.  Step second. Let's make an outline volume.
  Step Three. When you look at the desk from a specific point, some elements will be hidden behind others who are closer to you. Sotra line, not long to be seen from your point of view.
  Step fourth. Always from the bottom under the table a shadow is formed. It must be shown by hatching. Imagine from which side you have lighting. If on the left - a stroke on the right, if on the right - on the contrary to the left. Yeah I understood?
  I give you a list of what else can be drawn.
How to draw school?

Draw a school building is quite simple. However, still before drawing a pencil school, some nuances should consider, so it will look more realistic, and the drawing will not resemble geometric shapes.
In order to draw school, you need to prepare a sheet of paper, eraser and a simple pencil. To build the whole sheet of paper, it is better to arrange horizontally. It should also be declared how to draw school, that is, with the facial (from the facade) or in the future (in this case, you will need to raise at least two sides of the building).
Draw a school
With the help of a simple pencil, it is necessary to make sketches. Use the line to achieve direct lines is not recommended because it is a drawing, and not a drawing. If you decide to draw only the front side, the facade rectangle should be located slightly below the middle of the sheet. After that, you can designate nearby objects - trees, school garden, and so on. Then you should start drawing the building, pointing the porch and winding windows on the facade.
After that, you need to pay attention to small objects - school tablet, curb, roof, window design and doors. Now you can go to the surrounding objects. Draw a path, trees, fence. You can also add the figures of schoolchildren going to school. Then you should clarify small details, such as blinds and flowers on the windows, tile. After that, you can remove unnecessary lines with an eraser and apply a light hatching if you do not want to paint the drawing.
If you draw a school building in the future, the drawing should be started with the closest angle to you. Next, it is necessary to build roof lines and bases that, according to the law, the prospects must be found on the horizon. Also drawing a school in perspective, you should consider that you will need to position the door and windows. And the closer the windows to you - the amount of size should be more. Now you know how to draw school stages, and you can do it in two variations.
Phased lessons and master classes will tell the child how to draw a school or teacher at the board with pencils for a creative contest or artistic review. Information is made very accessible and equipped with step-by-step photos and videos. Even children of 7-8 years will calmly cope with the development of the material, and for 5 grade students and he will seem very easy and will not cause any difficulties. If desired, pencil sketches can be painted with paints by making them brighter, spectacular and viewing.
How to draw a pencil school - a simple lesson in stages for children 7-8 years
The easiest way to draw school building is described in the following lesson. Work is available for children of 7-8 years and does not require a child of serious effort or the presence of pronounced artistic talents. Some adult assistance may only be needed at the layout of the location of the windows. With all other boys and girls 1-2 classes will be copied independently.

Required materials for simple drawing of the school with pencils
- paper sheet
- pencil HB.
- pencil 2b.
- erasing rubber
- rule
- colour pencils
Step-by-step instruction, as kids 7-8 years old to draw pencils

As stages to draw the school of the future with colored pencils and felt-meters - a lesson for beginners

This is one of the simplest lessons telling novice artists how to draw a school of the future with pencils and felt-meters. The beauty of classes consists also in the fact that the guys may not just copy the proposed image option, but to show a fantasy and embody their own ideas about how to look in the distant future their favorite educational institution.
Necessary materials for creating a school drawing of the future beginner artists
- a4 format sheet
- simple pencil
- set of color pencils
- set of markers
- erasing rubber
Step-by-step instructions, as a beginner draw a school of the future
- The sheet of paper is horizontally and the conventional line is divided into two parts so that the top is a little longer.
- Closer to the left edge up from the horizon line to draw a high semicircle - the future of the school building.
- At the bottom under it, to portray another semicircle, only smaller. Conduct another 3 semicircular lines inside it, each of which will be less than the previous one.
- In the top of the semicircle, draw the arched input and read another 2 vertically curved side lines from the same side from the entrance.
- Above arched entrance to two cross-line.
- The bottom of the sheet, symbolizing the surface of the planet, flashes on the track sectors.
- Decoration sketch with colored pencils of suitable shades.
- Then, in the sky, draw two small aircraft in the sky, in which students fly to the lessons.
- On the arch on the entrance to the building to write the word "school".
A simple lesson for children in stages - how to draw a pencil teacher at the classroom board

If you need to draw a teacher near the board to some school competition or seeing children, this phased lesson will help cope with the task. For the smallest boys and girls, the case will seem complicated, but class 5 students and older will easily make the required.
Required materials for the phased creation of a teacher's drawing at the blackboard
- list of album paper format A4
- pencil HB.
- pencil 2b.
- erasing rubber
- rule
Step-by-step instructions, how to draw a pencil teacher at the classroom board
- Paper sheet arrange horizontally. Determine the place where the teacher and light strokes will be depicted without making the primary sketch. First draw vertical elongated oval (head), mark the middle of the face and the place for the eyes. Then designate the torso and circles to highlight the shoulder joints.

- Schematically depict the hands, placing the elbow joints and wrists.

- Draw the figure more hard and give hands shape.

- Start working out clothes. At the first stage, go to the handbrick's collar, pre-spout the neckline. Then to read the sleeve and folds in the area of \u200b\u200bthe elbow bend. Unnecessary auxiliary lines of the drawing remove with the help of erasing gum.

- Draw a second sleeve and an inner collar.

- Picture more detailed hand, noting compressed brushes.

- Detail the drawing, highlighting more clearly each finger. Take the pointer directed towards the board.

- Posted by oval face and ear. Stand your eyes, mouth and nose.

- Draw a society, nostrils and lips.

- Pictitate the missing details, making the face natural. Add eyebrows and eyelashes, clarify the eyeball. Light strokes allocate hair collected in the tail.

- Using the lineup behind the teacher, outline the board and write some example or equation on it.

- Sharp the jacket of the teacher with a dark pencil or felt-tip pen. The same color to make several strokes on the hair and more clearly highlight the contours of the figure.
Phased master class for school - how to draw teachers in physical education for beginners
Physical education lesson is one of the most beloved for many schoolchildren and, receiving a task to draw some teacher, the guys often prefer to portray the fizruck. Such work done according to the tips of the phased master class, you can then hang in the gym, where children are engaged in or send school artistic art creativity.

Required materials for the image of the physical education teacher on paper
- a4 format sheet
- simple pencil
- erasing rubber
- set of color pencils
Step-by-step instructions, how to draw a phased teacher on physical education
- The sheet is located vertically and light running at the floor to hold the floor line.
- In the upper right corner of the hand or with the help of the line, draw the square, and in it - it is one. Inside the second square, the fastener is the holder of the basketball ring and the grid hanging on it. Square, holder and ring paint red pencil.
- Mark the location of the teacher's figure, shifting it from the vertical conditional center on the left side.
- First draw sports pants and jacket. At the bottom to work in detail the sneakers or sneakers.
- From above, stock neck lines and make sowed faces. Sketch your eyes, nose, mouth. On my head, depict either hair, or a sports cap.
- Costume toned with blue pencil or felt-tip pen. On the chest for beauty to draw a red stripe. On the neck draw the whistle hanging on the rope.
- In one of the hands of the teacher, to portray a basketball ball. To paint it with an orange pencil.