Drawing a wolf. Learning to draw wolf pencil step by step
Now we will look at how to draw the wolf with a pencil in stages, how to draw wool wolf gradually for beginners, very detailed and very detailed. 1 option will be light, the second is complex.
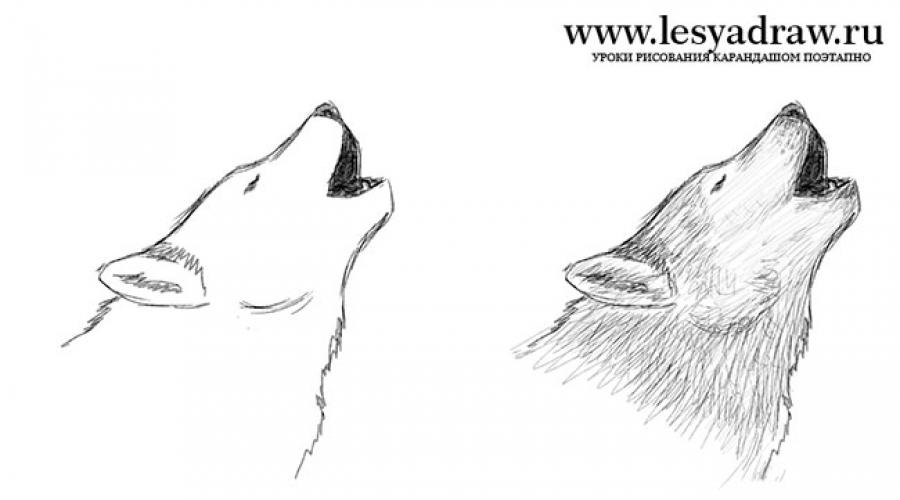
First we draw a simple variant of the wolf face. First draw part of the nose, then forehead, then mouth, nose, eye, tooth and paint your mouth.

For this work, I used A3 format paper and simple pencils with rigidity 2t, TM, 2M, 5M.
As a reference, I used this photo. Photo by lonewolfphotography.

First of all, I make a detailed sketch, outstanding all the boundaries of different tones. First, as soon as noticeable lines, there are general outlines, then, relying on some part of the figure as the basis for the construction, according to which I measure all the values \u200b\u200b(most often it is a nose, as I like to start the sketch from the nose), I perform the whole sketch.

I begin to stroke I always with eyes. At first, TM outlined the darkest places of the eye - pupil and eyelids, then Gusto hatching them 4m. Blik leave not painted. Then with more rigid pencils draw the iris. I move from pupil to the edges for a more natural image.

I turn to the wool. Starting with the fact that the pencil 2t is gently planning the direction of the wool.

Pencil TM short strokes begin to work wool. Near the eye of the stroke, I do quite short.

I take 2m and run out again in dark places.

I turn to the ear. Pencil 5m in painting the darkest plots.

2M stroke darkened wool. First, I dream light lines, then with a short river wool.

Weekly wool on your ear and paint a dark tip.

2m stroke ear. It is important not to get confused here in the direction and length of the strokes. Long strands draw long strokes, first separating one and working only it. Monitor tone.

The outline of the ear outlines almost point strokes. Draw wool with short strokes.

Returning to the forehead and work on the forehead 2m, in some places adding and 4m. Then I work on the wool around another eye, moving away from it. So that the contour looks naturally, first with rare long strokes outlook the extreme fur, then add a line between them and only then shaper the remaining plot. Light wool draw 2t.

2t outlining the length and direction of wool on the forehead. It is quite difficult, since there is a complex change of directions. Constantly crying with a reference. TM and 2M runs around again. It turned out too light, but we always have time to darken.

Completing forehead. Merva draw 2t long strokes. It is especially important not to put the strokes in parallel, otherwise the wool will easily turn into an unsightly bristle.

We work out the second ear. The technique is the former - from the dark to bright.

Now the nose queue. Its I'm a stroke short, almost point arcuate strokes to show the leather texture. I actively use 2m and 4m. First I pass black and almost black places, leaving brighter for later.

Drawing a face. Here the strokes are very short. Weekly point - the bases for the mustache. First pass the lower jaw, because She is darker.

I turn to the bundlebards. The technique is the same, only the strokes are much longer.

Here I change myself and pass the bright mane first. She came out lighter than necessary, but fix it easily. Weekly wool under the muzzle.

Stroke black wool band 2m and 4m.
We are writing. Dimming too bright places. Work is ready.

Remarks
- Never push hard on the pencil. It is better to go through the extra layer than to reverse it right away. It is sometimes very problematic to correct the reheasted places.
- Never paint the fur in parallel, it will look unnatural. Even at the most invited animal, the hairs will be bent and overlap each other. Therefore, each individual wool draw at a small angle to the adjacent or slightly strobs the arc.
- Try to minimize the eraser. Dirt remains from him, due to which new strokes will look untidy.
- Never hurry. If you feel that you want to quickly finish, it is better to postpone work, otherwise you can only spoil it.
- If something does not work or starts to annoy, postpone work. Later, a fresh look you can evaluate errors and easily correct them.
Full or partial copying and accommodation on other resources only with the written permission of the author!
In this lesson, we will learn to draw a wolf with a pencil in stages.
LESSDRAW website has a whole section on drawing wolves. There you can find such lessons as:
In this lesson, it will be shown how to draw a conventional wolf completely, in full growth. Let's start the drawing process.
To draw was easier, I need the basis. We draw a smooth circle and connect it with a figure that looks like a droplet.
To the front and back of the droplets we draw the lines of such a form - it will be paws of a painted wolf.

At the top of the main circle of the head draw ears. You can immediately begin to draw them or simply draw two conditional triangles to draw the wool more detail and so on.

In the front, a little speaking beyond the boundaries of the circle, you should draw the basis of the muzzle, the nose and the mouth of the wolf.

We connect your head with a wolf torso, also on the face you need to draw his eyes.


Give the shape of the stomach and the back of the wolf body.

Draw a nearby hip back leg.

I am erased by extra lines again. Now you can draw a long thigh and the rear paws themselves. Please note that they differ slightly from the front.

We remove all the line of the outline and teach the tail.

The wolf is a dangerous predator that for some reason gained great popularity on the Internet. According to the drawing method, it is most like a dog, but there are specific features and features. The wolf has a characteristic appearance, regardless of the specific type. He also often has a very thick and magnificent fur needed in order to survive in harsh conditions.
As in other lessons, we will consider the question of how to draw a wolf using step-by-step drawings and detailed explanations. This will allow anyone who wants to master this material. Thanks to the prompts and accurate explanations, the child without adults can understand what the wolf has been depicted independently. Even if you have no experience in drawing, try to go through each stage to get a really good result.
Before you start, prepare the place of work. You need a table on which there will be nothing superfluous. It is better to take a few pencils of varying degrees of rigidity. You will also need an eraser and, if you want to get a color image as a result, various tools for coloring. The usual color pencils are ideal. However, you can use paints, pastel and much more.
How to draw a wolf gradually
In previous lessons, we told why it is important to start any drawing from supporting figures. Let's briefly explain again:
- help correctly build an image;
- improve the quality of work;
- allow you to reduce the number of corrections;
- competently build up perspective;
- help to observe proportions.
If you can draw without reference points, it is recommended to use them at the training stage. You will immediately notice the difference. Moreover, drawing "out of the head" is very difficult to portray everything right from the first time. Such auxiliary elements will noticeably make it easier for the artist.
Main contours
We will depict a wolf, which runs to meet us and turns a little left. This animal has a rather wide muzzle, so the first reference oval must be depicted with a horizontal expansion. Keep in mind that you should not do it too wide. It is enough just to chop up from above and below.
Then put the center in the center at the bottom. It will be the right middle of the second reference circle. It should be about 3-4 times less than the previous option. With it, it will be marked by the border of the animal grazing and the correct perspective is created. Also at this stage you can begin to portray the body of the animal. 
Since we consider the question of how to draw a wolf pencil in the future, you should draw a small curve leaning to the right. It should be flexing in the middle and be about one straight at the ends. The bending itself is quite gently and resembles a small bulge. Thus denotes the bending of the body of the animal.
Mord and Torchishche

Now you can add a little detail to the face and start painting the body of the wolf. Initially draw the contours of the ears. They have the shape of triangles aimed at different directions and a little resemble cats, but more elongated and sharp. To do this, you can spend direct right from the center of the reference large circle to the right, and then the arcuate line for the right upper edge. Left ear is drawn with overlapping. Make sure that they are at one height.
From the middle of a large reference circle, start drawing the mouth of the animal. To do this, spend a slightly curved line to the lower boundary of a small reference circle, and then complete the form by following the arc. You can also add a nose in the form of a triangle with rounded corners. He must occupy about one fourth of the entire small reference circle. Eyes can be added with small drops located just above the grazing. In one of the following stages, we detail them.
I remember when I learned to draw, it was the wolf that was heavier than everything. He always turned out to look like a dog, then at all on some unknown animal. It is worth noting that then there was no particular internet and had to draw more from the head or on books. But now I can confidently say that thanks to the lessons you can learn to portray everything that your soul. Subscribe to our lessons, and you will be able to become a real master of fine art.

Now you can designate the body. It is best to do this by drawing two reference circles: one for the front belt and one for the rear. Since we are talking about how to draw a woman with a pencil in gradually, even such things will be considered. The right limit of the first circle should accounted for exactly on the middle of the support line for the body. Second circle Start drawing on the height of the intersection of the circle for the muzzle and the line curve. It should be slightly more and located below the first.
Fur and new reference points

Since the wolf has a lot of fur, he will hang out in some places. If you know how to draw folds, you will not have any special difficulties with the drawing of this stage. Initially, it is necessary to draw the fur around the animal muzzle. Start it to do on the left side where it is less and finished right. Consider that it is not necessary to draw on top of the fur, as it falls under the influence of gravity.
You can also slightly detail your eyes. Earlier, we drew only the upper boundaries of the drawing, now add the bottom. You must have a sort of ellipse with corners or parallelepiped with rounded corners. Something similar you could see in the article dedicated to.
Since today we consider how to draw a wolf for beginners, let's draw a few more reference circles. This time for the paw of the animal. They will accountet the joints of the wolf. From the lower right border of the pasta, go down to the lower boundary of the large circle of the body and draw a small circle. The second should be depicted a little right. The latter is also located on the right, but does not go beyond the current boundaries of the picture.
Paws

Initially, you should depict straight contours for the paw. To do this, spend one direct from the upper reference circle to the left circle, as well as the curve to the central circle. For the right contour line should fall from the big right circumference. Next, you need to spend vertical lines from the reference circles down to rather indicate the position of the paw in the space. Here, add a couple of strokes to the ears, making them more expressive.

Next, you need to add an external contour from the paw. They have a very specific structure. The width of the paws should not exceed the regions of the reference circles. Spend the lines parallel to the curve drawn in the previous step. For one of the paws, you can immediately draw claws - it will facilitate the task in the future. Since we are talking about how to draw a wolf pencil for beginners, I recommend repeating all the contours from the picture. Otherwise, the result may be implausible.
Detailing

The last stage in the drawing of the wolf is detailing. It is necessary to add even more lines denoting the animal fur. First of all, it is necessary to add a line from grazing to the center of the muzzle. You can also trust a little fur in the ears. Supporting circles are better to convert and add it uneven contours. Some parallel curves are suitable for each site. In addition, draw a wax tail behind the paws.

Let's add even more auxiliary lines so that the wolf turns out even more realistic. First of all, you should add fur lines on your head. Let them, they resemble a zigzag tick. Also on the face you can make a kind of eyebrows, using uneven contours. It is better to detail the mouth and nose line. At the end erase all the reference lines. If you want, you can paint the result.

How to draw a wolf
This time we draw a wolf, which will be on the moon. In principle, this option is even easier than the previous one and even children can cope with them. So if you want to teach your child to draw this animal, it is better to offer him this option. Moreover, with the help of these consecutive steps, you can understand how to draw a wolf on the side, which is also important to learn how to do.
Supported contours

Start drawing from the definition of the drawing boundaries. In the upper left corner, specify the point where the animal face will be harvested, in the right bottom - the back paw. It will also determine the location of the Earth. It is necessary that in the future to observe all the proportions and correctly understand how to draw a wolf gradually for beginners.
So, a little retreat from the upper point down and draw a small circle. It will be the basis for the muzzle of our wolf. Then go down a little down and right. Picture horizontal ellipse, in shape resembling beahs. He must narrow on the right and expand with the left. It will be a torso wolf.
Next designate your ear. It should have the shape of the floor of the ellipse and is directed to the right. Then connect with curved lines torso and head. It turns out a practically a full wolf. Next, it is necessary to designate the mouth of the animal. For this, two lines are conducted from the reference circle and are connected using a curve. Draw a passage.
By the way, since the wolves most often live in the forest, then the ability to draw trees is truly important. On our site there is, which is dedicated to this technique. Pass it and learn to portray excellent backgrounds.
After that, designate the base of the animal tail. It should come out of the upper border of the body around the arc to the right, and then drop vertically down. You should also depict the contours of the paw of the animal. Earlier it was noted that the wolves have a rather specific shape of the paw, so it is necessary to adhere to the figure. At the end, add several circles in contact with the surface of the Earth.
Detailing

You have a ready-made blank, which must be converted to the finished wolf. It is best to focus on the layout so that you have a smooth proportion. Then you can try to independently portray this animal using similar outline, but for now it is better to repeat everything that is in the picture.
Distribute the face and the upper part of the body. Add some fur on the neck of the animal. Also detail the ears by adding them the external borders and irregularities. Indicate the eye line, draw the nose-triangle and add a pair of fangs. This will make the drawing much more realistic and attractive.


- Paws must slightly drink out.
- From the torso they go under a certain angle back.
- Have a characteristic bone.
- The width of the paw is constantly narrowed.
- Fur germinates downstairs.
In general, it is better to also use the specified drawings and try to draw everything with sufficient accuracy. This will later create something "your".


In the end, designate the rear paws and the tail, following the same principles. This should be enough to understand how to draw a woman with a pencil in stages for beginners, however, you can complement the work in detail to add a life image. For this, it is necessary, first of all, draw the fold folds.

Most of them will be attended by neck, as our animal raises her head to the top to swell. You should also depict several zigzag lines in those places where the paws are connected to the torso. Add some ligaments on your feet using conventional straight lines. Make sure that the lines do not look fake.

At the end you can decorate the drawing, as I did.
In principle, these knowledge is enough to understand how to draw a wolf for children. However, if you have any questions, feel free to ask them in the comments. I will definitely answer them and help you understand everything. Here you can leave your comments that will be taken into account or processed. Do not forget to subscribe to updates, so as not to miss something really important. Until!
This guide describes the methods that I use to create realistic Fur Fur Texture by Graphite Pencil. To make your own drawings you need paper and a set of pencils of different hardness. In this picture, I mainly use 3B and 5V hardness pencils, it is due to small sizes in the drawing. The same technique can be used with a large pencil range. On a big sheet, I will use everything from HB to 6b. Each of them has a different hardness and tone, which allows the artist to create shading with a huge depth and detail.
.jpg)
Draw the main lines
I'm trying to give general outlines of the form, put important details on the sheet, such as eyes, nose, ears, legs, etc., trying to impress the contour of fur, direction and texture. I also try to give yourself an idea of \u200b\u200bwhat colors and transitions of the shadows are present in the image, although at this stage I did not draw exactly exactly. Many inner lines will move as soon as I start drawing.
.jpg)
The beginning of the first layer
When I work a pencil, I always start with eyes and face. If the picture has more than one subject, then I begin either from the dominant part or from the central theme itself in the image. It is very important for me to plan the process of drawing a picture at this stage. I painted my eyes first, with complete details, and nose, 5 in the pencil. Then I switched to 3b pencil and made a stretch in the shading area of \u200b\u200bthe muzzle. This layer of shadows should be about the same tonality as the brightest tone in any part of the pattern. Look at the main texture of the fur, and do the same in the shadow area. If you find that you can not make a lighter, use a solid pencil for the first layer (B or HB). Be sure to convey the fur texture with a pencil to follow the direction of the animal fur as in the photo. These moments, as a rule, play a big role in the completed image, and help determine the overall texture of wool.
.jpg)
Detailing
After creating the shading base, I continued to work with a 3r pencil. I created a fur texture, applying a little more pressure. When adding parts, keep the pencil sharp, as far as possible, and try so that the griffel remains so long like on this photo. Since I still work with 3b pencil, but with greater pressure, it is the average level of shading. More pressure on the pencil creates a blackness, and not the depth. At this stage, some of the shaded areas are created in the first layer can still be changed. I decided at this moment that the ears look small in relation to the body, so I extended the shading of the regions.
.jpg)
Second layer. Detailing
After filling in the average degree of shading, I switched to 5V pencil. On the larger area, I will use other hardness pencils, and not just 3V and 5V. I found that in small pictures, the effect of using more pencils is completely lost. I carefully add a small number of shadows on the area, which looked flat, but not necessarily should be dark. Each pencil hardness has a different tone. Any two pencils that are used to transfer the shade will have a completely different quality of the image of this shade. I applied the shadow in the top of the nose and around the eyes and the muzzle. As in the first layer, keep the pencil sharp as possible. Draw wool in the direction of fur growth.
.jpg)
Next stage
After filling out the shading of parts on the face, I switched back to the 3B pencil. Many of the areas located along the back of the head, neck, and the front legs have a bright white base color, so in these areas, I use a 3b pencil for the image of the first layer. I use the basic paper for the main color. When I saw areas that do not need to especially shade with a pencil, but also leave just a white sheet, I just slightly set the tone with a pencil.
.jpg)
More details
In the area around the wolf blade, where fur is strongly shortened, I applied short contrasting dark strokes to create the impression that the fur is short and directed towards the viewer. In the case of shortening the fur, I usually draw a dark shade immediately after the main color, and then fill in any medium tint. They are so short that much contrast is obtained. I filled the pads on the paw palm 6b so that they were as dark as possible. The next area using the same technique, I will go to the details of the body of the next area, as well as add the shading area to the hind legs and the tail.
.jpg)
Last area
This photo shows shading on the hind legs and the tail, I think that you need to sharpen this area more. Use the same technique for shading and detail.
.jpg)
Finished work
A source
http://sidneyeileen.com.
In the last lesson, we learned. And now in the continuation of this topic I will tell. He will be very similar to. They are from one family of pins. But nevertheless, this is a wild animal as a bear. In many regions of the world, they are tamed, and even guarded, since this type of animals is on the grain of extinction. Wolves have become heroes of literary works, and even legends. For example, wolves in some stories became weakened. And we already know. If you are for the first time, I recommend reading this lesson. We turn directly to our topic.
How to draw a wolf pencil stages:
Step one. We draw three mug. The first is the head, the second torso and the third rear of the body. The principle of building the body is very similar to the leopard. I recommend to see the lesson about drawing a wild cat.  Step second. We connect these circles with lines, thereby denoting the future body of the wolf and the face. On the face of the horizontal line we denote the level on which there will be, and the vertical nose.
  Step Three. Over the first circle draw the ears of the wolf. In order to draw a nose first draw a small circle, and later we turn to the detail. Now we need to draw different parts of the body. The front and rear paws must be located at one height. Please note that the wolf stands sideways, so part of the body is not visible. We draw circles for the front paws, leaving only a part of the visible for one paw. The rest is removing the eraser. For the rear paws we make an oval shape. And also one paw is seen only partially.
  Step fourth. On the face draw a round nose. Add tail and future lapto shapes. They can be depicted in different ways, for example: rectangles, cylinders, or even oval forms (such as we painted Teddy's bear). In our example, we use rectangular forms.
  Pitch fifth. On the head draw a detailed ears and eyes. Add your neck. Pay attention to the structure of the low limb wolf. Draw the tail.
  Last step. It remains to detail the object. Wipe the auxiliary lines with an eraser. Try to highlight the main features of the wolf. Fur in wolves thick and quite long. You can also add his teeth to look more frightened, still he is a predator. In general, he must remind, but he has a larger paws, and his head is staby.
  Did you like the lesson? Be sure to show your work. And also write what else would you like to draw? See continuation of this lesson, draw other prescription.