Portrait light that the photographer should know. Rembrandt lighting - classic portrait lighting scheme
Read also
There are several nuances that should be constantly monitored to get an excellent portrait. These nuances include: the ratio of light and shadow, the lighting of the subject, the position of the face, as well as the angle of view. You should familiarize yourself with these aspects of portrait photographing in order to be able to professionally vary in the future. In a specific article, this aspect will be described as a portrait light, namely, what it is why it is so important in shooting how to use it.
You can define a portrait light like this: this is a variety of relationship (game) of light and shadow, thanks to which new forms are created. A shape is created shadow on the face. There are four main types of light in portraits, namely:
- splitting
- "the loop"
- rembrandt light
- "butterfly"
There is also a short and wide light, but it concerns the style of shooting, and can also be used in combination with any types of light mentioned above. It is worth considering each of the types of portrait light in more detail.
The definition of breaking light is fully reflected in its name, in other words, it shares the face into two equal parts, immersing one part into the shadow, and the other on the contrary is lighting. Often this light is used to give pictures of the dramatic effect, perfectly suitable for portraits of musicians and artists. The breaking light is considered more suitable for men's portraits than for female. But it is worth remembering that there are no strict rules. However, the newcomer should still follow some of the Soviets, as long as he can play the light on his own.
To reach the effect of breaking light, you need to install the light source on the right or left of the object, and if possible, a little behind its head. The position of the light source directly depends on the person of a person who is photographed. It should be closely following how the light falls and adjust the source positions, respectively. Ideally, the breaking light allows lighting only the eyes of the shadow side. If, with any position of the source, the light falls on the cheek of the object, it is possible to simply face the face does not fit with its shape for the separating light.
Important: All types of lighting can be applied regardless of the position of the face (Afas, the floor of the face, and even profile). It is only necessary to remember that the light source must be located relative to the face according to the chosen type of lighting. If the position of the person changes, the type of light will change. So this can be used as an advantage: if you need to change the type of light, you can not move the light source, but simply ask for a person to change the position of the face a bit.
What is "blike"?
In the eyes of the child, the photograph shows a reflection of the light source. It looks like a small white point, but if you bring closer, you can even see that this point has the form of the light source used in this photo session.
In this case, the bright point has a hexagon shape with a black speck inside. It is this form that is light and used (a small softbox of a hexual form on the camera canon).
This effect is called "Blik". Without it, the eyes will seem dark and lifeless in the photo. You need to make sure that at least one eye will have a glare, which "revitalizes" face. Close carefully, it can be noted that the glare also illuminates the rainbow shell and the eye as a whole. With the effect of a glare of a person's eye in the photo full of life.
"The loop"
The view of the light called the "loop" creates the shadow of the nose in the cheek area. To create a "loop" effect, it is necessary to establish a light source slightly above the human eye level, which is photographed, and arrange it for 30-45 degrees from the camera (but it is also worth considering the features of each particular person, and for this it is worth learn to read people's faces).
The photo shows above, as the shadow falls, and on the cheeks of people you can see the barely noticeable shadows from their noses. In this form of light as the "loop" of the shadow of the nose and cheeks do not come into contact. It is necessary to create a small shadow that is slightly directed down. Many set the light source is too high, thereby creating strange shadows and losing glare. The "loop" is the most used and known type of light in the photographing, as it is easy to create, and the end result admires most people.
In the diagram above the black rear background - these are trees behind people. The sun comes out of the trees, but people are completely in the shade. White reflector, which is used on the left side of the camera, sends light on the face of objects. The reflector may be in the sun, and maybe in the shade, but in any case he will be able to catch the right light. Changing the angles and the position of the reflector, you can vary with the types of light in the photography. For "loops" you need to position the reflector in 30-45 degrees from the camera. It must also be slightly higher than the level of the eye of the objects, so that the shadow or loop of the nose was tilted towards the corner of the mouth. The most common newbies error is the wrong position of the reflector; By installing it below the eye level, they are thus guided shadow, and not down as required. It covers the tip of the object's nose, and the desired effect is already lost.
Rembrandt Light is named after the famous artist Rembrandt, who quite often used such lighting, drawing his paintings. This can be verified by looking at his self-portrait. Rembrandt light creates a triangle of light on the cheek. Unlike the loop, where the shadows of the nose and cheeks are not in contact, in this form they are connected in such a way that a small triangle remains on the cheek of the object. To create Rembrandt Light to begin with, it is necessary to make sure that the eye on the shadow side is lit or catches the light, otherwise, it will be released in photos of lifeless. Rembrandt light gives a dramatic effect of photography, like a breaking light, it reflects the mood and deep feeling of the pictured in the photo. It should be used correctly.
To create Rembrandt light, an object must be removed a little from light. The light source is located above the head level of the object. So that the shadow from the nose fell on the cheek. Persons not all people are suitable for creating this type of light. If a person has high and distinct cheekbones, then the photo is turned out. In case the object has a small and flat nose, most likely, this light is not suitable at all. And again it is worth remembering that this kind of light in the photograph should not be used, if a person does not like the result, and there is no suitable mood that you want to convey. If natural light is used from the window, and it in turn is located until the floor, it will be necessary to close it with the bottom of it using GOBO to reach the desired lighting.
"Butterfly"
This type of portrait light, like a "butterfly", is the name due to the similarity of the shadow shape, which is under the nose, with the insect form. "Butterfly" is created during the position of the light source above the camera and immediately behind it. With such a light, the photographer removes right under the light source. Usually, the "butterfly" is used in photography for glamor magazines and to create shadows under the cheeks and chin. Also, such a kind of light as "butterfly", ideally suitable for photographs of the elderly, since wrinkles become less noticeable.
"Butterfly" is created due to the light source located behind the camera and above the eye level or head (depending on the particular person). Sometimes they resort to the use of the reflector, which is placed under the chin of the object, in most cases the object holds it itself! Photos with such a light are touched by people with a clear cheekbone and thin face. People with a round, wide face will suit the "loop" or breaking light. And such a portrait light, like a "butterfly", will suit more people with clearly protruding, high cheekbones and lose face. This light looks tougher when using a window or reflector separately. Often hard light from the window or flash is necessary for a clearer shade under the nose.
A wide light is more to a greater degree of illumination of an object when photography, but its style. "Loop", Rembrandt and broken light can be both wide and short.
Wide light is when the face is slightly turned from the center, and the face side turned to the chamber is illuminated. The illuminated face side seems visually wider than that that is in the shade. Wide light is often used in High Key portraits. This style of light makes the face seem wider, and perfect for portraits of people who have narrow and thin face. However, most people seek to seem slimmer in photographs, so it is better not to use such light for people with wide, round faces.
To create a wide light, the face must be turned away from the light source. In this case, the side of the person turned to the chamber is most highlighted, and the shadow falls on another strand of the face that is turned away. Speaking easier, with a wide light on most of the face falls light.
Short light - the opposite of the opposite is wide. On the example, you can see that the face side turned to the chamber is in the shade. This light is often used in LOW KEY portraits (darkened). Most of the face is in the shade, the portrait resembles a sculpture, the face looks slimmer, as well as many people are delighted with the result.
In the event of a short light, the face is turned to the light source. It is worth paying attention to the fact that the face of a person who is turned away from the camera is most highlighted, while the shadow falls on the side of the face, which is closer to the photographer. Speaking easier, with a short light on most of the face a shadow falls.
We collect all together!
As soon as the photographer learn to recognize and create various types of light, you can begin to study when it should be resorted to them. With the help of the analysis of the face of the photographed object, the photographer learn to choose the right view of the world, which is most suitable for a particular person and portrait as a whole, and also take into account the mood. A man with a small round face, who wants to look like a lurch, does not fit the light, which was ideal for the rock band, where people looked malicious and bloodthirsty.
The process of photography is much easier if the main light source can be moved. But what to do if the source of the light is the sun or window - everything is more complicated here. All that is required in this case from the photographer is to change the position of the object depending on the light source, in order to receive various shadows and light on the face. Or change the position of the camera. In short, it is necessary to move objects that can move in relation to the source of light, if the latter is still.
Practical lessons
To begin with, it is worth finding an object for photography (a living person, the dog is not suitable), and then start practicing in various types of light in.
« Butterfly»
« The loop»
Do not forget about a wide and short style styles and practice every type of light with two styles. Do not worry about other parameters at this particular point. It is necessary to focus on the study and use of only light species in portrait photography. You can apply a window, floor lamp with a bare lamp or sun as light sources. The flash is better to use professional photographers, since only at the end of the photo you can see the game of light and shadow on the face. You can start with the study of wide and short light, putting the object right in front of yourself.
Good lighting is a critical component of portrait shooting. Its presence will notice even the usual viewer. However, despite the seeming simplicity, knowledge of the principles of the use of light to give the desired type requires a much deeper understanding. This introductory article is considering the most basic scenario: portraits with one source of light. Subsequent articles will be devoted to the use of several sources, but the principles under consideration are applicable in all cases.
Overview: One light source
The main source of lighting model is commonly called the main thing or key light. And although additional sources can be added to improved portrait, key light is usually set independently. This is a good news for those who are trying to explore the portrait light, as this means that the process can be simplified, while doing only one source of light. If and when you decide to add an additional backlight, everything studied earlier will remain in force.
Only one property of light has a cardinal effect on the illumination of the model: the degree of dispersion of light *. Despite the fact that some illumination parameters seem to have magical numbers, their effect is secondary. However, for the selected light source, we can decompose this characteristic of two, more manageable:
- directionwhich determines the position of the shadows and illumination on the subject, and
- visible sizewhich regulates the type of these shadows and illumination.
And although these characteristics may seem simple and controlled, their combinations form an amazing manifold of various models of the model. Illumination easily can become unpredictable if you do not develop an intuitive understanding of each of them.
* Strictly speaking, another characteristic is the balance of the white light source, but in this introductory we assume that you want to display the model as it looks like natural light.
Size: Soft and Hard Light
We will begin with a visible size, since it is perhaps one of the most common causes of bad portrait light. When photographers describe the light as "hard" or "soft" or use the term "quality of light", they actually talk about the size of the light source:
Although anything in excessive doses may not be beneficial, portraits usually look better in soft light. Mouse over to "Hard" and "soft", and you will see how they affect the portrait:
 |
||||
| Choose: | hard | source | soft | |
Please note that smaller and greater light sources are called "hard" and "soft", respectively, due to the boundaries of light and shadow formed by them. This happens because the light source of the larger area has a greater corner size relative to the subject of shooting. As a result, any detached fragment has more chances to get some kind of direct light, and the shadows become softer. Similarly, if the light source is small, a separate fragment has more chances not to get straight light at all or get a large portion - forming a much deeper shadow. Note also that the source size is directly proportional to the illumination, especially in the upper right side of the model hairstyles.
However, the source size affects not only the degree of contrast of the tones, it also determines the visibility of shallow texture. Pores, defects, wrinkles and other parts with rigid light become more pronounced. Hard light also increases the likelihood of rigid direct reflections from the skin model.
 |
 |
|
| hard light | soft light |
|---|
Most importantly, to obtain soft light to understand that the straight light is rigid, but when reflected or dispel, it is softened. Photographers enjoy this in order to achieve softness from originally hard light.
Light softening methods:
- Diffuser. Place between the model and the light source a large translucent object. It can be a lamp lamp on a lamp, or a white sheet, or curtain over the window, through which the light falls.
- Reflection. Position the model so that only the reflected light falls on it. Move it further from the open window (beyond the limits of direct rays), direct the flash into the nearby wall or in the ceiling.

porterf in a very soft light
In any case, keep in mind that the illumination of the model will significantly decrease - which will potentially require an increase in exposure time.
On the other hand, the light source can also be too soft (although it happens much less frequently). Someone pictures made in the shade may seem too flat, for example, if an indirect light dissipates from everywhere. This light is almost equivalent to the source of the infinite size, and it grows all the shadows. Example can serve portraits in the fog or in nature in a fully cloudy day.
However, how much "too soft" is the light - in reality depends on what image you want to receive. For example, even though the picture on the right uses a softest light than all previous examples, many may nevertheless count this type desired for glamorous portraits.
Distance and visible size
By this time, you may already have slightly confused: the value is not actually the size of the light source - only its visible size relative to the subject of shooting.
When the source is approaching, the light softensSince the light reaches the subject of shooting from a larger number of angles - even if the light itself does not change. It is true: the direct sunlight is hard, even despite the huge sizes of the sun. It's just that the sun is so far that his light reaches us almost at a singular angle.
On the other hand, the approximation of the light source adds brightness to it. If this is the main source of light, the portrait type is likely to not change - the desired shutter speed is reduced. However, if most of the backlight of the subject was carried out with a scattered light, the approximation of the light source can reduce the effect of scattered light - thereby making the overall light to hees, since most of it will come from one source.
In addition, close light sources will highlight the subject less evenlySince the various items of the subject will be relatively closer to the light source or further from it. For example, the back of the subject can be only 5% further from the remote light source, but will be 50% further, if it is closer - and it will be noticeably darker than other parts of the subject.
However, such unevenness can be paid in the advantage. Approaching the light source to the subject, you can better separate it from the background, as it becomes much brighter relative to the background. On the other hand, if they were already well separated from each other, the picture can be worse.
Direction: Sensation of Depth and Rembrandt Light
Finding the right direction of lighting requires a photographer to find a balance between different potentially incompatible considerations. Typically, the choice is made between the transmission of volume (1) and an attractive display of the features of the person (2).
1) Transmission of volume. Creating an impression of an amount is a key component of shooting realistic looking portraits. However, our perception of volume is not well tried, if not to highlight the model from the right direction. For example, using the sphere as a reasonable approach to the shape of the head, it can be seen that it looks different, only if the light falls on it from above:
Despite the fact that the backlight of the sphere is good modeling for portraits, many other options for the illumination angles can be used to transmit volume. On the other hand, the face forgive much less.
2) features. In addition to the head as a whole, each facial feature forms its own shadows and stains of light - and each of them should be taken care. In particular, it may be necessary to avoid visual extension of the nose shadow or the effect of a tired person as a result of shadows under the eyes. In addition to these, the backlight from above can give other unwanted effects, if not carefully positioned.
One of the classic * methods to achieve both the sensation of volume and flattering is the location of light so that the key triangle on the far cheek is lit. This style is often called the "Light of Rembrandt", and we will call this form "key triangle". If you take it into the calculation, the number of illumination angle variants is significantly narrowed:
|
|
 |
|||||
| Put shine: |
above | |||||
| left | key | right | ||||
| show | hide | ← Key triangle | below | |||

Note: Visualize the triangle is usually easier with rigid light and neutral
facial expression. In this example, it is somewhat rounded due to a wide smile.
Try to shift the light source in any direction from the key triangle, towing the cursor for options. Over the backlight from the bottom, all these options refer to the "front top light" - and yet the position of the key triangle is usually considered the best universal display. This is due to the fact that the presence of a triangle is an indicator of compliance with several basic principles of good portrait light.
For example, if a key triangle
- too large (high or wide) This means that the light is supplied too close to the object and most likely does not create enough volume, because in the direction of the camera, most of the shadows are not visible.
- too narrow This means that the light is delivered too far to the side, which can visually increase the nose of the discarded shadow, and also potentially leave a significant part of the face in the shade. However, sometimes this aspect of the recommendations of the key triangle is less taken into account.
- too short This means that the light is set too high or low, which leads to the appearance of shadows under the eyes or insufficient shadows along the lip lines, respectively. Lighting from the bottom is often used in films for ugly creatures or to create an ominous person when dealing with terrible stories.
Also also in mind that the final appearance will significantly depend on the features and expressions of the face model, so these conditions can only be used as a basic principle.
* Note: "Isolate light" is another popular portrait style (and more) style, which is similar to Rembrandt Light, however, the shadow from the nose in this case does not closes with the shadows on the far side of the face, forming an "isolated" diagonal shadow under the nose .
 |
|
| short backlight | wide backlight |
However, from any rule there are exceptions, however, only confirming the rule. For example, a portrait of three-quarters may not need a key triangle to transmit the sensation of volume, but only if there is additional shadows on the face (as an example on the left).
In addition, Rembrandt Light is just one of many styles, and each model differs from the other. For example, someone may need a hard side light to emphasize the bristle on a male face or to convey symmetry, highlighting only half of the face. The key is an understanding of how to use light to transmit volume, forms and textures - depending on the artistic design.
Two other widespread style is short and wide light.. They are used when shooting at an angle. The short light highlights the face entirely and leaves the near side of the head in the shade, while the wide light highlights the near part of the head and leaves the far part of the face in the shade. These and other styles of portrait light we consider in the next article.
Conclusions and additional information
As a rule, the purpose of the portrait illumination is to obtain a soft light. He smoothes the transitions of lighting on the facial features and softens the skin texture. Obtaining soft light requires an increase in the visible size of the light source. It can be achieved by moving the light closer (1), increasing its physical size (2) or by reflecting or scattering this light using other objects (3).
However, the choice of backlight direction is defined more significant than the rigidity of light. In any case, two backlight directions are usually unwanted: backlight from below and front illumination. The first looks unnatural, and the second destroys the feeling of volume. In any case, the portrait is usually designed to present the model in a favorable light, but each model is unique and requires an individual approach.
In independence from the selected solutions, the key is first to present artistic design, and then adjust the arrangement of light so as to embody it.
Related topics are discussed in the following articles:
- Flash: Display
Talks about controlling the quality and type of light from the outbreak. -
Talks about the backlight in portraits.
To understand how to portray the volume, beginners teach to draw geometric shapes. But how to transfer light and shadow on more complex forms? For example in the portrait? Consider the laws of lighting on the example of the drawings of various objects, including the figure of the human head.
First a bit of theory
We see the world around us due to the fact that the light is reflected from the surfaces with different strengths. Therefore, we perceive the objects volumetric. To convey the illusion of the volume on the plane, you need to learn to portray the light, which consists of:
- Blike;
- Shine;
- Penumbra;
- Own shadow;
- Reflex;
- Falling shadow.


On the example of the drawing of a ball, cube and man's heads you can see where the listed areas of lighting are located. But now more about each.
- Radik It is called the brightest part, which is a reflection of bright light: the lamps, the sun, etc. The glare is well noticeable on glossy (brilliant) surfaces and is practically not visible on matte.
- Shine - As can be seen from the name, this is the illuminated part of the subject.
- This is followed by an intermediate region between light and shadow - penumbra.
- Own shadow - This is the most dark part of the subject.
- At the end of the listed areas will be located reflex. The word "reflex" - comes from the lat. Reflexus, which means reflection. That is, in our case, the reflex is the reflected light in the shadow part of the subject. It is reflected from everything that surrounds the subject from the shadow side: from the table, ceiling, walls, drapes, etc. Reflex region is always a little lighter shadow, but darker than half.
- Falling shadow - This is a shadow discarded the subject that it surrounds, for example, on the plane of the table or wall. The closer the shadow to the subject from which it is formed, the more dark it will be. The farther from the subject - that it is lighter.
In addition to the described sequence, there is another pattern. In a schematic figure, it can be seen that if they are perpendicular to the direction of light, it coincides with the most dark places of the subject. That is, the shadow will be perpendicular to the light, and the reflex will be on the opposite flare side.

Border shape between light and shadow
The next thing to pay attention to is on the boundary of light and shadow. On various objects, it acquires different shapes. Look at the drawings of the ball, cylinder, cube, vases, and on the drawing of a man's head.


Of course, the border between the shadow and the light is most often blurred. It will take it only with a bright directional light, for example, with the light of the electrical lamp. But novice artists should learn to see this conditional line, the drawing that it forms. This line is everywhere different and constantly changing depending on the change in the nature of the lighting.
In the figure of the ball, it can be seen that the line of the border has bend, i.e. it looks like an oval shape. On the cylinder - it is straight, parallel to the sides of the cylinder. On Cuba - the border coincides with the edge of the cube. But on the vase, the boundary between the light and the shadow is an overmining line. Well, in the portrait, this line acquires a complex, intricate form. The boundary of light and shadow here depends on the nature of lighting, and from the shape of a man's head, damn face and anatomical features. In this picture, it passes along the edge of the frontal bone, in the zick bone, and then down, to the lower jaw. In the figure of a person's head, it is very important to distinguish the light of the whole head as a whole and the light of each individual part of the person, for example, on the cheeks, lips, on the nose, chin, etc. It should see themselves to see the drawing that forms the border between the light And shadow. For example, especially fancy character, it acquires in natural forms. It is one thing - to draw simple geometric shapes, and completely different - trunks of trees, foliage, relief of the rocky shore, flower petals, grass ... To learn how to transfer volume or light of such complex objects, first learn about simple. Next, complicate the task. For example, begin with a drawing of the cylinder, and with the acquisition of confidence you can paint the folds on the tissues. Then - still life. Well, and then, and the landscape can be done or a portrait.
Directional and scattered light
To make it easier to figure out the above aspects, you can experiment with the light from the desk lamp. It gives a bright and sharp light, in which reflexes are clearly visible, shadows ... Try to highlight any item first on the one hand, and then on the other. Try to change the direction of light, bring closer or remove the lamp. This will help you to visually see all the subtleties of the topic being discussed.
In the visual art there is a reception, which was called "Kyarostkuro". Its essence is to oppose light and shadow. A famous artist who was actively used by Kyarostkuro was Caravaggio. At his canvases, this technique is visible. With artificial illumination, a medium is created in which the light becomes very bright, and the shadow is very dark. This gives a tone contrast and makes painting saturated and sharp. With such a light, all the nuances of lighting and beginners will be easier to learn how to transmit volume. With multiple daylight (when cloudy) shadows are not so strongly pronounced as in sunny weather (or under the light of the lamp). Therefore, in the learning process, it is better to use artificial illumination with one source of light. With several sources, the situation is complicated and several incident shades can be observed in the formulation, and the above sequence - light-half-day-reflex - can be changed.
So, what does the drawing differ in practice when the directional or dissipated light is used? The illustration shows that with bright illumination, the half-day becomes already, and it will look less pronounced. The boundary between light and shadow is well noticeable. A falling shadow has clear edges and looks darker. With scattered light, everything is exactly the opposite. Halfing is wider, shadow softer, and the incident shadow does not have a clear circuit - its border becomes blurred.

All these features of lighting will be noticeable not only with electric light or its absence. When the sun shines on a clear day, the light will be clearly directed and sharp. When cloudy weather - it will be scattered. Accordingly, it will affect the blacks of trees, landscape or even the interior of the room lighted with light from the window.
Conclusion
You can still continue the discussion of this topic for a long time. But it is best to observe with your own eyes behind the real world. How are objects covered? How does lightness change and under what conditions? Ask you these questions and find the answers when you watch in kind. There is nothing better. Therefore, remembering the regularities of lighting described above, watch, remember, make sketches from nature. Then you can confidently realize the laws of lighting in practice.
Hi friends! In this material, from the studio shooting cycle for beginners, I will tell you about the female portrait, why for this type of shooting you can use both soft and hard lighting (unlike portrait of male), which when shooting women do extremely undesirable and show Not too complicated light charts for shooting a female portrait in the studio, which, I am sure, will be able to master in practice even newcomers.
So, photographing a woman, it is important for us to pass ... What? That's right, her femininity! And also natural beauty, tenderness, sensuality, smooth body lines, view expressiveness. Be sure to disclose the character and individuality in the photo - because there are no two identical women in the light of the two identical women, however, like men :)
It is important to emphasize that this woman is inherent to which you look through the viewfinder lens - what is its feature? It may be shyness and modesty, and may be emotionality, artistry or even a cool temper and the desire to be a queen in any situation.
Find the starting point. What is needed in order to make a natural, natural and lively portrait? Locate the model. When a trusting situation arose between you, you can start shooting - so it will be easier for you to figure out, in which direction to move when creating a female portrait.
If you read the previous article in which I talked about the specifics of the male portrait, then you know that the key to the success of such shooting is the use of hard light. For a female portrait, in most cases, soft light is suitable, without sharp transitions from light to the shade, with low contrast. Why? It is the soft, filling light will emphasize all the advantages of the face and body, without focusing the attention of the viewer on the irregularities of the skin texture - because People with perfect skin are not very much, it is a very important aspect.
Also for shooting a female portrait can be used hard light. The greatest popularity of this approach to shooting is characteristic of the fashion industry. But in this case there must be an idea, a plan that justifies the use of hard light. And the implementation is perfectly performed.
What submarine stones can expect a photographer who wants to use a diagram with drawing light? Yes, in general, the "stone" is only one, but very weighty is sliding light. The one that emphasizes attention even on the slightest flaws of the skin. Therefore, my dear, if you are not sure about 100% - do not risk, use filling light. Otherwise, you will probably have to be patient, producing deep retouching of filmed portraits using an incorrect pattern of drawing light.
Of course, you can spend time looking for a model with a flawless texture of the skin, on which, as anything, there will always be a good result. But! Such models are usually on the weight of gold, do not positive free, and even constantly busy. So I advise the first steps in the studio shot of a female portrait doing, using soft light.
So we approached the light-forming nozzles on the monoblocks that generate filling lighting in the studio. These are nozzles equipped with diffuse surfaces: all sorts of soft boxes and strip boxes, octoboxes, white umbrellas on the lumen. But it's a little about which of the nozzles form a scattered light, you also need to know two simple rules: the rigidity of light depends on the distance to the subject of the shooting object and on the source size. For example, a small portrait soft box, standing at a distance of 3 meters from the model, will give hard light. And the two-meter octobox in the meter from the model is soft. And the closer we will move the portrait soft box to the model, the silent light he will give us, and, accordingly, the farther the octobox is moving, the more hard light we get as a result.
Osiving these principles, it is possible not to be limited to diffuse nozzles, and experiment with reflectors and portrait plate - the drawing they give different from diffuse nozzles, and considering the diversity of the size and cover the reflectors, additional devices to them - find "their light" to a specific task will be very fascinating occupation.
Now go through light schemes for filming a female portrait in the studio.
(SS) Michall Korchia
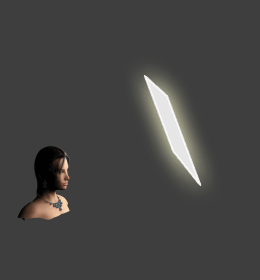
how it is done:

Two light sources are used. Oktobox is located a little on the right of the model. Stand height - at the level of the person. The reflector with curtains is installed behind-to-left from the model, the height of about one and a half meters, with the help of petals, a narrow beam of the opposite light is modeled, highlighting the hair and shape.

(SS) Sean McGrath
how it is done:

This scheme also uses two light sources. The main source (gives a more powerful impulse) - a monoblock with a softbox nozzle, it is located in front of the model, the light is directed down at an angle of 45 degrees. The height of the rack is about 2.5 meters. Oktobox is also located frontal, approximately at the same point as SoftBox. Rack height with octobox - at the level of the model belt, the light source is directed up at a small angle. A soft light-shadow pattern is created, uniformly illuminating the face and figure of the model. Due to the large size of the light sources and a short distance (about two meters) between them and the background, a uniform illumination of the background, with a pleasant vignetting of the top of the frame, occurs.

(SS) Yuri Hahalev
how it is done:

In the scheme, one light source is involved - the strip box, installed at a short distance above the head model, strictly in the center, the strip box is deployed along the line of the camera model. Due to this position of the strip box, emphasis is very successful - the main on face and the secondary - on clothes. As a result, it turned out a minimalistic composition in which in my opinion, there is nothing superfluous.

(SS) Yuri Hahalev
how it is done:

In this scheme, two light sources were used: a portrait plate in front, the height is slightly higher than the level of the eye of the model, and the reflector for a model at an altitude of about one and a half meters, creating a context light and extinguishing developing hair.

(SS) Yuri Hahalev
how it is done:
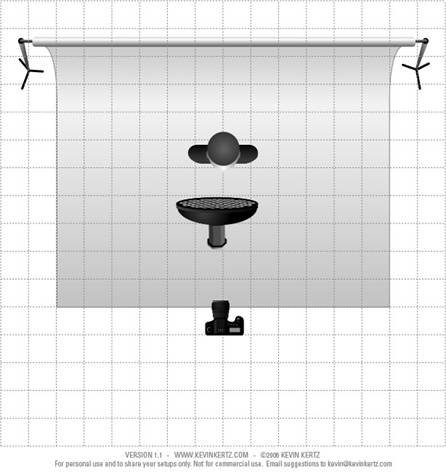
For this photo, one source of light was used - a portrait plate with honeycombs. There is a source over the model from above with the help of a crane or a suspended fastening system so as not to interfere with the rack. The plate is directed down at an angle of about 60 degrees. The monoblock with the nozzle is located in a half-meter from the face of the model.
Of course, this is not all light charts used by photographers in practice for shooting a female portrait. Since my goal is to introduce novice photographers with the basics of studio shooting, as an example, I showed those schemes that, no requires a large number of light sources or work skills with gobo masks such as Fresnel lenses :)
I would like to believe that for someone, my article will be a good start and cozy harbor in the endless ocean of the studio photography features. Pumping winds to you, dear friends.
First of all, you need to find out what you want to achieve in your picture. This is important because you can only determine which methods need to be used to get conceived frames. Try to assemble several examples of images that you would like to imitate. And then pay for some time on their consideration and examine the nature of the lighting.
Pay attention naturally this light or studio. If the second, then in what quantity and at what angle in relation to the object it was used? Such an analysis will help you determine what is necessary for your own work and will give much more chances to obtain the desired result.
Natural light
The use of daylight can be a very good option to achieve a thinnest, clear and natural view of your portraits. Many professional photographers love to use light from the window for portrait shooting. By resorting to this method, you can control the amount of light using the blinds or curtains, as well as change the range and angle of inclination depending on the configuration of the window.
When working outdoors, you must be attentive to choose the right time of day for shooting. It is preferable to avoid periods when the sun is high in the sky. Then the light works too bright and sharply. It is better to choose time in the morning early or late in the evening, when the light loses the brightness and become warmer. This will allow you to avoid excessive exposure and strong contrasts.
If necessary, when working with natural light, you can use the reflector of direct light. This will allow you to avoid shadow on your face, as you can direct the light on it reflected from the corner.

Studio light
The use of studio lighting should not be complex science. For some photographers who have always been removed in daylight, it may seem complex perspective. But it should be noted that the use of studio installations for lighting gives a lot of advantages. Therefore, it is desirable to pay for some time to familiarize yourself with the wisdom of artificial light. It's worth it.
The main advantage of studio lighting is that you can control light, its strength and an angle under which it is directed to your object. This opens up a sea of \u200b\u200bcreative possibilities that are not available when using natural light.
To begin with, you can take one source of permanent artificial light. Experiment with its placement in relation to the shooting object and see how it will affect your pictures. You can still achieve quite naturally looking personnel, as you have only one source of light, as well as with sunlight. Only now you have more control and this is an obvious advantage.

Corners of light
As soon as your objects are successfully located, you can proceed to the use of mobile light in order to get the desired lighting. Transfer it around. Thus, you actively control the angle and the amount of light spilled on the object.
You will find that, it would seem, minor changes lead to significant changes in the picture. Therefore, do not start with sharp movements. Just experiment, configuring light and making trial pictures. In this case, the shooting object remains statical. Moves only lighting.

Several sources of artificial light
As soon as you feel that you can manage one studio installation, think about using a slightly more complex set, which includes two lamps or even more. There are really many opportunities for the location of the lights and it all depends on your imagination and from what you want to achieve.

Tonya
With portrait shooting, you strive to portray the object at best. This means that you are asked to combine the main features and character of a person in one frame, which requires a lot of skills and, possibly, a little good luck.
Nevertheless, to help yourself, make sure that you do not use too much light, the excess of which makes the face flat. It is important to have different tones dictated by the features of the face. Due to the overaffect of light, a characteristic feature may well disappear, and you lose the natural interest and depth of the frame.
Good and bad shadows
When using powerful light sources, the shadows on the walls and the ceilings can easily be discarded. It is not always bad. You can do it intentionally to use in the frame. But they can also add an excessive gloomy and sullenly to your picture. As a rule, if you do not plan shadows, then their random appearance will not work in the best way in the frame. Therefore, just make sure that you do not create them.

Camera Racars
After your object has taken a favorable position, even if you look at it really nice, it is important that you do not focus on achieved. By changing the lighting angle, do not forget about the use of various angles. Some photographers prefer to use a tripod that is absolutely normal, but if you use studio light, you have access to sufficiently light lighting in order to remove with hands. Shooting from above, bottom, side or above - all this will depict an object completely differently. So do not be afraid to wander around it to find out which angles are better suitable for a particular photo shoot.

Contact with eyes
One of the golden rules of the portrait photography is to make sure that you have contact with your eyes or at least one eye of the subject. Of course, very successful exceptions happen from the rules, but it is rather luck. And in order to create a strong connection with the viewer with the object, you must make sure that the frame is visible at least one eye is being photographed.