Panel collages paintings for the interior with their own hands. Beautiful volumetric panels in the TERRA technique, MK
Read also
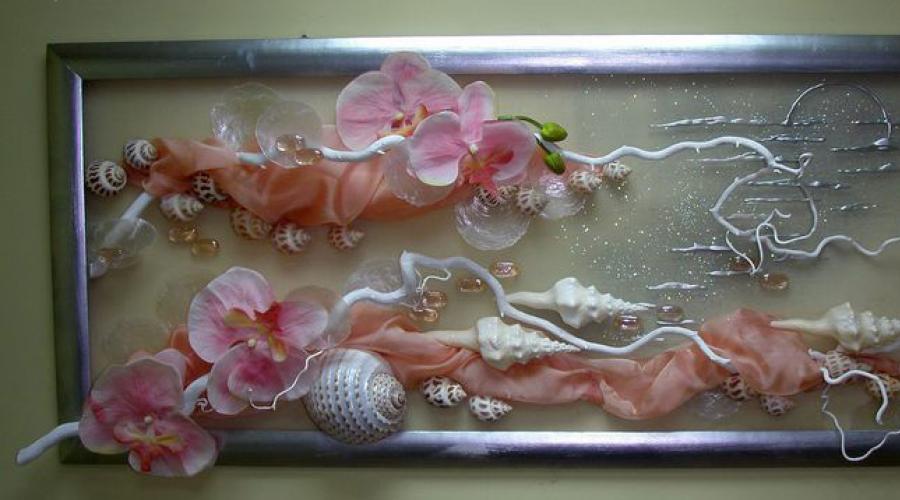
The technique of a floral collage allows you to combine natural materials and decorative elements fonders needlewomen. The creation of bulk paintings is characterized by great opportunities, combines objects of living and inanimate nature. Such a collage can add and decorate the interior. 
Each work carries an amazing energy, reflects the philosophical meaning and emotions of the artist.
Required materials and tools:
The basis for creating a bulk floral collage can be the usual dense cardboard, chipboard, a leaf of organity of different sizes. After selecting the size of the panel, style and color range of work, you begin to prepare the necessary tools and materials for creativity.
- dry plaster mixture or putty, allowing to create a volumetric surface texture;
- spatulas and brushes construction of different widths;
- paints: acrylic
- silicone or super glue
- wire, scissors, simple pencil;
- decor elements.
You can use dried flowers, stalks and leaves, bumps, beads, stones and seashells, cereals, pasta, and other types of natural or artificial materials to decorate the panel.

Stages of floral collage
Creating excellent work consists of several stages:
1. Application on the prepared basis of plaster or putty. When using a dry plaster mixture, it needs to be breeded with water in a ratio of 1: 4 before receiving the consistency of thick sour cream, and then create a color shade corresponding to the selected style.
2. Fixing the elements of a variety of decor elements using wire, glue or indulgence in the medium thickness coated layer.

3. Drying panel.
4. Decorating with additional elements in accordance with the selected style, applying shadows of gouache or painting by sprays and acrylic paints.


Any vegetable material is good in itself, in it, so to speak, priority form. Nature presented in it all possible forms with symmetry and asymmetry, color and texture and even flavors. Therefore, so understandable the desire to bring this perfection into your home and capture somehow in pictures and collages.  Someone uses plants in their unchanged form, someone likes separate fragments of the flower, sheet, and maybe their multiweight, someone attracts the graphics of natural lines or the texture of plant fabrics and. T.P.
All these preferences are reflected in the methods and character of the image of the plot in the collage.
Collage - The subject of decorative design of the dwelling, appeared, most likely, when a person learned how to produce adhesive substance. These first adhesive compositions were animal or plant origin. The collage was very popular in the 17-18 centuries, although at that time there were no enough good materials, there were no high-quality adhesives, as in our times.
In the period of great geographical discoveries, the creation of herbaries from unusual overseas plants was very popular. They were dried, and then exchanged the frame with glass. Such gerburnal sheets were very popular, they decorated the offices of scientists, geographers, writers.
Materials and tools
Vegetable material for collage
The source of the collection of dried vegetable material, first of all, can become its own garden. Walking in nature, presented flowers will help enrich your collection.
To create interesting works, it is absolutely necessary that the natural material is as varied as possible, differ in texture, form and color.
Preparation and processing of natural material
Floral material for floral collages can be collected and processing throughout the growing season. However, it should be known that the same parts of the plants (leaves, petals) collected in different times, at different stages of development, will differ in drying, for example.
Conservation methods
The vegetable material is harvested using drying, as well as the treatment of leaves with a solution of glycerol.
To obtain flat dried parts of plants, dried with the press (gender method); To preserve the volume, the drying method is used using hygroscopic substances that absorb moisture well: burned alum, bora, perlite, silica gel. Usually they are sold in chemical reagent stores, in gardener stores.
Very good to dry the plants in the Russian bath.
There is a conservation method, in which parts of the plant - leaves, flowers and fruits - do not lose their lifetime flexibility. This is a conservation method in glycerin.
Modification of vegetable material
Modification - a change in natural material - is made in order to make it more expressive for collage works.
It can be a change in color, shape, lacquer coating, skeletizing and so on.
Storage Collections for collage
Flat dried vegetable material obtained by the gear drying method is best stored grouped by plant species between folded in half paper napkins in oblong boxes for which labels should be pasted.
Technical means for making collage
The basis, or the base, for a collage there is a piece of cardboard, plywood, boards, wood chipboard, a tight sheet of paper of any shape. The background is superimposed on it. It can be made of colored paper, fabric, painted by any paints or fell completely vegetable material (leaves, petals, fission), and can also be covered with a layer of putty, plaster or paper pulp.
Composite construction collage and its design
The composition of the floral collage should be built on the basis of the general principles of creating paintings.
In collage, just like in painting, there must be all the basic design elements - color, light, texture, form, relief, contour, space. And all these elements should be competently contemporated, balanced, the contrast should be taken, rhythm, and of course, the proportions to get harmonious work.
Plane collages
Background manufacturing techniques
Leaves, petals, small seeds are often used as a background for a floral collage. With this material, you can get a background for all elements of the landscape composition. So, the petals of dolphiniums are superimposed on each other are suitable for the image of the sky. Reddish sails of dawn will perform the finest dry petals of poppies; The lunar glare is obtained by pearl partitions of the Lunarium pod.
Collage with the image of the landscape
To create a landscape, you first need to think about the composition, because without knowledge of the laws of perspective, without creating the front, middle and rear plans, a full-fledged landscape will not work. And you still need to choose a suitable background, baguette and passecut.
Bouquet of flowers
In collage technology, the bouquet in the frame can be depicted with a variety of ways. It will be very convexed by the performance that does not even need to close the glass, and there may be flat pictures that can be made under the glass.
L. Mogilenec "Bouquet" T. Kochin "Summer Bouquet" L. Elikova "Fantasy"
Postcards, bookmarks, stickers, covers
Flat dried colors make out postcards, bookmarks for books, diary cover, etc. To protect collage work on these items from mechanical damage and from moisture, they can be coated with a transparent heat shrink film that adhesions well to the flower and cardboard.
Another way to protect for postcards is the conclusion of them to the passe.
You can cover the wax surface, it is also good protection.
Professional florists are familiar with a special coating for dry flowers called "Elephant Skin". It is sold in floral stores in aerosol cans. Spraying the collage work by this composition, get a thin film, which protects it quite well.
Relief collages
Works where convex natural materials and non-deployed coating of the base are used, and which are not acclaimed under the glass, are called relief collages. They are performed by using textured volumetric items of plant origin (bumps, sticks, roots, fruits, seeds, cones) based on dense cardboard or board.
Preparation of bulk vegetable material
There are many plants that give interesting in color and texture fruit. Some of them are easily dried in the air and are not spoiled for a long time without any pretreatment. These are diverse and nuts.
For a collage you can dry with a good result and some juicy fruits - grenades, tangerines, oranges, lime ...
Technique work with seeds and fruits
Some rules helping to cope with collage work from fruits and seeds (ornament, figures).
The liner is usually started below; Seeds are stacked with a sharp end up; Glue better apply, using a pointed match. The glue is not applied completely, but only on the central part, then he "breathes", has a volume.
Relief bouquet in the frame
There are several ways to create a embossed bouquet in the frame. Plants can simply be located in the deep frame fixed with glue. And you can assemble the composition based on the floral sponge of the allowance bouquets.
Frames for similar collages are chosen deep with a complex profile.
Arabesci
Arabesque is the name of the ornament built on the principle of constant repetition of various geometric and plant motifs, decoration in color with intricate weave of leaves and colors.
Styles in collage work
Plants or their parts, eliminated from the usual context, painted or modified in any way, can be used for unexpected combinations.
The use of the usual mass of plant material makes it possible to create new structures at your own request. This also contributes to the addition of or repetition of elements from various organic and inorganic materials.
Collages in the interior
The collage in the interior appeared and even pushed out picturesque work, it disappeared until a complete oblivion. With the return of ascetic style and minimalism in the outlines of the modern interior, it seems, a collage, especially floral, is again in demand.
Gallery of the author
These panels are made without using textile glue. Used the fabric to the frame, but you can take any coarse tissue. Rough, relief texture, only give more interesting effect.
1. Determined with the size of the panel. Cut out a piece of fabric in length and 10 cm width larger than the size we need. The fabric is well staring with a hot iron through a wet rag, the fabric must fully give a shrinkage.
2. BOB, Fauer or, in extreme cases, thick cardboard, not only corrugated. Fiberboard, and Phaneur before starting work should be primed, PVA glue or cover enamel. Cardboard close a piece of p \\ e films.
3. Dealer begin to make the panel directly. We decide the fabric on the p / e film and in the center a piece of fabric, white acrylic paint paint a rectangle. If it is planned that there is no framing from paint around the picture, the size of the rectangle must be a few millimeters less printout. Those after the picture will be pasted, the paint should not be seen. If the framing is planned, the rectangle is labeled more by the size of the picture with the framing. If the paint is planned to paint all the panels, then the rectangle draw a few mm size less panel size.
The paint should be allowed to completely dry, film under the fabric, it is better to change periodically, then the paint will dry faster. This procedure must be repeated not at three times. Do not try to paint the fabric from the first time, it will not work, but will greatly increase the consumption of paint and time for the manufacture of panels.
When the last layer of paint dries completely, PVA glue lubricate the place to which the printout will be pasted. The printout, if it is printed on ordinary paper, soaked for 15 minutes in water, wedging, lubricate with glue and glue as with a normal decoupage, carefully smoothing the roller and not allowing air bubbles. If the printout is made on rice paper, it is not necessary to soak it, simply, we apply to the flavored tissue glue and, wetting the water with top, grow. If for the panel we use a napkin, glue it, as usual glue napkins on wooden boards, but observing greater caution.
4. When the picture will dry completely, we put the fabric to the base and bend the edges of the fabric on the opposite direction. Fix them with glue. On the reverse side of the work, we glue the cross with two two pieces of twine, so that they pass through the corners of the work.
5. Bamboo make a frame. Punk sword is fed to the nodes of the frame. Beautiful tight paper stuck up the opposite side of the work.
6. The work is covered with 1-2 layers of acrylic varnish.
Deciding with the style, you can start picking materials for the future work:
- Paint and canvas.
- Cardboard, designer paper, journal cutting, old photos.
- Textiles, leather, ribbons, braid.
- Glass or crystals.
- Buttons.
- Drokes, shells.
Tip! Do not throw out old children's drawings, loskutka fabric, magazines, decoration - All this can be part of the picture. Keep them in a separate box, periodically browsing and component.
Draw paints
The easiest way to create an original picture for the interior with your own hands is to write it. Theme is limited to the fantasy of the Creator. Even in the absence of artistic skills, a masterpiece may turn out: use abstract techniques, study master classes and photos of finished work.
Oil, watercolor, acrylic paints will be loyal assistants in creating a picture for the interior. As a basis, you can use both professional canvas and ordinary dense paper or a primed plank.
Tip! Inspiration can be drawn in nature, if there are picturesque places near the house. If neither the place or the weather is not lucky, feel free to paint your households, pets, fruit compositions - anything. The accuracy of reality reproduction does not play any role, the main thing is to come to the process with the soul.
Modular patterns are suitable for almost any premises: from kitchen before living roomBut it is important to select the relevant images. If you have no time to create a masterpiece with your own hands, we have good news for you - today you can buy them in any specialized store!
Photo printing
The technical side of the question takes on the photomaster, which can print a suitable image on almost any basis: canvas, paper, ceramics, etc. It can be ordinary posters depicting interesting places, people, ornaments.
Tip! The poster is not just a picture, he must bear a specific idea, correspond to the interior, the subject of the room and the nature of the home. Recently, PIN-AP and Retro posters have been specially popular.
If the poster is larger, you can divide the image into several segments and when connecting to a single cloth to beat the joints, making the similarity of the modular picture.
If there is a child in the house, then you can scan it drawings and, choose from color, form ,. Add such a poster can be photos of the artist. It will only remain print poster and put it in a frame suitable for color and style.
Collage of old and new family photos You can hang as a picture in the bedroom or living room, and posters are suitable for the kitchen with the image of the appropriate attribute, fruit. Finally, it is worth noting that it is recommended to choose posters and panels for the kitchen in juicy and bright colors, however, no one forbids to go against the rules and create stylish.
Textile
From all sorts of flaps, fabrics with beautiful ornament, ribbons, braids or lace do it yourself create real masterpieces in the style of patchwork. Pictures made of fabric most often do in the applique technique. A dense textile with a restrained and imperceptible ornament (stripes, peas, etc.) is taken as the basis, and the main elements are cut out of bright flasks.
Most often, textile works are decorated with kitchens and children, since there is a certain simplicity present for these premises.
Tip! From felt, flannels and other fabrics that are well holding the shape, you can cut fruits, animals, cars, houses. You can safely combine various textures and drawings on the fabrics, use for the design of the braid, decorative cord, buttons. For the living room you can make a textile picture of suicide silk with abstract patterns.
From buttons
With their help, you can create original things in the method of sewing or appliqué. Often this type of accessories is used to image leaves on trees. Buttons can be placed original inside any contour, for example, silhouette butterfly or cats. In the sewing stores you can choose the details of various shapes, colors and materials and lay out them as a mosaic, according to a predetermined scheme. Such works from the buttons will perfectly fit into the kitchen, however, they can also be used for living room and bedrooms.
Tip! Buttons can be pasted around the perimeter of the picture frame, giving it individuality.
Wallpapers and panels
Often, after repair, large pieces of beautiful wallpapers are left, which will be useful for the manufacture of unusual interior paintings.
- Wallpaper in the frame - the easiest option for creating a similar panel. A piece of the desired form is cut out of the roll and placed in the frame. And the ornament can coincide with the pattern on the walls or differ from it. Such elements can go to a row of 2-3 pieces.
- Gold paint and stencil or small black and white photos stylized under the old days will help to revive the boring canvas in the frame. Similar paintings from wallpaper perfectly fit into
Any decoration of the walls after repair is bored, I want to change something and find a way to show your fantasy, talent and creative skills.
The volumetric panel of undergraduate materials is one of the fashion trends in design 2017.

Browsing spectacular work on the illustrations, it may seem that it is difficult. But if there were figures from plasticine and salt dough on school lessons on the "excellent", there are experience with beads or natural materials - everything will turn out.

What material to choose for wall design
Punk on the wall of handmade is a special decor that can revive the most common setting, make a new design concept and revive the atmosphere.

The choice of material and technology for the embodiment of the idea depends on many factors:
- Functionality of the room;
- Wall decoration;
- Creative deposits;
- Tastes and preferences;
- Availability of materials and tools;
- Material skills (sewing, knitting, modeling, weaving, drawing).
Large panels on the whole wall better arrange in a large room where a lot of empty space. Buy painting or sticking the photo wallpaper is the easiest way. But there is nothing original in this, plus big expenses, and the new object will soon get tired.

Another thing is own "masterpiece", which can be proud to demonstrate to all visitors at home.

Looking at a unique work, friends and relatives will be interested in how to make a panno with their own hands?

First, it is better to choose a free wall, and then decide what it will be - a collage of a photo, drawing, modeling or mosaic from a bat tile. The common idea and the plot of images should correspond to the functionality of the room and practicality in care.

For example, it is easy to independently draw aquarium fish on the wall on the wall of aquarium fish on a smooth painted wall, but the paint should be stalked and inclemenable.

If the material is susceptible to the destruction or accumulation of dust, it is better to cover the finished product with a colorless varnish, like a photo of a panel of salt dough.
The base of paint for the panel should approach the walls of the walls. For example, if it is acrylic enamel, then acrylic paints are suitable for wall painting.

Walls in the nursery can be decorated with a panel of wallpaper, which is easy to build with a child from the remains of rolled materials left after repair.

Tip: Tell the children part of the fascinating process of creating a homemade decor. They willingly strengthen into the creative process. This will help the development of finger and spatial motors.

Children can collect natural materials - beautiful twigs, leaves and bumps for panels. If you do not know how to draw - instruct the child spraying paint from the stencil cartridge.

They will with passion will circle large maple leaves on the cardboard, cut their outlines to span on the walls in the hallway the contour drawing of gold and silver paint. Aerosol paints and stencils in the decoration of any room - the best solution for those who do not know how to draw.
Panel from edible products for kitchen
Kitchen - Vacuum of products, where many bulk materials are suitable for decor. Before making a panel with your own hands, make an audit in the lockers.
Note!


At the disposal of novice decorators a whole natural palette, which in the years retains natural color. Panel of coffee, cereals and spices will decorate the free fragment of the wall in the dining area.

Work is performed in several stages:
- Select the sample you like.
- Make a sketch with your amendments and put markings with squares to increase the pattern on the wall at magnification.
- Apply a marking and outlines of panels with a simple pencil.
- Processing glue fragments of decor under a certain product.
- Finished areas should dry by naturally, after which you can move to neighboring elements until the whole picture is completed.

Tip: In order not to be disagreements, the plot panel is recommended to agree with all family members.

For the kitchen, any "appetizing" materials are suitable:
- dried perficing cubs are black and brown contours of any drawing or soil in the picture;
- manka is an excellent brightened base that you can additionally decorate, it also fills empty areas;
- coffee beans (green and roasted) - excellent material of brown and green tones;
- white and color rice - variety of size and shades;
- peas, beans, lentils and beans - white, yellow, orange, reddish and green fruits of different shapes applied on glue with halves;

- mac - black base pattern;
- instant coffee and chicory, cocoa powder and ground cinnamon - a bulk base of brown shades;
- pumpkin, watermelon and cucumber seeds are excellent material for panels with their own hands, they are also glued with halves;
- sIX or cereals of millet, corn and wheat, oatmeal and barley - an inexpensive base of different colors and textures.
The finished panel is desirable to carefully operate with colorless varnish in 2-3 layers so that over time it was easy to clean from dust.
Note!


The image can be left as if unfinished or limited to the side (frame). Joint kitchen decoration is an interesting occupation, which is easy to involve family members of three generations.

Interesting ideas will be prompted by specialists who recorded the master class on the manufacture of panels do it yourself:

Those who are well obtained to sculpt figures, small sculptures or masked dolls from any material, it is worth mastering the technique of working with a salt test.

For relief panels, a small salt with flour 2: 1 is mixed, adding some vegetable oil, water and dry glue for wallpaper, kneading as ordinary dough. It should be plastic, but solid enough.

Ready mass should not pester hands. It is separated from it small pieces or balls, of which they make faces of characters, fruits, leaves and other elements of the panel. It will be better to stay if it is fixed to the frame in the form of a portable decor or attached directly to the kitchen wall.
Note!


You can add any other material to complete the plot, for example, fabric with embroidery, beads or yarn.

The embossed picture dries about a week, but then the solid durable material is obtained. The finished creation can be frowning and opened with varnish as the photo of the represented panel.

Tips for the manufacture of panels from various materials
Making decor with your own hands is a fascinating creative process. Usually after the development of one of the techniques on the example of decorations from dough or cuisine for the kitchen, I want to go to the decoration of other rooms.

The children's room will be appropriately decoration made of autumn leaves or colored paper panels from the fabric in the technique of Patchwork.
The bedroom of the needlewoman will decorate a panel of flowers, leather fabric or buttons. The popular plot is a cash tres, where you can add coins or green coffee to buttons.

For a bathroom or bathroom, a great decoration will become "marine" material - smooth color pebbles, shells and sprigs of corals.

The living room will decorate, traffic jam, bamboo, diverse stone. In skillful hands, any material will be the basis for a homemade masterpiece.

Photo panel do it yourself


