Experience "Filter Theater". Master class on making finger doll
Good day Guests and blog readers! Today I want to raise the topic again, how and how to get a child at home. This topic is very close to me, because I have two children at home. Which require attention and care.
In the previous article, I told you about didactic games with your favorite heroes from the "puppy patrol". Who missed this edition read here.
Today I want to offer another version of the game at home, this is a puppet theater. Of course, you can reduce the child in a real puppet theater, and you can create at home.
Therefore, I will share with you some thoughts, developments to make such a miracle.
We will need: Your desire and a bit of free time 🙂
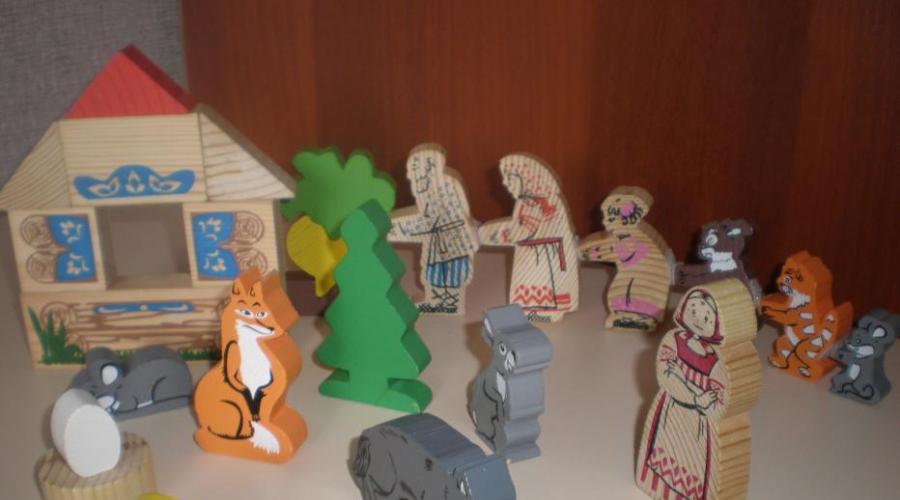
Honestly, our houses have different options for theaters, for example, wood.

My kids love him very much, because it is so fun and exciting when I show them a fairy tale, and they sit and listen. Now I already have a senior son, can show and tell the fairy tales. You just think, because it is very cool, because the child playing, learns to retell a favorite fairy tale, build a dialogue, etc.

I think that all the children of preschool, as well as in most young children of younger school age to such theaters will not remain indifferent. And if you still think of a fairy tale yourself with a ridiculous plot, and an intriguing end, then there may be a real holiday for a child.

The easiest version of the puppet theater with your own hands, it is paper. It is easy to make it easily. Well, or together with the child.
Paper finger puppet theater do it yourself, patterns
Paper finger puppet theater, very much like kids, he puts them up, and also develops a small motility of hands. Here look.

The first option is a flat round finger theater. You need to make your head and the top of the doll, dress on your finger will be using a roll of paper or you can make cones.

Create such dolls with your child together, start with characters templates. Download them on my site by writing me below the comment, I will gladly leave you templates, print and play fun.
After all, a puppet theater is a whole magic art in which children will know the world around. To be in the role of an artist will like any child, and it helps to believe in your strength and succeed in the future. It is also a good material for the development of children's such processes as imagination, thinking, as well as the development of shallow motility and much more.
The finger theater can be made of any girlfriend, such as paper, fabric, cardboard, corks, threads, cups, etc.
Desktop paper theater with your own hands, templates
I show my children, here is such a desktop theater that I did very quickly.

We need:
- glasses from "Roots", illustrations, sticks from under ice cream
Stages of performance:
1. Take any illustrations and cut through the contour of all the characters fairy tales.
3. Stick sticks from under ice cream on each fairy tale hero.

4. Now take the cups and each cup from above, make a horizontal hole with a stationery knife.

5. Well, and now stick with the hero in the cup. See what charm turned out. Very easy and simple, no worse than buying in the store.

Chopsticks from ice cream can be replaced with plastic forks or spoons.
If you do not want to take illustrations from books, you can find on the Internet characters from any fairy tales, save them, and then print it, but then cut and glue on sticks. You can download such ready-made patterns of heroes for such fairy tales from my site: Kolobok, Teremok, Ripk, icy hut, just write a comment or review at the bottom, and I will send you to the mail.
Puppet Theater from the paper "Platling"
Such the theater very much like small children, for such the theater you need favorite characters and a couple of holes.

Believe the children will gladly play such games.

And if you invite friends to visit, it will be more fun to play.

Samples of favorite heroes you also get the address on your e-mail.
Desktop paper theater on plastic cups, traffic jams, cubes
This option is also very easy to do, you can even draw the characters themselves or find and cut, and then glued on corks or cubes. Everything is brilliant simply.

And how do you like this idea? All children love the Kinder Surprise, and everyone remains from them the small contents that you can repay, here in such a theater.

Glove doll with your own hands
In reality, puppet theaters can be built a lot. Even almost without cash. Just need to turn on the smelling and make! You can sew for example.

And you can learn to knit and tie such cute heroes:

I honestly, I used to knit well, now a little time is missing for it all. But to sew, never loved. But, too, as an option, you can sew such a theater who loves this business.

Although here is the easiest Master class in the sewing of the puppet theater from the fabric using gloves. Anyone will cope, even who does not own sewing art.

We need:
- economic gloves, knitted - 2 pcs., Buttons for the eyes - 2 pcs., Threads, scissors, braid, stationery knife
Stages of performance:
1. Take the first glove and split the thread-seam on the cuff, usually it is red or yellow. Get the little finger, big and index fingers so that they do not get out, squeeze them. You have to get a head with ears and arms neck. The bases of the ears are squeezed so that the fingers do not fall there.

2. Now take the next glove and hide the ring finger in it, squeeze the hole. Connect the middle and index fingers together and now put the head of the hare on them.

3. Sew your head to the neck. To hide the seam on the neck, give him a bow or taper in the form of a butterfly. Sceress of eyes-buttons and out the face, or you can draw a marker. From the gun or knitted threads, you can decorate a bunny, sticking to him a pretty carechik. 😯

Thus, other toys can be made, such as a dog, parsley, etc.

I have a son, generally loves such a simple glove, caress her and walks all sorts of stories inventing with heroes 🙂

That's the short article turned out to be today. I think some of you have little children, you are happy to diversify their leisure. Choose any kind of theater, make it together with the child. And then enjoy a good mood and positive. After all, all teamwork strengthens your relationship! And the child will be only happy and happy from it, and will definitely tell you: "Mommy, how I love you!" The most magical words on this light.
Well, I say goodbye to you today. To new meetings.
P.S. Do you know what is very important?! It is in the home puppet theater that you can watch the child for his behavior. Because the baby can come up with something, to speak, and we are still adults to listen to what the child says what conversations he leads themes.
Flat finger theater from the paper "Teremok", from our point of view, not very suitable for children under 5 years old. But 5-6 year old children will gladly play with him. The principle of movement of dolls is very simple - index and middle fingers are inserted into the holes-slopes. This "legs" dolls. Now she can "go." Of course, the tale of "Teremok" the guys of this age know by heart. But here we will "play the theater." And you want to be an artist almost all the guys. But, although the fairy tale and familiar, such games will develop the speech of children - because for each character you need to speak a certain voice, try to convey its character. A bunny says timidly, chanterelle, the mouse begging, and the bear grokely growls. Transfer all these shades with a voice - an interesting and difficult task for younger preschoolers. In addition, the guys can actively participate in the creation of dolls and decorations for the finger theater from the paper "Teremok".
Flat finger theater from paper "Teremok"
In order to make dolls for our finger paper theater, you need to print (or draw) the heroes of fairy tale teremok on ordinary paper. The height of the dolls should be about 9-10 cm, and the width at the bottom of the figure is less than 4.5 cm - so that you can freely cut holes for your fingers.
Templates of dolls for flat finger theater of paper "Teremok"


 We glue a template on very dense paper or a thin cardboard. Let me get seized under load (2-3 fat books) 10-15 minutes. Coloring animals with colored pencils of suitable colors.
Cut the figure, cut the hole for your fingers.
If there is a desire, you can paint the back of the doll. Consider how to color the already carved figure of the baby will be more difficult. Doll is ready.

You can print out the color figures immediately or perform them to the appliqué technique (as in the photo below).

Decoration to finger theater from paper "Teremok"
To play a fairy tale with such dolls, we need a scenery - a lodge teremok. Make it quite easily.
Step 1
Take a brown leaf (not glossy!) Cardboard. Straighten it as shown in the scheme.

Step 2.
Slide the windows.

Step 3.
Cut red paper strips 1 cm width for windows and 2-3 cm for roof. Take stripes of the window and the roof slide. You can make a carved edge from the strips.

Step 4.
Cut from the yellow paper of a log circle with a diameter of about 2 cm. Start them on teremok.

Step 5.
Cut the grass from the green paper and glue from below.

Step 6.
Dorisite the details of the felt-tip pen and cut the extra cardboard over the roof.
Step 7.
From another sheet of cardboard, fold the harmonica. The first link "Harmoshki" 2 cm, the second and third - 5 cm. The remaining piece of cardboard we put again in half (that is, the fourth and fifth link will be about 3-4 cm each)
The most narrow part of the "harmonica" is glued to the teremku below.

In order for the terems to be stable, we glue the side parts of the second link "Harmonica" to the terem. It will be formed as if the pocket, in which we will "settle" animals.
 The photo shows how our terems will look back.

Teremok is ready, you can start the presentation.
The finger theater "Teremok" can be made in other ways, for example. Or . For these models, no scenery is needed. In addition, you can play with them with very young children for 2-3 years.
A finger puppet theater is a fascinating developing lesson for kids. It perfectly expands the imagination, strengthens the shallow motorcy. Heroes of this theater, that is, toys can be plated, stitched or connected, carved from paper or wood. Make a finger theater with your own hands simple enough. Consider all the ways.
Let's see how to make the toys of the famous Fairy Tale "Pink".
We will need:
- paste for modeling. Very good JOVI, which becomes solid outdoors. It dries quickly and it does not need to burn. The paste can be coated with paint or varnish;
- green and yellow paste Jovi Patcolor;
- tassels;
- acrylic paints;
- stacks (special sticks with tips);
- feltolsters.
It is necessary to take a third-third paste from the matchbox. Let's start with my grandfather. We sculpt the cylinder, form your head, outlining the body. In general, in the end there should be a figure in the form of matryoshki. Based on the nephew, you need to make a hole for your finger. To finished torso, you need to attach the knob blind from the same pasta.

Do not forget to constantly wipe your fingers with water, as the paste will quickly dry in the air. Small details - mustache, beard, nose, eyes - it is better not to cut out, but cut the stack.
In the same way, all the characters of the fairy tales are manufactured, the rest of the toys - from the grandmother to the mouse. Do not forget to do at the bottom of the toy hole for your finger!
We make repka as follows: I have a scope of a yellow paste, and with a stack cut from a leaf of green paste Bott. Krepim "Vegetation" to the root close, tightly fix.

When the heroes of "repka" dried up, paint toys with acrylic paints, with the help of brushes. You can trust this work and the most child. Plasticine puppet theater is ready!
Paper finger theater.

Make a finger theater with your hands from paper even easier. We will need:
- multicolored and monophonic paper;
- glue;
- paints;
- tassels;
- scissors.
Make toys that wear on your finger, out of paper is simpler. You can find templates-schemes on the Internet, print them on the color printer, cut and glue. You can simply cut a paper "attack" of the desired character, paint it yourself and also glue.


If you or your child are strong in Origami, then in this case, the expanser for fantasy is simply unlimited. The only minus - such dolls are very fragile and short-lived. On the other hand, every day you can put a new play with new characters. That is, is the theater where the largest productions and the introductions of new heroes are possible with the relative simplicity of incarnation.

Schoyed finger theater
Toys, stitched from dense fabric, are the same durable as blinded from the paste. Such finger dolls can be made of wool, felt, leatherette, felt. In addition to the tissue, we will need, of course, the threads, the needle and elements for the striking toys: beads, sequins, etc.

How to sew dolls? First of all, decide whether you can independently make patterns of cats, chanterelles, dogs, or better take advantage of ready? In the network, their great set. Next - simple work. We translate the pattern on the fabric, cut out two pieces of dolls, stitch them by the usual seam through the edge.

However, if you know how to work on a sewing machine with small forms, it is even better - the edges of the doll will turn out more neat. When the silhouette is ready - do not forget that the base cannot be sewed, with the help of it toys will be put on the finger - embroider with a sword Moulin either we make eyes and spout with beads. Toys are ready. It remains to put them on your fingers and arrange a presentation.
Another option: Tie. But for this you need to know how to knit, and quite well.
My kids finger fans dolls! But it was not always that, many children are interested in themselves in infancy and with pleasure they listen to mother's fairy tales and fun, but it was not like my children. They became interested in finger dolls and role-playing fairy tales after 2 years (and son and daughter) and already after some time they began to tell themselves and compose mini fairy tales with different characters.
A year ago, I already wrote an article about. In this article, I want to show you and prove that your finger dolls can be done with your own hands. This is a very exciting lesson who does not occupy a lot of time. The dolls are very compact, it is convenient to take with you, they will not take a lot of space in your bag and even fit in your pocket at the kid.
Have you noticed how much has become popular lately, like the material?! Yes!? And this is not by chance - it is really ideal for creativity for a number of reasons, I will try to prove:
- Felt keeps a good form
- Edges do not require processing
- It can be flashed, glue, fasten the stapler. Felt is ready for any impacts
- It is bright and colorful. Have a wide color gamut of colors and shades
- Pleasant
- There can be different thickness from 1 to 5 mm
- It has a different composition (woolen, half-wool, acrylic, polyester, viscose)
So, I hope, I convinced you to use felt for finger dolls, then prepare a thread and needle and proceed to creativity. Here are some interesting ideas for dolls, perhaps some like you:
Finger dolls from Fetra Ferm - horse, cow, pig, and farmer.


More finger dolls can be done, too, very beautiful and functionally, but, unfortunately, not durable.


Learn how to create a puppet theater with your own hands. At the same time, the characters can not only sew, blind, but also make out of plastic spoons, wooden sticks.
Finger Puppet Theater do it yourself
Want to develop a small little toddler motorcy, speech, thinking and just be able to raise the whole family mood, then turn the room into the temple of art. To do this, you need to know how to make a finger puppet theater with your own hands.

For this you need:
- felt;
- threads;
- scissors.
Fold 2 character billets with involving parties, place the edge of the typewriter or thread with a needle on your hands.
To make a beard for a grandfather, wrap onto the fingers of the thread into a few rows, shift them on the one hand. Fold these identical threads in half, enter the beard in place.
But what could be the heroes of the tale "Ryaba chicken".

Boroda and grandfather's bangs, granny hair carve out of gray felt. It will help to create a mouse with a long tail. These dolls for the puppet theater can be sewn. If they are toddler, take it out so that they are in the size of his fingers. If the performance will show adults for children, then the dolls from the fabric must be slightly larger.
Check out one more interesting idea. This may be a homely puppet theater for the production of the Fairy Tales. In kindergarten it is better to have larger characters so that the whole group can be seen from afar. But you can do this, taking:
- a paste for modeling (better than JOVI, which does not need to burn, it is hardening in the air);
- yellow and green paste Jovi Patcolor;
- acrylic paints;
- tassels;
- markers;
- stacks.

- Let's first cut the grandfather. Take a piece of paste size 2x3 cm, roll out from it the sausage, form the cylinder. You should have a similarity of matryoshka with a torso and head, and the bottom of the finger will be at the bottom.
- Separately cut the handles, attach them to the body. But the features of the face, beard, mustache designate with a stack.
- By the same principle, cut off the grandmother, granddaughter and animals. When these characters are dried, pull them out with acrylic paints.
- For repka, roll the ball from the yellow paste, slightly pull it from above, insert the tops from green plastic here, fix it.

When pushing paste, you will see that it will dry in the air, so periodically wipe your fingers with water.
This is how you will get a finger puppet theater, with your own hands the child will be able to play the fantastic "repka" or invent your story with some of these characters.

Desktop Theater do it yourself
If you want to have a desktop theater with paper dolls, then consolidate the following image. Print it on a color printer on dense paper. If there is no such possibility, attach a sheet of thin paper to the screen, transfer the outlines to it. Then place on the cardboard, apply the contours, let the child decorate the characters with colored pencils or paints. It will remain cut images, put each side and glue the top to the head.

But still templates for which dolls for theater are easily fused. With your own hands or, giving the workpiece to the child, cut them out along the contours, glue in pairs.

If a small rectangular sheet of colored paper glue the side, it turns out a small tube. He should be so good on his finger. Stick to the billet ears, nose, eyes, front paws, and it turns out the hero of the puppet theater.

These characters can be made it from the most unexpected materials. Look at how to turn plastic spoons into the heroes of the productions.

To make such toys for the puppet theater, take:
- plastic spoons;
- colored paper;
- scissors;
- ready-made plastic eyes;
- glue pistol;
- the cloth;
- narrow ribbon, scissors.
- Adhesive gun glue ready-made eyes to the convex side of the spoon.
- Fabric flap tied with ribbon, turn into a dress. For a male character, it is enough to glue a bow tie on the neck.
- Take up on one side of the strip of colored paper with a fringe, glue these hair. They will be replaced and pieces of painted wool.
In the same way, they also manage other characters to create which will be needed:
- wands from ice cream;
- children's magazines;
- glue;
- scissors.

If you want to make another desk theater, then the covers will go to the move from dairy bottles. Plastic cups from yogurt.

Stick on the opposite direction of these items of paper characters fairy tales, and you can play old plots with them or invent new ones. The background is created from a large sheet of cardboard, which is painted in the topic.
How to make a screen for a puppet theater?
This is an integral attribute of the puppet theater. Check out the most simple options:
- Close the hole under the table with a cloth, tieding two of its angle to the top of one and the second leg. The child sits at the back on the floor and leads characters at the table cover level - just above it.
- Take the old curtain or sheet. Collect any of these cauldons on the rope, the ends of the thread tie a doorway from one and the second side. Make a rectangular cut in the center at the top of any of these cloted. It should be at such a height so that it is not visible sitting behind the curtain of a child or adult who perform the role of dolls.
- For finger the theater, the shirma is made desktop. The easiest way to make it from cardboard. Box is taken. It should be disassembled, sack with wallpaper or colored paper, bend 2 sidewalls so that the center is left for a sufficient size. It makes a neckline through which the doll shows finger toys.

But how to make a screen from plywood. For her you will need:
- plywood;
- lobzik;
- fabric or piece of wallpaper;
- glue;
- little door loops.
- Relying on the sizes presented, cut out 3 blanks from plywood: central and 2 sidewalls. Puck their cloth.
- When the canvas dries, attach the loop to the marked areas so that you can close the screen for the puppet theater and fold it.

See how to make a screen from cardboard in order to be able to show the performances by mobby, glove, cohesive dolls. It should be such that the doll can fit there freely, stand in full growth. If the play shows children of different ages, then high stand on his knees, putting a pillow under them.
In order to make a screen, you will need:
- pVA glue;
- rope or lace;
- carton boxes;
- wallpaper;
- stationery knife;
- awl;
- roulette;
- wide brush;
- long line;
- rag.

Shirma for the puppet theater will be mastered as follows:
- Data drawing for adolescents or adults, the growth of which is 1 m 65 cm. If you make a screen for children, reduce this indicator.
- So that it was durable, make it three-layer. To do this, on one large cardboard sheet, stick the second, then on the other side - the third one. Apply PVA glue with a wide brush. So you will make the front part - apron.
- Side elements are also made by three-layer, but the bends that you then glue to the apron should consist of one layer.
- Connect the details by gluing them. When the glue is dry, position in these places with a lace, having previously done in the fastening of the hole. In the same way, attach the upper arch.

It remains to be saved by the screen with overseas color so that they do not distract from theatrical action.

Mastery doll gloves do it yourself
Such can be seen in the present puppet theater. Dolls gloves put on hand. Bending your fingers, you can do so that the tissue character will tilt the head, move their hands.

Children's puppet theater on hand will have many characters if you use the proposed template.

But it is not necessary to create at once all the heroes. Let's start with two - bunnies and piglets. Understanding how to make such dolls gloves, you can sew other, thereby gradually raging your theater.
If then you will manufacture dolls, you can perform a hairstyle of a fabric or from threads.
The thickness of the character's neck should be such that the dice is soaked here medium and index fingers for controlling the hero of the performance.
Before sewing dolls for the theater, put the porch glove on the rebuilt pattern to decide whether the base is suitable. If not, then increase or reduce it. You can do without a glove, attaching a hand of a pouch on the pattern. Consider, the character will not be static, so you need to add a little from all sides to the free fit so that the tissue of the character's character is tensioned during the management of them.
So, that's what you need to sew a glove doll:
- artificial fur and / or monophonic fabric;
- tracing or transparent paper either cellophane;
- a pen;
- scissors;
- threads;
- eye buttons.

Put the milestone on the cloth folded in half, cut 7 mm with the allowance. For a bunny, it is better to take a gray cloth or white fur, for a pig - pink.

If you want to draw facial features, tails, palm, hoofs, then do it now, before sewing both halves of each character. Take special fabric paints that do not learn when washing. If there are no such, then use watercolor, gouache, but pre-apply the PVA solution to the cloth, after drying it, pull this place, but use a minimum of water. When the paint is driving, put another layer of PVA on top of top.
But it is best to embroider the nose, mouth, pulling these sections to the hoop or to catch the billets of the corresponding colors and buttons-eyes.
Cut the bunny gloves for the bunny gloves, susht the triangular part to the front half, and semicircular, in the form of a collar, to the rear. Tailing is applied to the same reverse side, and there are white paws with pink claws or without them.

When small details are sewn, you can carry out both halves of the doll on the outbreak or on the face - on your hands. In the latter case, use the seam "via the edge" or take a passage of the passing color, end the side seam.
This technique creates other dolls of gloves, such as a piglet.

When the sides are steel from all sides, suffer the bottom. Ears of characters can be fill with cotton or syntheps. In any of these materials, fill the nose of the piglet, only after that the trick this "Piglet" to the head. Make appliqué on his cheeks, giving them a blooming view. It remains to sew a little yellow yarns between the ears, and another doll glove is ready.

Now you know how to sew characters for the puppet theater, if you want to see it, then look at the following plots.
![]()