The bottom frame from large colors with a pencil. How to draw a frame for the picture
In order to find out how to draw a frame in Word, you need to know where to find this feature. In the Word of 2007, this key is on the shortcut panel. The panel, in turn, is located at the top on the left side, in the corner. Initially, this feature is not visible, but this does not prevent us from learn how to add text into the framework.
How to draw a frame in the Word
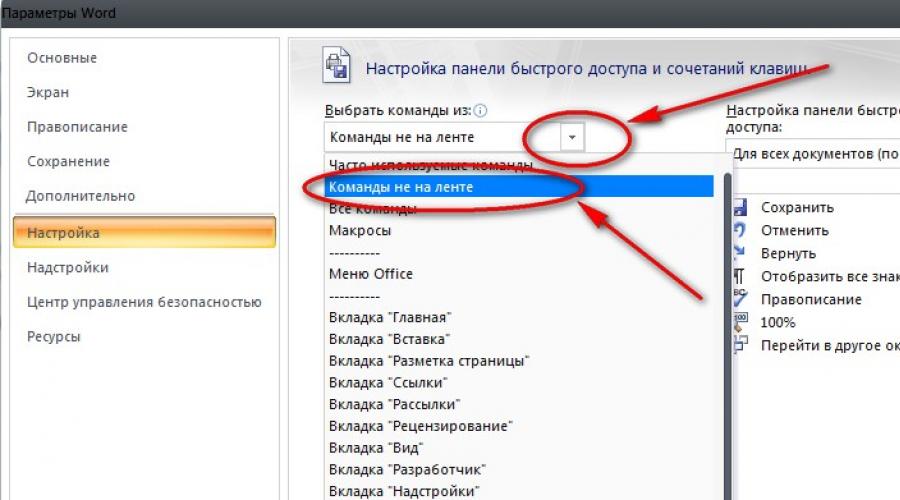
Stage 1.
Find over the Word window the quick access panel and right-click on it.
Stage 2.
In the menu that opens, select the Quick Access Panel Settings.
Stage 3.
In the Word settings window on the right in the menu called "Select Commands from", you should select "commands not on the tape".


Stage 5.
We accept changes by clicking on the "OK" button. 
Stage 6.
Now on the operational access panel there is a frame insert button. You must select the text that is planned to be framed, and then click on the "Paste Frame" button.

To make changes to the appearance of the created frame, it is necessary to click on its border with the right mouse button and choose the item "Borders and Pouring".
Not knowing exactly, it is quite difficult to guess, where exactly the developers of the program showed this function. By logic, it would have to be located in the "inset", but it is missing there. Although now we definitely you know how to draw a frame in Word.
Pictures in the beautiful framework are striking with their beauty. And if you depict some drawing can be easily easily drawn the frame seems to be a difficult task.
In our instructions, we will tell and show how to portray the frame for the picture, a photo or picture. Follow the instructions and everything will turn out. You will need: a sheet of paper; pencil; eraser; line;
Step 1
The foundation
We draw the basis in the form of a rectangle or square. You can choose a figure that you like best.
The border
Inside, you need to designate the border where the frame ends. Try so that the angles are on the same line. 
Step 3.
Corners
Corners draw in the form of diagonal lines.  On the same line they diverge in opposite sides.
  The lower should be continuing the upper.
  You can attach a ruler and draw diagonal lines. Then erase the extra, and leave only the angles.
Step 4.
Interior
Inside the frame there must be another rectangle, since the wood connections form these lines.  There is another rectangle between this line and the border. Draw it without pressing a pencil.
Step 5.
Volume
To give the frame volume, draw rectangles on a very small distance from each other.  A small part of the frame that is located near the foundation, leave empty. Here will be patterns.
Step 6.
Top and lower pattern
Patterns draw small curved lines. Their tilt must be one way.  Near the corners of the line are becoming less and less. Try not to go beyond the borders. Draw without pressure so that in case of error it is easy to erase the item.
Step 7.
Adjustment
At this stage, look at the drawing and correct it. Remember the necessary shape and erase unnecessary parts. 
Step 8.
Patterns on the sides
We finish the pattern with patterns on the left and right. These lines must be horizontal, but slightly bent up. 
Step 9.
Coloring
The classic framework is painted in shades of yellow or brown. This is because earlier there were popular gold-plated and wooden frames. 
Step 10.
Tatyana Kurbo
Hello, friends. Many are faced with a problem, how to make a corner of children's creativity. I want to tell about a simple and budget way to manufacture a frame for children pictures or photos. I did such in my group frames of two formats: For kids A5 (half of the altitude sheet, for senior preschoolers A4 (landscape or standard sheet for xerox) Immediately to the whole group to do it difficult, so I advise you to attract parents. You can organize joint master - Class kids will draw, and parents make a frame for them pictures!

It will take for work: A piece of wallpaper, cardboard, glue, large ruler, scissors.

Impose picture(sheet of paper required format) on wallpaper

Communicate on the contour pencil or flomaster. If you make a large number of frames, you can use a cardboard sheet, then you can delay the sheet without a ruler.

We remove the template and stuck in the rectangle another smaller size (retreat from the initial approximately 1 cm, still need to be done in the inner rectangle diagonal

Then you need to cut the wallpaper diagonally from the center to the corners. (not reaching a larger rectangle).


Then flexing the resulting triangles


We begin the external part of the wallpaper, trying to the resulting parties of the frame to be the same in width, and glue.


It remains to glue the back. I use cardboard from packs of colored paper sets. Then in the finished frame, even if it is empty, you can see a pretty picture. You can use cardboard from ordinary boxes. Then frame will be very tough.. Important: Glue applied from three sides so that you can change the work. In the center around the hole for figure We apply glue strips with long and short side. They are needed to figure N."Failed" inside the finished framework. I showed the gluing lines. If it is clearly visible, in the center of the napkin duplicated

Img] /upload/blogs/6bc1a82914e9567de04fa91f93f407bb.jpg.jpg All. The house for your masterpiece is ready!


You can rear glue the loop from the braid and attach frame with pattern Right to the wallpaper with a simple sewing pin. We have ceiling plastic cornices in the locker room as a shelves
Reflect on how beautiful to make a drawing or text? Frame it. Thanks to this, visual finishes will appear, and work will play in a new way. How to draw a frame in various ways to read below.
All ingenious - just
How to draw a pencil frame? The easiest way to create it using lines. You can simply turn the drawing with a rectangle or square. So that it does not look too primitively to duplicate the line. Frame to draw a soft pencil. Then she will not lose and organically complement the image. If it seems to you that the line is too simple, then experiment. For example, enrich it with dots, circles or triangles.
How to draw a frame to not look too easy? It follows from each side of the picture to spend two straight lines, and on the corners, depicting hearts or asterisks. Another interesting option is to draw a loop line. Zigzag will look sharply, but the wave will completely organically complement any image.
Ornamental geometric idea
How to draw a frame so that it does not look primitive? Create it from an arbitrary complex element. It can be a stylized flower or any other motive taken from the works of cabineties. Such an image should be applied on top and bottom of the picture, and on the sides you can add the frame with drops. The framing will not be a fusion, but visually it will still collect the drawing. It is worth remembering that the organic ornament looks in the event that its elements are repeated. Therefore, you need to take some kind of figure from the bottom and duplicate it on the side. This is not necessary to be something complicated, it is quite possible to do with unpleasant circles or squares.
Inspiration with trimming

Since ancient times, people paid great attention to the framing and decor. That is how the platbands appeared on the windows. Motives for creativity cutters took from nature. Therefore, so often in the frames on the windows we see images of colors and plants. Thinking on how to draw a framework, you can use artistic experience of generations. A simple drawing framed in the framework of platbands will play new paints. Complicated artworks such a framing is not suitable. But with an imperious pencil paint or an illustration will look quite organically.
We framed in oval

Draw such an image will not be a problem even for a person who infrequently holds a pencil in his hands. How to draw such a frame? First you need to turn the oval and give it the volume by duplicating the geometric shape. Now at the bottom we depict the flower and the grid. And on the right and on the left, we draw decorative leaves that are stylized under the wave. At the top of the frame, we create a similar, but a simpler image. You can copy our option, or come up with your own pattern. It remains to add a grid and flowers. The resulting framing will be an interesting frame for text or a small artistic project. It is also well suited to decorate a small portrait.
Blurred edges

The drawing does not have clear boundaries, but still well component in a square? Frame from peonies will be able to supplement it. But keep in mind that such a slight frame is suitable for a saturated picture. The linear image here is simply lost. How to draw such a frame for pictures? First of all we apply two squares - an external and internal circuit. And now in random order fill it with flowers. It is advisable to combine open flowers with buds. Free space should be taken by leaves. You should not worry if you go for the inner edge of the painted square, because at the end of work it will be necessary to erase. People often place large flowers on the edges of the frame. It is not worth doing this, then the floral composition will become trivial, and more so heavy. Large peony can be placed on one, maximum on two corners.
Flower framing

If there is no time to draw something complicated, you can do the usual linear frame, which will be decorated at the corners. Decorate the rectangle well will be a pattern or colors. How to do it? Choose two opposite corners. Remembering that the composition center can only be one, then it is solely from opposite sides to draw two and four (or five) flowers. You can portray the most ordinary daisies or cornflowers. How to do it? In the center draw a circle, and from it in an arbitrary order of petals. It is desirable that they have a complicated form, and not a simple semicircular. If the frame with flowers seems too boring, then from the upper angle can be drawn skelters and leaves. What to supplement this image? This way of decoration can be a frame for a picture or for text. A complex image is not worth decorated in this way.
Scroll

How to draw a frame on a sheet of paper? The image of the scroll looks very original. This decor element may even be an independent pattern. How to portray him? On the right and on the left should be outline the contours. Now you need to give them the wave form. From above, we also depict a curved line. From the right edge it needs to continue and spin like a snail shell. Now it is necessary to connect a short dash of the bottom of the curls with the frame. To make a little scroll, in its edges you need to draw zigzags. They personify the heads that are formed on paper with time. The bottom of the scroll decorate the rectangle, which has in the middle of the depression. The lower right corner is spinning similarly to the top. In order for the scroll to look more interesting, on the left and right should be added to flowers. And do not forget about the rules of the composition: on the one hand, the buds should be a lot, and on the other - little. Such an image is most often used as a frame for text.
It is often necessary to draw the frame around the photo, icons, avatars or any other drawing to visually separate it from the surrounding text or other photos. You can delay the picture thin line in any graphic editor, for example, in the standard Paint.. But better photoshop with photo processing so far no other program copes. Suitable Photoshop. And for drawing a framework, and the ways to draw it to draw about a dozen. In this lesson prepared for beginners in Photoshop.I will tell about the two most simple ways.
Method 1: Frame around the drawing in Photoshop as the effect of the background layer
Suppose we have a picture around which we would like to see a frame with a thickness of 2 pixels. The easiest way to do is use the effect for the background layer, which draws the frame of the desired color and thickness. If the picture has one layer (the usual photo or drawing, which were not worked out just in photoshop), then it is also a background. For this:
1. Open the window with the layers of the drawing (- F7.) and click twice on the background (only) layer in this window:
By the name of the layer (we - "Strawberry") do not need to click if only we are going to rename the layer.
2. Window opens Layer Style.in which many properties of the current layer can be changed. We are interested in the bookmark Stroke. window Layer Style.With the help of which we will make a frame of green in 2 pixels thick:

Pay attention to the field Positionwhose value must be installed in Inside (The frame is shown inside the pattern, and does not outlines it as default). To change the color of the frame, click on the rectangle near the field Color And select the desired color in the window that opens.
3. Actually, everything. It remains only to press the button. OK. in the upper right corner of the window Layer Style. And save the drawing in the desired format.
In order to change the color, thickness, transparency and other features drawn in Photoshop frame, repeat the points 1 and 2 of this lesson. To remove the frame right-click on the layer in the window Layers. and from the context menu that appears, select Clear Layer Style..
Method 2: Draw a pencil frame in Photoshop
To draw an arbitrary frame, for example, around the fragment of the pattern or different thickness and colors on each side of the photo, you can use the tool Photoshop. entitled Pensil Tool. (hot key - B.). Use the mouse to draw a pencil direct line difficult, but if you hold down the key Shift. On the keyboard, the pencil in Photoshop draws only a straight line. Instructions in this case are very simple, though detailed, and does not require illustrations.
1. Choose a pencil tool ( Pensil Tool.) by pressing the Latin letter on the keyboard B..
2. In the photoshop, the list of print properties in the list immediately under the main menu, specify the desired frame thickness that you plan to draw. The color of the line will be active color photoshop (top of colored squares in the toolbar Photoshop.).
3. Create a new layer ( Ctrl + SHIFT + N) in which we will draw the frame. You can not create a new layer, but so we risk spoiling a layer with the main pattern and will have to start all.
4. Click a pencil in the place of the picture where the frame will begin, then click Shift. And without letting the squeezed left mouse button, pull the cursor in the desired side.
5. Let the left mouse button, but do not let go Shift.. Now you need to duck where the remaining corners of the picture frame should be. Since the frame is non-standard, the corners can be as much as you please. Experiment, by canceling unsuccessful moves using the extreme Ctrl + Z and Ctrl + Alt + Z.
In the simplest case, when you need to draw a rectangular frame around the drawing, the picture will not differ from the one that we received the first way of this lesson:
