Methodical manual "Birch bark. Pictures-miniatures from birch bark and other natural material"
Master Class
"Drawing on birch bark"
Hello! My name is Yulia Viktorovna. Do you love Russian nature?
Russia is an immense country that is capable of impressing not only with its vast territories, but also with its diverse nature. Traveling along it, you might think that you have already traveled half the world. Fascinating landscapes, transparent lakes, unusual animals and atmospheric ethnos. All this leaves a deep imprint in the heart of every traveler who at least once was lucky enough to visit its territory, see what are the unofficial symbols of Russia.
One of these symbols is birch. This is really a favorite tree of the primordially Russian people. Why is birch an unofficial symbol of Russia?
For a long time, poems, songs and various proverbs were composed about her. Birch very often appears in Russian fairy tales, so this unofficial symbolism of the Russian land is understandable even to young preschool children.
And what is the significant place of this tree in the visual arts?
Everything about what the story goes next will be associated with birch bark. Amazing products are made of this delicate, very beautiful, velvety, soft material that is easy to work with. Birch bark is an ancient material that has accompanied the life of our ancestors for many centuries. They made dishes and sonorous musical instruments from it, they covered the dwelling and made light golden boats from it, adults wrote important letters on the birch bark and children drew drawings. (display of birch bark products). Did you know that birch bark can be used to make not only various kinds of crafts, but also use it as a canvas for a picture.
The picture made of birch bark is unique and individual!
The main subjects of such paintings are landscapes, churches, trees, houses, streams and fields. And the seasons that are most often depicted in such paintings are winter or early spring, when the snow has not melted yet. Why? Because the colors of summer and autumn do not harmonize with the whiteness of birch bark.
At the master class, you will learn about the amazing properties of birch bark, get acquainted with the technique of drawing on birch bark.
We will draw a picture on birch bark using gouache. To make a picture, we need: birch bark, gouache, brush, frame.
First, open napkin number 1.
What do you see?
Yes, this is not processed birch bark.
We open napkin number 2.
What do you see? This is a processed birch bark, ready for drawing.
Now tell me, what is she? What is the difference between processed birch bark and untreated birch bark?
I have prepared a birch bark for you in advance.
Stage 1. Use a small knife to clean the birch bark in the places where the drawing will be.
Gently pry the birch bark layer from the corner and remove it from the entire plane. The main thing is not to overdo it, peeling the birch bark. Attach a frame to the birch bark, move the birch bark away from you and carefully examine its surface. Think, maybe they remind you of something. Take a closer look and you will see tree trunks, clouds, snowdrifts ...
Stage 2. The birch bark is selected according to the size of the frame or vice versa - the frame is adjusted to the size of the birch bark. We glue the PVA and glue the birch bark on black cardboard, the size of which is the same as that of the frame. Glued birch bark under a soft press for 24 hours.
Stage 3. When you have chosen the plot of the drawing, came up with a composition and selected colors, you can start drawing. You just need to remember that drawing on birch bark is carried out gradually and, observing all the rules, you can get a wonderful picture.
First, the general background of the images is applied with blue paint (dim, translucent), then with brown and yellow. You should get something similar to solid spots with the shape of the depicted objects.
You have blanks on your tables on which you will apply the drawing. In advance, with the children of our group, we applied a background to the birch bark, as it dries for a long time.
Stage 4. This stage is the most difficult, and the quality of all work depends on it.
Take the thinnest brush and paint the outline of the birch with black paint. Draw all small details with thin lines.
Stage 5. Paint the snow on the trees with different saturations.
Stage 6. Thanks to this, the snow does not look like whitewash, but organically fits into the birch bark ornament.
The final stage of work.
When finished, frame your finished painting.
Well, in conclusion, to the topic of paintings on birch bark. I want to say: if anyone wants to paint such a picture himself, then these tips, I think, will be very useful ...
Thank you for your cooperation!!!
We need:
- photo frame - simple, with smooth sides
- pieces of birch bark
- beautiful photo
- hot glue, you can just glue the moment
- scissors
Everything is extremely simple: we cut out pieces of birch bark of the required size. And carefully glue it to the frame. Insert the photo. And voila - our piece of nature, in the form of a birch bark photo frame, is ready.
Option 2:
We need:
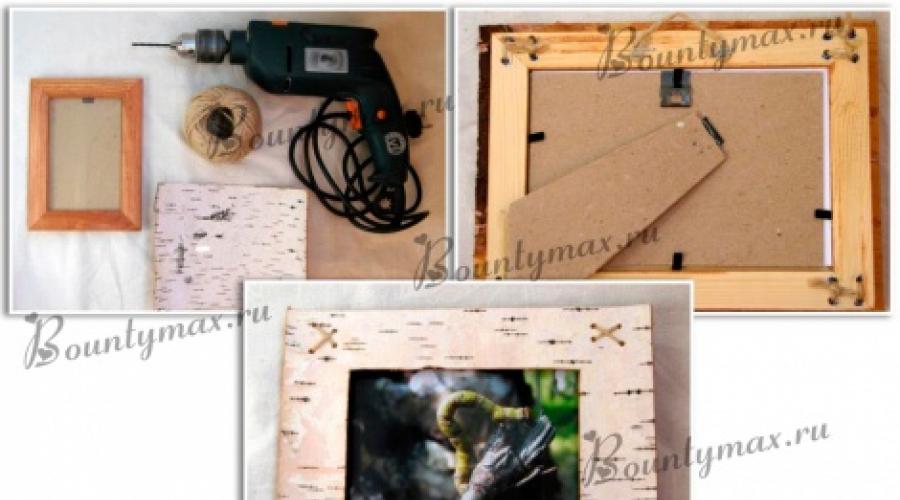
- photo frame - any size, but always wooden
- a large piece of birch bark
- jute twine
- drill
- ruler, pencil

The second option is suitable for those who have a large piece of birch bark, you can cut out a whole piece from it, slightly larger than the photo frame itself.
Next, we take not glue, as in the previous case, but a drill, with which we drill 4 holes in each corner of the wooden photo frame. On the finished piece of birch bark, in the same places as on the photo frame, we make holes with an awl.
And now we simply tie the birch bark to the frame with twine through these holes. Insert a photo or picture.
Here is the main idea. Therefore, I do not indicate the size of the frame - choose at your discretion, in fact, a photo or a picture too. You can even make several frames of different sizes and hang them side by side, it will turn out great.
In general, experiment!
, banana peel, moss, composition building, miniature
The purpose of the manual: to acquaint children with an interesting ancient natural material - birch bark. To prove its importance in the manufacture of both ancient household items and in the creation of modern paintings, panels and other products used in life and in everyday life. To teach how to work with this material.
Tasks:
Developing:
- Expand the child's understanding of the variety of natural materials that do not require large costs in their procurement, and in the manufacture of works using these materials
- Develop imagination and imagination, a sense of proportion and taste when working with this material
- Develop a sense of beauty when performing paintings, landscapes and a sense of responsibility for the preservation of the environment (parks, gardens, squares, forests, etc.)
Educational:
- Teach children to work with birch bark and other natural materials
- Prove that from individual pieces of birch bark, leaves, petals, you can create a whole picture, still life, landscape, etc.
- Teach children to observe nature, see the beautiful, collect the necessary material in nature, create their own idea in the picture.
Educating:
- To form a taste, a sense of proportion, a commensuration of color, shape, individual parts (elements of the picture).
- Form the student's assessment of his own activities and the activities of a friend.
- Foster a sense of mutual help, empathy and responsibility for work.
- To instill a culture of work - accuracy in work and love for what you do.
Birch bark harvesting.
Preparing it for work and using it in creating paintings
Writer V.I. Belov in his book "Lad" writes: "Birch bark is probably the oldest and most widespread northern raw material, used by all kinds of craftsmen."
And indeed, flowers can be made from birch bark for a panel or in a composition, landscape, frame, mat, etc. This material easily exfoliates into very thin but durable layers of a wide variety of colors: from white to dark brown (up to 40 shades). This allows you to create compositions from only one birch bark, and it is possible to add other natural materials, such as dried leaves, moss, flowers, petals, etc. From the coarser bark covered with dark spots, you can make such landscape elements as mountains, snow-covered land with thawed patches, etc. From thinner pieces they lay out the sky, earth, water, etc.
Birch bark is harvested in lumber sawn birches in strips at least 20 cm wide or removed with a cylinder from the trunks of birches that have lain for a long time in dead wood (pictures of birch bark removal). Rice. 1 - in strips (this method is used to remove birch bark in weaving baskets, basketry, shoes for making belts, etc.). Rice. 2 - for paintings and panels.

At home, the bark should be boiled in an enamel pan for 10 minutes to destroy the bark beetle larvae. Then straighten, stratify into thin plates as possible and put in separate color shades in envelopes under a press, after drying the plates. Then keep in a book or boxes in a horizontal position under a press. You can delaminate even after drying. It's okay if the pieces are small. The main thing is to find the right shades: yellow, orange, white, etc. (depending on the plot design).
The basis for the picture can be not only cardboard, but also parts of tree trunks, boards, veneer. Birch bark and other material are glued to the base as described below. We start work from the upper left corner (edge), moving to the right, overlapping with a piece of birch bark or leaf by 1/3 the next piece of birch bark or leaf. We glue only the middle of the plastic of the birch bark or leaf with glue.
Features of the birch bark applique technique
The color of the birch bark can “play” depending on your artistic taste, the idea of the work, the mood of the author. However, there is a constant: soft, muted tones are used for the background work. The foreground involves the use of rich, intense colors. The final transition from the first to the second should be smooth, gradual.
The color and thickness of the birch bark plates are directly dependent. A muted, soft color is most often found in thin translucent plates. They are the most convenient to use in those fragments that depict the “depth”, perspective of the landscape. Birch bark application cannot be characterized only by a set of rules - there are exceptions.
As for the color, we will restrict ourselves to only one of the main remarks: the colors of the picture should be combined, connected. Simplifying the idea of connecting colors, Renoir remarked: “If you have paint on your brush, then you have to go over the whole“ picture ”with it, including the sky, if it is even black paint ...”. We advise, of course, to accept only the idea of color unity (including in birch bark applications). As for the methods of implementing this idea, you can rely solely on the level of artistic taste of the author of the work.
In works made of birch bark, the use of thick plates (with the exception of the foreground of the landscape) and tint of the material should be avoided. As for the tinting of the material, it is interesting to note here: birch bark for a picture is beautiful not only for its structure and soft pastel colors, but also for its amazing property of emitting a glow. It has a beneficial effect on a person, surprises and pleases him. If paint is applied to a plate of birch bark, the glow disappears. The works become bright, expressive, but at the same time the main thing disappears in them - their warmth, softness, breath.
For coloring in pictures from natural material, in addition to birch bark, additional natural material is used (moss, crumbs from dried leaves and flowers, banana peel, grass, straw).
Preparation of leaves and flowers for paintings. Banana peel. Onion scales, garlic
Collect material in dry weather. Dried in old books or newspapers, changing the insert sheets daily. We shift flowers, fruits with cotton or paper to absorb excess moisture. We dry under the press. Store in boxes in the dark.
Banana peel- remove the pulp with a knife until translucent, dry in a book under a press or in newspapers, changing the inserts daily. When dried, the banana peel is brown in color, looks like suede and is cut with tracing paper along the contour of the object (vase, sculpture, houses, tree trunks, fences, etc.)
Melon, pumpkin, watermelon rinds- thin layers are dried in the book (for vases, fruits, still lifes). The peel of the apples is cut from the apple. The pulp is removed and dried in a book.
Garlic stalks, garlic scales, onions- for vases, for water reflections (pond, ponds, rivers, etc.).
Materials required to complete the painting - miniatures made of birch bark and dried leaves and flowers and methods of preparing them for work
Sketch of the work.
From a book, from a reproduction, from a photograph, in black and white or color; it is possible to translate the plot on tracing paper or parchment paper according to the size of the base. The sketch (plot) can also be conceived by the author.
1 mm thick cardboard. Standard sizes (for a frame with glass) for miniatures: 6x9 cm, 10x10 cm, 10x15 cm, 15x15 cm, 9x12 cm (for birch bark works); for works from dried leaves and flowers: 15x21 cm, 18x24 cm, 24x30 cm, 21x30 cm, 30x30 cm.
Tracing paper or parchment for the plot (according to the format of the base and for details).
Thin multi-colored plates are selected by color: from 9 to 15 shades (white, pink, orange, yellow, brown, gray, etc.) depending on the plot. It is better to remove birch bark from sawn birch trees in the spring and boil it in a saucepan over low heat for 10 minutes, then cool, stratify in a wet state and put each plastic (layer) in an envelope under a press, having previously arranged in color shades.
Banana crust.
Remove the banana pulp with a sharp knife until it is visible. To dry in the newspaper, in the book under pressure. The dried rind should be brown (light brown to black). It is better to have plastic, crusts, moistened for individual details (sculpture, buildings, etc.), so that it would be more convenient to cut with tracing paper.
Dried under pressure, 2-3 types: bright green - for needles, trees - spruce, pine, etc., bluish gray, lichen, etc. depending on the plot.
Tree leaves
Green and shades of green (for trees in spring, summer and grasses); yellow - for autumn trees, brown - late autumn, winter.
Flower petals
dry under pressure (bright red, crimson, etc. - depending on the plot). Tiny - prepared with a coarse rubber sponge and an awl (piercing technique) or flower petals crumble with your hands.
It is tiny used to create flower beds, borders, lawns, grass, etc. in a picture. For a flower painting, flowers are dried in a book or in newspaper sheets under pressure, changing newspaper sheets daily. Terry flowers are laid with cotton wool (we disassemble the heads into separate parts - the middle, petals, pedicel) and are also dried under the press.
Fruits vegetables
For paintings with bouquets and still lifes. Cut with tracing paper from the peel of apples, orange, grapefruit, watermelon rind, melon, pumpkin.
Tools for the job
- Metal tweezers (it is better to have 2 pieces: 1 - large, the other - small) with sharp long tips without teeth and thorns.
- Scissors (2 pcs.) With straight ends. Some are large, others are small - manicure, with straight blades, sharp.
- An awl for piercing leaves or a large needle.
- Porous rubber sponge for piercing leaves and petals (for trees, shrubs).
- PVA glue ("Silakra - Lux" 0.5 kg can) or Baltic (in tubes - 300 g)
- Oilcloth (for the table).
- The frame is selected at the end of the work. Should not be the main one, should complement the work, not distract. Matched by color, width, baguette thickness, texture.
Sequence of work execution and execution technology
Cut out the cardboard base depending on the sketch format.
Put a sketch (copy) of the plot in front of you. Draw the horizon line (the line separating the sky and the earth). In this case, a narrow strip of birch bark, straw or a strip from a banana peel is taken and glued to the base (it is dried under a press for 2 minutes).
The sky is laid out. From plastics of birch bark or leaves of white poplar, raspberry, mother - and - stepmother (gray shades). We start work from the upper left corner and move to the right, overlapping the next leaf by 1/3 of the previous one, taking into account the light and shadow (the light of the sun, moon, weather conditions and the temporary state of the day, day). Leaves can be torn off and glued in pieces to the horizon. We put the work under the press, putting the base in a paper folder or under a cardboard sheet (2-3 min.)
We spread the ground (water, meadow, etc.) You can use an even monochromatic layer of birch bark or veneer, and then recreate the plot in separate details. And it is possible to make the background a separate laying out of birch bark plastics (depending on the plot drawing), as objects move away or approach, taking into account the volume of the picture, the tier or the plan. The sky should be lighter than the earth, water. We put the base under the press (5-10 min.).
Individual details of the painting (sculptures, buildings, bridges, cathedrals, fences, trees, people, animals, vases of flowers, etc.) are transferred to tracing paper from the sketch, carefully cut out together with tracing paper and glued to the painting (application technique). Roads, tiled surfaces, etc. are also carried out. taking into account light and shadow.
Each glued object (if a house, then in detail) is placed under the press or glued well with hands and fingers.
At the end of the work, flower beds, lawns, stones, dividing lines of tiles and coatings, steps and other building structures are clearly depicted in the foreground (you can use cotton threads in the color corresponding to the image).
At the end of all the work, we put the base under a light press - book or under the iron for no more than 15-20 minutes.
We wash the glass in the frame. We insert into the frame.
We make hinges for the frame depending on the size of the picture. Miniature works - paintings have 1 loop (a paper clip is sewn between two cardboard boxes in the center of the upper edge of the frame). With the loop glued and sewn on, the work remains under pressure overnight (or 6-8 hours) so that the cardboard covering it adheres tightly to the wooden frame.


Literature.
- Bunich O.N., Zinoviev I.V., Poddubny V.F., Khokhlov N.P. "Floristics". - M .: publishing house "Ellis - Lak", 1996.
- Volkov N.D. Art studio at school. - M .: "Education", 1993.
- V.S. Aksenov Drawings and painting. - M .: Publishing house "Fine Art", 1993.
- Stetsyuk V.G. Pictures from flowers. - M.:. Publishing house "Culture and Traditions", 1999.
Works of students-winners of international and city exhibitions

"Piskarevsky Memorial"
Panel under glass. Materials: birch bark, banana peel, dried raspberry leaves, crumbs of leaves and rose petals, veneer, moss (wreaths), thread.
Krasnoshchekova Daria, 9 years old

"The road of life. Monument Flower of Life "
Panel under glass. Materials: birch bark, white poplar leaves, veneer, dried leaves (crumb), small flowers, ribbon (tie).
Galitsky Dmitry, 8 years old

"The road of life. Monument Broken Ring "
Panel under glass. Materials: birch bark, veneer, banana peel, dried parsley leaves, birch bark, moss, threads (wreaths).
Kargapoltseva Daria, 10 years old

"Good mood"
Panel under glass. Materials: dried raspberry leaves, flowers, cattail leaves, onion scales, solidago.
Razumnov Artemy, 7 years old

"Lilac blooms in the Summer Garden"
Panel under glass. Materials: birch bark, banana peel, dried leaves, small flowers, flower petals.
Nikitina Alla, 9 years old

"Morning in a pine forest"
Panel under glass. Materials: birch bark, banana peel, dried leaves, moss, felt, small flowers, flower petals.
Krasnoshchekova Daria, 10 years old

"Docking of spaceships"
Panel under glass. Materials: black paper, birch bark, cotton thread, semolina.
Abduganiev Umed, 11 years old

"In outer space"
Panel under glass. Materials: black paper, birch bark, cotton thread, semolina, moss, lichen.
Solodovnikova Elena, 11 years old

"Flower Wind"
Panel under glass. Materials :, dried leaves, herbs, small flowers, flower petals, coffee.
Kargapoltseva Daria, 11 years old
Professionally executed atmospheric footage needs decent framing. Minimalistic or classic frames can not always convey the naturalness of the captured moment. In this case, the successful shot was emphasized by an equally original frame made of birch bark. In fact, it is not difficult to make one, it requires minimal costs. It can be used not only within the framework that was conceived by the author, but also as an interior decoration.
Materials (edit)
To make a photo frame from birch bark with your own hands, prepare:
- a simple photo frame of the size you need;
- pieces of birch bark;
- sharp scissors or knife;
- hot glue sticks;
- thermal gun.

Step 1... Disassemble your existing photo frame. To work, you only need an external frame. Remove the glass and cardboard holding the photo. If you leave them, you can ruin them in the process.

Step 2... Cut pieces of birch bark into pieces of suitable size. Brush off all the dust from them.
Step 3... Using hot glue, start glueing the pieces of birch bark around the perimeter of the frame. Arrange the pieces the way you like. Overlap them so that the base of the frame is not visible. After gluing the pieces, you can press them down for security with a press. Several books are quite capable of playing the role of the latter. This technique will help you align the curled pieces, if any.


After the glue dries, the frame is ready, you can put back glass, photos, and secure them with cardboard.
If you do not have the opportunity to collect birch bark, you can use another technique. Buy a self-adhesive paper with a birch bark print, paste over the cardboard with it and then glue the cardboard, cut into pieces, to the base frame.
