Basket from the vine with their own hands. The neighbor cut the wand sticks and waited until they rooted, and then began to create ... the best solution for giving
Vine products can serve as decades, filling the house with comfort. They are appropriate not only in the rustic hut, but also in the city apartment. Ready to master a new hobby and learn how to create masterpieces?
Losophell is ancient art, the oldest baskets dated 6500 a year before our era. In the cultural heritage of practical all corners of the planet, braided products are mentioned. Baskets, trays, boxes and luxury are very diverse and beautiful, literally attracting the eyes. Wicker things were so widely used that they were reflected even in the canvases of the most famous artists. Today, the ancient weaving techniques from the vine returned and replenished the list of fashionable hobbies.
Cradle
From economic utensils to designer things
The use of baskets and wicker furniture strongly expanded the framework, these are not only country accessories, but full inhabitants of modern city apartments. Now these things are used not only as economic or utilitarian, but also as bright design accents. It should be noted that the billet of the vine for weaving does not cause any harm to the environment, but on the contrary, rejuvenates the ventilators.
They are engaged in this craft with equal success in rural areas, and in large cities. An indisputable advantage is the absence of the need to buy raw materials for work, it is quite possible to prepare independently. Willholes are plentiful in almost all regions of our country. Those who love long walks in nature, the workpiece will only bring pleasure.
How to prepare a vine for weaving

However, it is possible to buy raw materials for this hobby, although this industry is only gaining momentum. You can weave not only from willow, but also from a nut rod, dend and other enough flexible rocks of trees and shrubs. You should choose long and not very thick shoots, they should not branch.
It is used both non-corrosive (crude from the bark) material and purified. From a non-spoiled rod make mainly shopping products: plentine, baskets for vegetables or mushrooms. More graceful, small things are made from the base material. It can be a different kind of vase, Sukharanny, a box for linen and a huge set of other products.
It should not be harvested for a rod for weaving in the summer. At this time, he is often brittle due to violent growth. To avoid disappointments, the workpiece is carried out in spring or autumn. In winter, it is also quite possible to do this, but the work will be difficult for snowdrifts and frost. The rods cut in the spring are cleaned from the bark without prior preparation, the autumn rod is first boiled, then clean. Processing is simple, but will take time.
The weaving process quickly passes and delays, natural material in the hands takes the negative and bad mood. And the finished thing made by personnel will delight and the grace and convenience.
Where to start the sloping

In order to try to make your first basket, you need to be patient. Natural material is sufficient not as fast as before putting it in smooth rows, a considerable amount of blanks will be broken. Tools need a little, get them very easily, they are inexpensive. To begin with, it will be necessary:
- awl;
- secator;
- stationery knife;
- boxes;
- the pulverizer will help moisturize the rod while working so that he does not break.
Classic products begin to weave with the bottom, then the walls are fluttered, the bending and the handle are performed. Making the first steps in this craft, it is advisable to start with a simple round basket.

Before its manufacture, you need to get acquainted with all multiple weaving techniques:
- round rogue;
- ropes;
- layer laying for walls;
- registration of the feeding of the product.
Weave should be periodically finalized and tamped so that it does not work out too loose. It is necessary to ensure that the rods lay smoothly and tightly, without overlapping each other.
Having mastered the main weaving techniques from the vine, the master can go to openwork or other more complex things. You can decorate a basket with various braids, torso other materials, such as straw, bark or wooden beads.
Flight of creative thoughts in this business is guaranteed! The finished product is covered with varnish, better on a water basis. It is environmentally friendly and there is no smell, and the treated thing later can be successfully used in the kitchen or in the nursery.
Modern use and examples of braided products
Weaving from the vine - very flexible skill, its use is limited only to the fantasy of the master. Fashionable landscape designers specifically order sculptures from the vine to decorate the site. We enjoy sex, which can be performed independently. Separate attention deserve elegant and cozy rocking chairs.

The possession of this accessory is already talking about the status of the owner, about its achievements. You can come up with and make copyrighted decorations and gifts for holidays, for example for the new year.

Special place occupied cradle from the vine. Natural, unprocessed material is perfect for children's rooms. The kids are really good and calmly fall asleep in a wicker cradle.
Various shelving baskets will fit almost any interior, very convenient for storing small things that have to keep at hand all the time.

Each host will find a lot of opportunities to use such products in his home. To contempt out of the vine of modern lady with a fantasy, the question of gifts is close at once is becoming easier. It is unlikely that there will be such a thick man who will not appreciate the woven things specifically for him, the author's and such warm.
From the vine weave the people since sincerely, only over the grape vines, therefore, this name went - weaving baskets made of high-quality vines, although it can be used for rods and other plants (raspberries, blackberries, currants), which will be more pious. Then a person found a more flexible and durable plant - IVA. IV Broats are flexible and do not break as a grape vine, so there are large items from it and large objects, furniture (sofas, tables, shelves, shelves, armchairs), as well as smaller products, boxes, baskets, bread, dishes, vases, figurines , Frames for photos and much more, for which only fantasy is enough.
Many saw wicker products and some of them wanted to also get such a job in their own use. Therefore, it often arises the question of how to weave large and small baskets from the vine. It is not difficult to weave with your own hands and is not completely difficult, only you need to stockday, patience and weaving materials.
Photo lesson on weaving baskets from a vine for beginners
Preparation
For beginners in weaving from the vine, it will be more useful to prepare material itself, i.e. It is necessary to cut the annual rods in large quantities and with a margin, because the beginners of the rods in their work break more often. It is necessary to cut into thin bars with a sharp knife or a secateur, leaving another 3-4 kidneys on the branch so that the branch could continue to grow.
Before cut off a large number of vines from a certain bush, it is necessary to check flexibility on the first cut branch, i.e. It is necessary to bend it from the thick end in half, if not cracked, it means that it is suitable and can be cut further.
In order for the vine in the finished product to change the color, it should be soaked, preferably in running water (up to 1 month), disappear in hot water (1-2 hours) or reveal in boiling water (up to 20 minutes), clean from the bark, And then dry on a flat surface so that the color was uniform, without spots. Before the work itself, the vine should be shorted in water or wrapped in a wet rag and package to again give it flexibility so necessary during weaving.
Material and tools
Required for basket Material: 8 ponds for bottom cross, 7 mm in diameter and 20-25 cm longs, for stiffness of walls - 15 rods with a length of 25-30 cm, and in diameter 5-7 mm, for braid - 20-30 pieces of vine The thickness in the diameter is not more than 4-5 mm, but up to 1 meter long.
Tools that will be needed during operation: Knife, round-rolls, pliers, side-, shill of different diameters, incl. And a thick curved awl (Kochess), load for holding work on site and tightening gum or rope.
Breaking DNA
Weaving basket begins with the Donets. It is necessary to take 8 thick rods in length approximately, in 4 of them to make a cut, i.e. It is necessary to split in the middle with a knife or shill to then insert 4 more rods, so it turns out the crusades of the bottom.
The braid braid begins with the "Rope" technique, the subtle ends of two rods are hiding in the crack of the cross, then the rods are separated and one goes over the axes of the cross, the other under the axes, then they are changing in places and so pass one or two rows in a circle.

Then the axis of the crosses are divided by two and sweeping further.

Then it is necessary to make an odd number of crosses, because It is necessary for a simple weaving, one of the rods are cut by the side. The rods are further moved and the corners between them are made the same so that the bottom it turns out round and the weaving was uniform.

So the weaving continues until the entire length of the rays will not be worn, the extra ends are cut off.

Basket walls
The next step will be the attachment of 15 side racks in weaving Punchka.
It is necessary to bend these racks 90 degrees, set to a vertical position and tie together the upper ends of the racks with rubber band or rope.


The border between the Don and the walls of the basket is further tired by three rods. It is necessary to take three pieces of vines and insert into the bottom to be subtle ends near each of the three consecutive racks.

The extreme left twist goes around two racks to the right, it comes to the third rack in the inside and leaves the outside near the fourth rack. In the same sequence, 2 other rods of the vine are brazed. It is so woven by several rows (2-3 pcs.) Movement (the border of the transition of the bottom to the walls of the basket) to form a form.


Wall weaving occurs in the usual weaving method, i.e. One rod behind the counter, the other - in front of the rack.
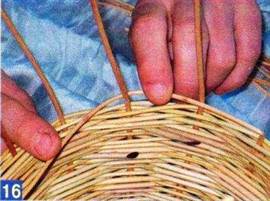


Pen basket
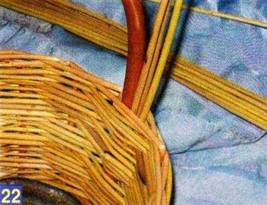
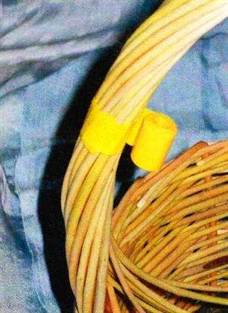
It is necessary to take a thick rod with the necessary length and bend it such a form, which a handle should look in the finished form, the ends to sharpen and insert the walls on both sides.


Inserted next to a thick rod 6 thin rods with a thickness of 2-3 mm, the handle shall be fluttered, if necessary, tightly tape.


In Russia, weaving baskets were quite common. Almost every peasant could wean a good basket if necessary. Well, the baskets flew up for every taste: small and large, round and rectangular, oval and conical, simple and complex weaving, with lids and without them. Without baskets in the farm, it was difficult to do. They wore underwear to the river; took on the road, going to the far path; they collected a crop; Mushrooms went with them.
In modern life, the baskets also find different applications, and a real mushroom skill is difficult without it and submit. And best for mushrooms is suitable. IV branches, of which the basket is woven, contain a large number of tannins. Thanks to them, the mushrooms are not spoiled for a long time, and the air passing through the rods both through the filter is cleaned of harmful microorganisms. In addition, IV's rods absorb excess moisture and thanks to the heat-insulating properties, mushrooms are protected from overheating.
First of all, it is necessary to prepare the good raw materials. In our country, more than 170 types of IV grows in a wild form. Rods of many of them after appropriate treatment are quite suitable for weaving. Yves wood is famous for its flexibility and high plasticity. Only some types of Yves, for example, WIA brittle, are not suitable for weaving because of its fragility. From wildlying willes, young shoots of willows three thousand, basket and winds are harvested most often for weaving.
IVA Three tight, called in the people of Belotal, Belolaz, or just a Lose, is a small shrub growing along the banks of rivers, lakes and other reservoirs in almost all parts of our country. Belotala leaves are oblong, long and shiny. The bark is greenish and yellow outside and lemon yellow from the inside.
Iva is a basket, also called a riquitox and a white car, a shrub or a small tree. Sevective young branches yellow or olive brown. The leaves are long, lonelynolinene, on top of smooth, and from the bottom of silky-felt, whitish. Eye vein, passing along linden, yellow, and sometimes slightly drowned.
Roads, on the banks of the rivers and ponds or not far from housing, you can often find a large spreader tree, which is sometimes thirty-meter height. This isva white, or vehicle. Branches at the winds of green-yellow, the bark is covered with silky hairs resembling whoreish flare. You, probably, more than once had to observe how in a matter of seconds, only it is worth a busty wind, the crown of winds from the green turns into a silver one.

In the old days, the peasants were harvested by the so-called absenter way. Lights growing near the house, they saw the top, which went on firewood and various crafts. By the autumn, the part of the trunk of the trunk is densely turned by young escapes suitable for weaving. Most of the rods were cut off, and the next autumn in their place they grew new ones. Approximately also come on modern baskets, spreading in special sections of willows of cultural species - twisted, purple and others.
For weaving, rods aged from one to two years are usually used. For small elegant weaving, annual shoots are taken, which in individual types of Yves are thin and long like a cord; For weaving large things, as well as for the manufacture of a skeleton of baskets - two-year. Yves rods intended for weaving should be long, thin, flexible, viscous, straight and well split along the fibers. It is necessary to harvest only those rods whose surface after removing the bark looks clean and glossy.
For baskets, try to harvest the rods with a length of at least 60-70 cm with a diameter of a comula (in a cut-off) 5-10 mm. Usually, on one bush, IV shoots have approximately the same physical and mechanical properties. Therefore, before cut off the rod from the bush, first check the quality of one of them. If the IVOV branch on the cut is too big core, and even with a brown-reddish tint, do not take a rod from such a bush - they are usually brittle. For our purposes, you need branches that in the cut is small, barely distinguishable core. And, of course, you need to choose enough shoots, without growing and bitch.
It is almost possible to harvest the vine for weaving baskets every year.
But most often the baskets harvest it in spring or autumn. Spring rods are easily removed without preprocessing. But if the rods are cut at another time of the year, then in order to remove the bark, they need to soak or evaporate. In the summer and autumn, the bars are soaked in running water rivers or streams; You can both in a barrel or trough, but in this case you need to change water every day. The harvested vine is binding to a beam, inside the cargo - stones and immersed in water. So that the rods did not take the flow, they are tied by a rope to a peg, in a shore. Ponds are soaked one or two weeks.
Instead of soaking, they can be disappeared. Then the processing time will be reduced from one or two weeks to one or two hours. Place the rod into the tank or trough, fill with water and put on fire. Bring water to boil and boil one or two hours. Then remove the rods, wait until they are cooled, and take a cerebral to the bark (Fig. 5).

Silent designs are a lot, but the simplest of them is a metal slingshot, drove into a massive bench, a table or a log. Chemille can be made of two metal rods. The pointed rods of the same length score simultaneously into a wooden base from below, turn them into a thick wire, laying the turn to the turn, to a height of 5-7 cm. Free upper ends are driving - it turns out a slingshot.
To remove the boring from the rod, insert it a thickened comral part in a chemale and, pressing the rod to the undertaker with his left hand to the undertaker, right pull over. If the bark was filmed only on the one hand, skip the rod through the chemistry again. Purified bars sort over thickness. If the thin bars failed to prepare you, then thicker split on the strips - halves and quarters. Remember that too raw wood splits badly, so driving it at room temperature.
Part of the rods intended for artistic weaving, spend or proceed. A grayish brown is obtained if the rods are plunged into a solution of iron vapor for a while; Brown color - in a solution of mangartsy or in a decoction of alder bark.
If you want to get bright colors, then take ordinary aniline dyes for fabrics or colored ink. On the bucket of hot water it is necessary about four packages of aniline paints. In a colorful solution, add several spoons of acetic acid. So that the rods are well attacked, to withstand them in the colors of the hour. Then we rinse with clean water and dried at room temperature. Immediately before weaving, soak the rod in cold water.
To weave the basket itself, you need, first of all, master the various types of weaving and methods of seelings.
The most common simple weaving. In some cases, to speed up the process, it is performed at once with two or three rows (Fig. 1). Although simple weaving is performed quite quickly and easily, its strength is not high.

A variety of simple weaving is weaving by inclined rows (Fig. 2). Alternating rows of multicolored rods, you can achieve a large decorative expressiveness.

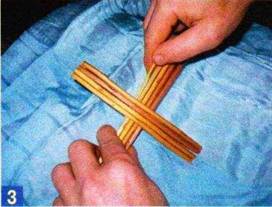
Weaving the "rope" (Fig. 3) are used in cases where in some areas the baskets want to obtain special strength. For example, in the flowers "rope" intersect intersecting or parallel bars.

Weaving "Chess" (Fig. 4) are used mainly with decorative purposes. The rods of two contrasting colors alternately laid as in the usual simple weaving, just not through one rod-riser, but after two.

The beauty and strength of the basket is largely dependent on the proper sealing of the board.
The easiest and fastest way is through one rod-riser. The first rod is set for the second, the second for the third and so to the last (Fig. 6).

Also close the board with two bars, only after two rods-riser (Fig. 7)

or one rider - after two rod-risers (Fig. 8). Using these ways, the ends of the rods need to withdraw the inside the baskets, and the remaining neatly cut through the knife.

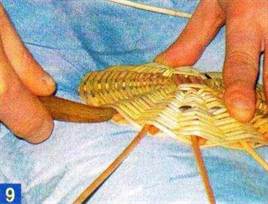
Inserting the side of the "pigtail" takes more time, but the basket gives a special beauty and expressiveness. To put the pigtail, the board first close in a simple way through one rod. At the same time, all the rods are associated with threads of three together and intertwined as it is done when weaving ordinary braids. The brazed pigtail around the side, the rods used are cut, closeing their ends under the pigtail, and successively including weaving all new and new group of roths (Fig. 9).

Losophell is known from very long time, when our ancestors were made by Napti. Over time, people began to weave various kinds and appointments of containers and household items (boxes, baskets, cradle and so on). Now the slurge allows you to create unique and unusual elements of the decor, and everyday items have just diverged your arsenal and style.
Christmas wreath

Necessary materials:
- vine grape (you can use any grape plant, both wild and cultural), it will take about 10 wands of grape vines at 0.5 cm in diameter and about 2 meters in length (the number of sticks of the vine depends on the desired thickness of the future wreath);
- glue gun;
- natural materials for decor (cones, chips of christmas tree, acorns, berries);
- decorative materials (burlap, balls, bows, beads, money, boxes).
Weaving is best done from freshly cut vine. If the vine dried, you can moisten it and it will again get the necessary moisture and elasticity.
The order of the weaving christmas wreath:
We take one wand of grape vines and turn it into the ring, as shown in the picture.

The second stick should be laid around the resulting ring.
At the beginning, at the end of the terrace of the working vine, it is necessary to fix between the rods of the first row of weaving.

In the process of plexing, the vine has a property to break in this case in the place of the scene you need to cut a twist, and the end to fill between the previously woven rows.


For the accuracy of the finished product, you need to ensure that all rods in the weaving process lay in one direction.
The finished rings from the vine can be left without decor, as an overlap, and can be separated.

With the help of glue pistol, you need to glue all previously prepared decor elements to the ring from the vine.
You can fill with a wreath with twigs and cones, you can use your own fantasy.

You can add various types of bows and even artificial snow to the wreath.
Weaving decoration braid

This example will be made along the contour of the plywood board with rounded corners.
Necessary materials:
- plywood board with rounded corners;
- nail;
- a hammer;
- pencil;
- drill and drill depending on the thickness of the rods of the vine;
- nippers or secateurs;
- vine.
First you need to take a plywood board and the future holes must be placed on the sides to insert the rods of the vine, there are about 3 centimeters between the tags.

Nail and hammer make small recesses on labels. Drill drill a recess of about 2 centimeters.

The bars are best used wet, so they are more flexible, so insert the rod into the holes as needed during the weaving process.
Insert into the holes on the rod about 30 centimeters of length.

We need to weave the braid from left to right from the place where three paired holes are drilled by each other. Of the three places we will have four rods of the vine.
We will be for a convenience to call these structures from the bars "strands."
Take a separate wand and overload through it the middle strand, using the prompts from the picture.
Take the first strand of the rod and boil for the third, over the second.

Third strand bend over the first strand for her


We take the second strand out of four twigs and bring it for a strand of two branches over the third strand, which still consists of four.
We are fucked by a pair of rods.

To the already bent steaming straight join four rods from the first. We have formed six rods in the same plane. Next, the upper waves of braids will consist of four rods, and the lower waves of six.

Create a third strand of four rods for the next pair strand.

Cancele a pair of rods.

To the already bent steaming strand, attach four rods from the second strands.

In the fourth straight, we have already formed six rods. We take from them only four and get a four-rod next steam straight.

Canceling the pair strand from the rod attaching four rods to it. So a wave of six rods is formed.
Repeat the step in which you need to take four rods out of six.
Continue the weaving in a circle while the end and the beginning of the weaving will not come together.

Take four rods out of six in the upper wave and make them for the first strand.

The last time you need to start the following four rods out of six, for a strand from which weaving the pigtails began (a strand, which was initially drove through auxiliary stick).
To ship the bottom wave of the rods, which remained and adding four rods in order to each woven portion, two more. And two unused rods at the end of the entire weaving cut.

Also, at the end you need to cut off all sticking rods only carefully, so as not to spoil the leading.
Weaving basket

For weaving, you will need a ventilant vine, but not all the vine is equally good for this case, some species can break when working with it. To check whether the vine is suitable for work, bend it 90 degrees, if it does not break - then suits. The vine must be dried before starting work with it.
However, before the process, the dry vine must be moistened to simplify work with it. The duration of the vine is depends on its length than longer than the vine, the longer it needs to be soaked.
In addition to the vines, you will need:
- scissors;
- secator;
- long nail or acute wand.
Starting stage - Creating a base for a basket. Make eight segments of a sufficient thick vine. For a basket of this size, as in the master class, there are enough segments of about 30 centimeters.
Take four segments and in the center of each of them make a cut with a length of about 5 centimeters.

Insert the continued segments into the middle cut in the form you turned out the cross.


Now examine the segments of the rod and choose the most subtle of them, as well as the longest. Of these, it is best to start weave. Take two segments and insert thin ends into the cuts, as shown in the figure.


To start making a basket, we will use weaving "twisting". In fact, this is a pretty simple technique, but it may not succumb to you the first time, if you have never come across it before. It is as follows: you need to keep two twigs, and then twist them one over the other so that they change places. Each twist is always done in one direction. To better understand the technique, look at the drawings.

Watch each time four segments, take two rows. This will help fix the base of the basket. Try as possible to tighten the twigs and position them as close as possible to each other.

After you finish two rows, using the same twisting technique, you need to wrap it with rods separately each segment.

Separate the segments from each other, tilting them. Make the distance between segments as uniform as possible. After you finish this series, your rods must be distributed as a bike knitting wheel. Make a few more rows.

Soon your segments for weaving will become too short, and to continue work, you will need to lengthen them. It is better not to add two vines simultaneously, as it can make weaving weak. To understand how to do it, see the drawing.

The end of the new segment must be inserted between the two last rows, and then bend. After that, cut the old vine and continue to weave the basket. When adding new twigs, connect a thick end with thick, and thin with thin.

Having made the foundation for the basket, insert another vine to the top 16 that you have at the bottom (just sharpen the end of the vine and insert it into the last two rows). It will have to make some effort if the need arises, you can expand the distance between wicker rows so that the segment is easier to insert.

Cut the rods that you selected earlier and continue to weave only one inserted (above the twig, under a twist and so on). You can add new twigs by simple tied new to the old. Continue to weave until the base reaches the diameter you need. In this case, the base is 20 centimeters.

Now take the segments of the vine of the middle thickness. You need to create a side of the basket. The thick end of each of them sharpe. Insert these segments next to each of the "spokes". Cut the ends of old spokes at the base level.


One of the new twigs, bend it left under two adjacent, and then start up, as shown in the figure. Repeat in the same way with the rest of the twigs. After that, all twigs take in the bundle and tie.

Now insert three twists from the left of three twist at the base of the sides. Take the extreme left, bend it right in two neighboring and before the third, then turning it out. Continue in the same way and take two rows, then unleash the twigs.
Calculate the number of twigs, take the same amount. Insert the right from each needle at the bottom of the twig, tilting it to the left and calling for the neighboring needle and before the third one, then again output the twist out.


When you insert the required amount, you can start weaving. Shooting until the segments become short.


It remains to make a rim. To create it, take one of the twigs and start it right.

Get it in two neighboring twists, before the third and fourth, then for the fifth and output.

Repeat in the same way with each of the twigs. In the end, cut off the excess length of the segments.

Wicker furniture creates a special sunny mood in the house. It is not only beautiful and elegant, but still durable and comfortable. Despite the seeming difficulty, you can make this furniture yourself. The main thing is to know some features of weaving.
The most popular material for weaving furniture is IVA.
Preparation of raw materials for work
The branches of many plants are used for weaving, but Iva is most popular.The thinner the core of the rod, the better the raw material. Rods are fitted and with thick core. Of them make the basis for large articles. But for openwork and air creations, it is best to choose a material with a thin "heart". When the workpiece should pay attention to the width of the willow. What he is already, the more elastic will be a vine and an openwork weaving.
You can harvest raw materials from October to the onset of strong frosts, as well as in the spring. During this period, the rods are well cleaned.

Tools for weaving from Willow: A - Knife, b - a chemalel, in, g - chopped and work to them, d - a stroke of the plane, E is the stroke of the regional.
Before proceeding to the manufacture of furniture from willow, you should decide how it will be done. Two types of wicker furniture are known: Frameless and wig. The peculiarity of the first species is that conventional sticks are used in the manufacturing process. In the finished design, they play the role of rigidity. In the products made in the second way, the carrying structure is constructed from sticks.
We can weave furniture in different ways. The main types are single, openwork and combined weaving. They allow you to create both holistic surfaces and perform patterns.
To fasten the parts of wicker products, use two types of compounds: detachable and delicate. The first way will be convenient when furniture is planned to disassemble, for example, for transportation. However, it should be noted that it is rarely applied. The second type of compounds is more popular. In this case, ordinary fasteners (nails, glue) are used, which makes the finished design more durable. In addition, it is much easier to use this method, especially for a novice wicker master.
Back to the category
Making framework
Make from the branches of Willow with your own hands you can do any thing. A small braided sofa will always be appropriate as in the country's yard and on the balcony in the city apartment. To make this necessary thing, you need to prepare. For work you will need:
- Yves rods.
- Strong sticks with a diameter of 25-30 mm.
- Sandpaper.
- A hammer.
- A sharp knife.
- A secator or scissors to trim the rod.
- Roulette.
- Self-tapping screws and small nails for fastening.
- Hacksaw.
- Glue.
- Screwdriver.
- Morida.
- Foam and cloth to drapese the seat.
First you need to prepare the material. With sticks and twigs, it is written with a bark and leave them to dry. Before starting work, the raw material is slightly treated with emery paper to protect their hands from the zoom.

Items of wicker furniture frames: 1 - jerking, 2 - subcurrents, 3 - Cross, 4 - horseshoe pod, 5 - P-shaped pod, 6 - 2-way pod, 7 - 2-way pods with two longitudinal rods.
The manufacture of the sofa begins with the creation of a frame. For the future seats, 4 blanks are cut from the prepared sticks: 2 to 600 mm and 2 to 400 mm. You need to make them together with self-draws, so that the rectangle turned out.
In order for the sofa to be more stable, it is better to install 3 legs ahead and rear. For the front legs, cut blanks of such a length that corresponds to the distance from the seat to the floor, for example, 400 mm. They should be attached with self-draws to one of the sides of the skeleton of the seat at an equal distance, in this case every 200 mm.
As for the rear legs, then to height from the seat to the floor, it is necessary to add the height of the back. For example, a 250 mm height is selected. Then 2 legs should be prepared 650 mm, which will be fixed on the sides. The leg, which will be installed in the middle, is better done above, for example, 750 mm. This will make a back with a beautiful bend. Attach the legs to the skeleton of the seat.
For the backrest, it is necessary to cut the blank, which will be longer than the seat. With the help of self-sufficiency, consolidate it at the upper ends of the rear legs. The result will be back in the form of an arc.
Frame must add stiffness. The same sticks that were used for the carcass were used as the ribs. Be sure to fix them at one height. First, the lateral and medium legs are bonded. To secure these ribs, it is necessary to attach 2 billets along the length of the seat. The next step is to connect the extreme legs with the middle rear. Billets are attached diagonally. The edge that will be attached to the extreme legs should be located at the level of the ribs that the rear and front legs are fastened, and the other is slightly lower than the seat.