Pictures with pencil flowers gradually. How to draw a bouquet of flowers beautifully: phased master classes
- From this article you will learn how to draw one of the most beautiful colors in the world - rose. Many people have a holiday associated if not with roses, then with a lot of colors, bouquets and small flower compositions.
- Raise the mood and beautiful pattern of roses, which can be made as a simple pencil and paints. The signed figure will be transferred to the perpetrator of the celebration atmosphere of the holiday for a very long time.
- Picture on a sheet of paper one rose or a whole bouquet will be able to even a novice artist if they follow our step-by-step manuals. With the help of a simple pencil and several markers, you can not only transfer the main forms of the flower, but also draw the petals, bring their beautiful bends to paper.
How to beautifully draw roses bud Phased Pencil: Scheme
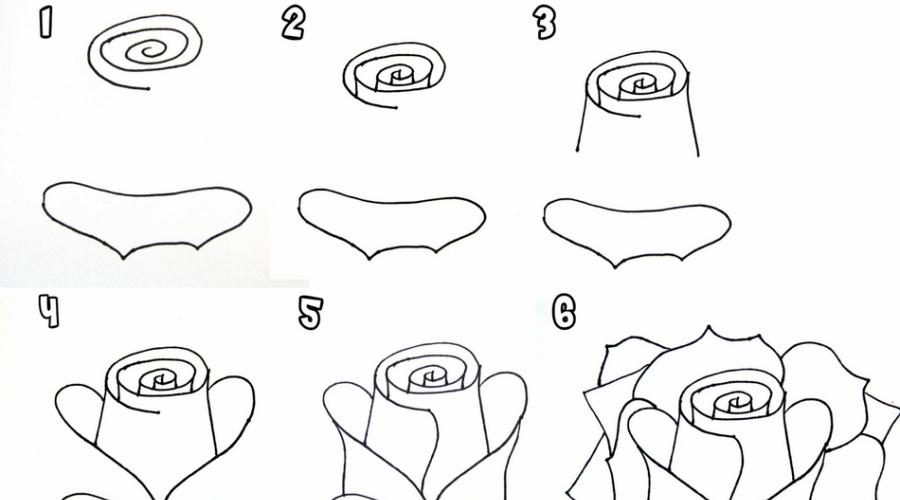
If you decide to portray the revealed rose bud, then you will need to draw every petal. Draw, not strongly pressing on a simple pencil so that it was easy to remove extra lines. Just add on every line of the line, check with the original picture.

Advice:
- Start drawing from the top of the bud. Here, the main thing to adhere to the form of a spiral, which resembles not fully opened bud.
- After that, a slightly retreating down, start drawing the petal: the largest and most developed more than the rest in size, and then others are smaller.
- When the rose acquires recognizable contours, proceed to add volume. Having retreated from the top of the bud, draw the bottom of it. If you shifted long lines, the flower will look no loose.
- Draw petals on the sides of the flower. If you decide to portray a lush flower, add more petals.


How to draw a phased pencil rose: scheme
- Despite the fact that the rose is a sophisticated flower for drawing, artists often depict it on their canvases. If you are just starting to comprehend drawing aza, it is better to stop your choice on simpler colors.
For those who still decided to portray a rose, without having much experience in drawing, the wizard reveal its secrets in master classes. Here is some of them:
- You can draw a rose without experience in drawing flowers. The main factors for creating a beautiful drawing are the presence of a desire and the absence of a rush.
- Help helps to reveal to the artistic talents of even those who, with difficulty, the simplest drawing is obtained.
- To begin with, it is recommended to familiarize yourself with several basic drawing lessons. Now there are many sites where such information is available and informative.

Roses are well combined with other flowers
- Look at the lessons on which it describes in detail about the techniques of pencil strokes, about how to make it easy to do, and what paper it is better to take a simple pencil paper for drawing, and what kind of painting with watercolor paints.
- It is also worth picking up and pencils of the corresponding degree of hardness. However, do not overload yourself to unnecessary information. One or two lessons will be enough to portray the flower not worse than an experienced artist.
- Try to draw simple bulk objects. It will help you understand how to have items on paper.

- Be careful and do not hurry, because the extra lines will not decorate your drawing, and they can only lead to irreparable errors. Yes, if you draw a simple pencil, all additional lines can be erased (drawn without strong pressure), however, real artists avoid applying unnecessary contours.
- Try to explore the selected object before drawing, so that the picture in the smallest details can be reflected in your imagination.
- To begin with, draw a flower with a unacceptable bud. His contours will be much easier to portray a novice artist. Follow the step-by-step explanations, drawing new lines to the initial contours.
- Regular classes will help you to transfer even complex forms and pictures on paper.
Step 1: Draw a rose bud and stem
- We carry out a conditionally horizontal line separating the sheet into two halves. In the upper half of the leaf, begin to draw a circle. We do not need the perfect circle, the main thing is to guess with the size of the initial contour.
- After all, inside the circle we will place a bud. We spend all auxiliary lines without pressing a strongly pencil.
- When the drawing is ready, we will get rid of them with the help of an eraser. We carry out two parallel curved lines under the circle. It will be stem.

Step 2: Draw Petals
- In the center of the circle, we draw a unproofy part of the bud. After that, it will be conditionally divided by a bud of two halves (on our example this auxiliary line of blue).
- Now it will be easier to navigate: we have the right and left part of the bud, on which we need to draw petals.

Draw petals
Step 3: Draw the leaves and add buddes
- We will pay attention to petals.
- You do not need to copy them exactly: just give them natural bends.

Add leaves
Step 4: Draw Petals
- At this stage you need to portray the leaves on the stem. You can also include fantasy and draw a few twigs with the leaves, so that the picture winsly looked, and the flower did not seem lonely on a sheet of paper.
- Drawing twigs with leaves, try to give them more realistic sizes and shapes. Too big leaves will immediately spoil the overall impression of the picture. Dorisu, resilience on leaves.
- Drawn the petals in more detail. Additional lines can be deleted now, and you can do this at the final stage. Just need to keep in mind that the beauty of roses lies in the correct image of the petals.
- We begin to spend the lines under the top, previously drawn the container of the petal, connecting the edges. Each petal will be depicted by two lines, so we can create the impression of a bit bent along the edges of the petals. Two lines of petals will also help the shadow on bud correctly.

Draw shadnes
Step 5: Draw Shadows
- Rosett is almost ready. We only need to give it the volume with the help of shadows. In order to portray a falling shadow, imagine which side of the rose is under the light source.
- The deepening between the petals fill in darker shadows, trying to press a pencil a little more. At the junction of petals, we also draw dark areas.
- After all the shadows are applied to the flower, a little thumb with a pillow of shaded plots. Such a simple reception allows you to smooth out sharp lines, which will make a drawing more gentle.
Step 6: Finishing
- You can make this step to finishing and remove all the auxiliary lines of the eraser. Rose will look more realistic if tinting with a simple pencil is replaced with colored pencils or paints.
- Reline leaves can be angry with green, and bud is a bright red or any other suitable tint. Drawing ropes with paints or colored pencils, do not forget also draw the shadow with deeper shades. Otherwise, the flower will look like "flat", two-dimensional.

Decrade a rose


Simple rose drawing scheme
Video: Drawing lessons. How to draw a rose
How to step by step to draw a rose pencil on cells?
- Draw in cells like both children and adults.
- If you need to pre-mark on the landscape sheet, so that the picture fits into the conditional boundaries, then when drawing through the cells it is only necessary to take into account the scale of the planned pattern and clearly adhere to the scheme.

- If you do not know how to draw, it will not be difficult to carry schematic images to the cell on paper. The main, attentiveness and some free time!

Drawing roses by cells
- And with a set of necessary materials, with this method of drawing, it is quite simple: pictures can be created by floters, colored pencils, markers, black and white using one simple pencil or even a conventional ballpoint handle.
- One prerequisite: the presence of a notebook in the cell.
You can transfer to paper ready-made simple patterns of drawings, or invent your own by taking as the basis of your photo or picture. Knowledge of various complex methods of drawing can not be needed.


- Why do we suggest drawing roses? Yes, because these flowers are perfectly coping with the task of decorating any diary, notepad.
- When drawing through the cells, it is necessary to start with the light circuits themselves, in which there is a small amount of cells to fill with colored pencils.

- After simple pictures begin to get out without any effort, you can proceed to handling complex schemes in which several colors are involved.
Video: Pictures in cells
How to draw a bouquet of roses in a vase with a pencil and paints?
Restrained to draw roses buds, disclosed in varying degrees, you can start a more complex pattern - the image of a bouquet of roses in a vase.
Step 1: Prepare a draft and try to transfer the drawing sketch to it. This will help to navigate in the sizes of the future picture. We can also be able to outline in which part of the sheet it is necessary to start conducting the initial lines.
Please note that the flowers in the vase are not located smoothly, but slightly inclined.
Step 2: A bouquet can be drawn without additional elements, however, most often collected columns together draw in a vase.
Step 3.: Flowers collected in a bouquet should be different in size and degree of disassemble. Other flowers will be appropriate in such a still life. The main thing is that all elements are proportional to.
Step 4: When all the flowers take their permanent place in the figure, start to give the volume with the help of the shadows, while deciding with what point on the roses bouquet the light falls.


How to paint the heart with a rose pencil and paints?
The drawing, which shows a rose with a heart, will decorate and a postcard for the birthday room, and Valentine. Let's try and we draw a heart next to one of the most beautiful colors - a rose.
- To begin with, we carry out the contours of the big heart. It will serve as the main element of the drawing to which we will "hold" the missing details.
We will proceed to draw roses: chant the initial lines of the bud at the bottom of the heart.

Draw a big heart
Add multiple petals.

Draw accommodation on the leaves
It remains the most interesting thing: decorate the picture and arrange in the frame.


Beautiful drawings of roses for sketching
If you find it difficult to draw flowers from the photo, then try to draw the contours of the pictures made by experienced artists. Even with this method of drawing, it is possible to show fantasy and choose the colors yourself, experiment with their saturation.


Video: How to draw a rose watercolor
The desire to take into the hands of the pencil and start painting album sheet with lines and contours in order to create a beautiful drawing at the exit, sometimes covers every person. In this way, he is trying to express thoughts, the inner sensations and its vision of certain objects. On the one hand, it is a fascinating and exciting occupation, and on the other hand, painstaking work, requiring skills and skills. But do not rush to get upset! Today we will reveal you some mystery of artistic art and tell me how to draw a bouquet of flowers.
Prelude to drawing
To do this, you will need: landscape sheet, simple pencil, eraser, color pencils (optional), enthusiasm and patience.
You can recreate flowers on paper in different ways. The source of ideas can become a fragrant bouquet of flowers, standing on the windowsill, or a postcard with their image, presented to you with friends.
Do not think about what you will succeed, but just draw, trusting the flight of your fantasy. The most simplest pattern is the colors with a round core and rounded petals, but you can try to portray something more complex and unusual.
How to draw a bouquet of flowers in stages
Regardless which flowers will be your bouquet, the first strokes pictures are drawn equally:
- The general outlines of the bouquet are designated.
- With the help of ovals and lines, buds and flower stalks are depicted.
- The cores of colors and petals are drawn. The latter can be drawn in the form of clouds and daisies with round ends and circumference in the middle.
- Buds are depicted, large and small leaves, taking into account the selected bouquet of flowers.
It was a step-by-step instruction on how to draw a bouquet of flowers from the category of the simplest. A successful drawing will give you confidence and will inspire to create a more complex art composition.

Draw a bouquet of roses
Disgrace on paper fragrant, velvet roses is a bit harder than to draw ordinary flowers. But a beautifully decorated drawing can be given to a close person as well as real roses. Let's try to draw with you a bouquet of these beautiful colors. Rose, as a rule, is a flower of five petals, leaves and stems with spikes.
Step-by-step instruction
Step 1. First action - Image of stems. To do this, draw two smooth intersecting lines passing on the sheet plane diagonally. At the upper points of the stems, draw the circles, thereby designating the arrangement of colors. With the help of curved lines, recreate the contours of the leaves on the stems of your roses.
Step 2. Draw a bouquet of flowers from roses is simple enough, if you carefully examine the object, "sobering" in his mind into composite parts and lines. Sketching the sketch of the future picture, depicting the petals inside the circles, referring to their wave-like arc lines. Arcs should be intersected with each other, recreating the effect of petals overlapping each other. Parallel lines of stalks draw another line.
Step 3. Sheets need to draw uneven lines with small angles. Draw on each central vest. Having finished decorating the leaves, add to the stems on which they are located on one parallel line. Delide the stems of rose spikes. Decide for yourself how to draw a bouquet of flowers: as still life (in black and white gamma) or in the form of a full color picture.

Step 4. Remove the edges of the petals of naturalness by making them not rounded, but uneven. On leaves, draw small veins in the direction from the central line to the edges.
Carefully remove the auxiliary contours of the sketch and extra lines with an ease. After that, additionally circle a pencil image to give it a finished look. Drawing ready!
We hope that our advice helped you about how to draw a bouquet of flowers. Do not be discouraged if the picture turned out not so plausible. Drawing requires regular training, and the more often you will take a pencil in the hands, the more beautiful your "reproductions" will be obtained. And who knows, perhaps, in the future it turns out that modern Michelangelo lives in you!
Kasatat, Cockerel, Royal Lily is all about him, about gentle and mysterious Iris. Learning to draw your favorite flower of gods and kings.
Before drawing to drawing, look good for your floral model. Pay attention to the location of the petals. Three stretch up, forming a kind of tube around the core. These petals are called standards. Three lower, large enough, the petal with a bend descend down. These petals are called fouls. Each foul has a kind of beard from thick Village at the base. For the lower rods of irises, the presence of dark thin veins is characteristic.
The leaves have a sword-shaped, flat and long. Stem smooth, high.
Determine for yourself what basic geometric shapes (circle, oval, rectangle, triangle) You are guessing in the outlines of the flower.
Option 1
Let's try to draw a single flower.
Draw two oval, placing them as shown in the photo below. Be sure to spend the vertical axis of symmetry. Lines must be thin and easy, it is easy to wear it easily. These lines will draw up the borders of the future drawing.
In the upper oval, draw three standards. Drawing Start by drawing a central petal.


Draw two elements creating a beard effect.


Focusing on the auxiliary lines, draw two side petals.

Draw the lower central petal, stem and narrow sheet. Erase the auxiliary lines. Color the drawing at your discretion.


Option # 2.
If you disassemble the previous drawing technique, it means that it is completely mastering and the technique proposed below. Thanks to carefully drawn petals, Iris looks more naturally.


How to draw a bouquet of flowers of irises with a pencil?
Using the hints and techniques described at the beginning of the article, you can easily draw a few irises, making a gentle bouquet of them.
Option 1
Think over the future composition. With the help of light lines, make a drawing sketch. Working on drawing flower petals, do not forget that Iris is far from perfect symmetry and it is in this charm.


Be careful, working on drawing details. Do not forget about the characters characteristic of Iris and residents. Do not neglect the application of the shadows. The presence of shaded sites will add the drawing of depth and contrast, make it more alive and voluminous.

Option # 2.
Below is another, simple enough, the way to draw beautiful irises. Pay attention to the color solution of the pattern, because the irises is characterized by a constant movement of color.

How to draw a flower Iris watercolor in stages?
Irises and watercolor are created for each other. Professional artists claim that it is difficult to work with watercolor, however, how to draw irises. However, this article is designed for those who make the first steps in visual arts, which means the techniques that are offered to the reader do not require a high professional level.
Important: Use appropriate paper to work with watercolor paints. Ordinary album sheets are not suitable, because, watercolor paper has a rough surface and is better holding paint.

 Watercolor "Irises"
 Think your composition. If necessary, make a light sketch, indicating the colors heads, stalks and leaves.
Determine the color gamut of the future drawing. The specks on the diagram below are ideal, from the point of view of professional artists, combinations of colors.

Watercolor loves water! And even special sheets of paper are prone to deformation in the process of drawing. To minimize the effects of deformation, the sheet should be fixed on the surface with painting scotch (around the perimeter).
Well moisten the watercolor sheet using a spray gun.


Excess moisture remove with a clean sponge. Look carefully on the surface: the sheet should not shine. If you notice the shine, getting blocked the surface with a sponge again.

Start drawing. Write easily, without effort. The paint will divert softly, creating a blurred edge.


Having mastered the technique, proceed to creating a masterpiece.


Give the drawing to dry.
Draw contours and details with a head handle or a special liner, if you see the need. Several clear lines in the picture below turned blurry watercolor blots into elegant flowers.

 Watercolor "Irises"
 "Wet" technique does not limit the flight of fantasy and allows you to create unique floral images.

 Watercolor "Irises"
 The combination of wet and dry equipment gives stunning, in their realism, images.

 Watercolor "Iris"

To minimize the effects of deformation from moisturizing and subsequent drying, a sheet lock on the working surface by painting tape (around the perimeter).
Make a light sketch, noting for itself location, shape and size of colors. With a waxy pencil, hover the contours of the image. Lines must be thick and clear. Their destination is not to give paint to spread and save the boundaries of each individual element.


Draw the leaves and stems (wax pencil).


Lightly moisten the middle of one of the petals with brushes and clean water. Color the petals by working with two combined colors (see the scheme above). As a result, you will get a beautiful and natural gradient inherent iris. Purple and blue paint are used in the photo.


No painted areas of petals Moisten with clean water. Coloring pale yellow or lemon watercolor. Closer to the base of the petal thin brush drip the colors of the colors of the ocher. Wet watercolor will start moving, creating an interesting transition. You can also strain yellow. Color leaves. Give the drawing to dry. Draw fine veins on the leaves.


Gently toned background. And draw thin veins on the petals.


Video: Iris Watercolor. Detail video Tutorial. Lesson. Iso-studio Tuta-ka!
If you try to try well, you can draw such a cute bouquet of colors, even if there is no experience and the scheme that is shown below, will help us in it. And for the beginning, we reserve with simple and colored pencils, an eraser and a sheet of white paper.
To begin with, you will show three balls, and a thread that goes out of the bottom ball and it will be the base of the stem of the bouquet.
Then, from each ball form flower, as it is shown in the diagram number two.
Then we draw the leaves and describe the stem, looking at the scheme in the stages it is not difficult to do it.
Then we erase the extra contours and supply the main details, and then you can paint our bouquet.
To draw a bouquet of colors, it is necessary to diligence, because in this question it is important to work out the details (every small flower) so that the composition looks realistic.
Below, I propose to familiarize yourself with the option of an image of a bouquet in a step-by-step representation, where the composition consists of different-type colors in a vase.
First draw the sketch of the vase and the contours of the flowers with stems.

Then, draw petals in colors.

Draw a thoroughly stem with leaves.

We wash the contours of flowers and draw an outer outline of colors in the final version.

Dorify small details.


The final version of the picture is as follows.

A bouquet of flowers to draw is not difficult to eat. Can paint flowers. For a bouquet just need to connect these flowers into one drawing so that they are located next to each other. First, we plan where what flower will be located, and then draw them. It is better to draw a bouquet from a natural bouquet, it will be understood and easier to draw shadows.


A bouquet can be any. For example, you can draw a bride bouquet, which will consist of small roses and satin ribbons; You can draw a bouquet of wildflowers. And I suggest to draw a bouquet of garden just torn colors. I think it is not difficult. We need to draw again circumference. They are the basis of the drawing. Flowers of different sizes, so the circles will also be different too. Stems draw. And then in the circles draw the flowers themselves. If the nogot, the petals are narrow and long, if the velvets, then petals are small and wavy along the edges. Draw those flowers. Which will tell you your fantasy. You can draw valley at the edges, but it would be in my drawing. Like this:

When the flowers are ready almost, we need to draw the middle. Do not forget to draw foliage. I suggest, after all, a bouquet paint paints. It will be very beautiful!

First you need to solve a bouquet of what color we will draw. It seems to me that it is easier to draw chamomile or roses. Let's try to portray a bouquet of roses that stand in a vase.
First, we need to draw rose petals and buds themselves. Next, go to the image of the stems with the leaves. In a horse, it remains to trust the vase at its discretion. That's how we gradually painted a bouquet of roses:


I really like roses flowers. Therefore, I suggest draw a bouquet of roses.
Of course you can draw any other bouquet. Very beautiful will look daisies, orchids and other flowers.
So, the first step simply planning the silhouettes of the bouquet, bow and vases.

in the second step, you need to throw the buds of roses in small ovals. From each flower there should be a rose stem down. A little draw a bow and more clearly denote the circuit of the vase.

we make roses similar to roses drawing their clearer outlines. More clearly draw a bow and a vase.

it is necessary to give stalks the volumetric look and buds draw in more detail.

now draw leaves and finish the drawing

A bouquet of flowers can be any! If there is no strict idea to portray the valley, poppies or tulips, then the bouquet can be portrayed in a simple way.
Draws stems, legs, then ovals determine the size of the flowers and from the amount. And after you can draw petals. To come out not quite childish, it is important to pass, show the plane. And after then you draw the leaves and apart our bouquet.

Draw a bouquet of wildflowers wrapped in beautiful packaging with a bow.
Such a bouquet is very easy to draw, you can see this for yourself.
Prepare a sheet of paper and solid, well-dotted pencil and start drawing.
Draw a bouquet of flowers to start with packaging - paper in which the flowers will look beautifully:

In order to decorate the packaging, draw a big bow:

Now proceed directly to the bouquet itself - draw flowers. On the left draw the chamomile: a circle and then petals:

Then two more of the same daisy flower.
Draw a flower with a simple pencil - what could be easier? But transmitting the beauty and tenderness of nature and its components is quite difficult. How beautifully draw flowers, not everyone knows. But the art of images of gentle inflorescences can be comprehended by studying the master classes of phased drawing and tips of the articles of graphics. After reading this article, you will learn how to draw flowers to draw beautifully: royal roses and snow-white valley, proud tulips and arrogant daffodils.
Draw a rose
The queen of colors provides a real space for creative ideas. You can draw a semi-splashing rose or completely dropped flower; bouquet or one branch; Fragrant bush or plant in a pot. Rose image options. The easiest way is to be styled.
We depict a ball, a double wavy line - stem, we draw a cup of sewers and leaves.
We wash the circle, on its trails create the first 2 petals.
The middle of the flower looks like a spiral, add a few more petals and paint. Rose is sketched schematically, but quite recognizable in the figure.
The second method is a bit more complicated than the previous one. We depict 2 circles from them down stretch the line - stems.

In the edges, give twigs with future leaves.

Then, on the spot of pink buds, draw petals having a smaller size closer to the top of the infloresception.

We supply the leaves by looking at them to the cloves and streak. Stems decorate spikes.

The resulting pattern is refined: We remove the extra lines and partially hatching to give naturalness.
How to paint the lily of the lily of the valley?
You need to start the drawing from the image of large wide leaves and stems, slightly curved under the cargo of flowers.

At the tips of the stems, on the cuttings we draw small cups of inflorescences, at the next stage they give them the shape of the bell tape.


The leaves of the valley have one main allocated bodies and other longitudinal veins, less noticeable.

The bends and shadows show thin strokes.
The leaves of tulips in shape resemble the leaves of the valley, only a little already.

We depict 2 thick stems, make a sketch of cups.

Then we divide the inflorescences for 6 petals each, and 3 petals are inside, and three - from the outside.

Sharch the right places.
Draw the inflorescence of Narcissa
Delayed by oval item, the lower part of which contains 3, then depict small cloves along the edge of the middle, covered with points. We draw the petals in the form of hearts, refer to the middle of the petal. Relief flower is ready.
To perform a complicated drawing, listen to the advice on how beautifully draw flowers with a pencil.

One of the subtleties is an approximate calculation of proportions. Flowers drawn according to this rule look the most natural.
When painting the pattern, deeper or remote parts are painted with a darker tone. For a pencil image, the role of blackout is performed by hatching, which can be single or double.
Another way to give the volume of the image is to grow the desired section with a cotton wand or dry up with an eraser. This is a spectacular technique for those who know how beautifully draw flowers.
Skillfully combining the listed methods, you can mostly pass the beauty and tenderness of the flower bouquet.