As with their own hands from improvised materials, make stylish paintings for the kitchen interior. Interesting paintings with their own hands for the interior (15 photos)
Read also
Deciding with the style, you can start picking materials for the future work:
- Paint and canvas.
- Cardboard, designer paper, journal cutting, old photos.
- Textiles, leather, ribbons, braid.
- Glass or crystals.
- Buttons.
- Drokes, shells.
Tip! Do not throw out old children's drawings, loskutka fabric, magazines, decoration - All this can be part of the picture. Keep them in a separate box, periodically browsing and component.
Draw paints
The easiest way to create an original picture for the interior with your own hands is to write it. Theme is limited to the fantasy of the Creator. Even in the absence of artistic skills, a masterpiece may turn out: use abstract techniques, study master classes and photos of finished work.
Oil, watercolor, acrylic paints will be loyal assistants in creating a picture for the interior. As a basis, you can use both professional canvas and ordinary dense paper or a primed plank.
Tip! Inspiration can be drawn in nature, if there are picturesque places near the house. If neither the place or the weather is not lucky, feel free to paint your households, pets, fruit compositions - anything. The accuracy of reality reproduction does not play any role, the main thing is to come to the process with the soul.
Modular patterns are suitable for almost any premises: from kitchen before living roomBut it is important to select the relevant images. If you have no time to create a masterpiece with your own hands, we have good news for you - today you can buy them in any specialized store!
Photo printing
The technical side of the question takes on the photomaster, which can print a suitable image on almost any basis: canvas, paper, ceramics, etc. It can be ordinary posters depicting interesting places, people, ornaments.
Tip! The poster is not just a picture, he must bear a specific idea, correspond to the interior, the subject of the room and the nature of the home. Recently, PIN-AP and Retro posters have been specially popular.
If the poster is larger, you can divide the image into several segments and when connecting to a single cloth to beat the joints, making the similarity of the modular picture.
If there is a child in the house, then you can scan it drawings and, choose from color, form ,. Add such a poster can be photos of the artist. It will only remain print poster and put it in a frame suitable for color and style.
Collage of old and new family photos You can hang as a picture in the bedroom or living room, and posters are suitable for the kitchen with the image of the appropriate attribute, fruit. Finally, it is worth noting that it is recommended to choose posters and panels for the kitchen in juicy and bright colors, however, no one forbids to go against the rules and create stylish.
Textile
From all sorts of flaps, fabrics with beautiful ornament, ribbons, braids or lace do it yourself create real masterpieces in the style of patchwork. Pictures made of fabric most often do in the applique technique. A dense textile with a restrained and imperceptible ornament (stripes, peas, etc.) is taken as the basis, and the main elements are cut out of bright flasks.
Most often, textile works are decorated with kitchens and children, since there is a certain simplicity present for these premises.
Tip! From felt, flannels and other fabrics that are well holding the shape, you can cut fruits, animals, cars, houses. You can safely combine various textures and drawings on the fabrics, use for the design of the braid, decorative cord, buttons. For the living room you can make a textile picture of suicide silk with abstract patterns.
From buttons
With their help, you can create original things in the method of sewing or appliqué. Often this type of accessories is used to image leaves on trees. Buttons can be placed original inside any contour, for example, silhouette butterfly or cats. In the sewing stores you can choose the details of various shapes, colors and materials and lay out them as a mosaic, according to a predetermined scheme. Such works from the buttons will perfectly fit into the kitchen, however, they can also be used for living room and bedrooms.
Tip! Buttons can be pasted around the perimeter of the picture frame, giving it individuality.
Wallpapers and panels
Often, after repair, large pieces of beautiful wallpapers are left, which will be useful for the manufacture of unusual interior paintings.
- Wallpaper in the frame - the easiest option for creating a similar panel. A piece of the desired form is cut out of the roll and placed in the frame. And the ornament can coincide with the pattern on the walls or differ from it. Such elements can go to a row of 2-3 pieces.
- Gold paint and stencil or small black and white photos stylized under the old days will help to revive the boring canvas in the frame. Similar paintings from wallpaper perfectly fit into
Not every person is decided to hang in his own kitchen beautiful paintings. And this is despite the fact that designers are very recommended to decorate the kitchen with their own hands. After all, they will be able to bring something new and unusual into this room. Pictures in the kitchen with their own hands are considered a new direction in the transformation of the premises.
If you want to decorate the kitchen by paintings, then, first of all, you will need inspiration. Just how to find it?
Search for new ideas for inspiration should be scorn with everywhere. Do not discard even those that initially seem too simple and banal. They may end up with exactly what you need.
Also copy bright impressions. Find some beautiful box and fold all those curious things that you hope to subsequently decorate your kitchen.
Implement your capabilities in new genres for you. To create something interesting, you need to try to exercise new ideas.
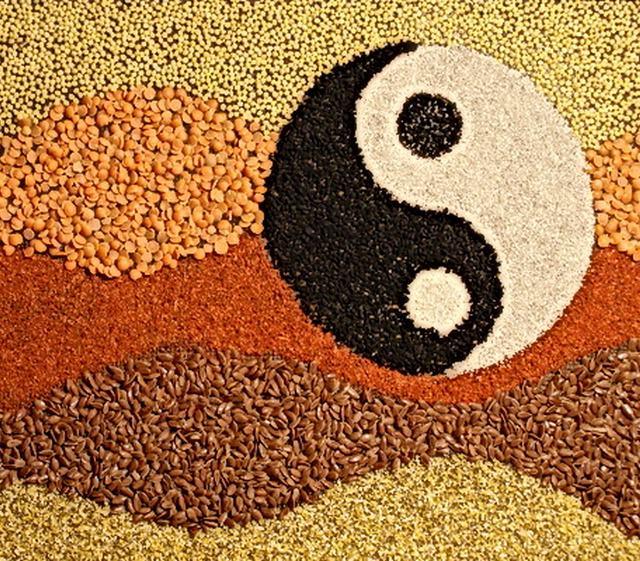
Coffee and seasonings for kitchen paintings
Make a canvas with your own hands is quite simple. For this you will need only certain tools and materials:
- various cereals;
- cardboard;
- glue;
- beans;
- bay leaf;
- coffee beans;
- dense tissue;
- corn cortex.


Picture fabrication
Initially, you need to prepare cardboard. It will take to cut a rectangle or a square. It depends on what you want to see the picture.
After that, the resulting workpiece is driving along the fabric, they make the allowance of five centimeters and cut out.
Next you need to attach cardboard on the cloth, cutting the corners to cut off and glue it to the cardboard. So that the fabric does not spread, its corners will need to be punctured with special care. Burlap with your own hands stretch into cardboard very tight.

Drawing picture
If you have done with your own hands everything written above, then you had to get a canvas. Now it will be necessary to make a drawing, settling coffee grains and cereals along the canvas. What will the picture for the kitchen, depends solely on personal fantasy. The material can be decomposed both freely and tight.
After you have issued a pattern, you need to stick all the pattern elements. You can use the usual glue, but it is best to find a silicone gun with your own hands, since it is much faster with it with its help.
On this process of manufacturing this picture can be considered completed.
Pictures from cereals and seeds (video)
Crafts from cutlery in the kitchen
In this case, it will not be about standard paintings for kitchen, And more about the panel.
Pictures of buttons and plates
The more buttons, the much better. They will be the basis for paintings. They will be needed to sew on a dense tissue. After that, they are inserted into the frame and glued with glue. In the center and on the sides hang interesting plates, paint them with acrylic paints. Masterpiece is ready!
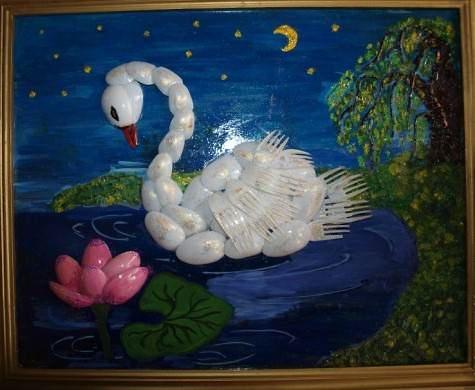
Pictures of spoons and forks
To dense tissue, you can also sew forks with metal spoons. They will need to paint enamel, after which it turns out a beautiful still life.
Their plastic materials can make more interesting paintings in the kitchen. Plastic forks and spoons face simply and can be pasted on any surface.


Cross-stitch
With the help of an embroidery, you can achieve incredibly beautiful paintings for the kitchen. Such pictures are considered simply a stunning decor for this room. All drawings and pictures can be made from:
- various products;
- flowers;
- dishes.
For many items you could not pay attention before. Now, thanks to the paintings it will turn out to feel all their beauty and charm. In order to make such a picture with your own hands needs the following materials and tools:
- fabric (canvas fit best);
- scissors in the number of two pieces (large and small);
- threads (preferable Muline);
- marker for marking;
- special pile needle;
- pickles (suitable for various shapes, sizes and from any materials).
All these materials are most often included in the general set for embroidery.
Screw materials
Mosaic
Mosaic opens a large space for the implementation of creative ideas for the kitchen. Make pictures in the form of a mosaic of the following materials:
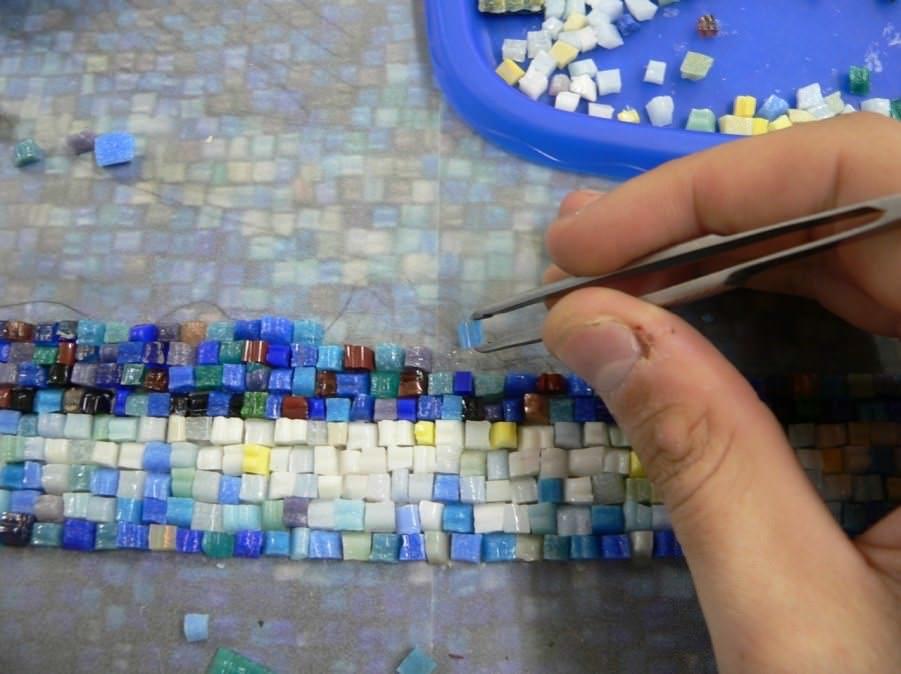
- glass;
- egg shell;
- bat tile;
- routes.
With the help of the instruction below, you can easily make picture in the form of a mosaic:
- cardboard is taken as the basis;
- glue is applied on it;
- to impose all the necessary elements on it;
- to fix small details, the product is covered with varnish.
Installation
In the manufacture of paintings with your own hands, you can use very non-standard ways to the kitchen. With the help of ordinary household items, the most incredible paintings are created. For example, thanks to ordinary knives and other subjects, you can create an incredible composition. Therefore, for this we need materials such as:
- frame for photo format A4;
- glue;
- line;
- pencil;
- scissors;
- cutlery in the form of a knife and other devices;
- pieces of fabric.
Picture of flowers do it yourself
The essence of this painting is to collect dried flowers. Make it completely easy. Such flowers can be bought in any specialized store.
We carry out the basis, the flowers are glued with glue. With the help of pencils and felt-tippers, leaves and petals are drawn. If you wish, you can even glue the dried grass.

Skin painting for kitchen
In this case, it is suitable for suede and real leather. Its pieces are connected to paints, cloth and other materials. The most important thing is that with any such combination the picture will look amazing.
Picture of paper
Unfortunately, this picture will not be durable. But very beautiful. You can make both origami and quilling. Basically, these masterpieces are made by the children who bring the process of manufacturing brings a lot of pleasures.
Paper painting (video)
Decorating posters
Posters are considered to be large images that can convey someone or some idea. The progenitor posters consider black and white posters.
Exists several types of posters:
- depicted on canvas;
- printed on paper imitating canvas;
- printed on photo paper
Make them for the kitchen is completely easy. It is enough to find the desired image.

Picture of foam in the kitchen
Many polyfoam blocks remain after the purchase of various household appliances. Many people throw it away, and do it completely in vain. After all, if you come to the case creatively, then you can make a peculiar picture for the kitchen.
Initially, you will need to prepare any image. It will need to be glued to the surface of the foam. The sidewalls of the block are also covered with paper of the desired color. To hang the resulting picture in the kitchen, it will be enough to attach a small loopback to it.
Master class on making frame for painting (video)
Conclusion
You have read in this article about the main types of paintings that can be made personally. As you might notice, there is nothing complicated in their creation. Therefore, boldly proceed to experiments!
Pictures for the kitchen (photo)


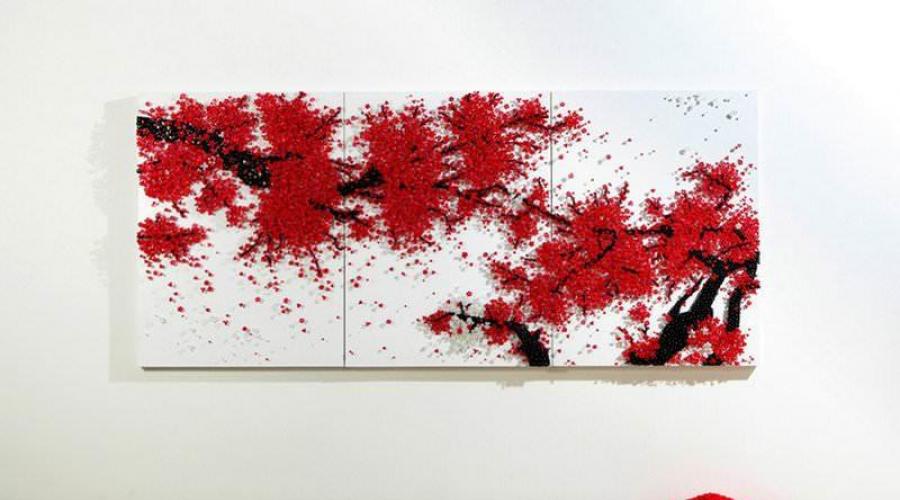
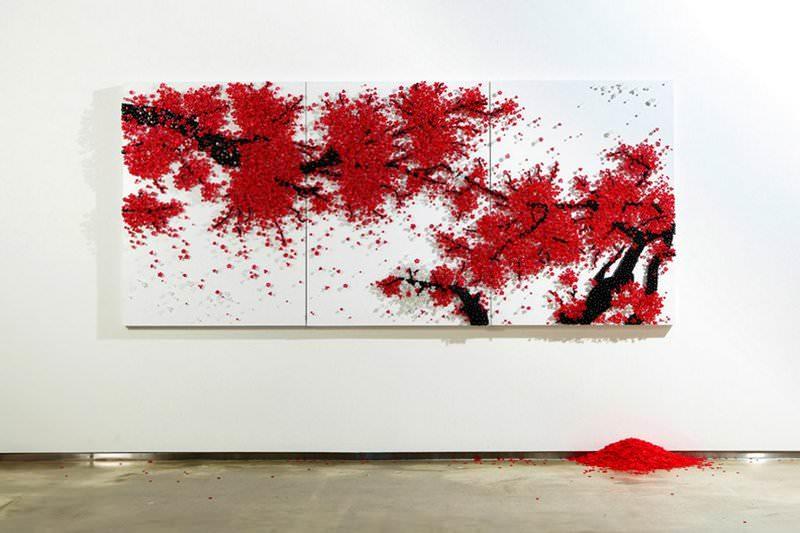
Are you looking for a fresh and unusual idea for interior decoration? The usual paintings are good, but the soul is looking for something new. On the Internet you can find not one master class on creating bulk paintings with your own hands from paper, fabric or skin. It is striking 3D canvas, which is fascinating to create and nice to contemplate.
Pictures do it yourself
The bulk picture can be called a 3D sculpture in a frame made of girlfriend. This may be in the full sense of the word anything: paper, dry flowers, polymer clay, leather, fabrics and other materials for creativity. From gypsum, for example, perform magnificent bulk drawings directly on the wall of the kitchen. The modeling of plaster, of course, is beautiful, but this article will be discussed about simpler techniques.
Make an original masterpiece of art with your own hands can each. Why don't you try your strength? The master class will help you learn the basic principles to push the idea and start creating.

Master class "3D painting paper"
For the first sample of the pen, take the most simplicity of the volumetric picture - the application from paper.
Set of materials for work:
- frame with deep sidelights;
- stationery knife;
- pencil;
- color cardboard with a bright print;
- white watercolor paper or thin cardboard;
- ruler, scissors;
- pVA glue.
Instead of the frame, you can take a box of candy.

Step-by-step description of the bulk painting from the paper:
- cut the rectangle from a white sheet of paper under the selected frame;
- draw from your hand or type the heart of this size on the printer so that it is freely placed in the frame 9 times in three rows. Approximate heart size - 4x5 cm;
- heart needs to be cut and put in a simple pencil, putting on white paper, harvested earlier. There should be 3 rows of three hearts or more (less) at your request;
- now the responsible step has come - carefully with the help of a stationery knife, cut the "wings" of hearts. For this you need to make cuts along the contour of the hearts, not the touch of the lower and the upper part;
- i flex the cuttings of the hearts up and to the center, making them volumetric;
- harvesting with hearts need to be glued to color cardboard. It is desirable that it was a special scrapbook with a small pattern. It will be visible through the bent wings of hearts;
- the final step - we put a picture into the frame and fix on the reverse side of the stapler or glue.
The presented master class is simple, but on the basis of it you can make your 3D plot - fluttering butterflies, pliers, people and other interesting templates.

Master class "Multi-layered 3D paper painting"
Make an interesting picture of paper, guided by multi-layer technique, very simple - you need to find a drawing and print a lot of copies. The finished product hung on the wall is imprisoned from different angles of view - a real 3D picture.
Set of materials for work:
- a fairly deep frame;
- cardboard;
- laminate substrate;
- tight album sheets and printer;
- adhesive for needlework;
- acrylic paint;
- acrylic lacquer;
- scissors;

Step-by-step description of a multilayer pattern of paper:
- choose a beautiful and bright picture with a distinct image. It is desirable that there were many details on it that will be convenient to cut. We format or select a picture for the size of the frame. Print 10-12 copies on thick paper;
- depending on how you have a printer, we determine the need of pictures in the coating of varnish. So, images printed on an inkjet printer should be sprinkled and covered with varnish, otherwise paints flow. Laser images can be left so;
- the first image is simply glue to cardboard, cut by the size of the frame plus the gaps on the mount;
- all other images cut out, but in a special way. For example, if you create a flower, then let a slightly flower with a leg and leaves are cut out, leaves - a couple of layers more, and even more inflorescence. It sounds difficult, but in the course of the case it will become clear;
- now we prepare the basis for details from a thin substrate for a laminate, which looks like a thin layer of foamed polyethylene. The cutting substrate must be slightly less details so that it is not visible in the finished product on the wall;
- we glue parts for the substrate, but not all, but selectively - only those layers that should be issued forward. In some small details, the substrate may not be needed;
- prepared details We put on the basis of the glue. Initially, we place large pictures with many details, and then separate parts that must be more voluminous;
- side parts should not be white, otherwise they will issue the presence of a substrate - they need to be painted into a tone of the image;
- cover the picture with acrylic varnish in several layers. Each layer is applied after drying the previous one;
Now there will be a bulk picture with your own hands - now it can be placed on the wall in this form or add glass. Such canvas can be made of fabric, then get a picture with a beautiful terry surface. 
Master class "3D leather painting"
Set of materials for work:
- frame;
- the basis of the pattern of leather, suede or fabric;
- segments of skin of any colors;
- acrylic paints;
- rectangular sheet of chipboard or plywood;
- furniture stapler;
- glue for needlework or superchalter;
- scissors;
- paper (for sketches);
- soap or chalk (for contours on the skin).

The first question arising about the creation of a similar work, where to take the skin? First, it should be genuine, and therefore she is not cheap. But you will surely find a jacket, bag, gloves and other sensors from genuine leather. Boldly cheer them - you will get a lot of pleasure and can make a chic picture.
Step-by-step description of creating a picture "Bouquet of leather":
- on paper, make sketches of leaves and petals and cut them out - it will be templates for work;
- transfer the contours to the skin and cut out how much you want to have colors with petals on the finished picture;
- if there were no color leather suitable for colors of shade in the girlfriend, then use acrylic paints. Color the petals of burgundy or pink colors with paints, green leaves. You can choose the paints of any favorite colors;
- to make petals rounded and bulk, you need to hold the skin over the candle flame - it will become an interesting natural form;
- from the petals collect buds, you can put a ball of leather or tissue to the center as a flower center;
- we stretch the basis of any tissue, suede, leather or other material on a sheet of plywood and secure brackets from the wrong side. The canvas can be tightly tightened or drape. The resulting base insert into the frame;
- based on lay out ready-made flowers and leaves - rate their location, departing to the side;
- complete the composition with leather curls, natural materials - shells, dry flowers, etc.;
- now you can glue all the items on the planned places, using the adhesive gun or a superclaud tube.

We clean the finished picture from the traces of the needlework and hang on the wall - that's the whole master class. Similar creations can be made from the fabric - decorating drawn girls silhouettes from fabric and lace.
To repeat the master class and create the volumetric patterns with your own hands, you really optionally have the ability to draw. But what you can really come in handy - this is perfection and accuracy.

For beginners, it is possible to advise equipment from paper, and more sophisticated masters - a magnificent 3D paintings from leather, polymer clay or gypsum. Interesting paintings for the kitchen are flown from clay or made of plaster vegetables and fruits in the frame.
Video Gallery
Photo Gallery


Probably paintings, it is one of the most ancient accessories to decorate your own housing. The question of how to make pictures with your own hands, can cause logical bewilderment - of course, draw, but what else? But, suppose you do not know how to draw. Or know how to - but not yet ready to represent their work on the public, even even a homely.
But even in this case, you have the full right to call yourself an artist! After all, there are many ways to make a picture yourself - contact decorative and applied art, pumping a masterpiece in a graphic editor, cut into collages a one-year subscription of your favorite magazine. Or give away spontaneous painting and throw paint in canvas from a distance of several meters. Or maybe enter into the frame of dried flowers or bags with sugar worn from a cafe?
Opportunities much more than you assumed! We will make you - in the article we will talk about how to push your creative framework, and not how to drive yourself in them. Our goal is not to get a "five" on drawing, but to express your character through the interior decoration.
- Search for ideas
- Scroll impressions
- Try new
- Embroidery
- Painting Applique
- Silhouettes on canvas
- Patterned silhouettes
- Scenery
- Abstraction
- Geometric patterns
"Where to begin?"
Planning to make a picture with your own hands? We will try to tell you some simple and original options. Maybe some kind of idea you like, you will embody.
"Search for ideas"
- Are you ready to give the room a charismatic face? If so - then start looking for inspiration sources everywhere. Creativity is a constant search, observation and irrepressive curiosity. To make a breakthrough in the interior design, you need to start, take a breakthrough inside your head. Do not discard even the most crazy ideas, because the original vision is what we need.
"Scroll impressions"
- If you have joined the ranks of the supporters of the Philosophy "DIY", then soon you will begin to notice with yourself how to scan the apartment in search of unnecessary things that can be turned into a work of art. Extraction of garbage will also turn into torture for you - the true handmider must beat until the latter for each beautiful piece of paper. Jokes jokes, but a separate box or a basket for treasure will have to start. Who knows what feats sooner or later she will inspire you.
"Try new"
- Even if you are beautifully drawn, no one has canceled a creative stupor. In addition, suddenly it's time to try yourself in a new genre? The interior design options proposed by us belong to the category "Try". That is, much strength and time they do not take away. If you understand that the topic causes you the most lively response - you can always plunge into it deeper. In the meantime, let's try the wonderful nectar of the artist, the concentrate of inspiration and creative power!
"Pictures of fabric"
If you create might and, and sewing is your hobby, forget about throwing away the rest of the fabric or let them on the rags! Textile paintings for interior decoration - the last squeak of fashion is now. And lose their status, apparently, they are not going.
"Embroidery"
- Without much difficulty, such an element of the decor will create fans of minimalistic jewelry and catchy accessories. The first can simply pull the cloth on a wooden subframe, the second - find openwork frames in a vintage style.


- Some do not know how to approach the embroidery, complex multicolor schemes scare, and therefore, postponed for later. But to make pleasant masterpieces for interior design, you do not need to keep yourself a high bar and embroider the scene of the Borodino battle. See how thin stems of colors embroidered on a rough canvas can look gently and placed on the wall right in the chambers!

"Painting Application"
- Look, any embroidery is very easy to combine with the application, and work in a more flexible genre that allows you to create images that will decorate not only the interiors in the country style. Pictures for the interior made by their own hands, consisting of several parts, always look interesting - try your hand in this, will suddenly work out?

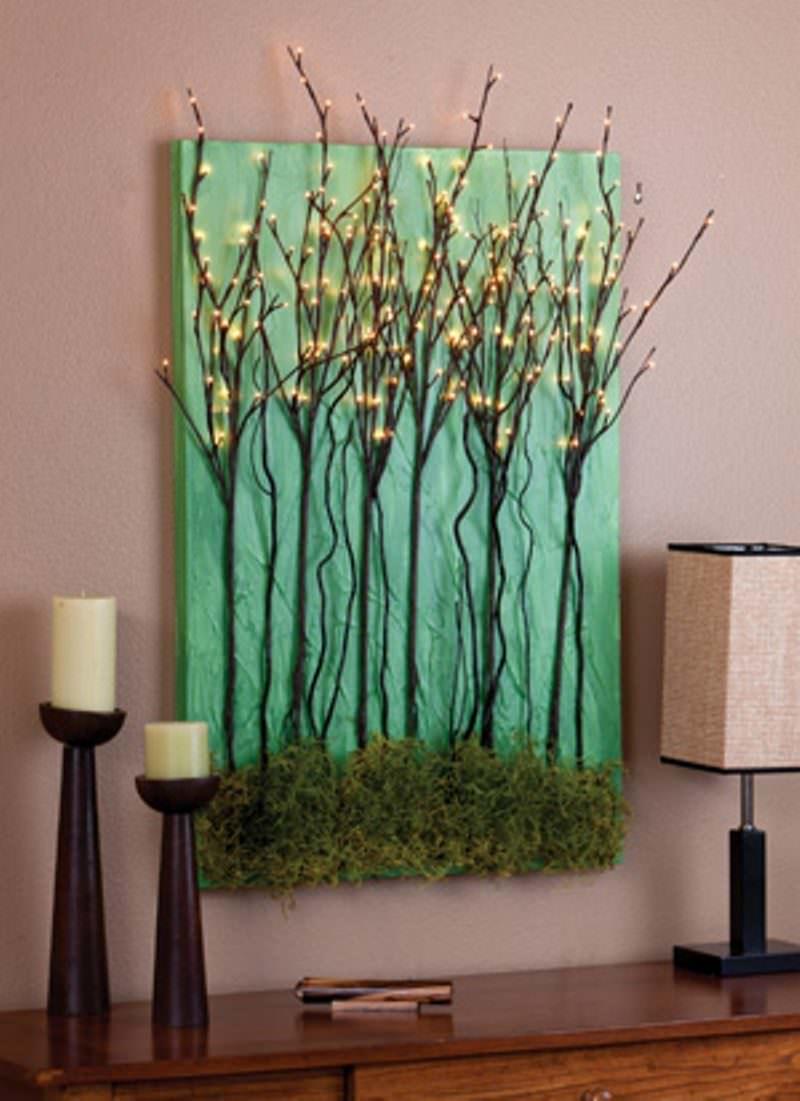
"Silhouettes on canvas"
- The next photo confirms which unexpected discoveries can take simple work with the silhouette! We use a simple form - it means that we complicate the texture, tells us common sense. To repeat this picture at home, you will need:
In order to mimic the texture of the tree, cover the canvas with a smooth layer of dark brown paint, and then gradually add chips and red strokes into it. Do not dilute with the density of the coating, it is the "bandaging" of the figure will give him similarity with the original. The image of the branches and birds can be found on the Internet, print and cut the stencil from paper, according to which the textile option is cut. Wait for the full drying of the paint (a few hours) and gently cover the cloth on the canvas.

"Patterned silhouettes"
- The possibilities of such a silhouette applique are endless. You can create pictures for the interior with your own hands on any topic: elegant for living room, appetizing fruits for kitchen, cute animals or for a children's room. For example, look at the photo below - make this wonderful giraffe will not be difficult. The main thing is to find a suitable bright fabric.

"Take the paint"
Would you like to paint? Have you always dreamed of your own wall masterpiece at home? Do not robet and do not postpone inspiration for later. Get paints with tassels, and went to create ...
"Scenery"
- If you are not out of a timid and prone to expressive gestures, or you understand that it will not be worse - splash emotions on the wall in the literal sense of the word. Yes, very boldly, but you have a chance to purchase not only a unique experience, but also a stunning wall. Paints Big - and go ahead!

"Abstraction"
- Each of us has a favorite color to which we can watch infinitely. Or the interior greedily asks to supplement it with a tint of the sea wave or piercing purple. If you carefully look at the photos of the design interiors, it could notice that it was precisely the abstract canvas that the role of color support is often playing. Do the same? Take:
Mentally split the host into several parts and begin to make a color stretching from the dark to light. Do not try to get perfect transitions! You can always make the right places are darker or lighter by adding paints or water. Work with acrylic easily. But it requires speed, as it dries quickly. In a word to make a picture for the interior with your own hands, as in the next photo, you will have no more than an hour. It will only be left to choose a frame for a new masterpiece or leave it in a slightly unfinished form.

"Geometric patterns"
- Remember, in the article about we told about the nightstand, the unusual pattern on which turned out to be thanks to the painting ribbon? Similarly created this picture. Places that should remain white are pounced with a pencil, and then closed with a ribbon. This technique provides perfectly smooth edges. To get paint divorces in some places, scrape a wet job with a cloth or a foam sponge.

"Making a collage"
Collage - Nakhodka for those who want to create something unconditionally fashionable, bright and striking. Moreover, the process of creativity may not be monotonous, but very impulsive. You can think over the composition and paste the collage on the Watman sheet. And you can buy a big cork board and start collecting your card wish. Such a drawing can always be easily replayed, so newcomers can dwell without fear in the second version.

"Photo printing"
If you have conceived to make a picture with your own hands in a more difficult genre - it is better to contact the services of printed workshops. Only so you can get high-quality prints on any surfaces. For example, on book pages, as in the illustration below. At first glance, it seems that the drawing is applied with black ink, but in reality, it is a good photo. In particular, it is important if you are interested in the genre of thumbnails, which you can't portray yourself.

"Pictures of natural materials"
Of course, a completely special comfort in our house brings natural natural materials, minimal processing, and all sort of crafts from them. Make paintings with their own hands not only quickly, but very nice. In addition, you can bring your interior to eco-friendly style.
Brought seashells from the sea, pebbles and stars - and do not know what to do with them? Do not hurry to pour into the vase, better reserve:
- a set of deep photo frames - the depth determines depending on the size of the shells,
- color blue or blue cardboard,
- scissors
- superclaim.
The further task is clear without words. As you have already managed to guess - cut out squares from cardboard in size frames. Then we stick the sinks on them and insert inside. Voila - Sea Painting with your own hands born! If the shades of blue in this room are not suitable for anything, you can replace them with any other color.

"Frame without painting"
Well, if you do not come to mind at all - we interior with a picture that is not! Yes, yes, oddly enough, the frames again entered the frames without paintings. Reduce her prepressive - and go ahead! You can find with a dozen frames of different sizes and shapes, and then cover their paint of one color, or create one massive and noticeable. For the design of the frame as the next photo, you will have to learn how to create - so read our article dedicated to this insanely relevant topic.

In each interior there must be their highlight, and often the easiest and most elegant option to bring the uniqueness to the room is a picture.
But how to find what decorates your bedroom, living room or other room? Most likely, for the author's work, you will have to give a large amount of money.

But if you do not expect for extra expenses, but I still want to have something original, then it is quite possible to make an interesting picture with your own hands.

At the same time, not necessarily be able to draw well. After all, the paintings in the usual understanding have long replaced the bulk images on the walls, abstract ideas embodied in the most different technique.

Fabric paintings with their own hands
All high-quality canvases are made on a tissue basis. However, the modern interpretation of such patterns changes our view of art.
Modular fabric patterns have acquired great popularity. But it's not so difficult to make them. In stores now you can find a lot of fabrics with a very beautiful interesting and bright print.

If you probably like some of them, you can safely buy it and make the author's decor.

Modular picture
To create such a decoration of the room, as a modular picture of the fabric, you will need in addition to the selected material. It can even be a door from an old cabinet or a piece of chipboard, which could well be rooted somewhere in the garage after repair.

Cut out from the base several details on the size of your fabric and cover her tree. Watch that the fabric is well stretched and has not formed folds. Your picture is practically ready. It remains only to attach hooks for which it will be attached to the wall.
Most often, such pictures consist of three or more modules that may have both the same size, and differ. The form of them can also be different.

Square and rectangular elements are considered the most common and easy to manufacture. But there are round, oval and other forms of modules for paintings. Frames for the pattern modules in this case are not needed.

Pictures from clothes
Even a T-shirt can be decorated with your interior. It often happens that on the clothes you worn not so long, and its colors still remain bright, spots or holes appear. You can not throw away the thoughst thing, but make an original picture from it.

Cut from the clothes rectangle with the image, take it on paper and place it into the frame. The photo shows that such pictures with the image of cartoon heroes will be remarkably fit into the interior of the children's room.

Embroidery
Some way to tissue pictures can also be attributed to the embroidery. This method of decorating the interior is not new. Our great-grandmothers had at least one embroidered image in the house.

However, to embroider the picture, still some skills and patience are needed. Not everyone is suitable, but if you are doing handicrafts, then paintings embroidered by a lot of people will be able to say about you, as a hostess.
Volumetric paintings
Relief images on the wall are also very popular as decorative elements in the interior. Volumetric patterns can be made by plaster on the wall before its finishing finish.

But such a decoration can only take place when it is not planned to stick wallpaper on the wall.
Note!


The method of manufacturing such pictures requires training and a considerable amount of time. Therefore, not everyone is suitable.

Paintings from paper
There is an easier way to make a three-dimensional image. To do this, you will need colored paper or cardboard. Cut from it a few figures of the same or different size. This may be, for example, butterflies.

With a pin or bilateral scotch, attach them to the wall in a chaotic order or forming some kind of drawing. Your picture of paper will look more effectively, if you choose a color contrasting with the tone of the wall itself.
Butterfly themselves can also be different colors. Such a picture will play with new paints with artificial light enabled, so it will be most beneficial to look at the premises where the light turns on most often, for example, in the corridor.

If your house has a staircase on the second floor, then the kittens will look original in different poses placed on the wall to which the steps are adjacent.

Pictures from sleeves
Make a bulk decor with the image of colors and leaves will help bushings from toilet paper or paper towels. It is sufficient to flatten the cylinder slightly and cut it on the same parts of the width of about 2-3 cm.
Note!


In order for the flowers to be brighter, and the leaves stand out in color even before the start of work, the bushings can be painted in different colors. Place individual parts of the sleeve follows so that the flower formed is thus the forces to compile whole compositions.

Artificial paintings
The most simple in the manufacture are paintings from artificial colors or other decorative elements. Here the main thing is beautifully gluing ready-made details.

For such equipment, you will need a frame, one-picture material and the actual image itself. Cover the sheet of paper with a cloth by wrapping its edges and sticking on the reverse side.

Then, after taking the glass from the frame, insert the base of your picture into it and stick to it artificial flowers or other parts (shells, dry twigs and the like). At the end, you can decorate the frame of the beads.

If you already have a ready-made canvas, then there are many classes master how to decorate the picture you already boring and thereby update the interior.
Note!


A flat image of nature or still life can look completely different if you attach several volumetric parts on it.

It can be like an image carved image and natural materials in the form of dry leaves or even butterflies.

Photo of paintings with your own hands


