How to put strings on acoustic. How to pull the strings on the guitar, pulling the strings
Many are already familiar with nylon strings. And you know perfectly well that they have no "hammers"
(Special small balls, thanks to which the strings hold on to the strinet of - Bridge.)
For such strings, a special node is invented to be tied around Bridge.
In fact, there are several nodes, one of which I remembered well. This method is a bit more complicated by others, but more versatile and accurate in the end.
It is easier to show you clearly, using the photos below. The third string of black is taken exclusively for better visibility. :)
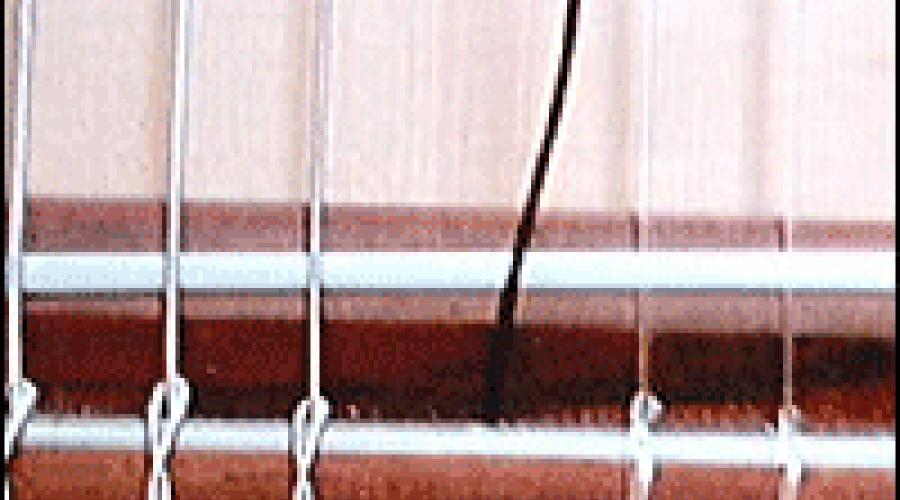
1. Insert the string tip into the hole hole and drag it about 10-15 centimeters (we look at the photo).
2. Tie a node at the end of the string, the closer to the edge, the better. 
3. We carry out the nodules and wrap the rings with a string, spending it under it, (as in the photo).

4. The end with the nodule we skip into the resulting ring, thereby forming a loop around Bridge. It is not necessary to delay it.

5. Take the tip of the string again with the node, as if trying to overtake it, the reverse around the loop. (watch more attentively)
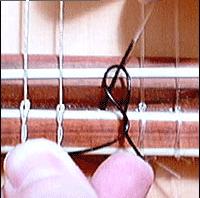
6. Watch it the second time around the loop, so that the loop is formed, twice wrapped around its axis. (Photo explains clearer 🙂)
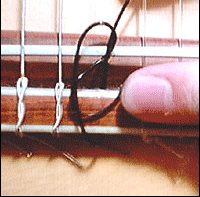
7. We bring the tip with a jet for a stripper (bridge) and slowly pull for the free end of the string. At this moment you need to try to end with the node under the bridge. (photo to help)
& NBSP & NBSP & NBSP Publication Date: April 08, 2015
Each of the novice musicians, who took the guitar to the hands, is forced to encounter early or late with the replacement of strings. And, as practice shows, few of them are capable of doing it as it should be. In this article, we will look at how to pull the strings on the guitar correctly and without errors.
At the moment, guitar strings are produced in two types - nylon (they are sometimes called synthetic) and metallic. By and large, each acoustic guitar is designed to use some one type of strings. This is due, first of all, with a different strength of strings tension: "Nylon" is much softer "metal", and the design of the guitar is taken into account. You can, of course, try to pull the nylon strings to the western guitar, but in this case the soft "nylon" will be difficult to dig a rigid body, designed for strings made of metal. The metal strings stretching on the classic guitars originally designed for "nylon", simply risky, since the lower threshing can be cut down from a strong tension, and the neck without anchor can be a story. Do not do it!
In appearance to distinguish guitars designed to tension different types of strings, very easily. It is enough to look at the neck and on the lower birthday. Look at yourself - and everything will become clear to you. Metal strings, unlike nylon, are attached not on the edge, but in the guitar case. Inside the case, the deck under the edge is enhanced by a wooden plate that helps withstand the tension of metal strings.
How to pull strings on the guitar with metal strings
So, how to change the strings on the guitar? Consider this process step by step.
1. We relax the flashes - rotate them until now, until the string is free to sign. It is very convenient to use a special turntable for string for this - its value is kopeck, but helps great!

2. When the metal string weakened, simply unwind the string, freeing the ring from it.

3. Take out the plugs (pins), holding the string in the lower strain. Many do it in barbaric - ordinary impressions or pliers, after which there are traces of this unsightly surgical intervention on the plugs, and sometimes on the hole. It is better to use a special tool that is much more convenient, and the plugs do not spoil.

4. When the plug is removed, pull out a metal string with a ball (hammer) at the end from the hole in the lower melode.

5. When the guitar was left without strings, do not forget to take care of it - wipe the dust in those places where the installed strings did not allow this to do, and also clean the vulture and body with special means.

6. Now stretch new metal strings. The installation procedure can be advised by this: the strings of the 1st and 6th, then the 2nd and 5th, then the 3rd and 4th are stretched. It is convenient to the fact that the installed pair of strings does not interfere with the installation of the next pair.
Take the ball of the new string into the hole and insert the plug until it stops.

7. Another end of the string has been taking into a hole of the ring and turn around the main part of the string around the bar axis so that the tip of the string remains under our turn.

We make the next turnover with the help of a ring, wrapping the string under the tip of the string. Thus, when tensioning, the tip of the string will be securely recorded between the two turns.
The meaning of these actions is simple - the more turns of the string will be wound around the ring, the more often the guitar will be upset. Our task is to minimize the turns, but it remains the likelihood that under the tension of the string in the ring will not hold and depart. Therefore, we make a kind of knot, which will allow not to wind up a large number of turns, and at the same time it will reliably hold the string on the rod.
If you still wrap a lot of turns on the ring, make sure that they do not overlook each other, and they were located next to each other, like spirals in the spring.
Remember the winding direction: the first three strings (thin) are wound clockwise, and the 4th, 5th and 6th strings are counterclockwise.
8. We pull the string on the guitar to about the working state, necessarily holding the plug with free hand. If you don't hold it, it can easily fly to the string. String slowly and smoothly, without jerks, otherwise it can burst. When tensioning to an elastic state, stop and carefully release the plug. In no case do not drag the string! It is better to notice than to drag!
9. We repeat this operation for all other strings.
10. We take a nippers (or a special multifunctional tool) and gently cut the ends of the metal strings at the rings. Do not leave these terrible borders of speaking strings on the grip head! It looks terrible, but the matter is not even in this, but in the fact that you can easily be easily injured by a number of man.

Staying the strings on the guitar, adjust them to tyuer or tuning. Be prepared for the fact that until the next day, the system will sail a little: the strings are sitting in their place, stretch, come to the working condition. Therefore, once a few hours adjust the guitar, and everything will be fine!
In general, the replacement of metal strings on the guitar leaves about 15-20 minutes. And the question "how to change the strings on the guitar" you should disappear by itself.
How to stretch the strings on the guitar with nylon strings
Now learn how to pull the strings of nylon. It is somewhat more complicated than replacing metal strings, but not so much so that you do not cope with it. Go!
1. Remove old nylon strings. With the help of the turntable or manually rotate the ring in the desired side until you can pull the tip of the string out of the hole in the rod. Some lazy guitarists to facilitate the task are starting with the fact that they simply cut the stretched strings with scissors, but flying over the guitar scraps of strings and the separated pieces of the panitis are potentially dangerous for you, and for the guitar!

2. Take out the other end of the string from the lower thief, by unwinding the hinge knot.

3. Removing all the strings, wipe the guitar from dust - the head of the grid, the ridge itself, the guitar case. With the installed strings do it inconvenient. You can use special guitar care products.

4. Tensioning new strings. Tensioning the nylon strings will be in the same order as metal: first 1st and 6th, then the 2nd and 5th, then the 3rd and 4th. In this case, the installed strings will not interfere with tensioning the following.
Consider the classic installation of nylon strings to the lower birthday. Let's start with the sixth string. We produce it into the hole of the thoring for 10-12 centimeters.

5. We make a loop - we bring the tip of the string under its main part.

6. Wrap the tip around the string and get into the loop - the node is obtained.

7. Mortgage the main part of the nylon string to the guitar deck. If you do not do this, the tip of the string can slip out of the node.

8. Strongly pull the main part of the string and its tip in different directions so that the node is delayed.

9. Go to the second end of the string. Count the tip of the string into the hole of the ring.

10. Display the tip of the string up, making the seaside around the ring.

11. Wrap the tip of the string around the main part of the string.

12. Rotating the flake, stretch the nylon string. There are enough of several turns around the ring - the tilt of the string will be securely pressed and will not pop up. Rotation should be done aside when the string leaves on the thresholds from the top of the shaft.

13. Go to the first string. We produce it into the hole of the thoring for 10-12 centimeters.

14. We make a loop - we bring the tip of the string under its main part.

15. Wrap the tip around the string, only more than once, and several. By the way, many do so with all strings - this is a purely personal business.

16. Strongly pull the main part of the string and its tip in different directions so that the node is delayed. Be sure to make sure that the tip of the string goes beyond the edge of the lower thief! Otherwise, he can jump out.

17. The second part of the string is tightened to the silt similarly to the sixth string.

18. The 5th and 4th String stretch similarly to the 6th string, and the 2nd and 3rd string - similar to the 1st.

19. The ends of the nylon strings gently cut.

Twenty-thirty minutes you will handle. Unlike metal strings, nylon strings sit down much longer - sometimes until the week. You can advise immediately pull the strings a little higher in terms than it is supposed. They will still weaken. Do not forget during shrinkage all the time pulling the strings.
Let's talk about some subtleties now. First, do not wind up the coils until the end of the shaft - where they can get into the gap between the shaft and the trees of the griff (red arrows). When tensioning string can break! Always leave free space between the last twist and the end of the shaft.
Secondly, the large inflection of the strings should be avoided in the area of \u200b\u200bthe upper melode (highlighted by a red line):

To do this, the direction of winding strings must be defined: 1st and 6th strings - in the outer direction of the shaft, 2nd, 3rd, 4th and 5th - in the inner direction of the shaft. In the photo of the direction of winding strings is shown by arrows. Of course, it may not get a string completely without inflection, but our task is to make it minimal:

Another advice is many guitarists before installing smooth strings (without winding - from the first to third) in the lower thresholds make an additional nodule on the tip. It insures from slipping the tail from the loop.
Some string sets are already sold with small thickening at the end. In this case, additional nodules can not be done - the string will not pop up:

Sometimes manufacturers produce nylon strings with balls (hammers) at the end - as for metal strings. This allows you to simply cover the string through the hole, without tieting the node on the lower strain. A good solution, but it has not received wide distribution for some reason.

Good luck in this simple case!
Replacing the strings on the electric guitar is carried out exactly by the same algorithm, as in the acoustic guitar, and, as a rule, does not cause difficulties. The exceptions are electric guitars equipped with a two-sided tremolo machine, especially with the machines of the Floyd Rose system. For this article we took the Sterling by Musicman AX40 guitar. The machine on it is one-sided, but the principle of fastening the strings in it is similar to Floidovsky. So, proceed.
To replace strings, we will need, in fact, new strings and a hex key.
Usually the key goes complete with a guitar, but if it was not given you, or he was lost, then you will have to pick up, and it is important to know that in the American Guitars, the keys made in an inch measurement system are used, and in all others in the metric.
The first thing to do is to loosen with a hexagon screws on top logs.

To completely remove them there is no need. Then, the same key, the screws are weakened by clamping, so-called, crumbs - small metal inserts in the sis.

It is not necessary to completely remove crown, and even better not to do it, as they can be easily lost. After that, the string can be easily removed from the rings. Immediately, by the way, it is worth noting that on guitars with a double-sided machine to change the strings more conveniently on one, that is, to put a new one in place. The reason for this lies in the fact that the tension of the strings in such machines is compensated by springs that hold the machine, on the other side. Thus, removing one string, you increase the effort on the remaining strings, and if it does not matter for old strings, then new when you will put them, you can randomly break. But in our case, the machine is one-sided, and, when weakening the tension of the strings, it simply falls on the deck, so you can safely remove all the strings at once.
A feature of the fastening of strings on double-sided tremolos is that metal coils at the ends of the strings needed to attach strings on other types of guitars, here are completely useless. They can either cut immediately, or lose a little, what we will do - we will put the string on the contrary. Please note that there are no lengths on some strings along the entire length - there are still 8-10 centimeters at such strings at the end. For such strings, this method is not suitable, but the general principle remains the same.
So, we draw a string through the slicer hole with the end, on which there is no coil.

I stretch it all through this hole so as to get the end to Bridge. At Bridge, insert the end of the string into the gap between the sugar and the saddle

And tighten the screw of the crush.

Too strongly delaying the screw is not worthwhile - the carving is very thin, and it is easy to rip it.
The free tail of the string, sticking on the other side of the ring, most likely, will be too big, and all it is not necessary to chew on the ring - first, it will not be careful, secondly, the many turns formed by the string on the ring will begin to spring that Bad will affect the ability of the guitar to keep the order (although it is not so sensible for guitars with top logs). The useful length of the string looks like this in this photo.

Taking the string away from the grid of centimeters by 10, everything that will be behind the ring can be considered superfluous. Transmitting the string light tension start spinning the flask until the string falls on his place and stop hanging out.

The excess tail of the string can be trimmed with nipples.

There is another way to get rid of excess length. Pull the string along the grief and make a bend bend on it 5 after the ring you need.

Rates from the bend towards the free end of the string of a half-meter-centimeter, snack it with nipples.

It turns out an improvised hook.

This hook gear for the shed hole,

And everything, you can cheat.
When all strings are installed, you can start setting up. To do this, you must first set all the micro-adjusting screws into the middle position.

Without tightening the screws on the top logs, we remove the guitar along the tune

And the setup procedure will have to repeat two or three times. Guitars with bilateral machines easier to rebuild, alternating strings: 6 and 1, 5 and 2, 4 and 3.
Now is the time to pay attention to the position of the plane of the machine relative to the decawal plane - they must be parallel. If you install the strings of the same caliber that it was most likely the machine itself will fall into place, if you switched to thicker or, on the contrary, thinner strings, the machine either will be delayed, or fall inside the deck, respectively. Suppose you put the thicker strings and the machine looked out, what to do in this case?

Open the lid on the back of the guitar.

And we detect the same springs under it, about which already mentioned above. The springs are mounted on one side to the sustain-block, on the other - to a metal bar held by two screws. If the machine lifted, then the screws need to tighten a little, and if the machine failed, then the screws are weakened.

If the manipulations with the screws did not give any results, and the machine still does not become parallel to the deck (usually it happens when it is very thick strings), the problem is eliminated by installing an additional spring, which is most often attached to the guitar bundled.
Finally, when the machine has taken the correct position, we rebuild the guitar along the tune and only now tighten the top layout. It remains to make the smallest - to check the strings setting again, and, if some deviate from the desired value, bring them to the micro-adjustment screws. That's all. Creative success to you!
Guitar, probably, the most popular musical instrument among music lovers. Virtually everyone can master the equipment of the game on an acoustic guitar. Like any other musical instrument, the guitar requires a careful relationship and care. The most, perhaps the main procedure of the current maintenance of the tool is the replacement of strings. In which cases it is required and how to correctly install strings on an acoustic guitar - disassemble in this article.
Causes of replacement
The most common and obvious reason for which strings have to be replaced - this is their gap. Usually the thinnest - first and second. It is also necessary to replace in cases where the strings stop sound. This happens in the case of:
- strong pollution;
- long-term operation, when the string from time stretches and loses elasticity;
Before a responsible performance or concert, it is also recommended to install strings on an acoustic guitar - both for obtaining a qualitatively new sound and in order to protect yourself from late break. Replace preferably 2-3 days before the event. In this case, the strings should be asked on the instrument, and it will be possible to thoroughly configure it.
In general, experts advise to replace strings on an acoustic guitar at least once every six months, and with intensive mode of the game - more often.
Preparation for work
Before installing strings on an acoustic guitar, you need to decide on the choice of a new set. Regardless of how much it broke, it is recommended to change their complete set. First, the strings of different manufacturers have different properties and can differ significantly on sound. Secondly, during operation, they stretch, therefore, even taken from exactly the same set, will play differently.

Another important point is the choice of material type: steel or nylon. If the tool is initially intended for nylon strings, in no case cannot be installed steel. From the excessive tension, the bottom of the threshold can be distorted or to escape.
Before starting work, you also need to prepare the necessary tools.
Replace tools
To replace strings, it will be necessary:
- Accessory for replacing strings. Sale in every music store and greatly facilitates work. It puts on the ring and speeds up twisting the old strings. At the bottom it has a recess, with which you can pick up a locking peg.

- Set of new strings. It is selected individually, depending on the game level, the owner's budget, the number of strings in the kit.
- Metal nippers or scissors. If there is no purpose to save old strings, then you can cut them to relieve them. After installing the new the remaining ends bite.
- A piece of soft fabric. To wip the grof and the case, a microfiber napkin is suitable or an ordinary flannel.
- Guitar care agent. Special fluid for cleaning the surface of the tool is sold in any music store. It makes it easier to remove contamination and dust from the housing and the grid, dissolves fat stains, gives the surface of the shine.
Removing old strings
To weaken the string tension, you need to start rotating the flake. If instead of weakening the string continues to stretch and the sound becomes higher - change the direction.
Rotation is carried out until the string starts hanging out. Then the end needs to be removed from the hole of the rod fittings. Such a procedure is performed for all strings.

If the pegs are too tightly sitting and do not succumb to, you can push your hands brush into the resonator opening of the guitar and slightly press on them below. After that, the neck and guitar case preferably wipe with a napkin treated with a special tool. Old strings can be collapsed and removed, and subsequently use as spare.
How to put strings on an acoustic guitar
6 strings of the new set are removed from the packaging and unfold. Installation starts with extreme, moving further to the middle. Such an order will allow evenly and gradually loading the vulture.
Before installing strings on an acoustic guitar, it is desirable to check the height of the grid and, if necessary, adjust its position by an anchor.
The end of the string on which the hammer is located (a special cylinder, holding the string), is cut into the hole under the bottom plank, the peg is inserted from above. At the same time you need to pull the string in the direction of the grid so that it is securely fixed.
Next, go to the winding and final consolidation. The strings are passed through the appropriate slot in the upper shelf, then they are then fought through the hole of the ring of the rod and make a couple of turns so that the end is under the twist.

Finally fix the string, rotating the screw of the flask. You do not need to immediately delay all the strings. There is a risk that one of them will burst and the whole set will come into disrepair.
After all the strings are stretched and installed, it is advisable to wait 1-2 days. During this time, the voltage in the new string will be removed. Then you should trim the tips with laying. But some lovers for consupported effect prefer to leave curls.
How to put nylon strings on an acoustic guitar
Choosing a guitar for learning, novice musicians stop their attention on nylon strings. They are much softer than steel. The first three are the most sharp - they do not have winding at all. This avoids the appearance of corns on the fingers in the learning process. The advantage is that it is possible to install nylon strings both on the acoustic guitar and on the classics.
We will analyze how to install nylon strings on acoustics. The main difference is that there are no balls at the ends. The string is simply skipped through the slot, it has been done through the hole of the bottom plank and is fixed by the nodule.

There are a lot of ways to tying a nodule, but the main thing is to securely fix the string on the bar. Then, by analogy with metal, fasten on the slices in the top of the grid.
Guitar tuning
After strings are correctly installed on the acoustic guitar, the tool is set. The new strings will be very stretched at first, so it's not immediately to achieve perfect sound. In the absence of sufficient experience in the configuration process, it is recommended to use a tuner.

Then it is desirable to give a "rest" tool and repeat the setting. The first time after installation will require a more frequent setting of the tool. But when the strings are sitting, the guitar will receive a qualitatively new sound.
Quickly and easily learn how to install strings on an acoustic guitar, both steel and nylon, it is possible, only constantly practicing this. Perhaps newcomers first will not be easy to fulfill it on their own. In this case, you can consult to contact the services of specialized music salons, where they will help and prompt how to put strings on an acoustic guitar. 6 strings Specialist will replace within 15-20 minutes.
I, in general, quite often met complaints from guitarists that their guitars quickly upset and do not hold.
Many sin on their inexpensive guitars and cheap fittings, without even suspecting that the guitar does not hold the system, not because of the fittings.
It's all about the proper installation of strings on the guitar!
Replacing the strings on the guitar process only at first glance is trivial, and after all, there is here and your tricks.
At least, learn how to put or change the strings on the guitar, can greatly facilitate your life.
Step 1:
After you secured on, bring it to the head of the grid and skip the slicer.
Step 2:
Leave the reserve a small stock of the string for winding on the neck and slightly pull the string towards the head of the grid. Try not to pull the string back and forth - she can bother and break.
Step 3:
Bend the end of the string towards the center of the grid head, and skip it under the string.
Step 4:
Holding the tension of the string, wrap the strings around him, making a kind of "lock." Try to keep the string in the stretched position, it will prevent the deformation of the string and will help it properly install.
Step 5:
Holding a string in tension, start twist the flake. The string must hold itself. The string should be cooked down on the shaft of the ring to increase the angle of its inclination relative to the clad.Final result:

This is such a "castle" makes it possible to achieve that the guitar will be upset much less.
So now you know how to change the strings on the guitar. \u003d)
UPD: Well, and visual videos:
Video: How to change the strings on the electric guitar
Video: How to change the strings on an acoustic guitar
Video: How to change the strings on the classic guitar
Additions, corrections, comments are welcome. Friends, write to cammammies.