How are unusual paintings from wax pencils create? Encausky - Iron Drawing, Master Class for Beginners How to Swamp Wax Pencils.
With the help of beautiful candles, you can create a romantic atmosphere or just decorate the interior. The modern market represents many variants of candles of various sizes, colors and flavor. But why spend money on what you can easily do at home? After all, almost everyone has ordinary paraffin candles.
Today we will tell you how the usual candle to turn into a work of art. This is a very exciting occupation, and there is something magical in it. You can safely attract children and other family members to create a multicolored miracle.
Multicolored candles
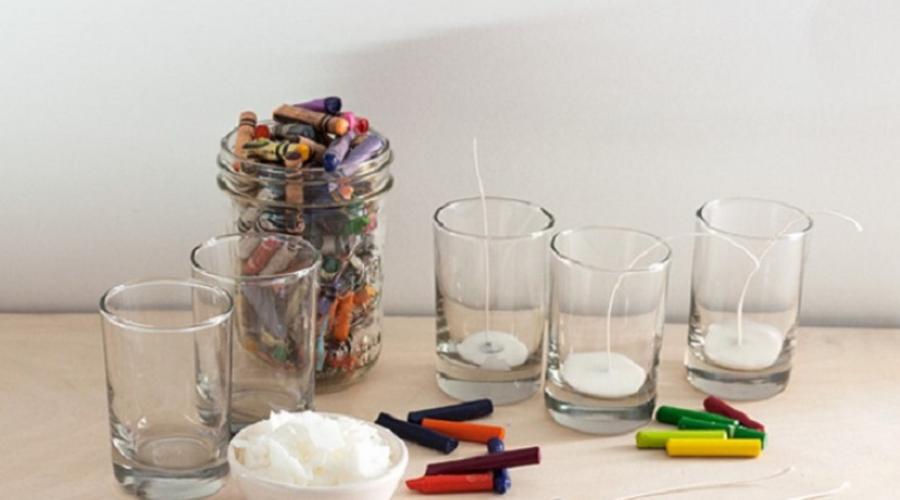
You will need
- paraffin candle
- paper cups
- glass glass
- colored wax shallow pencils
- wick
- small piece of glass or metal
- favorite essential oils

Progress
Prepare wick. Usually it is sold with a ready-made basis, but if you don't want to buy, then do it yourself. Placing a small piece of paraffin into a paper glass and crop in the microwave (if there is no microwave, just hold the paraffin on a water bath) .Fig in a piece of glass or metal a small hole and anterior of the wick. Place the resulting construction in a glass glass and pour prepared paraffin. 
Desecrate the chalk of the desired color into small pieces. 
Paraffin and sliced \u200b\u200bcrayons placement on paper cups. Mills everything in the microwave. Thoroughly mix the contents of the glasses to obtain a homogeneous mass. Add essential oil. Perses in a glass with a wick mass of the desired color. You can tilt the container to obtain the desired form. 
Wait until the first color freezes, and pour a lot of other color. So do with each color to get a full-size candle. You can do each layer with another aroma. 
If you add essential oils to a mixture, try to make candles with the smell of the Christmas tree and mandarin before the New Year holidays. You can also decorate a glass cup by grains of coffee, shells or beads, the main thing is not plastic.
So you can make a variety of candles. The whole process will take quite a bit of time, and the result will greatly please you and your loved ones. 
Children are often fond of drawing and try everything: pencils, markers, chalks. The remaining pieces can be thrown away, and you can, know how to melt wax crayons, give them the second "life" and the opportunity to still serve art. Children can create real pictures from molten wax chalk: it is chips and crumb, for the preparation of which you can use the most residues or wreckage of wax pencils. It suffices to follow the recommendations of the instruction. To melt chalks, you will need to grind them first. To do this, you can use the stationery knife, which is cut by wax chalk. The pieces should be small sizes - not more than 1 cm. Then they will melt evenly, there will be no grains. And one more important point: it is necessary to lay chalks for basic colors. Otherwise you can get a lot of dirty brown.
The second step is the organization of water bath for melting wax chalk. For this, the saucepan is filled with one third with water, put on the stove. From above on it - a metal bowl in which chalk will melt. So, alternately, the color behind the color can be dissolved by several pencils and pour them into a pre-prepared form. If there is no desire to bother with a "water bath", you can apply oven. Preheat it to the maximum temperature and put the silicone shape filled with wax shallow. In five minutes of heating, all pieces are missing. But it should be borne in mind that chalk into each container should be poured with a slide: as a result, the figures of normal thickness turn out. If it is not possible to use the oven, you can apply the microwave. For this, the shape, filled with crushed fine, must be put into the stove for two minutes. Periodically, every half a minute, should be mixed with a mass.
Whatever melting method has been selected, you need to follow the melting process, bearing overheating. When the material is ready, completely melted and is stirred, the form is carefully getting out of the stove and put it cold. The quality of recycled raw materials will not change: the children will calmly continue drawing by molten wax shallow. In addition, there is another way to apply wax remnants: drawing patterns from molten wax chalk. To do this, remnants or pencil debris are also used to be crushed. Many simply rub the pieces on the grater. But you can apply both pencil sharpeners: scroll large pieces in it, and the residues wipe on the grater. So, get a small crumb, which is further used for drawing. Drawing finely not only traditionally, on paper sheets, and still on fabric or knitwear.
For drawing molten shames, it is necessary to make a drawing sketch with a simple pencil, and then fall asleep drawing with a cooked crumb. It can be separate colors or a mixture of colored crumb. It all depends on the fantasy of the author's drawing. Then the leaf of the parchment is superimposed on top and strokes the heated iron. Waxing shallow melted, spread and turn into a fantasy pattern. You can also paint the old T-shirt. For this, a sheet of cardboard will be required, which is placed inside the T-shirts so that the paint does not impregnate on the back of the product. The front part sprinkles with a crumb of wax chalks in the form of patterns, covered on top of paper and strokes hot iron. The wax is impregnated into the knitwear and makes it color. Thus, you can work with creativity together with children: it has a beneficial effect not only in development, but also strengthens the relationship between them and parents.
Encausky is drawing with wax crayons, melted on the surface of a hot iron. Such a simple device will help create amazing paintings, master an interesting needlework.
What is Enkauska?
This art implies the creation of paintings with the molten wax of various colors. Such work is still found on excavations of ancient Greece. Early Christian paintings and now retain their bright colors.
To work it will be needed:
- paper;
- iron;
- wax pencil.
Drawing wax: Necessary equipment and materials for Enkautics
You can depict anything. If you are a novice artist, then you will be abstract pictures. If you have experience in creating crafts, then you can depict clear landscapes.

The main material that is required in the work is art wax with colored pigments. It is sold in specialized art stores. If it is not possible to purchase such a wax, then use crayons for drawing and wax pencils. They can be purchased at the Stationery Store.
You will also need:
- glossy dense cardboard;
- soft cloth for polishing;
- lining on the desktop so that it remains clean in the process of work.

If there is no such possibility, then use the usual household iron, but it must be a small size, have a sole without holes and a temperature controller.
You will need toilet paper and napkins or a cloth, these materials need to clean the sole of the iron to change the wax color to the new one.
If you have a hairdryer, in which you can adjust the temperature, then you can apply it. Then use wax pencils as materials.
If the Enkauska becomes your constant hobby or even a source of income, then you will need to buy a special heating rod that has the name of the causary. It will help to portray small details and suitable patterns.

Encaustics for beginners
For those who only decided to master this interesting technique, it will be useful to find out which techniques can be used when working, this is:
- smoothing;
- the work of the edge;
- print;
- work nose.
When the material acquires such a consistency, it will be necessary to carry out the iron on the surface of the paper, but without pulling it into it, so as not to burn. A trace of the desired form should remain on the sheet.

Working an edge allows you to create various strips. This technique is used to draw grass, flowers. First you need to act in the same way as in the case when you put an impression in the technique of smoothing. Now put iron iron on this drawing to get a strip of the desired length. Surplus wax remove with a soft cloth.

In order to use Enkauska technique, to do in the drawing of the residence, you need to apply paint on the paper basis, and then put the iron sole on it for a few seconds. At the same time, it should lie like a blade, they can not be shred.

To create small pattern details, you need to dip the tip of the iron in the molten wax, and then attach it to the canvas in the right place.

Enkaausky - Master Class with photo
Now that you have learned the basics of this art, it's time to move to a practical lesson. It will be slightly, under the power of beginners.

Take:
- wax pencils;
- white tight cardboard sheet;
- glue;
- hair dryer in which the temperature can be adjusted.
Pencils should be the same size, if any of them are longer, cut them back from the side rod to compare with others.
Fold up the top of the sheet with glue, attach here the wax blanks tightly to each other with the edge down. When the glue dries, bring the hairdryer to the tips of wax pencils, turning it on the strongest power. At the same time, the blanks will have to start melting, and the wax will gradually drain down.

If you need strict vertical lines, then keep the cardboard sheet in the usual position. If you want to achieve interesting special effects, then turn it out of side.

If you are satisfied with the resulting result, then put work on the horizontal surface and wait for your masterpiece.

Such an art object will decorate the dwelling or will be an unusual gift for the new year or another holiday.
The next master class will create a beautiful abstract picture.
For the implementation of the conceived will be required:
- dense paper;
- a small iron without holes on the sole;
- wax pencils;
- paper that can be displayed working surface.

Now bring the iron to the paper sheet and begin to promote it horizontally into one and the other way. Try so that while the color stripes as little as possible crossed each other and mixed with each other.

As you understood, the principle of smoothing was applied. Now you need to use the ottis method. To do this, press the iron to the surface to leave uneven prints on it. You can make some more posts on each to achieve an interesting effect.

Wait for the picture in the technique of ENKAUSTIC slightly cool and tell the surface with a soft cloth in about a minute.

The inexperienced spectators are unlikely to understand what you have made this job, beautiful and very spectacular. After you work out on simple samples, you can move to more complex.
Enkauski - master class for experienced
If you have all the necessary tools, then the work should not seem too difficult to even crafts with small experience. That's what you need:
- cooking surface;
- iron;
- paper;
- foam;
- the cloth.

To draw a landscape, take the wax chalk or pencil of blue and begin to rub it in the top of the sheet. Since the cardboard base will be heated, it will be easy to do it.

Then the mountains are drawn. To do this, put the brown chalk on the okay sole, turn the tool, heat it.

Then attach the iron to the surface of the sheet, depict the pointed peaks and the system of the mountains using some techniques of enkautics.

If you need to grow paint, apply a piece of fabric or sponge for this. In order for the mountains to surround the greens, depicting it with the help of a shape of this color. Draw other elements of the picture, after which you can edit it into the frame.
Wax drawing technique on paper
Encaustics technique allows you to get very beautiful landscapes. In this you now make sure. See what miraculous paintings create craftsmen.

To work, you will need:
- iron for Encoustics or ordinary road small size without holes;
- glossy cardboard, the thick photo paper is suitable for printers, on which photos are printed;
- colored shallow;
- napkins;
- soft rag.

When they become soft, you can use them, but without waiting until the wax starts to drain from the surface of the iron down.
Attach melted wax to glossy cardboard, move the move from left to right. At the same time, make a small semicircle.

Carefully, not to burn, erase from the surface of the iron wax with napkins and put a small color here. When they are missing, put the iron on the right side of the sheet and spend left, then in the opposite direction and left again.

Now you need to remove this wax with a napkin and melt brown on it. Prepared solution make so-called lowlights. At the same time you need to apply iron to paper and quickly raise it. So do several times.

It remains to designate small details. For this, the receivers listed earlier are used. Spend a rib, and then the tip of the iron in the drawing to portray the bush.

Look, what beauty turned out. Since the picture is made with wax paints, it will charmively glitter.

Encausky technique is good yet in that you can invent the plot for the picture right on the go. Making several movements with an iron, placing wax in an arbitrary order, you can detect that they drew uneasured earlier.
Master from the next master class exactly so depicted a bird on his masterpiece. But first things first.
At first she took:
- heat-resistant glossy cardboard;
- german and Russian wax crayons;
- iron;
- towel;
- napkin.
Now we need to put the white and blue chalk on a warm iron, start drawing them.

Turn the cardboard sheet and cover it with wax with an iron on the other side. Now you need to draw a cloud iron iron ribs.

If required, sometimes wipe the sole of your tool with a napkin. But if you use the same colors, then you can not do that.
Looking around, the craftswoman saw that a bird appeared on the canvas, though, a little strange. It was decided to try her feathers with the tip of the iron.

You can make an adjustment using a toothpick or a sharp wooden spare. With her, you will remove too much, try something, clean something.

Now you need to make prints to portray grass, bushes. To do this, put green and brown chalk on the iron, apply them to the desired part of the pattern.

Crowns of trees are depicting so. Apply a little brown or green wax on the weeds of the iron and draw this part of the picture to this part of the tool.

Applying the technique of print, draw on the trunk and branches of the leaves, and apply adjustment with a spacing.

The first bird did not like the heroine, so she painted the crown of the tree on this place. But then decided to draw a seagull white. To do this, you need to suck the contour of the bird with the edge of a wooden stick. Pulle it in molten wax and draw the items.

It remains to polish the masterpiece with a soft napkin and you can hang a picture or give it to any holiday.

How to draw an iron - technique for beginners
The next master class will create a picture in red-yellow tones with dark splashes.

It can be portrayed even those who believe that they do not know how to draw. To do this, they will need only:
- glossy cardboard format A5;
- wax children's crayons;
- iron without holes on the sole with a thermostat that is designed for a dry ironing.

The iron temperature must be minimal, so put the thermostat to the smoothing position of wool or silk. Position the shames on the sole of this tool so that the yellow is at the bottom, orange under it, red is even lower, then it goes dark pink and burgundy.

Draw this color rainbow a bright sky, applying a reception of smoothing. To do this, simply take the iron on the surface of the paper as if you see the right left and vice versa.

Watch the napkin of the excess wax on the warm surface of the iron and put the chalk of another color. What, visible in the next photo.

It is also necessary to try the leaf horizontally movements there and here. So you make the main background.

To draw an iron further, you need to dissolve black chalk at its tip. Use this part of the working surface of the iron, making it a tip of writing on paper.

Further, with the help of this technique, make an outturope at the bottom of the sheet and create fabulous vegetation.

To draw wax further, use the side sides of the iron. Put it on the edge on the applied background, to get vertical lines, for example, grass.

After you have made a black wax, on the tip of the iron you will have a certain drawing. Do not wipe this coating, make prints further, it turns out a spectacular result.

Such an enecausky is suitable for beginners, since it does not require special skills.
Now paint the tip of the iron, for this, the spacing of the iron you need to pick up a little wax and drive it in the picture, creating black flowers and leaflets here.

Look, how to draw bird wax. To do this, put on the desired part of the picture by the end of the iron point. Then draw the ribs for two wings for each bird.

Final Accord - polishing the image with a soft cloth. It will turn out to be radiant and brilliant.

When you parse on such work, you can create masterpieces in this technique with smaller features.

To reproduce such a blooming apricot or Sakura branch, take:
- black cardboard;
- white marker;
- wax crayons;
- iron;
- soft rag.

Keep iron in your right hand, and take green chalk into the left. Leave his tip to the iron so that the wax slightly melted.

If you better own your left hand, then keep the tool and chalk as it is convenient for you.
Start filling first one half of the sheet, moving the iron up and down. Do not break it away from cardboard to get a solid layer. Now, just fill out the second half of the sheet.

Take the pink chalk, melt it on the tip of the iron and begin to recreate the pink petal.

In the same way, perform all the flower elements. Those petals that are closer to the viewer should be filled with the latest to create volume.
Apply a brown paint on the tip and make a twig. From yellow and brown form the stamens.

To the flower look more realistic, you need to slightly scratch a special tool from the core to the beginning of the petals. To do this, you can use a pointed wooden wand.

With the help of the same device, you can scratch the wax where it is not needed to make the contours of petals and flowers more smoother.
If the elements of the picture are already frozen, you can put the web on the heating surface, so that the wax can be softered slightly and remove unnecessary or draw residence per sheets. After the final grinding, the painting with a soft cloth can be proud to admire the result of the work.

Yes, if you try, then the iron will become a tool of a talented artist.
Presented works more forces adults, and young children can not be given to work even warm irons. Therefore, familiarize yourself with the type of this technique, which kids are happy with pleasure.
Encausky technique for children
Inconsider the guys to engage in pointelism style. The next master class will help you master this needlework yourself and teach him children.
On a sheet of paper, you need to draw a simple pencil outlines of the future masterpiece. For example, it is a rooster.

So that you can portray it, we offer to attach a sheet of paper to the presented template and simply redraw.

Since ENKAUSTIC still implies the heating of wax, so you are with the child during the classes. Place the candle in a comfortable container, burn it. Let the child holds the wax chalk over the candle flame until a drop is formed. After that, it needs to be quickly transferred to a certain section of the picture.

Work requires patience, accuracy, but the result will be amazing. Such a bulk picture will be the subject of the pride of the parents for his child.

If children are very small, then you do not need to show them the method of creating a picture of a burning candle, but it is better to teach them how you can create masterpieces in the technique of pointelism, using the cool cold method for them.
Winter drawings will now come to the way. To make them, give children:
- sheets of black cardboard;
- cotton swabs;
- paints.

Adults or older guys can use white wax pencils, heating that will create work, thereby having mastered the art of Enkautics.
To secure the material studied, look a video, which will help beginners and older children even better master the drawing with hot wax.
If you have already been strained enough, then try to create a picturesque landscape with the author of the next video.
Modern artists for writing paintings use the most unusual techniques and strange items. Today, no one will surprise the pictures of, and even. Instead of paints, artists apply.
Not exceptions and wax pencils. It turns out that it can be done not only, but also to create masterpieces. The article will consider several techniques for creating paintings from ordinary drawing items.

Method No. 1 "Chips". To create a picture, prepare wax pencils of different colors.
.jpg)
Remove the paper wrapper from them.

You can make chips from pencils with two options. Using sharpeners. She removes a thin layer of colored waxed with pencils.

Or you can grate pencils on the grater. You will have a smaller crumb. Both shallow wax size is necessary to create a picture. So patterns will turn out more diverse.

Prepare a canvas for the painting. In order for the drawing to have saturated paint, it is better to use the fabric. On paper, the color will look like fad. Put the cloth crumb from pencils. It can be stripes or other figures.

Cover from top of the parchment that hostesses are used to baking.

Well warp the iron and swing the paper. At high temperatures, the wax will start melting.

When you handle the entire surface, slowly remove the paper. You should not do sharp movements, otherwise the drawing is lubricated.

Leave the wax to frozen. Optionally, you can decorate the sides of the canvas.


Method No. 2 "Pictures using a hair dryer". Melt wax with pencils will help the hairdryer. At the same time, the option of creating paintings does not need to be removed wrapped with pencils and grind. Stick them on canvas.

Lift it so that the pencils are located on the top of the base.

Turn on the hair dryer and direct hot air to wax. Gradually, it will melt, and flock down.

When using such equipment, the original paintings are obtained.

Figures from wax pencils can be anyhow. If you arrange a color wax in the shape of a heart, then the inner part on the canvas will be clean.

.jpg)
Or glue a paper stencil on the material before we melt wax.
.jpg)
Then remove it after working with the hairdryer. Additionally, you draw an empty place or decorate sparkles.

With this option, the creation of paintings is the drawing in the form of strips. Make bright spots on canvas can be different. Cut the pencils in small pieces. Attach them on canvas.
.jpg)
Warf wax hairdryer. If you slowly rotate the hair dryer around the pencil, then the drawing of a round form.
.jpg)
.jpg)
Colors and place them choose depending on the desired composition.
.jpg)
Method 2 "Adhesive Pistol". Often in needlework use a glue gun to connect parts of the decor. It can be applied to write paint wax. This device has a heating instrument in its design. It is he who can melt wax pencils.
Instead of glue rods prepare pencils. If necessary, then cut the extra wax. Insert the pencils into the adhesive gun, and turn on the device into the outlet.

When the wax starts to melt, bring the device to the canvas and click on the lever. The wax will drip on paper, creating bizarre patterns.
.jpg)
Color wax remnants collect together and make colored crayons for children's creativity.

Create paintings from wax pencils is easy. Make such an original masterpiece you can do it yourself, if you use these technicians.
Content:
You should not throw away your old and broken wax pencils. Just like candle wax, pencils can be overpowering and turning into new pencils, candles or even lipstick! There are several different ways to melting pencils, and in this article we will tell you about them.
Steps
1 Melt pencils on the stove
- Do it with a double boat or water bath. Pour 2,5-5.1 cm water into a large saucepan. Put the temperature stable glass container inside a large pan. The upper part of the glass container should be higher than the water level.
- You can apply a metal glass for these purposes, which you use for the manufacture of candles, instead of a glass container.
- Remove the wrappers with pencils. In case of difficulties, you can hold a stationery knife along the entire length of the pencil, gently cutting off the wrap from its surface. However, wrapper should be deleted quite easily. .
- You can also put a pencil in a bowl with hot water for a few minutes. Water will soften the paper and it will be easier for you to remove it.
- Soak a pencil in a bowl with hot water for a few minutes. Soften paper and it will be easier for you to remove it.
- Run the wrapper. Start from one end (from above or below) by seam. Hook the shell of the nail and start tearing it.
- Some pencils have a free wrapper. You can easily remove it.
- Sore pencils in colors. If there are a large number of different pencils, you should decompose them in colors. This will save time later when you melt them. You do not need to divide pencils on shades, for example, you can put a blue and rich blue together. Just group together all shades of blue, yellow, etc.
- Cut the pencils into small parts using a stationery or kitchen knife. You must have pieces of about 1.27 cm long. So you can melt them faster and reduce the number of lumps that may form.
- Turn on the stove and bring water to boiling. After boiling, reduce the temperature and maintain the boil water on moderate heat.
- Throw pieces of chalk into a glass container. Do not throw all the colors at the same time, otherwise in the end you will get a muddy brown color. Instead, send chalk sorted on the melting. Just throw pre-selected pieces of pencils in a container.
- In the production of candles from wax pencils, add candle wax and a few drops of essential oil to give a pleasant fragrance.
- If you make lipstick based on wax pencils, you must use only one pencil (you can use one or more colors, in size of one pencil) and ½ teaspoon of almond, argan, coconut, jojoba or olive oil.
- Wait until the pencils are melted. Still them with a spoon to heat the whole mass uniformly. Do not leave the slab unattended and be sure to ventilate the room; The substances released by wax can cause headache.
- Add some more water if its level in a large saucepan decrease.
- Remove the water container and use the wax. The glass container is heated very much, so do not forget to use the tack or mitten to protect your hands. To obtain pencils of various funny shape, you can pour hot wax into silicone molds for ice or candy shapes. You can also use this wax for the manufacture of candles and lipsticks.
2 Melt pencils in the microwave oven
- melt wax pencils 1 Remove the paper wrapper with pencils. You can do it with the help of a stationery knife or remove the wrapper manually, you can also put pencils into a bowl with hot water to twist the wrapper.
- Peel and Tear The Wrapper Off.
- Score The Paper Wrapper with A Craft Knife and Peel The Wrapper Open.
- Soak The Crayons in A Bowl of Hot Water for a Few Minutes to Loosen The Wrapper Off.
- Some Crayons Have Very Loose Wrappers. You Might Be Able to Simply Slide These Off.
- melt wax pencils 2 Divide pencils in colors. If there are a large number of different pencils, you should decompose them in colors. This means that all pink and purple together should be folded together. You do not need to focus on shades separation, for example, shades of pink "chewing gum" and "Rose" should be folded into one pile.
- melt wax pencils 3 Stationery or kitchen knife cut the pencils on small pieces. They should be about 1.27 cm long, which will accelerate the melting time.
- melt wax pencils 4 Put pieces of pencils into the container for the microwave oven. You can use a glass jar or even an old cup. If you have in stock pencils of different colors, you should use different containers.
- If you want to make a candle, you should mix pencils and candle wax in proportion 1 to 1. Then add a few drops of essential oil or essence.
- If you do lipstick, you will need one pencil (you can mix several colors), ½ teaspoon of Shea oil, and ½ teaspoon of any other oil (almond, argan, coconut, jojoba or olive).
- melt wax pencils 5 Put the plate or stand and container with pencils in the microwave. You can place several containers / colors in it, but do not complete the microwave oven. It is better to heat each color individually or small batches.
- melt wax pencils 6 Preheat pencils for 2 minutes, stopping the process every 30 seconds for mixing. Do not move away from the microwave and look after the pencils. The parameters of each furnace are different, which means your pencils can melt faster.
- melt wax pencils 7 Use melted wax. After complete melting, you can pour the wax into silicone shapes or plastic forms for candies to get a funny form figures. You can also use pencils for making lipstick and candles.
3 Melt the shallow in the oven
- melt wax pencils 1 Preheat oven to 94 C. This method will help give old pencils new funny forms.
- melt wax pencils 2 Remove the paper wrapper with chalk. With the help of a stationery knife neatly cut the wrapper from each shape. Be careful and do not damage the pencil itself. The wrapper should be easily easily.
- For easier removal, the wrap should be put a pencil in a bowl with hot water for a few minutes. Water softens paper, which contributes to the easier removal.
- melt wax pencils 3 Distribute chalks in colors. If there are a large number of different pencils, you should decompose them in colors. This will save time later when you melt them. This means that you need to sort yellow to yellow, and blue to blue. You do not need to group pencils on shades, for example, folding together all the "cornflower" blue or "golden" yellow.
- melt wax pencils 4 Cut the pencils into small pieces with the help of a stationery or kitchen knife. Their length should be about 1.27 cm long. This will help you quickly melt pencils and reduce the number of lumps formed.
- melt wax pencils 5 Find a suitable baking form or silicone shape. You can use old tin shapes for cupcakes or baking, or silicone forms for baking and ice cubes. Silicone forms have a very high melting point, so that their use in the oven is quite safe.
- If you are using tin baking forms, you should slightly lubricate the recession to baking or culinary fat. This will prevent sticking. You can also use paper molds for cupcakes.
- If you use silicone forms, you will not need to lubricate it or use paper molds. The silicone form is very resistant to temperatures and flexible, so molten pencils (after they are frozen) will very easily take out.
- melt wax pencils 6 Put pieces of pencils in forms. If you plan to use curly forms, then apply chopped pieces of pencils with a slight margin. Pencils during melting will fill all the voids of such a mold.
- Pay attention to the correspondence of the color of the pencil form of the desired figure. For example, if there are several different forms in the form of stars and hearts in your tray, then red pencils should be put into the shape for hearts, and yellow and blue shape for stars.
- melt wax pencils 7 Put the tin shape in the oven and bake about 10-15 minutes. If you use silicone forms, you should first put them on the baking sheet.
- melt wax pencils 8 Remove the shapes of the oven. After a complete melting of the pencils, remove the shapes out of the oven, then you can use the molten wax for your project, or wait for complete solidification and get pencils of funny forms.
- In the manufacture of pencils of funny forms, you can speed up the cooling process by placing the form for baking in the freezer for 30 minutes, after the wax hardens.
- melt wax pencils 9 Get hardened pencils from forms. In the production of pencils, you should wait complete frosting. The wax is completely frozen if the bottom of the shape is cool to the touch. Turn over the shape upside down after full wax froze. Pencils should easily fall out if you use shape for cupcakes or drift. You can slightly knock the shape of the surface. When using silicone forms, take care of its edges and press the bottom of the form, pushing the pencil.
- Melted pencils can be reused for the manufacture of new ones. Just pour wax in forms or leave in the one in which you melted them. New pencils will be the same color that you added to the container.
- Molten pencils can be pouring into curly or ornamental forms to get new pencils of interesting forms or figures.
- Silicone ice forms are ideal for the production of new pencils.
- You do not need pencils. You can make a cylinder of wood and following steps 1-7 and incur in the griffel.
Warnings
- Melt pencils in a well-ventilated room. Keep the window open.
- Melted pencils are very hot. Adults are needed and precautions during melting wax and its use. Do not leave melted or hot wax unattended.
- Do not overheat pencils.
- Never leave the plate on or oven unattended.
What you need
- The pencils
- Stationery knife
- Resistant to high tank temperatures and tanks for the microwave.
- Plate or Stand for Microwave
- Equipment for the project, for example, forms, etc. To work with molten wax.