How to make a picture with your own hands from various materials - step-by-step instructions with photos and videos for making at home. Interesting paintings with their own hands for the interior (15 photos)
Read also
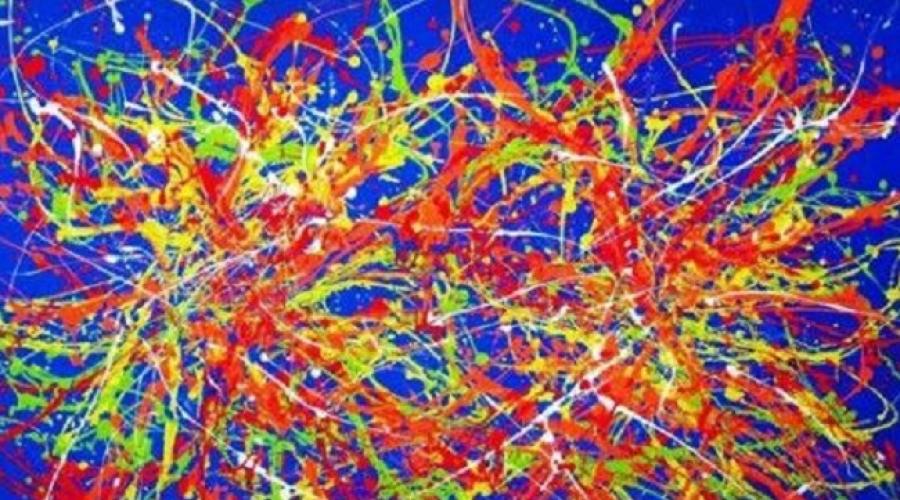
Individingly developing as a type of art, well reached the present day. At the same time, in the modern design interior today, practically not to meet the classic landscapes with still lifes: the place of the picturesque classics was taken by an abstraction or a highly artistic photo. It is with an abstraction and modern, mostly, an interior painting is associated, the task of which is to create a specific psychological background of the premises, the corresponding mood among those present, as a rule, the atmosphere of pacification and peace, or vice versa - office activity and energy.
Displacement towards abstraction, must be admitted, greatly brought painting to an ordinary person who does not engage in fine art professionally either at a technically high level. Naturally, not everyone is realistic to reproduce reality on canvas, with abstract art of any more opportunities to create their mini-masterpieces. There are a variety of techniques, sometimes even a brush will not need: yes you can and yourself come up with an original way to apply paints to the surface, you only need to practice and gain experience. 

The main condition for self-creating the pictorial interior element can be called courage of ideas and determination in their embodiment: creating artistic abstraction, it is imperative to free consciousness from limiting stamps and with a light heart, solid hand to produce strokes, smears, colored divorces on paper, giving will inspiration and fantasy . If you succeed, the creative process will turn into a semblance of meditation, giving rest your head and nervous system, distracting from everyday worries and disturbing thoughts. 


The working surface for the picture can be, in principle, any flat surface, smooth or with a embossed texture. It is quite logical to make the first steps on the usual dense paper of the required size, cardboard and plywood are also suitable, which can be pre-painted in the required light (or vice versa, dark) shade.
Any brushes are suitable as working tools, from artistic to paint different widths, as well as pieces of foam rubber, a spray gun with adjustable spraying, syringe to create splashes and the like, depending on the technique and the desired result. 
The paints are suitable for the most different: watercolor will create a more "air" image that will harmoniously decorate, for example, a bedroom; Acrylic, oil paints, gouache - everything that will be at hand can serve to implement your ideas. Depending on the tool and appliances used - smears, divorces, splashes, strokes, etc. - Having achieved the necessary consistency (degrees of degree) of paints, mixing which, besides, get interesting color shades. You can also remember about pastel crayons - also a very good means for designing design in calm, soft (pastel) tones. 
Do not forget about the additional possibilities of combining paints with other materials like multi-colored flaps of fabric, ribbons, leaves from trees, etc. This is true, a somewhat different genre, but it can help to help create a truly original picture. Also look good photos located on the field with you and placed, for example, into the frame.
Registration of the finished picture, according to modern ideas, can be represented in different styles:
- Warmless style - the absolute majority of interior pictorial canvases do not have a traditional frame;
- Modular patterns - composed of three or more, less often - two elements of the same or several different sizes located on one or at different levels: Today, a fairly widespread solution seems to have already experienced the peak of its popularity;
- a small pattern located in the central part of the field framed by a narrow modern frame of significantly large sizes - thus achieve focusing in the picture, highlighting it from the overall interior;
- a narrow modern frame around the perimeter of the picture, its thickness of the plane of the picturesque canvas by several centimeters above the wall plane;
- Other styles, up to bizarre combinations of classical and modern standards.
In conclusion, I would like to remind the well-known and repeatedly proven statement, according to which "practice is the basis of knowledge." Only during the creative process are born the most interesting ideas, and well-developed visual techniques will help them embody on canvas. Initially get acquainted with the finished works, you can on our website and other resources, however continue to get acquainted with the genre, interest what webs are most successfully sold at auctions, attend exhibitions, receiving information and new landmarks for creativity. 


Decorating the interior with paintings made by their own hands has become popular. Placing them on the walls in the apartment will give comfort, individuality and inhales the part of your soul into the room.
Where to start drawing
First, you should decide what you want to see as a result. Do not imitate someone else's ideas, it is better to find your own. Think what is missing in your home, feel the mood of the room in which it will hang. Any, at first glance, not even real fantasies, take place. Abstract images will give the interior of irresistibility, and posters in black and white perfectly fit into modern design.
Having determined the style of work, you can start creating a masterpiece.

Making a web
Before applying the pattern, you must prepare the cloth. To do this, you will need a cardboard and a fabric directly on which the image will be. From the cardboard, a square or a rectangle is cut, the size of the alleged work. On this workpiece, a 5 cm cloth is cut out. Then, the fabric is glued to the cardboard, while it should be tightened well. Corners are cut and carefully smoke so that the fabric is not spread.
You can use a simpler base option - cardboard painted with a roller with white acrylic paint. It should be good to dry, before applying the drawing on it. It will be a picture of paintings.

Application of drawing
Before applying the drawing on the canvas should make a sketch on plain paper. It is cut, applied to the canvas and will be burned with a simple pencil. The contour of the drawing must be circled with black paint.
Now you can proceed to the design of the intended picture. Methods can be different:
- paint - the most common, drawing is painted with multi-colored paints;
- coffee, coffee, cloth - elements are located in the figure and secured with glue.
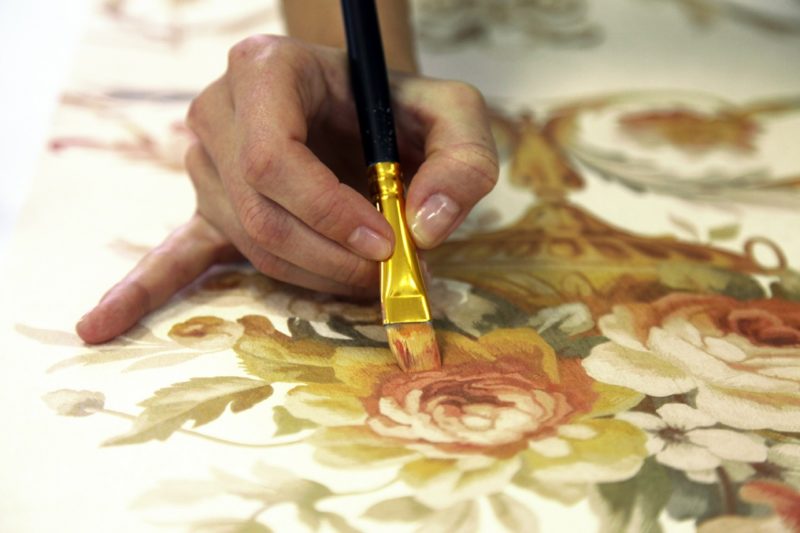
Selection of paint
Paint can use any: acrylic, watercolor, oil. The main thing is to properly combine the color shades of the paints, then the picture will look spectacular.

Stencils
Stencil is an ideal device for getting an image using paint or a canister with paint. You can apply the drawing using a traphant in the graffiti technique that is today at the peak of popularity. The best basis for this picture will be a cardboard or plywood, which is painted in a contrasting color. Original look like similar ornaments on gold or silver background.
It looks implicitly the use of elements of herbarium instead of stencil or openwork napkins.

Photo printing
The modern and stylish interior can be created if you use the pictures ordered in the printed workshop. Such workshops make high-quality prints on any surfaces.
Perfectly fit into any interior of family photos in covers or framework, they can be colored or black and white, placed in chaotic order or in the same plane. It is possible to locate photos as modular elements, which creates the impression of a single image.

Textile
Masterpieces in the style of patchwork is easy to get using flavors, tapes, ribbons. Such pictures are made according to the principle of appliqué. The basis is textiles, dense in quality and not catching ornament (polka dot, stripes). Elements of the picture, on the contrary, cut out of bright fabric. Using different colors of the patchwork, you can get the original picture. And if you put it under the glass, it will look stylish and effectively.
The combination in one picture of the tissues of different textures looks great. And from the material of the form (felt, velvet, flannel), you can cut the patterns of the picture: a house, animal, fruit.
Ideal fit similar products for the kitchen or children's room. And for the hall there will be a decoration picture of Silka.

Modular pictures
Modular - these are several paintings with a similar plot or one drawing separated into individual items that can be of different sizes. Currently, they are popular, as they perfectly fit into the interior of any room. They can be made themselves and arrange at their discretion.
Starting with the selection of the picture: landscape, abstract image or photo. Billets can be printed on paper or canvas in the photo of the salon, and then cut into separate parts. The paper variant is glued to the fane or chipboard, and the fabric is fixed on the back of the frame, with a stapler. Tissue-based batik's technique.

If the drawing is created independently, it is better to immediately do it on individual elements. To make such a picture you will need:
- color acrylic paint or waterproof marker - when applying an image on paper;
- hacksaw;
- line;
- simple pencil;
- sponge of foam
- sandpaper;
- tassels;
- sheet expanded polystyrene (1 cm thick).
It should be started with the separation of a sheet of polystyrene foam on the intended number of parts. For this, it is necessary to measure the ruler and cut it to the modules of the desired size. Then, edges to handle the sandpaper.
Now, all parts are folded into a single cloth and you can start the image process itself. First, the pattern of paintings is made, the sponge is wetted in the paint of the intended shade. When the paint gets dry, you can proceed to the drawing itself using brushes with paint, marker, applique.

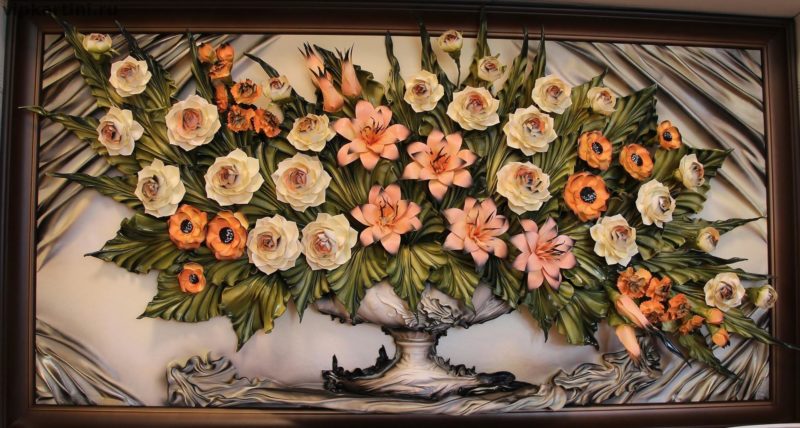
Creating a volumetric picture for the living room
Speecually in the living room looks with volumetric patterns, they can be done under any design room. Options are possible: from leather, paper and even coffee, and pasta. For the manufacture of such pictures, the technique is fit:
- decoupage - decoration of objects;
- quilling - creating a drawing of twisted paper.
Creative in the living room will look like a picture of textiles or foam rubber, from this material it is easy to make an original multilayer image. Frame for the picture should be taken simple and decorate according to the interior of the hall.

The most simple way - where monophonic paper is taken as the basis, on which elements (butterflies, animals, flowers) are placed from different material.
If the hall is big, then the image of the gypsum is perfectly fitted. It is done immediately on the wall and well combines with a common interior. However, it is quite difficult to make such a picture. It is necessary for skill drawing and working with plaster. There is no general recommendation for the manufacture of bas-relief, some masters create it immediately on the wall, others separately make elements from plaster, which then fit into the general image. In the absence of experience, it is better to use stencil.
Master class: paintings for interior
Unusual and modern solution - decorate the interior of the 3D picture. They are interested in making it and they look spectacularly. There are different ways to make similar products.

3D paper paintings
One of the lungs is the application of paper. For work is necessary:
- knife, scissors;
- pencils;
- not fat cardboard or white paper;
- pVA glue;
- frame with large sides, suitable cannon box.
Step-by-step actions, on the example of the image - butterflies:
- A rectangle cuts out of the paper, the size of the frame.
- Figures or printed on a butterfly printer, and cuts out.
- The resulting butterfly layout is put on the prepared white paper and will be burned with a pencil.
- The most difficult thing is to cut the wings of the butterfly without affecting the body.
- Wings are rejected on top and to the middle, thereby giving the volume.
- The billet with the butterfly is glued to the color cardboard, which will be visible through the bent butterfly wings.
- At the end, the picture is placed in the frame and fixed on glue, or stapler.
This method can be given by any drawing.

3D leather paintings
To create a 3D picture, no expensive skin is needed, slices are suitable from old boots, bags, gloves, raincoats, but it is important that it is natural. You can use acrylic paint to get the desired color.
Technology for creating paintings from leather is similar to paper technology. The skin is a material that is easily influenced and from it you can create whole bouquets of ornaments. Prodial tools are the same as when working with paper. Operating principle:
- made sketch on paper;
- transferred to the skin and cut out;
- in order for the elements from the skin rounded and the volume, they need to hold them over the candle;
- the basis of the picture is made from the fabric;
- it contains elements of a pattern of leather and secured with glue.
Buttons, dried plants, beads can be used as an additional decoration.

Multi-layered 3D paper painting
Beautifully looks at multi-layered 3D paintings from paper, it is not difficult to make them. It should be prepared:
- deep frame;
- cardboard;
- album sheets for copies;
- printer;
- glue;
- acrylic paint;
- scissors,
- acrylic lacquer;
- laminate substrate.
By choosing a picture, proceed to work. Well, if the picture is from several elements that can be cut. It is necessary to make a minimum of 10 copies on album sheets. If an inkjet printer is used, then the pictures need to be lacquered, otherwise the image will flow, when using laser - you can do without varnish.

The next step - the base of the cardboard is cut out, the size of the corresponding frame, one drawing is glued to it. The remaining images are cut, but in different ways. Several copies (let's say a flower) is cut completely: flower, leaves, stem. Others - only flower and leaves, and only flower.
Now the base is cut under the detail from the laminate, and elements are glued to it. Then, these billets are already glued to the general basis. The sidewalls of the substrate should be painted with color under the image so that they do not stand out.
The final stage - the coating of the painting by varnish into several layers.

Painting with your own hands for kitchens made of girlfriend
In the kitchen, homemade paintings look like anywhere to the place. They give even more atmosphere of heat and comfort. There are different options for their manufacture and here will be suitable for any items that can be found at home: buttons, seeds, cereals, coffee.

Cereals and seed paintings
This type of interior decoration is increasingly popular, it is environmentally friendly and inexpensive. This picture in the kitchen of a rustic style is particularly well described. Make a picture of the cereals is not difficult. It will take several varieties of croup, glue, cardboard and thick material.
First prepare the foundation. For this, cut out of the cardboard the form of a future picture, and there is already a cloth, with a break of a somewhat centimeter for bend. The fabric is glued to the cardboard.
A planned drawing is applied to the resulting canvas. Now you need to decompose the grain or cereal, if necessary, you can paint it into the desired color. After decorating the pattern, all the elements to the canvase should be glued. This can be done with the help of conventional glue, but more convenient with the help of silicone pistol.
Crafts from cutlery in the kitchen
On the prepared base, spoons and forks made of metal coated enamel are sewn. Such still life, perfectly fit into the interior of any kitchen.
If you take plugs and spoons of plastic, then you can create a more original picture. Plastic objects are easy to glue to any surfaces and paint well.
Ideally fit into the kitchen in French style decoration with melchior appliances.
Aristocratically, it will look a canvas with the braced porcelain dishes.
Positioning items can be arbitrarily or following a certain idea.

Pictures of buttons and plates
Buttons can be used not only for direct intended, but also to create original paintings. They can be glued or sewing. From buttons it is easy to make different patterns, animal figures, flowers. And you can use them as a background for the image, they are sewn on the fabric and all sorts of plates and sortshes are hanging on top. If necessary, paint acrylic paint.

Paintings in nursery do it yourself
Wonderfully decorate the children's room created by their own hands and not necessarily make them very complex. Selecting the picture option should take into account the design of the room, its color, gender and age of the child, and his hobbies. Everything is suitable: hand drawn pattern, applique, panel, photo, can be a big picture or modular option, the main thing is that it fit into the overall interior. The original children's work will look at the framework.
Excellent solution - fabric option based on foam. For this, it will be necessary: \u200b\u200ba piece of foam, patchwork, pencil, glue, copied, sharp object to pushing a drawing.
The foam of the desired size is cut out, a picture is transferred to it with a copy. A sharp tool is a picture of the picture. The piece is launched by glue, on which the fabric will be, and matteria is applied to it. It is pressed into the sealing contour earlier, the excess fabric is trimmed with scissors, and the string of the loskutka with the help of a unpacker is hiding inside. Using such equipment, it is easy to create different fabulous patterns.
Paintings created with their own hands - Photo
There are many methods for creating paintings, you can use any materials and items for this. It all depends on your imagination and creative vein. The photo presents possible ideas.
In the century, when all design solutions already seem to have come and a little faded, make a picture with their own hands on the wall - it means to find the opportunity to strive for their guests and make them admire the creation of a talented owner. However, experts insist that even talent is not strictly mandatory, because the main thing is desire. Everyone has the right to the highlight in the interior, and the fact that it can be done independently, it allows you to significantly save - it is even strange that this technique has not yet become ubiquitous popular.
The idea of \u200b\u200bplacing paintings on the walls is quite attractive to play with an interested person a bad joke. The owner of the premises, having heard about the unique opportunity to quickly, inexpensively and creatively decorate his housing, can make rash steps - for example, making paintings inactively or use the first idea instead of that which would be perfect.
So it is impossible to do. Failure in this matter is able to greatly disappoint a bad designer, and it is not excluded that he is really talent, he simply does not suspect about it. The idea of \u200b\u200ba creative work is mandatory to be neglected for a long time - until all parts of its implementation do not seem obvious, and the idea itself will not become the usual and integral part of the future implementer.

Remember that masterpieces are created only when the Creator clearly imagines and the work process and the end result.
Methods of mapping
Sometime, under the paintings, it was understood mainly painting, but if we are talking about the design element for the wall, then the options will be much more. The usual paints deposited on paper, here will not be - guess to draw a drawing and insert it into the frame maybe everyone. We will try to disassemble only those solutions that look fresh, and at the same time they can be made with their own hands.

Ready fabric patterns
This method does not imply any visual art at all, except, except, the correct compilation. The picture does not have to contain a clear plot and meaning - it is possible to make a chic abstraction, just hanging alongside the base three of the same in the form and size of a piece of fabrics that would be properly harmonized with each other.

If the fabric already contains some images, it can be used additionally to create some meaningful composition. Make such with your own hands is quite simple, it is harder to find a good combination in such a way that it leaves a persistent pleasant impression. From the above-handed triptych, it is possible to move away - individual fragments of the tissue may have incorrect forms, intertwined or combined with any other way.
 The main feature in creating pictures of fabric is the ability to correctly pick up a combination, in accordance with the rules of the combination of colors
 Embroidery
This method is fully consistent with the wisdom, according to which everything new is just well forgotten old. In the old days, women decorated their homes in this way, and today it was mostly abandoned from this tradition - and in vain: with due execution, the embroidery looks very attractive. Of course, only a real needlewoman can perform such work, but you can portray any plot. If the author also dreams of marrying, then her work hanging on the wall in the framework, a lot tells the potential candidates for her husband, invited to visit.
Paintings in 3D
And who inhabited generally that the wall should be flat? We offer our own hands to make a present volumetric image from it, the features of which are transmitted not only by paints, but also by convexities and depressions!

Such work will be more complex, it will spend more time and forces on its execution, but the result will definitely be unusual! And you will need the following:
- On the wall, which is planned to be originally decorated, with thin pencil lines apply the outline of the intended picture. The sketch is desirable to immediately appreciate at different angles of view and from different distances, to show several people for an objective assessment and immediately adjust, if there is a constructive criticism.
- In the adhesive package, dial a sufficient amount of putty and tie the container by doing a small hole in it. The improvised pistol for putty circle the contours of the pattern so that the drawing lines become convex, thanks to the added layer.
- Wait until the material dry and hardens, and then with the help of a small knife, carefully fir the bulk contour. If the drawing is quite complicated, you can highlight with irregularities both contours and internal parts.
- Since the resulting surface will be not only convex, but also very rough, use sandpaper to achieve smoothness. Do not choose a coolest option - it will only hurt the results of creative work. Preference is best to give the smallest grain used for final grinding.
- Gouache Mix with liquid plow glue - so it will be much more resistant and durable. With the help of a tassel, show off the image as assumed at the planning stage.
- To complete the end of the picture of its boundaries, it is possible to designate special baguettes, which in this case will play the role of the frame.
Colored paper
Such a decision threatens to be short-lived, but it is easy to make it yourself and then renew it periodically, making additional elements. The idea is extremely simple - silhouettes are cut out of colored paper on the pattern, for example, butterflies, which are in a free closer on the wall with the help of an ordinary PVA, or simply pinned. Cut figures can additionally decorate intricate patterns. Ideally, the figures should differ in shape and size, and maybe - both in color. It is best to combine opposite shades, for example, black with white or red with blue.

For walls near the stairs, figurines, imitating kitten, captured in various playful poses on different steps are perfect in various playful poses on different steps.
The twine as a tool in the hands of the artist
Amazing, but you can even make beautiful decorations for the interior, even from an ordinary rope! You can make such a picture with my own hands only a gifted person - here you need artistic vision and great patience so that the rope is in a vertical position to fasten in the necessary form. You can specify a form in any way - both with the help of hot glue and by hidden fasteners. On the wall, the resulting product is attached or the same glue, or hidden studs.
 Pictures from the twine look unusual and stylish, so this version of the decor of the walls unequivocally deserves attention
 Volumetric Pictures with Applique Elements
You can make a picture of your own hands, which will combine and painting, and applicative creativity. For this you need:

The value of this product will be the higher that, despite the availability and prevalence of all the materials used, the masterpiece is so simple in their genius of the masterpiece, with their own hands, do not so many people.
Option for the longest
In the end, there is a way to create a wall picture, which does not require talent, nor any skills or even efforts. All you need is to find the desired image on the Internet in good resolution and print it on the printer. Next, the resulting printout is inserted into a ready-made frame and voila in the store - cheap and angry!
The modern market of the decor and the decorative elements of Pepit is their diversity. Made from the simplest and affordable materials, the masters sell them on all sorts of resources. Alone everyone can make an absolutely any item in order to emphasize the individuality of their housing.
And the pictures are no exception. It is only worth showing fantasy and be patient. Well, if there is not enough inspiration, it can be drawn from the photo of paintings with your own hands in the literature or on the network.

Beginning of work
Start creating a canvas with inspiration. No need to copy the works of other masters. We advise you to focus and think about how you can emphasize the mood and dignity of your home. Write all your ideas in a separate notebook. Think over the place for the future masterpiece.


You also need to decide what style you will work. Based on it, prepare the consumable material. It can be:
- any fabric, skin flaps, as well as ribbons, lace and so on;
- drieds, seashells;
- paints and canvas;
- paper, all sorts of cuttings, photos;
- buttons.

In your work you can use the pictures of children and a lot of things that at first glance it will seem like a trash. From time to time, spend the revision of your "wealth", and at some point you will feel that the exclusive canvas are ready to create. After all, the best ideas of paintings for the decor come spontaneously.

Paints
The use of paints is the simplest way to solve the task. What picture can be made with your own hands, depends solely on your imagination.

In arsenal, you can use both ordinary watercolor paints and gouache, acrylic or oil. The basis can serve both ordinary paper and professional canvas or a blackboard treated with primer.

Using stencil
If you have paints that are sprayed, you can create a unique masterpiece using a stencil. We advise for the foundation to take the cardboard of the highest density. Suitable and high-quality plywood. The background and drawing should be contrasting: the combination of silver or golden background with a color pattern will be interesting.

And, it is worth noting, interesting templates for creating paintings can serve dry herbs and leaves.

How to make a modular picture?
Modular is called a picture where a single composition is enclosed in several webs. They may be the same or asymmetric. In such pictures there can be anything, ranging from the landscape, ending with abstraction.


It's not difficult to choose, from which you can make a modular picture at home. Pick up the image that you like. It needs to be increased by format and divided into parts (that is, cut). The paper or fabric with the applied image is fixed on a suitable basis.


If you decide to write a picture yourself, you should do it on a harvested canvas. In the case of use as the basis of paper, we advise to write a masterpiece to use acrylic or waterproof marker.

The modular picture will look good in any room. The main thing is that the themes correspond to.

Printing photos
Protnikov professionals in Photo meters can apply the image of the fabric, ceramic dishes and paper of any density and quality.

It is worth noting that in many, and in our, in particular, instructions, how to make a beautiful picture with their own hands, it is noted that the image should have a semantic load. For example, if you work on the kitchen product, it will be relevant to still life.

From the posters of a large format you can make a modular combination.


With the help of the scanner and the printer, you can easily create a collage of your baby's drawings. Add photos of a young artist, and you will have a wonderful poster.

It remains only to put it in a frame that will correspond to the overall mood of the children's room. Old and new family photos, combined in one poster, will become a good decoration of the bedroom or living room.

Pictures of fabric
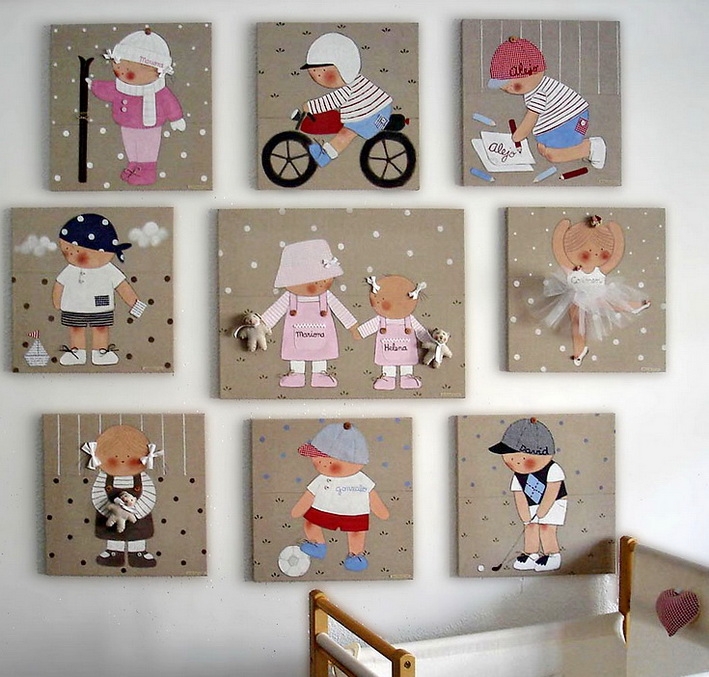
In master classes on the manufacture of paintings, work is often found from flap, ribbons, braids and lace. Works from such material are real masterpieces, which belong to the style of Patchwork.

The most common technique for this destination is an applique, accommodation room - a kitchen and a children's room.

Materials are often used by those that are well kept form. The combination of a variety of textures and drawings, as well as decoration with cords and buttons and other accessories is allowed.


Buttons
Original decor items can be created from buttons, sewing them or chopping on glue. Often of butchers do images of leaves on the trees. They can also liven up any contour. In the modern market, you can choose the fitness of all sorts of colors, forms and from various materials.

Butterfly paintings are perfectly written in the interior of any room.


Please note that buttons can be decorated with frame frame. In this way, you will emphasize the exclusivity of the product.

Leather. Quilling. And much more
Now you can often find volumetric canvases. In this case, use the skin, cardboard, pasta, coffee and all kinds of cereals. Works are performed not only in the appliqué technique. Now popularity wins quilling and decoupage.

And finally, it is important to note the following. In order for the work you created, it is not enough in a short time, cover it with a transparent moisture-resistant varnish. For a more persistent effect, repeat the procedure 2-3-3 times after the first layer is dry.

Photo of paintings with your own hands


A new character and flavor to improving interior design, as well as make a fresh jet in the design of the kitchen, bedrooms, the children will help the paintings created by themselves. You can make unique paintings with your own hands from any girlfriend, for this, a professional art education is absolutely not required. Stylish works of art that occupy the right-hand role in the house is the bright emphasis that can revive the interior by filling out it with individual features.
In fact, you can make a picture with your own hands from anything. Yes, yes, this is not a joke. Applying a fantasy, the whole creative and creative beginning, in turn really to start any blowing materials: coins, seashells, buttons, threads, seats of fabrics, leaves, dried berries, small branches, cutlery, furnishings for sewing, personal photos and even miniature children's toys .
Excellent solution not only for the kitchen, but also for the bedroom, living room, children's. Such modular compositions look holistically due to the single barrel and branches derived from it. The background of each individual element corresponds to a specific season (autumn - orange, summer - emerald, spring - salad, winter - blue). The foliage from the buttons is also made in the tone that meets the presented times of the year.
Picture of buttons

Composition from buttons "Seasons of the Year"
Still a little butt
Buttons are the perfect material for self-creating interior paintings. Using the structure, dimensions, shape and materials with the mind, you can create real masterpieces, without having artistic education.

Purifying butterfly

Cat for Kotomans

Seascape from buttons

Color Rainbow Spectrum
Works from leather
Despite the fact that the skin is quite easy to handle, with the picture is not so easy to cope. Here it is necessary to understand the work with the material, the knowledge of the basic properties of the skin, considerable patience and perfection. Therefore, it is recommended to first try to make small trial compositions, and then move to bulk, fundamental work.
The most frequently used color palette in the patterns of genuine leather is brown-beige. But some crisp with pleasure use green, red, orange, yellow flaps.
The main advantages of leather images:
- Exclusivity - due to the originality of the material it is impossible to repeat the picture one in one;
- Relief - depth, hill, light glare and shadow create an unsurpassed 3D effect, due to which the picture "comes to life";
- Availability - Small skin cuts can be found both at home, and to buy on the "flea" market or the shoemakers literally for a snot.

Multicolored leather still life

Contrasts game (used red, black and white flaps)

Convex leather flowers
Video Master Class: Painting of the skin with your own hands
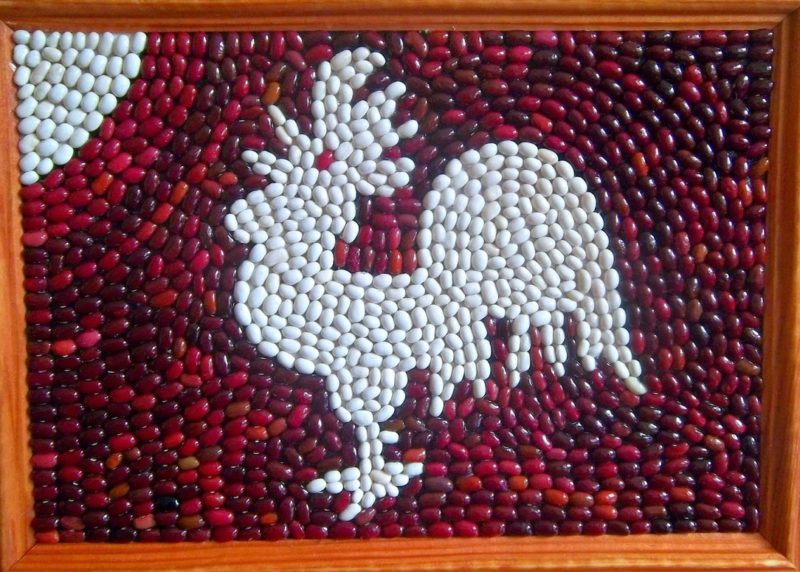
Panel from products
One of the most relevant techniques for creating paintings for the kitchen is subject to the subject application. Moreover, in this case, cereals, grains of coffee, small dry vegetables and fruits, citrus peel, spices and similar are most in demand.
A panel of food harmoniously looks precisely in the kitchen interior, as it looks not just stylish, but also appetizing.


Monochrome composition of black and white beans

Landscape from various cereals and seeds

Round Panel of Bob
Wallpaper in the frame
Wallpaper paintings are a very budget addition to the interior. Moreover, you can create in several techniques at once: Applique, 3D format, stretching on the wooden basis, etc. Wallpapers are good because they perfectly fit into any room in style - after all, remnants purchased in excess rolls are used.

Elements of ornament

Creative collage

Panel from wall residues

Frames from wallpaper
Applique of dry flowers and leaves
Unusually look at the wall and paintings made from the in-time dried vegetation. Kidneys, flower buds, petals, small twigs, leaves, blades - everything goes into turn. Drawing a pencil sketch on paper, the necessary elements are simply pasted on top, taking into account the preferred color and form.

Vase with Flowers

Surround painting from dry vegetation

Unusual Applique of Flower Petals
Photography in the kitchen interior
For those who prefer to walk along the path of least resistance, a wonderful way to put the placing color - photocartines. In this case, it is enough to choose a photo on the Internet or from a personal archive, and print it on a widescreen color printer.

Photo-triptych do it yourself in the kitchen

Thematic composition of several photos

Photocollage on canvas
Fabric drawings
In the design of the kitchens are widely applicable and patterns of fabric. They always look original, colorfully and stylish. In order for dust and fat to penetrate inside, at the end of creating a work of art, textiles are usually treated with varnish. For tissue products, synthetic material, burlap and silk fits best.

Textile Applique in 3D Format

Flat Application of Laces Fabric

Picture made of fabric made using a sewing machine
- Creating a picture for the interior with your own hands, it is best not to take paints with paints, but to use the tonality that meets the design of the kitchen. Always need to stick to the style of the overall concept of interior design. For example, in the classic room it is acceptable to leather and canvas written by oil. The following materials are suitable for High Tech style: glass, metal, mirror. Provence can be filled with vegetable ornaments and paintings from croup. Volumetric works harmoniously look in modern and combined styles.
- The color palette should include three main colors and several (at the request of the owner) close shades. Cold tonality is allowed to dilute with warm accents, but it is necessary to take colors from the opposite spectrum.

Color spectrum: Right principles of combination of shades
- For convex forms, you must always use alternation of light and dark tones. Moreover, oversized dark volumes on the light plane are best. Approximately the same principle of the glossy tandem with matte materials: matte must perform over glossy. Thus, a large depth of paintings is achieved and the maximum 3D effect.
- With independent manufacture of paintings, whether it is an application or a drawing, it is important to comply with the main composite principles, dynamics and equilibrium.


- Easy way to make a picture of the original - output the inner pattern beyond the baseline. For example, extend the image to the frame or, with embossed forms, abroad frame.
Four simple master class

Photo of the final result
It will take:
- empty box of candy or any deep frame
- double-sided colored paper
- simple pencil, eraser
- carton trimming
- sharp scissors
- PVA or transparent stationery glue.
Step-by-step instruction:
- At the bottom of the candle box, you need to draw a big heart. It is desirable that a distance of at least 20 ... 50 mm remains to the frame (depending on the size of the box).
- Make from cardboard several templates of different sizes in the form of hearts.
- Cut on cardboard templates multicolored hearts from paper. Each heart folded twice vertically.
- Same on the color and size of the hearts glue two pieces. The gluing is made through the edge of the top figure.
- Descript inside the frame composition of double miniature hearts. It is important - it is impossible to go beyond the contours of the painted big heart.
- Print all items according to the schema. The glue should be applied only on the ribs of the hearts.
- Volumetric 3D picture ready! Next, you can decorate it, having painted a one-photon frame or using a suspended decor (candy on ribbons, paper butterflies on a fishing line and the like).
Drawing with your own hands

Photo of the final result
It will take:
- colored cardboard
- simple pencil, eraser
- rule
- black marker or felt-tip
- pVA glue
- scissors
Even a child can do this picture independently. After all, accurate forms and proportions are not important here. The main thing - skillfully wrap the line and pencil, and also have at least a bit of creative potential.
How to draw a picture yourself: step by step

Tip: The drawing can be left in monochrome or paint with colored pencils, watercolor, wax chalk to the interior tone.
How to make a modular composition

Photo of the final result
It will take:
- cutting of the fabric (the size should be with a margin - for each item need a stock of at least 10 cm in width and 10 cm in height)
- pieces of plywood and slats from wood for frame
- foam or chipboard for the foundation
- furniture stapler
- scissors
- roulette or long line
- a simple pencil or chalk (chalk is useful if the cloth is dark color)
Phased instructions:
- Two options for creating a basis for a picture of their own hands:
- Making a subframe with your own hands. Put the ends of the rails under 45 degrees and connect them with the help of glue or stapler. For reliability it is recommended to fix the equally sized triangles of a small size in the corners of the frame. Triangles can be made of plywood or fiberboard. Also, for stiffness of the structure, you can pull the cloth around the perimeter by attaching it with a stapler.

Making a subframe with your own hands
- Cut the finished base strictly in size from chipboard (16 ... 25 mm) or prepared foam.

Basis of chipboard
- Fixing textile canvas. Cut the fabric in size more subframe with all the gentlers. Next, it should be slightly mixed with the material and only after that start tensioning the basis. Corners require special accuracy and attention.
Tip: First you need to pull the long sides of the future picture, and then - short.
Before fixing one of the parties, you need to make sure that the material is not a curler and do not take it.


- That's all - a modular picture is ready. On this principle, you can make a photo decoration for the interior.
Decor in the kitchen of threads do it yourself

Photo of finished work
It will take:
- the basis - can be used wood, laminated chipboard, cork slab and the like
- miniature cloves with wide hats (not slipping the thread)
- tangle of Middle Thickness
- scissors
- a hammer
Step-by-step master class

This technique for independent creation of paintings is only the first step towards the manufacture of masterpieces of art from threads. Having learned the basics, you can make pictures of the most complex configurations from multi-colored threads.
Pictures of thread: video master class
Fountain ideas, create and pull up - let the interior pictures made by their own hands please not only you, but also amaze, surprise, admire guests! The stylish interior of the kitchen and the whole house is the merit of initiative owners who are not afraid of experimenting.