How to draw stages to cool cars. Draw a car
Read also
You can draw a passenger car without difficulty. After all, it has simple forms that can be denoted by simple lines. At the first stage, the "external box" of the car or its overall silhouette is created. From the next stage, the main components of any passenger car are added - wheels, windows, doors. You can also add a phased drawing of the machine with colored pencils with small details that only be embedded. And only then you can circle an image with a marker and apply color on it. Created as a result of a beautiful car. The lesson has an average level of complexity.
Necessary materials:
- line;
- pencil;
- eraser;
- marker;
- colour pencils.
Stages of drawing:
1. Simple pencil outlining the shape of the passenger car. For beauty and accuracy, you can use a ruler.

2. Despite the fact that in a passenger car 4 wheels we draw only two. Why two? Because the profile shows only one front of the front.

3. Around the wheels draw arcs.

4. Now draw the windows. They depend on the brand and type of machine. We also draw a small item near the front window, with which the driver can see the transport, which is behind his car. Between windows we will make a small partition.

5. We draw small details: headlights in the background and on the front, doors, partitions in the form of simple lines.

6. Obligate the drawing marker. Can be used with a thick and thin rod. Do not forget about small details that are in the middle of the drawing.

7. Light green pencil ransom fully the entire car, except windows, wheels and headlights. The darker color of the pencil will give the pattern of a volume type.

8. Blue pencil make glare on windows in the car, reflecting the clouds in the sky and good weather.

9. Gray pencil, which was used to apply a drawing sketch, deactivate the wheels. But red will make headlights.

10. On this and is ready for our hand-drawn car. For such a scheme you can learn to draw other types of machines. After all, each has wheels, headlights, windows.


If you have found a mistake, please select the text fragment and click Ctrl + Enter..
This is the average lesson. It may be difficult to repeat this lesson and adults, so I do not recommend painting the car in this lesson to small children, but if there is a great desire - you can try. I also want to note the lesson "" - be sure to try to repeat it if you have time and desire to draw today.
What do you need
In order to draw a car, we may need:
- Paper. It is better to take a mediated special paper: novice artists will be much more pleasant to draw on such.
- Compared pencils. I advise you to take several degrees of hardness, each you need to use for different purposes.
- Eraser.
- Shelf for rubbing hatching. You can use conventional paper twisted in the cone. She Lego will rub the hatching, turning it into monotonous color.
- A little patience.
- Good mood.
Phased lesson
Drawing the car is difficult, like any complex vehicle to function, it must be constructed in a certain way. In order not to break the design features better live to see how it looks. If there is no such possibility - look at the available photos on the Internet.
By the way, in addition to this lesson, I advise you to draw your attention to the lesson "". It will help to increase your workshop or just deliver a little pleasure.
Please note that every object, every living being, each phenomenon on paper can be depicted using simple geometric items: circles, squares and tracks. They create a form, it is them that the artist needs to see them in the surrounding items. No at home, there are several large rectangles and a triangle. So build complex items are much easier.
Tip: Create an outline as few thick strokes as possible. The thicker the outline will be - the more difficult it will be erased later.
The first step is more precisely zero, you always need to place a sheet of paper. This will give you to understand where it will be the drawing specifically. If you place the drawing on the half of the sheet - the second half you can use for another picture. Here is an example of the markup of the sheet in the center:
Step 1. The first step is pretty light. All you need to do is make an elongated form for the future machine. It should look like an oblong box. Something reminds even a guitar or violin. Try to repeat exactly as shown in Figure 1.

Step 2. Using this form, we will gradually add details, and draw the real body of the car. It is best to start from the roof, and then go to drawing the wheels and the rear. Do not use rules or auxiliary tools, as the car has rounded shapes. And here is much easier than everything, for example, draw a helicopter.
But if you want, you can use a ruler to draw the windows of the car, and later it is manually rounded them.

Step 3. Start drawing a glass. The first windshield, later the window from the passenger side. There may be some Barbie or the famous singer Debbie Ryan. Further draw headlights.

Step 4. In the drawing of the machine with a pencil, we see the car only on the one hand, so we draw only one door and steps under the door. Add fractions for windows. Do not forget to make a handle and a keyhole.

Step 5. Go to the hood. Draw two lines on the hood, and below the grille. Next to make a lining for a spoiler and bumper.

Step 6. We get everything ready. It remains only to draw the wheels of the machine. Note that the wheels are not round! Under the weight of the car, they become a little flat below. It will look more realistic. And naturally, the tires are not perfectly round.

Step 7. And finally, we thoroughly draw the wheels. Try to repeat as in the picture, or you can draw your own option, so they can be different types and shapes, for every taste and color.

Step 8. We remove unnecessary auxiliary lines with an elastic and circuit. Here's how we should get:

Step 9. Color.

I sincerely hope that you liked the lesson on how to draw a racing car. If you make efforts, I believe that you will achieve everything I wanted. Now you can pay attention to the lesson "" - it is as interesting and fascinating. Share with your friends this lesson in Soc. networks.

In this lesson, you will learn how to quickly draw a crossover class car, step by pencil. The machine of this class is slightly larger and harder than other types of passenger cars, so the wheels of this car are higher and wider than that of ordinary passenger cars. For the best passability of off-road, this car has a high suspension, that is, the body of the body and the ground will be more. Modern streamlined machine design of the machine is not very easy to reflect in the picture, so we will draw the car without additional design elements, only the basis of the body of the machine.
If you can correctly draw a car Phased pencil, you can after adding additional design elements, such as air intake and spoiler, etc. The picture drawn by the pencil can be painted with colored pencils in the penultimate step of this lesson.
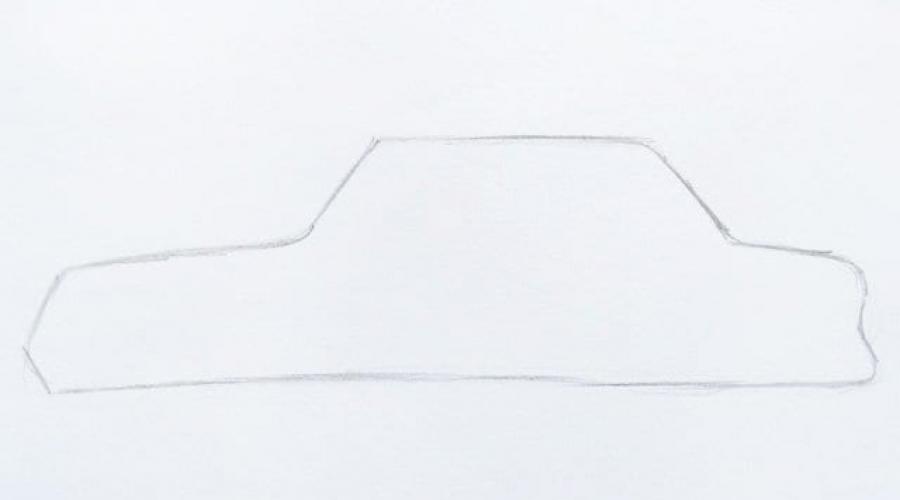
1. Draw a simple overall car circuit

Draw a car It is not easy, so it is necessary to make the right preliminary marking of the total car circuit. To simplify this task, drew two parallel lines at a distance of 2.5 cm from each other. Divide these lines with two sections of 6 and 8 cm. If you draw a car larger, onto the whole sheet of paper, then increase these numbers in proportion. At the same stage of the drawing, next to the straight lines, draw the lines at an angle, and remove the first outline lines.
2. Draw contours of the roof and wheels

Try to make exactly the same marking for the wheels, like on my drawing. Please note the right front wheel is further from the vertical edge of the contour than the left wheel. And the contours of wheels are not square, but rectangular. The roof circuit of the car is easier to draw, however, try to make it as accurate as possible.
3. Begin to draw the body shape of the machine

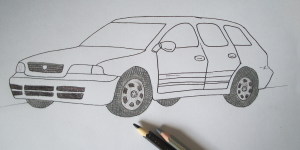
Initially, it is better to draw the streamlined lines of the body shape along with the hood, and after it is already embarking to draw the contours of the sinks. Between the wheel contours, draw the bottom of the body of the machine. Do not rush to draw everything right away, look carefully on drawing machine Once again before switching to the next step.
4. body shape and wheels

Start this step due to remove all the extra contour lines from the picture. After that, start painting the wheel of the wheel. Maybe ideal circumference immediately you will not work out, so do not press a pencil strongly. Now proceed to draw body parts, glass, headlights. Detailed instructions on how draw a carit is impossible to give, just be attentive.
5. Latest touches in the drawing of the car

Wheels for the car is difficult to draw, because they must be perfect round and the same. But to draw disks is easy. For a disk pattern, any symmetrical figure is suitable, such as a star. When you draw the car side windows, do not forget to draw a side mirror. The remaining parts of the body draw at their discretion, the main thing is that you can correctly and symmetrically draw the shape of the body and wheels.
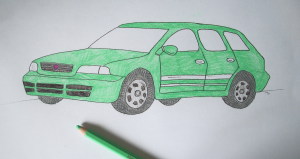
6. How to draw a car. Final Step

If your drawing of the machine will be performed in a simple pencil technique, then you must definitely sharpen. It will give the picture of the machine three-dimensional appearance, volume. But, probably, any car will look prettier, if it is painted with colored pencils. Be sure to draw the road and the surrounding car landscape, then your car drawing will be a real picture.
Sports machines have a more streamlined dynamic design and low landing. In addition, they have low and wide automotive tires. It is necessary for greater stability on the devices and the best clutch of the car with the road. Otherwise, the picture of the sports car is not different from the drawing of a conventional passenger car.
The tank is one of the most complex military machines. The most important thing in the drawing of the tank, as well as in the drawing of the car, draw its frame correctly.
Nowadays, you can rarely meet wooden sailing ships. But even now they are the object of many drawings. On our site there are many lessons drawing techniques, including cars. In this lesson, we will learn to draw the ship in stages.
A plane draw is not so difficult, much easier than, for example, draw the car. In order to draw an aircraft, you only need to know some of the features of its structure. For example, military aircraft, unlike passenger, do not have a passenger compartment, but only a cabin of pilots.
Let's try to statenly draw hockey player in motion, with a stick and washer. You may even be able to draw your favorite hockey player or goalkeeper.
Figure tram better do on the background of the cityscape. Draw a car, cars, and if you wish, you can draw people coming into the tram.
From early childhood, boys are indifferent to machines. Therefore, not only play them and assemble the body from the designer, but also depicted on a sheet of paper. Creative potential in drawing is manifested in the reproduction of modern and rare cars of famous brands, military land equipment and even cars of the future. The last item is especially interesting for its idea due to the fact that the child besides the syriska is offered not a lot to dream, submitting how the car of the future in the pencil figure should look like in his opinion. For example, whether it will be a mirror, glass or generally similar to the spacecraft on wheels.
If an adult to draw an invented car is not a problem, then the child often requires small tips, presented in the form of pictures. Therefore, in today's article, we decided to demonstrate the options of the already invented cars of the future, which can be drawn or take as the basis of our drawing with a simple pencil.
To inspire a child to draw an unusual and you can even say a fabulous pattern, parents need to come up with a presentation that includes intriguing speech and printed pictures (PHOTOS). As an idea, you can use the style of teaching teachers on drawing or psychologists who can even tell if desired.
No need to limit the child in the items required for drawing. Well, if the table will be not only white sheets of A4 paper and a simple pencil, but also markers, watercolor, gouache and color pencils. Such an approach will not limit the child in actions.
Do not limit the baby in time! Let it give up the drawing so much time as it will consider it necessary.
Machine of the future - drawing with a pencil for children, photo
Below in the article proposed pictures of cars that have come up with adults, children and even famous brands, annually replenishing their ranks with new cars. Among them: BMW (BMW), Audi (Audi), Volkswagen, Lifan, Toyota, Lamborghini, Porsch, etc.


The car of the future drawing with a pencil phased

Draw - it's easy! Video
You can see the video how to draw children.
On how to draw a car, of course, experienced artists know. It is not easy to understand the beginners to figure out the car, it's not easy, because the car is a very difficult tooling vehicle. Therefore, in order to learn how to draw the machines, you can not only make sketches from nature, but also sink from high-quality photos. If it is difficult to draw straight lines, then a ruler can be used as auxiliary tool. In general, before painting the car should be prepared: 
one). Liner;
2). Pencil;
3). Pencils of various tones;
four). Eraser;
five). Lickest album.
It will be easier to understand how to draw a pencil machine if the process of working on this kind of image is divided into separate steps:
1. Put the car body without going into details;

2. Turn the wheel of the wheel. Wheels located on the left, draw more accurately, and the wheels on the right should be barely visible;

3. Draw the doors. Picture various small details, such as bumper, rear view mirror and headlights;

4. Now you know how to draw a car with a pencil in stages. To make the image clearer, circle it with a liner;

5. Using the erasing gum, erase the pencil sketch of the car;

6. Gray and dark brown pencils color wheels and small details;
7. Pink color to the emblem. Blue-green pencil squeeze the car body;
8. Bolot-green tone fascinate the handle door handles. Dark green coloring the stripes on the doors of the machine and a little persecute small details;

9. Yellow, as well as orange pencils, color the headlights of the car. Blue tint slightly stitch windows of the machine.

The drawing of the passenger car is now ready. Having learned how to draw a car in stages, it is possible to quickly learn how to draw a car of almost any model, be it a foreign Mercedes or domestic Lada. Color pencils are absolutely not necessary to paint the drawing with colored pencils, it can be limited to a hatching made as the most common acutely sharpened pencil. You can also paint the car, for example, the bright gouache or watercolor will fit perfectly for this purpose. Spear Children will probably enjoy the painted with markers, which have very juicy and diverse shades.
