How to draw lips and eyes. How to draw lips
Before you start creating a portrait, imagine how it will look in the final version. Determine for yourself that in the future the image is the most important thing for you that you want to highlight what you want to say and emphasize this image. Before proceeding to the image of various parts, consider the features of the portrait creation, find out what should be paid attention to first.
General
Eyes - soul mirror. This banal phrase does not lose its relevance. In the eyes reflected the inner world of man, what he thinks about what, maybe, does not say. Think some kind of dashes, small strokes will tell about the interlocutor more than his words. Photographic accuracy of the eyes, lips, nose, chin - this is not a portrait, a camera can cope with this. Thought, mood - that's what you will give a portrait and your fitter. Try not to spoil the "original", do not bring into it what is not that he is not peculiar. Any "trifle" like a distorted corner of the mouth, a slightly raised eyebrows can make an evil or envious try first to understand a person, look into it from the inside, notice the most basic and pass it on paper.

What is a portrait
The most difficult type of visual art requires daily labor, failures and finds. As in any other form of activity in which a person can achieve certain heights, a lot of patience and talented mentoring is required in drawing. Your individuality will remain with you, but it is important to "put a hand", learn how to accept images that have been implemented by samples and errors many generations of portraitists. Only having learned these techniques, you can find yourself in them, your uniqueness, your essence.
Any drawing is starting to perform with general contours, gradually moving from common to the parties. Burst with simple pencils of varying degrees of softness. Of course, they should be well sharpened. Do not forget about good paper and a soft eraser that will not spoil paper and smear pencil lines.

Let's start with contours
Consider eyebrows. They also emphasize the character of a person: surprised raised corners, frowny, wide, narrow, long, short. Try to show them as similar to the original, carefully consider and depict the main lines of hair framing, these lines can be rigid and soft. Human lips can express the entire range of emotions that are experiencing a person in a particular situation. Step-by-step instructions will help you to portray what you want.
The question arises: how to draw lips beautifully? Start from the bottom of the lips, then draw the upper one. Lips may be the same in width or various, capriciously inflated or dried up. Notify these details. Then draw a nose. We start with its lower contours, the tip of the nose can be blunt or pointed, wings are wide or narrow. Pay attention to the characteristic features of his form. During the drawing process, remove excess details, auxiliary lines that you no longer need. Do it carefully not to damage the picture and paper.
Now consider more, a person with a pencil. Below is a simple instruction.

Phased pencil
We start with a few simple contours. They will "limit" the size of the upper and lower lips. The lines will not match the mouth in general. Try to keep the proportions of the lips of the match. Short lines outline their borders, connect the corners.
From total - to private
By studying the question of how to draw a pencil's lips in gradually, a number of moments should be taken into account. Consider them. Above the upper lip in a man is a hollow, separating it into two parts. Draw it in the shape of a heart, and then remove the extra line of the eraser.
Apply clarity
To make lips more realistic, you must take a soft pencil and draw shadows. So we give them volume, character. Peer on the lips of the simulator. Maybe a person has wrinkles that are stable or appearing when it rejoices or frowns. See how and where they are located, how deep and noticeable. Reflect these parts in the figure also with a soft pencil.

Lighting
Studying the question of how to draw the lips with a pencil in stages, you need to take into account not only the features of the simulator. Lighting is important. The light can give glare on the lips, leave these places with white. Want to add a color to the image - do it now. But do not get carried away the brightness, you draw a portrait, and do not paint the children's book. Try to make an image of a maximum realistic. If you reflected all this in your drawing - your housewriter's lips will revive, acquire individuality, uniqueness, character. Here, in fact, all. Now you know how to draw the lips with a pencil gradually.
Conclusion
As you can see, everything is not so difficult and scary. You can learn how to draw, if you really want it and are ready to spend a lot of time and strength on this occupation. It is also important to learn to peering, observe and notify the details that may be invisible to a less attentive person. Your lesson will bring you a lot of joyful minutes when you have to get what you have conceived, ideas, you can pass and give someone a particle of yourself and your skill.
Human lips are an emotion expression tool. Not because we speak with the help of lips, and also because they can pass the infinite amount of emotion. As an artist who draws a static image, you must be able to express and show everything in one hundred and football - in your picture.
This may seem simply enough, but in most cases it is not. You must master the anatomy of various emotions, including the equipment of shots, textures and colors to pass the mood and main idea.
Take, for example, the same couple of lips - one of them are painted in fresh, lungs, natural colors, while others are made in fire-red shiny lipsticks. Just seeing the lips - you can say about the created mood!
Therefore, today we will look at the technique (among the many others - everyone has its own technique) to create realistic lips.
Final result
1. Various lips forms
First, several standard lips forms. From top to bottom, left column: normal lips, chubby lips, small lips.
From top to bottom Right column: narrow long lips, angel lips, Hollywood lips.

2. Lip type at different angles
Different types of lips at different viewing angles:

3. Lips expressing various emotions
And several expressions!

4. Draw the basic drawing of the lips
Step 1
Create a new document, set the following dimensions of 600 px in width and 400 px height, The contents of the rear background(background) Transparent(Transparent), Color mode(Color Mode) RGB.
Once you have created a new document, name the existing leather layer, select the tool Fill(Paint Bucket Tool (G), set the foreground color on # C99E7E.
Translator Note:fill the leather layer with a color tint # C99E7E
Step 2
Create a new layer. Name a new "sketch" layer.
Set the foreground color on # 603521 and select the tool Brush(Brush Tool (B), install a hard round brush, in the brush settings, turn on the options. Oporal oscillation(Opacity Jitter) and Size oscillation(Size Jitter). Draw the contour of the lips.
Translator Note:press the (F5) key to enter the brush settings. In parameters Shape dynamicsShape Dynamics and Other dynamics(Other Dynamics), set Pen in the settings Size oscillation(Size Jitter) and Oporal oscillation(OPACITY JITTER).

5. Add the base color to the lips
We assume that the light source is located in front, at an angle of 0 degrees, to simplify.
Create a new layer, name this layer "lip color". Set the foreground color on # 571b13, select a hard round brush by turning on in the settings Oporal oscillation(OPACITY JITTER), start adding color within lips borders. Softe a little color on the corners of the lips to create a small transition with the back background (with skin color):

6. Basic Retouch Lip
Step 1
Create a new layer. Name this layer "Basic Retouch". Set the color of the foreground on # BE4852. Select a tool Brush(Brush Tool (B), Install the hard circular brush shape by turning on in the settings Oporal oscillation(OPACITY JITTER). Skin the top sections of the upper lip, as well as the middle section of the lower lip. This will be the basis for creating a small 3D effect.


7. We combine colors
Next, set the color of the foreground on # C54D59, and the color of the back plan on # 701c1e. Do not forget that the lips have a convex structure, and because Our light source is located in the center, then there will be more light to the middle area of \u200b\u200beach lip.
Cross carefully, retouching the middle part of the bottom of the lips, Next, switch the color of the foreground on the color of the background using the 'x' key to create the effect of "folds" in the center of the upper lip.

8. Add the volume to the lips and draw folds
Step 1
Set the foreground color on # 701C1E. Scroll to the bottom of the bottom lip to add 3D effect.

Reduce the size of the brush to the smallest size - say approximately 3 or 4 px, depending on the size of your working document, carefully draw vertical, slightly curved lines on the bottom lip to recreate the folds. Almost until the end, reduce the opacity of this layer so that the folds were barely visible:

9. Add natural lighting
Next, we will proceed to create natural lighting, reflected on the lips. Natural lighting is the light (the so-called color in the PhotoShop program), which is reflected on the surface of the object, reinforcing its 3D view.
Step 1
Create a new layer, name this ambient lighting layer.
Select a tool Brush(Brush Tool (B), Install a hard round brush by turning on the options. Oporal oscillation(Opacity Jitter) and Size oscillation(Size Jitter).
Set the color of the foreground on # 8F503B. Scroll to the lower edges of the lower lip, creating a beige effect, as in the screenshot below:

Step 2
Now, we will do the same as in the previous step, but this time, in progressing the top of the upper lip, as in the screenshot below:

10. Strengthen 3D Lip View
Step 1
Next, set the foreground color on # 692229, and then look at the top of the bottom lip. Thus, we will create a pale shadow that falls on the lower lip due to the upper lip. Next, select Tool Lighter (Dodge Tool), in the settings of this tool, install a soft round brush, Range(Range): Sveta(Highlights), Exposition(Exposure): 30%. Skin the ends of the bottom lip to add a soft glow:

Set the color of the foreground on # d2a192, the color of the back plan on # 802424. Start setting certain shapes to folds in the middle part of the upper lip. Press the 'X' key to easily switch between the color shades of the front and rear plan. At this stage, you can also add some soft folds to the upper lip:

11. Wrinkle and lip folds
Step 1
Create a new layer, name this layer of "lip folds". Set the foreground color on # 490E0E, as well as reduce the size of the brush to several pixels. Draw vertical curved lines on the top and bottom lip, do not forget, on the bottom lip, the folds should be in the center, and on the upper lip, the folds should be at the edges:

Step 2
Next, set the foreground color on # C88E82. Draw a brush duplicate of the first lines using a new color shade. ( Translator Note:draw the same folds as in the previous step using another color of the brush). The main thing is that light lines are drawn in parallel to the first lines and are located to the left of them. At the end, you can use the tool Finger(Smudge tool) to soften the folds slightly. You can reduce the opacity of the layer, it is at your discretion.

12. Add the basic shine
Set the color of the foreground on the dirty and white shade, for example, # F7DCDE. Select a soft round brush in the settings, turning on Oporal oscillation(OPACITY JITTER). Create a new layer, name this layer "Glitter 1".
Arbitrarily draw vertical glare in the middle part of the lower lip, as shown in the screenshot below:

13. Add more brilliance and work on the details.
Repeat the previous step by adding more shine while continuing to improve the folds. At this stage, I also used correction Color Tone / Saturation(Hue / Saturation), go Image - Correction - Color Tone / Saturation(Image\u003e Adjustments\u003e Hue / Saturation) to add more red shades to her lips.
Also, set the foreground color on # 3C0A0A. Scroll to the bottom of the upper lip, creating a shadow from the lips itself.

14. Detailing upper lips
So, it's time to add some love and to the upper lip!
Step 1
Create a new layer. Draw a blurry spot between two "curves" of the upper lip. Make sure that this blurry spot was barely visible, similar to a weak glow. Next, over a blurry spot, using the same technique, draw white light glare. Make sure that opacity / Pouring(OPACITY / FILL) of this layer was installed 100%, otherwise, you will not notice the difference in the light saturation between the vague spot and light highlights!

Step 2
Create a new layer. Set the foreground color on #eccece and using a small rigid brush, draw light folds on the upper lip:

15. Add texture to the bottom lip
Set the color of the foreground on # 6F1E16. Choose a soft round brush of a small size.
Draw soft, curved, vertical strokes over the bottom lip to enhance the folds.

16. Create reflective glare
Step 1
Set the color of the foreground on # F8D7DB. Select a tool Pen(Pen Tool (P), in the settings of this tool, set the mode Layer FigureShape Layers. Create a few arbitrary figures, do not forget about the vertical direction.

Step 2.
Reduce the opacity of the layer with glare, the degrees will depend on your choice - the main thing is that the glare were slightly catching, as if many glare would be reflected on the lips:

17. We add final touches to the lips
As a final stroke to the lips themselves, create a new layer on top of all other layers, change the overlay mode for this layer on Lightening the basics(Color Dodge). Set the foreground color on the light shade, for example, # F1D992.
Choose soft circular Brush (Brush (B) and with a brush, squeeze the average top of the bottom of the lip, as well as the top of the top lip to strengthen your light glare. Next, reduce the degree Fill(Fill) Layer at its discretion.

18. Pain the inner part of the lips and draw the basis for the teeth
Step 1
Create a new layer below the layers with lips (but on top of the layer with a back background, i.e. layer "Leather"). Name this layer "Rear lip background" - I know, a very creative name .....


19. Add details to the teeth
Step 1
First, set the color of the foreground on # 6D4848, and the color of the back plan on # 2F0503.
Choose a soft brush of medium sizes in the settings Oporal oscillation (OPACITY JITTER). Scroll to the middle of the teeth (not forgetting about a convex form). Use a longer shade to shading out external edges. Also, reduce the size of the brush to just a few pixels. Skin the borders between the teeth so that they become more reverse:


Step 3
Using the same color shade, add a pair of strokes to create light glare in the following areas:
Left corners on the teeth on the right
Right corners on the teeth on the left

Step 4
Finally, set the foreground color on # A18C8C. Add two light glare on the inner corners on the front teeth on the left and right:

20. Retouch of basic skin
Step 1
Create a new layer, position this layer over the layer with the back background, i.e. Layer "Leather".
With the help of a soft round brush of a large size, squeeze the top half with a lighter color tint, and the lower half is a longer color tint:
Translator Note: upper half is the upper half of the working paper, if of course the lips are drawn in the center of the image.


Step 3
Next, set the foreground color on # F2D6AB, and the color of the rear background on # b76141. Draw two bends that rose from the top lips folds. The glare should be much lighter, the closer to the lips and weaker, the farther respectively.

21. We combine lips with skin
Using a dark tint, squeeze around the corners of the lips, a longer shade in the area where the separation line goes between the lips and the lightest shade as it removed. Basically, focus on the side and on the top.

22. Add texture to the skin
Go Filter - noise - add noise(Filter\u003e Noise\u003e Add Noise). Install Distribution(Distribution) Uniform(Uniform), check the window in the window Monochrome(Monochromatic), noise intensity approximately 2.5, then, click OK. Next, select the brush you can download in the applied file.abr. Gently draw the pores on the skin - flow between the dark and light tint to create the best effect:

23. Selective step: Draw Makeup
Translator Note: Queen Amidala from the movie "Star Wars".
Set the foreground color on #FFFFFF. Create a new layer. Change the overlay mode for this layer on Linear light(Linear Light), as well as reduce the value Fill(Fill) up to 30%.
Using a rigid round brush of medium sized, in the settings Oporal oscillation (Opacity Jitter), squeeze the top and bottom lip in the center.
Advanced in the center and a little bit at the edges:

24. Admire your work
Mandatory action to motivate yourself to create other works!
I hope that this lesson was useful for you, and that you liked this trip.
Final result

Now we will look at how to draw a pencil's lips in stages. For a start, we must look at the photo original and determine the light source. He comes from the upper right corner. Now carefully look at the lips, a very strong shadow is visible under the bottom lip and in the tips of the lips, as well as under the upper lip, there is also a glare on the bottom lip from the light. Now you can proceed to drawing. The original lesson is a video that is in the very bottom, I would recommend first to watch it, everything is shown in very detailed. They just asked to make a lesson and not only a video who wants watching videos who do not want - draw by pictures.
Step 1. We will need a more or less soft pencil, you can take HB or 2B and, slightly pressing on it, draw the contour.

Step 2. Draw the contour of the lips and determine the area of \u200b\u200bthe lips with ovals.

Step 3. Now stroke upper lip at the bottom. To make a continuous monophonic tone, you need to practice a little (there is a lesson, and you at least just look at). Those. We apply strokes so closely that they merge, while a smooth transition should be between a white sheet and dark tone (push on a pencil decreases, as a result of which the strokes intensity decreases).

Step 4. Draw a shadow under the bottom lip.

Step 5. If you have, then you need to take a very soft pencil, for example, 6B, if not, then you should simply give much to the existing one. We make a dark area near the tips of the lips, under the upper lip and under the bottom of the lip, where the dark plot is large and extended with a small strip under the lip, to see her look at the previous picture, and then this. On the video, this moment without any questions at all, everything is clear.

Step 6. On the upper lip we make a dark plot.

Step 7. Stroke the upper lip first a one-photon light tone first, then we make darling areas on the upper edge of the lips, the middle part of the lip, while making the shadow transition, so that there is no clear separation. This is a dark area, it is light. There must be small smooth transitions of the tone. Then stroke on top down the bottom lip.

Step 8. We apply another layer of hatching to the left to the middle of the lips, we make a smooth transition from the bottom, i.e. We do the lowest bottom, then we weaken the pressure on the pencil and it turns out the transition. A little darke on the right, take the beat and make a glare.

Step 9. We make the shadows around the mouth.

Step 10. Some places are racing the beat. This is an area from above the top lip on the left and make a glare to the right under the upper lip.

So, with any painting with a pencil, including lips, it is necessary to determine the source of the light, then determine the bright and dark areas, after that only move to drawing.
Beautifully drawn lips are one of the inalienable elements of such a fashionable and modern style, like pop art. Many people implicit it so they seek to decorate their apartment or the house with some characteristic details of this flow. On the other hand, the ability to draw the mouth can be useful in everyday life, because it is one of the most attractive and important parts of the human face. In this article you will find many tips, how to draw lips.
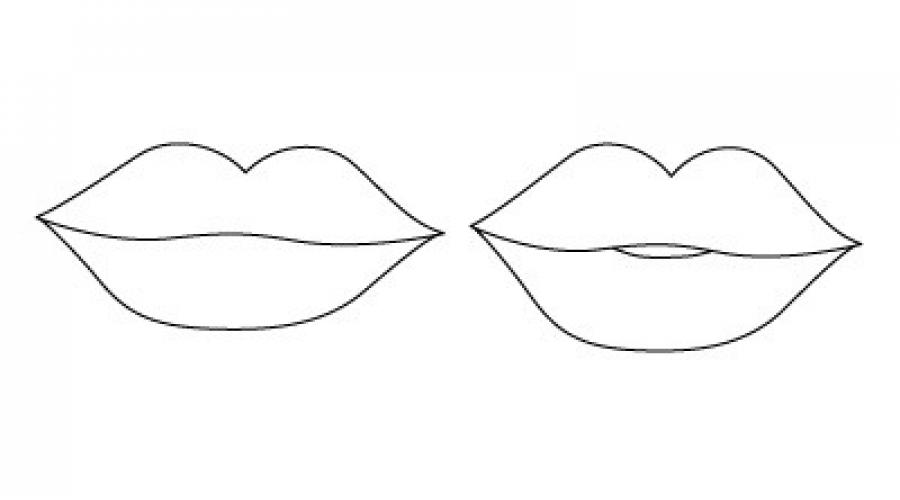
There are many techniques of the mouth image. The lips in the style of pop art, which has already been mentioned above, will be an ideal form. The upper should be two arcs forming a small recess, and the lower - semicircle. At the same time, smooth snow-white teeth are certainly added, which are clearly visible to the viewer, since the mouth is slightly awarded.
But it is much more important to know a living person. Depending on racial, they can have a different size, shape, width. So, the upper and lower lip sash is about the same thickness. Representatives the bottom part is significantly larger and fluffy top. Their mouth is usually characterized by quite large sizes. The Mongoloids also, most often, narrow.
So, let's deal with how to draw the lips in stages. We started a direct horizontal line. Its length should correspond to the length of the future mouth in the figure. Then schematically depict the upper lip. At this step, you should not draw it in detail. It is enough just to designate her contour, giving it an individual shape. It must be symmetrical, and under his nose it is necessary to highlight a small hole. By the same principle, we define the bottom circuit. Thus, the initial stage was passed. Now you should clarify with the help of an eraser we erase sharp image angles and spin them, making your mouth more natural.
After that, a natural question will arise how to draw the lips with a pencil so that they are as much as possible to real. Shadows play a very important role in this. So, if the light falls at at a right angle, then the upper sash should be shaded, and the bottom, on the contrary, clarify. In most cases, the shadows will need to be located in this way. The exception is only the option when the human face is illuminated from below. Then you need to perform the above-described actions up to the opposite.

One of the most important questions remained on how to draw lips if the head is turned into a profile or by three quarters. The proportions of the mouth in the second case, naturally, distort. That half of the lips, which is closer to the viewer, should remain for the same size, and the second should be drawn twice as fewer than the first one. Drawing a face in the profile, you need to concentrate on the lip loop, which protrudes from the face line. Half of the mouth with this type of image will not be visible.
So now you know all the secrets of artists telling about how to draw lips.
In this lesson I will teach you how to draw lips With the basis on triangular form in just ten simple stages. You can reproduce different types of lip positions by making minor adjustments in the first stage. This method appeared by chance: I somehow compared lips with onions and an arrow.
(I regularly receive messages from subscribers who tried this method, and all of them are convinced of its effectiveness. I hope he will also help you! Merry creative process!)
For this lesson you will need:
- mechanical pencil with a nv with a rod with a thickness of 0.5 mm;
- Graphic pencil 6B (for example, Derwent);
- Eraser-Klyachka;
- stupid;
- Smooth paper (for example, Bristol).
Step 1:
Draw an extended anoscele triangle. Under the upper angle, draw the curve (in the form "U"). Draw a horizontal straight line between the curve and the base of the triangle. The longer the drawn line, the wider there will be lips, and vice versa: the shorter, the more fully.
"But what if I want to draw it already on the face?" See my lesson for drawing people to determine the location of the "triangle". Here you have to pay attention to the proportions, and they will help you calculate the length of the triangle and the width of the lips, given the rest of the person.
Step 2:

Make an outline of the upper lip, imitating the form of a cupid bow.
Step 3:

Draw a lower lip of a curved line that is not overlooking the end of the triangle. With a support for the horizontal direct "Open" drawn mouth.
Step 4:


After you erase a triangle, determine the light source. In this example, the light source is located in the upper right side. I emphasized the parts that I want to clarify, as well as put the shadow on the left side of the lower lip.
Step 5:

Dimmerly both lips and leave the areas that you identified as the brightest in step 4. You see that under the bottom lip is the shadow. It is closer to the right side, it decreases, which shows that the light source is in the upper right corner.
Step 6:

Draw several folds on the lips with a firm-soft pencil (0.5 mm). Do not press much, because in the next step you will have difficulties.
Step 7:

Combine the mouth of blackout on the bottom of the lip. Do not touch the bright sections from step 4. Thanks to the clarified parts of the lips will look at voluminous and rounded. You may also notice that the lobs are becoming thinner in the shade, but do not disappear completely.
Step 8:

Comerate the most acute angle of the lasty-klyachki in light areas and give the lighted parts a more accurate view with the reflections effect.
Step 9:

Do operations from steps 7-8 with the upper lip.
Last step:

Staff shadow in areas such as the exterior edges of the lips, above the upper lip, folds and corners of the lips (6B pencil).
You can change the lip size by moving the horizontal line up (so that the upper Gua is thinner) or down (so that the upper lip is fluffing). Also add an empty to the ruler so that the lips seem even more.
Did you have any questions? Leave them in the comments under the article! Do not be discouraged if you have no desired result from the first attempt. Continue to work, and disassemble every step. Work will be much easier! Also, do not forget to experiment with different forms of triangles and positions of lines in step 2.
Translation of the article from RapidFireart.com.