How to draw a river fish. How to draw a fish step by step
Drawing a fish with watercolor pencils in stages for children
Master class "Fish-iris" drawing with watercolor pencils step by step.
Author: Sopina Tatyana Evgenievna - Technology teacher, MHK, head of the art circle.
MBOU Kerch Republic of Crimea "School No. 26"
Master class for children from 10 years old, teachers, parents
Beginner course
Target: acquaintance with the graphic capabilities of watercolor pencils when creating an image of a fish.
Tasks:
- introduce the visual possibilities of watercolor pencils;
- to study the proportions of the structure of the fish, to train the eye;
- teach using lines, spots to draw a fish;
- repeat the order of the colors in the rainbow;
- develop creative imagination;
- cultivate artistic and aesthetic taste, patience, accuracy
Step by step process of drawing a fish
Materials: landscape sheet of watercolor paper, simple pencil, watercolor pencils, brush, water.
Stages of work:
1. We place the sheet horizontally. In the center we draw the torso - draw a horizontal line, divide the resulting segment into 4 identical parts. We mark the location of the head - 1 part, 2 parts - the torso, 1 part - the tail.

2. Next, we mark the head, torso, tail with lines. We make markings of the upper and lower fin on the continuation of the line of the head.

3. Draw the outline of the fins. We outline the eye just above the center line in the middle of the head - an oval.
For scales. We outline 5 lines along the vertical, and we reduce closer to the tail of the division.

4. We outline 7 lines horizontally.

We give a finished look to the scales on the body, rounding each rectangle. Erase the vertical construction lines.

5. Draw the eyes and mouth on the head. And in the lower part we paint on the second fin.
6. We draw the eye - blue, the mouth - red, the head - orange.
Scales. We draw the colors of the rainbow sequentially from red to purple with horizontal strokes in the average power of the pencil.

7. Fins and tail. We make a stretch on the fin, repeating its shape from red to orange. The tail is similar.

8. Blur with clean water, gently rainbow on the body of the fish, head and fins.

Colors become richer and brighter.
9. When it dries, we finalize the scales. We perform tone stretching on each scale. From the line of the separating flake, we compact the tone.


10. We shade the background with purple, blue, green, yellow with vertical strokes.


11. Blur the background with clean water with vertical strokes. We often wash the brush so that the colors do not mix much, leave in some places not blurry pieces of the background for texture.
12. Draw bubbles on a dried sheet. Rinse selectively with clean water.

13. Finished look, add purple and red with a pencil, shading the eyes, fins, tail of the fish. We seal the background by painting algae with pencils.

14. Creative success.
Hello dear friends!
Today we will look for inspiration in the underwater kingdom and try to portray the inhabitants of the seas, rivers and lakes. In this lesson we will learn how to draw fish of different types, shapes and from different angles.
Most aquatic inhabitants have fairly simple forms; it is easy even for beginners to draw them with a pencil. If you want to get a more realistic and authentic drawing, you should look for high-quality photographs that will serve as a model. If there is an aquarium at home - great, you have a nature that you have probably already studied well.
Line of motion and shape
To correctly display the position of the body in the water, the drawing must start from the line. In most cases, this line will coincide with the position of the spine.
When a fish swims, its spine squirms in waves, so we start from the line that indicates the movement:
The red line shows the direction of movement, the blue - body shape, green - fins and tail. It is noteworthy that the direction of the head and tail do not match.
Human balance in motion
Thus, already at the initial stage, the sketch shows movement, and not a static position. In this position, it is impossible to freeze or drift, but you can only move quickly and confidently.
If your task is to depict a fish in a calm static position, it is enough to show a straight or slightly curved axis that displays the position of the body.
The center line is our frame, the skeleton on which we can put the shape of any of the fish species.
Next, we plan form. It is very easy to do this because it is streamlined, the head flows smoothly into the body, and then into the tail, only the fins stand out. 
With a simple geometric figure, we outline the torso and head, and then attach the fins and tail to it. Thus we get an approximate silhouette. In a difficult perspective, you can easily fit circles or ovals into the body, so the sketch will take on a more understandable and voluminous look.
At this stage of work, we apply all lines very easily, barely noticeable, for this it is better to use a hard pencil.
How to draw a beautiful sunflower
Clarifications and details
Now is the time to refine the silhouette and outline the main details. From the generalized figure, we select the head, easily outline the line of the eyes and mouth. Refine the shape of the body, fins and tail.

We apply all lines on top of the previous ones, we try to make them more accurate. It should be a light sketch that is easy to make changes and corrections.
Next, we detail and refine the sketch. Select the head, outline the eyes and mouth. We show bulging lips or teeth in an open jaw. Let's draw the fins and tail more precisely, showing the relief edge, rays and transparent veins.

We easily outline the scales.
Color
If your drawing needs to add expressiveness and color, work as follows:
- First paint over the general shapes without going into details. For example: the body is greenish, the fins are reddish, etc.
- Do not paint over each scale individually. First give all of them one common color, and then select some of them. Detail only what you want to focus on, and not all at the same time.
- At the end of the work, add a highlight along the entire length of the fish's body and in front of the eyes.
Draw a human nose

Structural features
There are a huge number of fish species, all of them have some serious or minor differences in structure, color, shape and size. Nevertheless, we will try to highlight the main important points that you need to know when drawing underwater inhabitants.
Fins and tail
Your work will look more natural if you place the fins correctly. In all typical marine and river fish, they are arranged as follows: 
The picture shows how the fins are most often located. The ventral and pectoral fins are always paired, located on both sides of the body. The dorsal fins sometimes merge into a single shape, and the caudal fin is barely noticeable.
Fins help move in the water, balance, keep the course and change direction, sometimes attract attention, disguise or scare away other inhabitants of the water kingdom. Naturally, they look different in different species, and sometimes they take on completely bizarre shapes.
Draw a beautiful swan
Scales
Scales can be shown in several ways. It all depends on what kind of fish you need to depict and how much detail you want to work. 
- The first method is fast and more or less accurate. Its essence is that you first need to outline the diagonal (slightly rounded) lines all over the body. We draw these lines very easily with the same interval, in two different directions. In the picture, this is shown by green and turquoise arrows. Next, in the corners of the formed rhombuses, add scales.
- This method requires precision and care. We draw scales in rows. The first row (shown in blue) scales are placed at a small distance from one another. Second row (green) one scale of this row is slightly covered by two scales of the previous (blue) row. Repeating the rows of scales, we cover the entire body.
- The easiest way and suitable for many species, such as mirror carp. We randomly show only the largest and most expressive scales, they are usually located in the upper part of the body.
Draw a person's face in profile
When drawing scales, it should be remembered that its size and expressiveness on the tummy and in the tail area is much lower than on the back and ribs.
Head
How to draw a fish head in stages is shown in the following illustration: 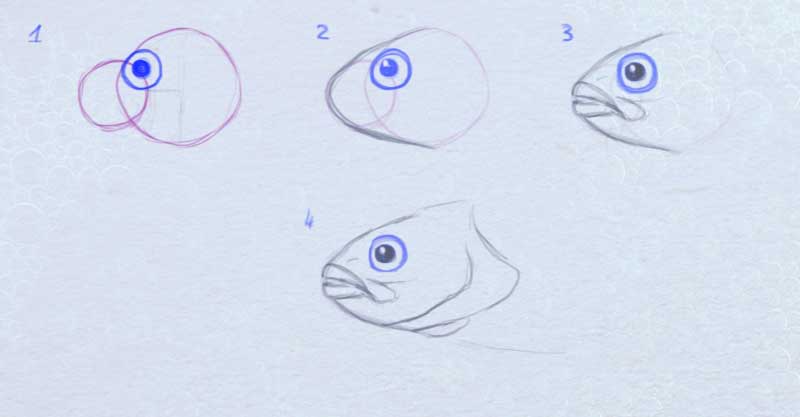
- First you need to outline two circles, one about twice the size of the other. These circles should intersect with each other at about 1/3 of the larger circle. In the upper part, at the intersection of these circles, we outline the eye.
- We combine the circles into a single shape, a semi-oval or a semicircle.
- In the middle of the smaller circle we outline the mouth. The upper lip is directed downward. Lower - straight or up. There is a nostril-like notch between the upper lip and the eye, which should also be easily marked. Below, from the mouth to the eye, there is also a small fold.
- We designate a plate above the gills, refine the eye and all previously outlined lines according to the specific look that you are drawing.
The eyes of most fish are round with a dark pupil in the middle, and the corners of the mouth are turned down.
Video tutorial
Watch the video how to draw a fish in stages:
Draw an elephant
And for inspiration and search for creative ideas, I have prepared for you some interesting pictures with fish:


Marine animals. But what if such a design idea came to mind? It is not necessary to make the drawing one hundred percent naturalistic. It is quite possible to use stylized images of fish.
We use children's drawings for design purposes
Making drawings is very easy. First you need to draw with a pencil on paper such pictures that will appeal to both the baby and the artist-designer himself. Then you can cut them out and stick them on the wallpaper where appropriate. By the way, it is quite possible to involve the children themselves in the drawing process, since many kids can draw fish on the shoulder. And how nice it will be for little people to take part in the design of a nursery or bathroom!
How to draw a fishdecorative?
Decorative drawing differs from naturalistic drawing in that the depicted objects look fabulous, they often have features inherent in cool expressions of "faces", freckles or eyelashes. Our fish will only be rewarded with a smile and plump cheeks, the rest will be as close to reality as possible. So similar to real, living kids can not do it, many details are still drawn schematically.
Master class "How to draw a fish with a pencil"


How to draw a goldfish with a pencil
The aquarium is universally loved. Children love to draw it very much. Sometimes they add a small crown to her, and it turns out the heroine of Pushkin's fairy tale - the Golden Fish, fulfilling wishes. You can draw a goldfish in the same way as a regular one, but it should be noted that this species usually has a luxurious veil-like double tail. The eyes of a goldfish can also be located in the usual way, or be a little protruding. If, however, a decision is made to depict a goldfish more plausibly, then one should notice such a difference from other fish as a small “hump” at the top of the body and a rather voluminous tummy. The line that outlines the belly of the goldfish curves rather sharply in the back half of the body.
I am sure you and your child will like this drawing lesson for kids, because you can draw a cute fish very easily! Take a pencil or felt-tip pen and start drawing with the kids!
Drawing lesson for children: draw a fish in stages
Draw the big arc you see in the picture below - this will be the top line of the fish's body! Pay attention, on the right, the line should end a little higher, because we need to leave room for the tail of the fish.

Draw the bottom line of the fish's torso, starting from the left side. Do not close the line on the right, but leave room for drawing the tail.

We have drawn the torso and now we will move on to drawing the tail of the fish. The tail is quite simple to draw - the upper half of the tail can be depicted as a leaf of a tree. If you look closely, you will see that half of the fish's tail is exactly the same shape as a tree leaf.

To finish drawing the tail of the fish, draw the bottom half, exactly the same shape.

We continue drawing lesson for kids and in the next step we move on to drawing the fins.
Drawing fins is also quite easy, just a couple of lines. The upper fin is larger, and draw the lower fin smaller.

Finish the drawing by drawing a cheerful "muzzle" of the fish. Separate the “muzzle” from the body with a line, draw a smile and an eye for a fish.

The drawing of a cute fish is ready! As you can see, drawing a fish with children is very easy! I look forward to seeing you in the next lessons, I will be grateful for your comments about drawing lessons with children!
In this tutorial you will learn how to draw a fish step by step. Let's take rainbow trout as an example. This fish has a graceful body shape with a beautiful spotted pattern.
Fish are relatively easy to draw, so they are a great choice for beginners. I'll show you an easy way to draw a fish, and you can change the proportions or add details if you want to get a completely different result.
Required materials for the lesson
We will need the following:
- simple HB pencil
- simple pencil 3B
- eraser
- sheet of paper for drawing
How to draw a fish body
Step 1
With an HB pencil, draw a horizontal base line and mark vertical segments at the ends - the boundaries of the body.
Here you can do without a ruler, the line does not have to be perfectly even.

Step 2
We draw an elongated oval for the body, leaving a third of the segment for the tail.

Step 3

Step 4
We connect the body and the trapezoid, forming the basic outlines of the tail.

Step 5
Let's move on to the head. We mark the junction of the head with the body and outline the gill cover with a curved line.
Each type of fish has its own body proportions. Let's imagine that the length of the head is equal to the length of the tail.

Step 6
We draw an eye and an iris.

Step 7
Add a slightly open mouth.

Draw the fins and details of the head
Step 1
In this part of the tutorial, we will start adding details. I recommend working with the drawing gradually and not getting carried away with just one part, as you can lose control over the process.
Let's start with the front dorsal fin which we place on the top of the body.
Dorsal fins come in a variety of shapes and sizes. In rainbow trout, it is quite small.

Step 2
It is logical to assume that there should be a rear dorsal fin. But many fish, like our rainbow trout, don't. Instead, it has an adipose fin, a small boneless formation.

Step 3

Step 4
We draw the anal fin in the form of a triangle with rounded corners.

Step 5
We pass to the pectoral fin, which is located next to the gills.

Step 6
We detail the head. We draw the gill cover and add membranous formations at the bottom of the head.
You should not try to perfectly copy the fish or overload it with a lot of details. Sometimes less is better.

Step 7
We are also finalizing the mouth to add volume.

Step 8
In front of the head, draw the nostrils and a couple of folds near the eye.
Usually, there are many small details on the fish head. You can experiment and draw them.

Step 9
We finalize the outlines of the fish by narrowing the tail. We also give a more natural outline to the tail fin.

Step 10
There are so-called rays on the fins, so we fill them with paired lines.
Leave enough space between each pair of lines.

We draw rays on the tail fin. We start at the base of the fin and slightly increase the distance between the pairs of lines towards the opposite edge.
Try to stick to the rhythm and observe the width between the rays of the fin.

We apply chiaroscuro
Step 1
We take an HB pencil, darken the iris of the eye and leave a few highlights unpainted. Add hatching at the top of the head and increase the contrast of the details.

Step 2
We fill the fish with spots, including fins.
The best option would be to use both pencils - 3B and HB to control the size and intensity of the color. Thus, the resulting pattern will look natural.
The belly and a thin strip in the center of the body are left intact.

Step 3
Using a 3B pencil, we draw hatching in the upper part of the body, usually this part is darker than the central and abdominal region.
For hatching, in addition to vertical lines, you can use long horizontal lines that follow the direction of the body of the fish and curved shapes. A combination of several hatching techniques helps to achieve a realistic effect.

Step 4
With the help of an HB pencil, we finalize the outline of the fish. We apply small strokes to make the drawing look more holistic.
Do not forget to increase the contrast of details: fins and gill cover. The drawing should be sufficiently contrasting.

Our fish is ready!
Congratulations! You learned how to draw a fish with a pencil using the example of a rainbow trout. I hope you have mastered the basics of drawing fish and put the knowledge into practice.
Don't be afraid to experiment, draw and have fun! Don't forget to leave comments and share the tutorial with your friends. Happy creativity!
