How to draw face in cartoon style. Draw portrait in animation style
In this lesson, I will show you how to draw the Writer of Edgar's writer with his favorite cat Pluto in animation style, using standard brushes.
Final result
Step 1
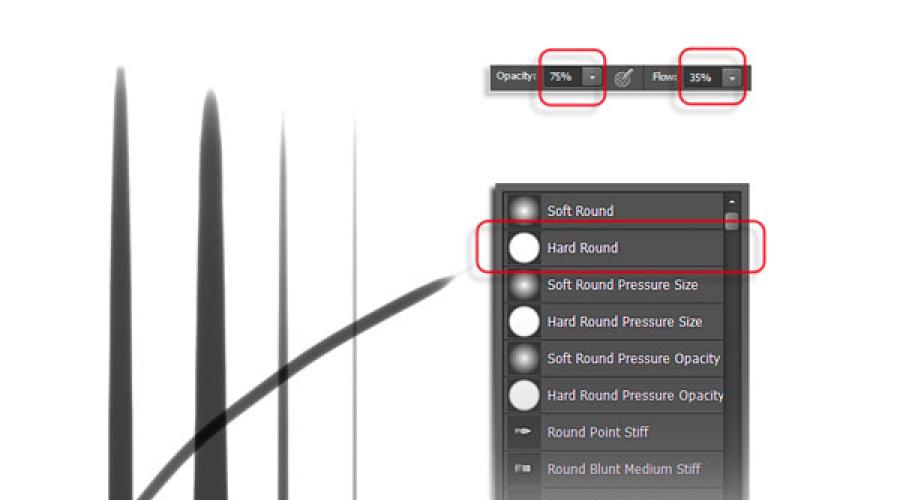
Create a new document with the following 1800px in height and 1200px in width. At first we will configure the brush that we use to create the main lines. In the set of brushes, select a brush at number 30, Hard round (Hard Round) Opacity(OPACITY) Brushes 75%, Pressure(Flow) 35% brush.

Step 2.
Now, go to the settings Pussy (Brush Presets (F5) to apply the following settings, check the option Shape dynamicsShape Dynamics and Broadcast (TRANSFER), as well as set the value Interval(Spacing) 1%. You can see the final brush in the screenshot below.

Step 3.
Create a new layer, name this PoE layer. With the help of a brush that we set up, start drawing face, neck, shoulders. Variate brush size, thicker strokes Use for clothes, thinner strokes for face, hair and neck. Apply smooth strokes, not paying attention to the details, later, using the tool Eraser (Erase Tool), hide extra pieces of strokes. Using tools Eraser(Erase Tool), create pupils.

Step 4.
Next, create a new layer. Name this layer ‘ Body &Pluton '(Translator Note:'Body and Pluto'). Draw the body of the writer and the Pluto Cat. In the screenshot below you can see that the strokes simply define the main forms using the general features instead of the exact lines. Also, using the tool Eraser (Erase Tool), remove certain areas, such as Pluto's eyes and Edgar's fingers.

Step 5.
Create a new layer. Name this layer ‘ LowerBody '(Translator Note:Lower body). Scroll the area between the body of the Pluto and Pluto. This action will help divide the two elements of the composition so that they do not merge together. Pay attention to the area that is covered on the side of the pluto head.

Step 6.
Now, let's create your own watercolor brush. On the new layer, drew two strokes with a brush, as shown in the screenshot below with a soft round brush. Please note that the strokes are not symmetrical, it will improve the final result. Next, go Editing - Determine Brush(Edit\u003e Define Brush), we can name our watercolor brush, now, the brush will appear in the set of brushes, ready to use.

Step 7.
Next, in the settings Pussy (Brush Presets (F5), apply the following settings, check the option Shape dynamics(Shape Dynamics), as well as set the value Interval(Spacing) 1%.

Step 8.
Next, check the box in the option. Diffusion(Scattering), set the settings that are listed in the screenshot below. The same for the option Broadcast(TRANSFER). On the preview you can now see the brush shape.

Step 9.
In conclusion, check the option Double brush(Dual Brush), select a brush number 45 with the following settings that are listed on the screenshot below. So, our watercolor brush is ready for use.

Step 10.
Select a tool Finger (Smudge Tool) and with a watercolor brush, smear the strokes that we painted earlier. Variate value Intensity(Strength) to obtain the desired result.

Step 11.
Create a new layer. Name this layer 'details'. With a rigid round brush, draw small details, such as, the mustache at the cat, as well as separate hairs of wool. Next, using the tool Finger(SMUDGE TOOL), select a soft round brush, add wool to the cat using a small diameter brush.

Step 12.
Next, we will create another brush, this time a textural brush. Using a brush at number 30, as a basic brush, apply the following settings for options. Shape dynamics(Space Dynamics) and Diffusion(Scattering).

Step 13.
Apply the following settings for options. Broadcast(TRANSFER) and Double brush(Dual Brush).

Step 14.
Select a tool Eraser(Eraser Tool), install the brush that we have just created. Using an eraser, process the edges of the wrain blast to simulate the effect of watercolor dry brush.

Step 15.
Next, create a new layer. Name this layer 'Pluton's Eyes' ( Translator Note:pluto's eyes). Draw the pupil to the cat, yes, do not forget that we will only have one pupil .... Also draw shadows on the eyeball. With a white brush, draw a fang, and also make an eye lighter.

Step 16.
To create shadows on the face of software, select a brush at number 30. Apply the settings that are listed on the screenshot below.

Step 17.
To create shadows on the face of software, create a new layer. Name this layer of 'PoE Face Shadows' ( Translator Note: Shadows on the face of the software). Set the overlay mode for this layer on Normal(Normal), layer opacity 60%. Start painting the shadows on the cheeks, chin, orcing, etc. Apply a few strokes to get a longer tint.

Step 18.
Now, let's create a back background. Create a new layer below all the rest of the layers that we created. Name this layer 'Rear Background'. Select a tool Gradient (Gradient Tool), choose a brown shade as a gradient color, a gradient type from the main color to transparent. Pull the gradient from below, as shown in the screenshot below.

Step 19.
Next, we will add light glare. Create a new layer, name this layer 'light glare'. With the help of a brush that we created in step 16, the color of the brush is white, draw light glare, I chose the central lighting, so it affected the upper portions of the image, as shown in the screenshot below.


Step 20.
To add a vignette effect on the back background, go Filter - distortion - distortion correction(Filters\u003e Distort\u003e Lens Correction) in the settings Vigatki.(Vignette) Install Effect(Amount) dimming -40, it will be enough.

Step 21.
To create paper texture, we will add a present image of paper. Create a new layer, name this paper texture layer. Change the overlay mode for this layer on Multiplication(Multiply), the opacity of the layer is 30%. Next, copy / deposit paper texture on this layer.
Translator Note: place the paper texture above the layer with gradient fill.

Step 22.
Next, we will add the illumination effect behind the image of Edgar software. Create a new layer, name this LED Layer. Change the overlay mode for this layer on Replacement light(LIGHTEN), layer opacity of 50%. Using tools Oval area(Elliptical Marquee Tool), draw a circle. Place the circle by the shoulders of the software. Pour the created round selection with white. Next, go Filter - blur - blur by Gaussu(Filter\u003e Blur\u003e Gaussian Bluer), and blur the edges. So that the white glow does not overlap the image of the software, use a mask layer to hide extra sections.

Step 23.
We continue to add textures. Create a new layer, name this Watercolor Texture layer. Change the overlay mode for this layer on Replacement light(LIGHTEN), layer opacity 80%. Copy / Pan the watercolor texture on the created layer. The result should be, as in the screenshot below.

Step 24.
Add more textures ... .. Create a new layer, name this layer "worn texture". Change the overlay mode for this layer with the texture on Soft light(Soft Light), layer opacity 80%. In the same way, add another watercolor texture to give the picture aged view. Please note that the textures are located below the layers of the software and Pluto so that their images remain clean on the remaining surface.

Step 25.
The lesson is almost completed. Create a new group, move all the layers to the created group. Next, save the workplace in the format.jpg, and then open the saved file in our working paper, placing over all other layers.

Step 26.
Using tools Lighter(Dodge Tool), slightly illuminate individual sections of the image to add contrast. For this purpose, it is good to use a watercolor brush.

Step 27.
Let's add the effect of vignette again, we go Filter - removal correction(Filters\u003e Lens Correction), set the vignette vignette value.

Step 28.
In conclusion, we will add a small effect of noise to our picture. Create a new layer, name this "noise" layer. Change the overlay mode for this layer on Multiplication(Multiply), pour this layer (SHIFT + F5) with white. Next, go Filter - noise - add noise(Filters\u003e Noise\u003e Add Noise), set the noise between 8 and 10, it will be enough.

Children are the main audience of viewing a variety of cartoons. A good cartoonist is the one who can extract the main features of an object or person, simplify them to attract the attention of the child. Such masters like Walt Disney, Hannah and Barber, Chuck Jones, Jim Henson, Walter Lantz and many others, studying children's opinion and perception, achieved the charm of the whole world with their magical and eternal characters. In this lesson, we will consider how easily and correctly draw cartoon characters, from which children and adults will be delighted.
The final version will look like this:

Details of the lesson:
- Complexity:Average
- The estimated time of execution:2 hours
Understanding human perception
A person is a creature that has a very interesting feature - we can convert details that form a very complex structure or object, in a fairly simple form.
Can you say that two images below are the same object?

It may seem strange what you can look at the image and say that this is a car.
What happens to most people, except for artists who can not get out of memory all parts of the car, kind of dog or face feature? They begin to associate very simple and primitive forms with the specific features of each object. So, for example, how many children came from school with a similar piece of paper in his hand and said "This is a mother and dad!"?

You do not want to draw so much, is it not true? If you do not want, let's take a pencil in the hands and start drawing!
1. Creating a first character
The main form of the cartoon form will be a circle. Circle is all you need. From the circle you can define the basic proportions of the character's head.

Swipe vertical and horizontal lines that intersect in the center of the circle, as in the picture below:

Step 1
Draw an oval eye with a slight inclination around. Necessaryleave the gap between the eyes of about the same size as the eye.

Step 2.
In the top of the eye of the eye, we slightly denote the eyelashes of the character. Placing above eyelasheseyebrows that convey a kind of surprise. Draw an eyebrow form that turns out in the future you will adapt to your own style.
Draw pupils so that they are reduced to the center (this is a very effective tactic that is used by caricaturists in order to make characters prettier).

Tip: To give more life to the eyes can draw a small line under them to imitate wrinkles.This is another very interesting tactic that gives a special flavor of the facial character.

Step 3.
Now the most interesting point of the lesson. It is at this stage that we will define what our character will be: lean, fat, young, old. Character we will have a young.
Draw the jaw:

Step 4.
The nose will be from the front. In order not to use many details, draw it in general terms. Quite often drawn nose in detailon the one hand, the face due to the fact that the light falls only on the one hand.

Step 5.
Our character is a child. Making your mouth is something simple and with an expression of innocence.
Note that in the cartoon style children, regardless of gender, have a fairly simple form of mouth without lips.

Step 6.
The form of the ears is quite simple.

Step 7.
Dorify the boys with a haircut.

I do not know how to draw hair. Help!
In order to draw perfect hair, you do not need to be a designer or stylist. There is no correct way to draw hair, so you should try until it turns out exactly for this case. Just remember that the hair can transfer certain personal qualities of the character with their form. Oddly enough, hair can express age, riot, conservatism. Incredible, yes? And what is your hairstyle?
The exact and fast way of drawing hair for cartoons is to search for the corresponding photo on the Internet! After you found the perfect style, place the image as an example next to the tablet or sheet of paper and start developing its simplified version.
The first character is completed successfully! Congratulations!
Now let's work on a different character using the same pattern as for the boy.
2. Creating a senior character
Step 1
Let's start with eyes. This time we will draw faster, adding wrinkles, eyebrows and pupils of the eyes. Please note that we have not changed much, but just slightly expanded your eyebrows. Older people have thicker eyebrows that occupy more space on the forehead. Eyelashes draw in the same way as in the previous version.

Step 2.
The chin will be slightly increased than the previous character.

Step 3.
Create a nose. The form is completely different. Please pay attention to the fact that the nostrils are very close to the lower eye. The idea is to get a good result, a little exaggerating part of the body.

Step 4.
Instead of mouth, draw big mustache.

Step 5.
Add the same ears as the boy. However, the hair will be another form - add a little on the sides, and leave the eye from above.

Our character looks like a crazy scientist.
3. Creating a female character
Create a sister for the boy:

How did it happen so fast? Very simple... In women, a thinner structure of the face. Consider some features:
- thin eyebrows;
- larger and expressive eyelashes;
- thinned chin;
- little nose with fewer parts;
- long hair.
That's all! As soon as you begin to feel more confident, you can draw some more characters with different details.

4. Mimica
Let's draw a girl after receiving the news that the school holidays approached the end.

Now let's go back to the boy and ask his opinion on this:

Such a feeling that he conceived something!
Pay attention to the changes in the face of the boy:
- one eyebrow is lower than another;
- semi-closed eyes;
- a smile has been added (one side above another, in accordance with eyebrows);
- pupils moved under the eyelashes.
And all! All easier than simple!
5. Draw in profile
Draw two circles.

We will create a boy and a girl in profile:

The ear remained in the center of the circle.
Pay attention to these details when male and female characters are drawn up:
- the boy has eyebrows thicker;
- the chin of the girl is slightly advanced;
- nose girl thinner and sharper;
- the boy has no eyelashes when the girls are big and thick.
6. Game with angles
Eyes, nose, mouth, ears - all these details make your face change your form if you look at them from different angles. Behind this, it is very often possible to watch the characters of cartoons.

Please note how real eyes are simplified when converting to cartoon.

The real form of the nose consists of several cartilage. Its form is radically simplified in the cartoon.

Understanding how the mouth behaves at different angles is important. Delete extra details and try to save only the basic shape of the lips. Ears are also greatly simplified.
Now we will implement everything that we learned. Below are circles with arrows, which show the direction of the view. We can practice your drawing skills in various positions:

Note the eye for each of the circles:

Now add different shapes of the jaw:

You can independently finish the drawings based on those knowledge that you have been granted in this lesson. Remember:
- the face must be simplified and give rounded forms;
- exaggerate some parts of the person and its expression.
As soon as you managed to outline the direction of the eyes and choose the appropriate chin, try using your creative potential and finish the drawing. If you draw at least 10 minutes a day by the rules that are presented here, then you can draw multiplication faces as simple as breathing.
Let's summarize the drawing of characters:
- Draw a circle for the skull;
- We establish the direction in which the character will watch;
- We make the outline of the eye of oval shape;
- Draw the pupils of the eyes who look at the nose if you want to create a cute character. Do not forget the eyelashes;
- We choose the right eyebrows depending on age and gender;
- Create appropriate jaws;
- Add simple ears without unnecessary parts;
- We are looking for the necessary hairstyle in Google and use it in your sketch;
- Celebrate!
That's what happened:


An example of how to use the same pattern to create various emotions. Note that only eyelashes and eyebrows were changed. Nothing more!
7. Study of nationalities
We are approaching the end of the lesson. I would like to encourage you to continue experimenting with faith and, if possible, to explore the face more. Find out how the eyes and mouth behave in various situations. Take a look at different nationalities and learn their key features.

For example, African Americans have a slightly flattened nose and more rounded cheekbones.
Whenever it is possible, try to draw your characters more realistic. Watch for the behavior of people in real life.Look at the photos, study the style of your favorite artist or look for inspiration on the Internet. TOwhen we appeal to real life, we can extract high-quality information for our sketches.But remember: observations of the real world does not mean copying it!You want your character to be unique, not a copy of real, right?
Great job!
Now you know the basic methods that are used by the best multipliers worldwide. Good luck!


We hope you liked the lesson.
Explore other methods of drawing the head of cartoon characters.
The limit can only be the sky!
Translation - duty.
Children are the main audience when it comes to cartoons. A good multiplier is the only one who can extract the main details of the object, or a person, and simplify them to such an extent that the child can realize and imbued with what he is watching children's perception studied and such masters like Walt Disney, Hannah and Barber, Chuck Jones , Jim Henson, Walter Lantz and many others who could charm us with their magic characters.
My task is to help you find the right path, folded the puzzle and learn how to create any character using the presented technique. I guarantee that you will be shocked - how easy it is to create multi emotions that children (and adults) will love.
Understanding human perception
A person has a very interesting feature: it can generalize the details of a very complex object in something simple and understandable. Thus, a person can present any thing through several geometric shapes and curves.
Can you tell me that the same object is depicted on these two pictures?

And let it be strange, but you watched on both these pictures say - "This car".
In fact, unlike artists, most people cannot call all the details that make up a car, a dog or even a child. Therefore, they begin to bind very simple and primitive forms with the specific characteristics of each object. How many children 4, 5 or 6 years of age come from school with the drawings, which show two circles and several toothpicks, and say: "This is a mother and dad!"?
 You probably do not want to draw so much, isn't it? So let's a little staining your hands and draw a few cartoon faces!
 1. Creating a first character
The main cartoon form is a circle. The circle is all you need (in addition to love, of course). It is from the circle that you determine the main proportions of your character's head.

After drawing a circle, it is necessary to outline the axis of the face. Draw a vertical and horizontal line intersecting in the center, as shown in the image below:

Step 1
To make an eye, draw oval with a slight slope to the side upstairs. Repeat on the opposite side. It is important to leave the gap between them about the same size as one eye. Since we do sketches, it is possible to draw another eye in the center for the accuracy of the construction.

Step 2.
Top of the circle make fatty, it is an eyelashes of our character. Place your eyebrows slightly higher than the eyelashes so that the facial expression is surprised. The form of eyebrows is arbitrary, and with practice you will come to your own style.
Draw both pupils closer to the center (this is a very effective technique used by the main multipliers that they want their characters to look nice).

Tip: To add more life and "realism" eyes, draw a small line under them, something like wrinkles. This is another very interesting technique, which will add a special highlight of facial expressions.

Step 3.
We got to the most creative part of our course. Think about it like this: in the cartoon sketches, the main structure of the face is the skull and the eye of the character. At this stage, you define distinctive features, i.e. People are already clear that you draw a hero.
Now, when we approach the drawing of the jaw, we need to determine whether the character will be thin or thick. Do we want to create it young, old and so on? My character will be young. Let's draw it a suitable jaw.

Step 4.
When we draw a nose with the front side, it is important not to add too much details. If you draw only a tip, the nose is already starting to look convincing. Also very often, only one side of the nose is drawn in detail, based on the idea that this is the shadow side.
Let's draw our character the right nose.

Step 5.
Since our character is a child, we draw a cartoon mouth: something simple to convey the expression of innocence.
Please note that when drawing the mouth of a small child, you do not need to draw lips! In cartoons in children of both sexes, pretty simple mouths. A fairly good expressive feature.

Step 6.
The ears are visible from the front side (since our character looks into the chamber), so we will not depict the inner cavities. We draw a simple form using the basic perspective (more about this later).

Step 7.
The form of our skull is already determined by the circle that we painted at the beginning, right? Now we need to draw a very simple childish hairstyle so that our boy will come to life. Let's do it.

I do not know how to draw your hair! Help!
Calm! There is nothing to fear. It is not necessary to be a stylist or fashionable designer to draw perfect hair. There is no correct way to draw hair, so try until you reach the perfect option for you. Just remember that the hair reflects the individuality of our characters. Oddly enough, the hair can express age, the riot, conservatism ... incredible, isn't it? By the way, what is your hairstyle?! Okay it does not matter..
Accurate and fast way to draw cartoon hair - this is searching for links to photos on the Internet! Do it all the time: leaf fashion magazines or look for Google. Finding the perfect style, take the image as a basis by placing it next to the drawing board (or tablet), and start drawing a cartoon and its simplified version.
Looks like we successfully finished drawing our character. Congratulations!
Now let's play a little more and draw a completely different character on the same template that we used to create a small volume (yes, I gave him a name).
2. Creating an elderly character
Step 1
As usual, let's start with the eye. This time we will draw faster, adding wrinkles, eyebrows and pupils.
Please note that we have changed not very much - just expanded your eyebrows. In the elderly, eyebrows thicker and occupy more space on the forehead. Eyelashes for men do not matter, they are always drawn equally.

Step 2.
This time a little lengthen chin. Try to do it.
Our character already looks different! Excellent. Let's try to pick him up the perfect nose.

Step 3.
Following what we did before, let's create a nose. This time I paint it completely differently:
Please note that the tips of the nose are located very close to the corners of the eyes. This is an effective reception to create wider and large nose. The idea is to exaggerate the features to get a good result!

Speaking of exaggeration, we will not draw our character's mouth in favor of another object.
Step 4.
In this case, I decided to use another technique: instead of drawing the mouth - draw big mustache to create a better image of our character.
Ready! Large expressive mustache for an old buddy.

Step 5.
Remember, I said that the hair helps determine the age and identity of the character? Take a look.
We added hair on the sides and left Lysin on the top of the top. Surprisingly, as the appearance immediately transformed, isn't it? Please note that I drew the same ears as Tommy, our favorite boy. In this advantage of working with templates. This is the magic of cartoons!
 I think our new friend is crazy scientist!
 3. Creating a female character
I do not even know .. I think Tommy needs a sister! He is so lonely. As a magic, we will create him sister:

Hey! How did you manage to do it so fast? Very simple .. Women have a more sophisticated structure of the face. Follow the step-by-step instructions:
- Thin eyebrows;
- Longer and expressive eyelashes;
- Neat chin;
- Little nose with fewer parts;
- Long hair (draw based on the real image, and using any style you want).
That's all. These are all the changes you need to produce. In addition to them, I used all the same details as when painting Tommy, her brother. In the end, they are brother and sister, right?
When you feel more confident, you can gradually add more "realistic" details to your characters. Such as pupils larger ..

4. Facial search
We are ready to add emotions to our expensive Lucy (yes, this is her name). Let's draw it after she learned that the school holidays came to the end ..

And again we create something completely different, just adding two elements: tears and a new form of mouth! Amazing, isn't it?
Now let's go back to Tommy and ask what he thinks about this:
 Hmm .. I have a suspicion that Tommy conceived something!
 Please note that I completely changed its facial expression following the following rules:
- Made one eyebrow below another;
- Half covered his eyes with eyelashes;
- Added a smile (one corner of the mouth above - follows the eyebrow);
- Raised pupils, leaving them with covered eyelashes.
That's all! We got the desired result by making a few changes. Hair, ears, nose, chin and rounded eye shape remained unchanged! How easy!
5. Side view
Refer the template again. Now we will learn to draw Tommy and Lucy to the profile:

Draw both faces:
 Please note that the ear profile is located in the center of the circle.
 Remember the main differences in the structure of persons when comparing them nearby. Pay attention to these details when you draw female and male characters:
- Brewing Tommy Willow
- Lucy's chin slightly issued forward
- Lucy's nose is thinner and more pointed;
- Lucy has long feminine eyelashes.
6. Play with angles
Eyes, nose, mouth, ears .. All details of the person change the form when the angle is changed. Cartoon characters constantly look at all possible directions from different angles, as they need to react to situations and objects around them. It makes them more realistic!
 Please note that the text structure is simplified in the cartoons. In red painted cartoon eyes. Compare their oval shape with a rounded form of the present eye.
  This nose consists of several cartilage. Please note how important it is simplified in cartoons.
  It is necessary to understand how the mouth under different angles behaves. Delete extra details and try to save only the basic shape of the lips. Ears are also greatly simplified.
 Now we will practice drawing all the details that we studied. Below is a basic template (only circles and guide guides), where we can learn to draw different positions:

We note the eyes looking in different directions, on each of the circles

Now add random jaws of different sizes and forms

The choice is yours. I suppose you can work independently and explore the techniques that I gave you to complete the picture. Remember two major animation rules:
- Simplify the details of the person with the help of rounded shapes;
- Making expressions of people exaggerated.
As soon as you learn how to make an outline of eye directions and choose suitable chins, try using your creativity and draw so many persons as you like. You can be sure - the practice of the above technician for at least 10 minutes will make the drawing of cartoons in the same familiar occupation as a breath.
Let's summarize! To secure the material of this tutorial, let's remember the right steps in drawing cartoons:
- Draw a circle that will be a skull of a character;
- Determine the direction where the character will watch and read the guide lines;
- Make an outline of an oval eye;
- Draw pupils (closer them to the nose, if you want to create a cute character). Do not forget about eyelashes;
- Choose the right eyebrows, depending on the age and the floor of the character;
- Draw a suitable jaw;
- Draw simplified ears;
- Search for hairstyle in Google (or magazine) and use them as sketch patterns;
- Celebrate!
My version:

 An example of how to use one template for drawing different emotions. Please note that only eyelashes and eyebrows have been changed. And nothing more!!!
 7. Learn different ethnic groups
The management is coming to completion. As the last advice, I would like to encourage you to continue experimenting with expressions of individuals and, as far as possible, make more efforts in the study of persons. Examine how the eyes and mouth behave in different situations. Take a look at representatives of different ethnic groups and their distinctive features.
 For example, black people have a slightly stubborn nose and more rounded cheekbones.
 If possible, try to make your characters as realistic as possible. Watch the behavior of people in real life. View photos, learn the style of your favorite artist or look for inspiration on the Internet. From real life, we can extract high-quality information for drawings. But remember: watching the real world does not mean copying! You want to create your character unique, not a copy of reality, right?
Great job! That's not all!
Now you know the basic technicians who used the best multipliers of the world. There is still a lot of things ahead, and this is a guide - just a small part of the educational material that I prepared for you. Let's go deep.
 Learn different styles and the structure of the skull. There is no limit to perfection!