How to draw face looking in side. Building a man's head
We will immediately go from words to business, that is, to the proportions of the head. Let's start with the portrait, namely from the head and all the details belonging to it, like: mouth, nose, chin, eyebrows, eyes and ears.
Introduction
So. The main criteria for proportions in all scholar books take into account the average-proportional dimensions of objects, forms and objects in general.
If you know the classic canons and the patterns of proportional ratios, then it will help you to produce observation ( important for drawing), the ability to correctly march features of living forms and objects, and also distinguish them from correctly proportional and vice versa.
It is assumed to be a measure of proportional relations in - this is because its dimensions are accepted and smelted all the other body values, like growth, foot length, hands, as well as sizes of hands, elbows and so on.
As we already know, the shape of the head consists of two equal and equally important parts: cranial box and face front. Their ratio will be approximately 1:2 If you start with the front part. Her (that is, our head) can be viewed from three different points of view: with frontal, profile and horizontal. We will look at S. points of view "in the FAS".
Proper head proportions in the drawing
- Its height relative to the width will be somewhere in the area 1:1,7 .
- Since we start to draw without hair ( in the sense, in the figure, the hair is not yet depicted - it is not necessary to cut), then the middle of the head can be considered a line of the eye: it seems to separate it into two equal halves.
- The distance between the sinylograms is directly proportional to the distance from the chin and to the bridge (type 1: 1).
- Height of the head relative to its diagonal 1: 1,8.
- Head width relative to the head width from the profile side will be approximately 1: 1.7 or 1: 1.8.
- The front part in height is divided into three uniform lobes:
A) from the tip of the chin until the beginning of the nose
B) from the beginning of the nose to the surveillance bumps
C) from the surplus arcs to the middle of the frontal bones (or two fingers above the frontal bugs).

- The dimensions of the eye slots are equal to the distance between the inner corners of the eyes ( in other words, you need to draw eyes at such a distance so that one more exactly the same could fit between them), and they are equal to the width of the wings of the nose and the width of the chin tip. In how!
- The mouth line falls at a distance of two thirds from the base of the nose and to the base of the tip of the chin.
- The length of the oral slit is equal to the distance between the tip of the chin and the mouth line. This distance is also equal to the nose length ( this is the distance between the bridge and the tip of the nose).
- The bridge is located somewhere at the level of the upper eyelid.
- Skylight points must be sought at the level of the middle of the nose.
- As for the ears, they are about the same dimensions as the nose, and they are located in parallel to each other ( discontinuity is not difficult).
- Now about the neck. Its height is determined by the distance between the jugular garbage and the base of the chin (this is if you look at the front), and the distance between the bottom of the head and the seventh vertebra. The height of the neck approximately corresponds to half the height of the head.
In various specialized institutions (art schools, for example) it is recommended to explore the complete structure of the head. - From the muscles to the hair - to draw it correctly. But there is one little secret here: Even if you somehow it will be possible to learn from yourself absolutely all the terms, even indirectly associated with the structure of the head, you still can not draw your head as it should be. And all because such institutions have at their disposal a large number of warders (teachers, in the sense)that adjust and send students during work.
Our task (before learn) - Alone (without teachers under the side) Learn how to coordinate your actions, understand the essence of the drawing process itself, can be able to see your mistakes and correctly correct them. That is why, we are a little increasing the standard habitual system and proceed to the formation of items of a kind of instruction, which will help us solve our task:
- First, we need to understand the process of working in creating a head on paper
- Next - the easiest at first glance - just draw.
- And finally, learn how to draw a head without too much strain, to understand the essence of this process and be able to eliminate your mistakes.
Well, expensive amateur drawers are ready? Tuned to work? Then ahead and with the song (people are preferably mentally, there is nothing to worry!)
To start working, as always, it is necessary to find everything that may be required.. In this case, it , coal, A2 format paper, Nature, chair (or clip - it is from your nature envy ...). For nature, catch the restless and proven friend or convince your grandmother with her knitting to move to the stool to you, or ask the grandfather to tell about something interesting (In the process, of course, we work). If you have enhanced sister brothers - and they can be attached. But you should not begin the picture of the head from drawing the head of your beloved parrot ...
In case of emergency (well, very much - if there is absolutely no exit and a single living soul) You can use the finished reproduction or photo (Which we are krepim on the easel in the upper left corner). Everything is? Natura is available? We continue, but rather, proceed to drawing.
The first sketches of the head
First of all, we make constructive coal - and let it go not very carefully, do not worry, it's just a sketch:
- We are looking for the main ratios of the proportions of height and widths - for this purpose on the paper shoulders, neck and head. Here we have diligently worry.
- Now we need to find the volume of the fact that we made separately (head, neck, shoulder belt)
- Remember, as at the very beginning, being more disreamed beginner drawers, you worked in the sweat of the face over drawing, cylinders, etc.? So, look at your nature and understand that it is not a head, but only one of the varieties of form. It is now that we must realize and perceive the fact that the head is an inanimate subject, then it will be easier to draw.
The next step will be observing your kind and sketch of this very scalp. You should not immediately draw tiny wrinkles, bristles and cilia - better note that we draw a three-dimensional image, and not flat. From this it follows that we need to feel the scope of the head, feel all the protruding parts of the face and head at all.

Draw, enough to spend time reading my writing - pencils in a teeth and forward, you must understand the essence of the process. And as you will understand - I will still be here.

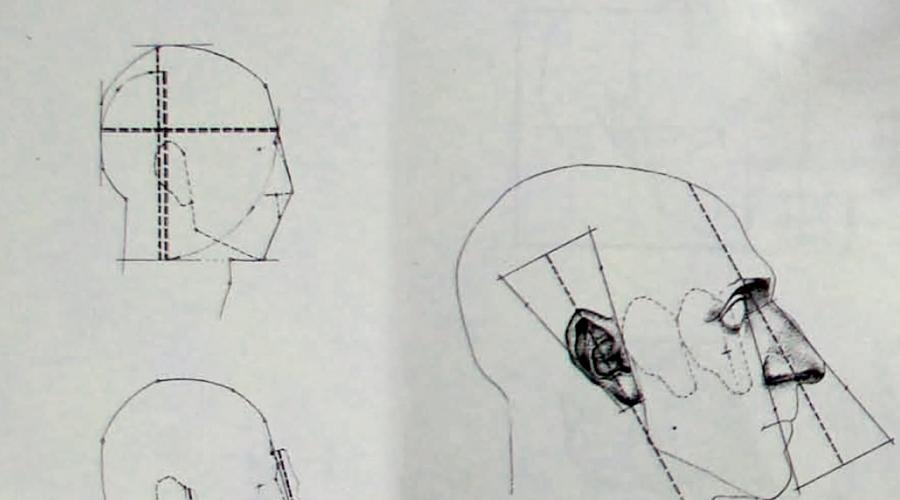
In order to draw a pencil's head, we need to stay for something. These may be such points that, if watch, are visible immediately - they mean the most discovering places in the head area. Further need to highlight the main planes - They are formed using a variety of blown form.
The most distinguished points and, accordingly, the plane constitute the structure of the scalp - these are structural moments. Brighter, all the cheekbones are allocated by our gaze, (or nasal prism - because the nose in shape resembles a prism), forehead, chin, balls in the eyeballs.
To find the height of the head, it is enough for us to just find the highest point on the skull and the lowest, the most discovered point on the chin.
Now it is important to distribute the main light. To do this, you need to squeeze your eyes and look at nature, then you can distribute the basic lights on the head planes. By the way, if you are strong in the distribution of shadows on the edges of the simplest geometric figures, I will say it in secret that it is quite possible to enter into a cube, so ... and act on the same distribution system of light and shadow.
The main thing is that you have to understand at this stage of work - so this is what the head is the same form in which there are characteristics such as depth and width plus plane and facets (as in Cuba). That is, they act on it all the same patterns as before (I hope you remember, there was a speech about the active and inactive, distant and approximate).
Start the next item. In one of the previous paragraphs, the mysterious design points were mentioned, thanks to which the shape of the head is determined. It is these points that give us the proportional ratios of the planes on the volume of the head. If all the importance of these points you realized, then with due reverence and trembling, we proceed to their consideration, analysis and distribution.

- The first thing that rushes immediately to us is of course the orphans and a society.
- The second thing that we immediately pay attention is the cheekbone to the left and right.
- Now the turn of frontal bugrov.
- Chin (or rather, the point of chin).
- The angle of the lower jaw.
- Now one of the most important is the highest point on the skull of our nature.
- Finally, temporal dots.
- Dumpy bugs are the most convex, according to textbooks, in the width of the bone, which are located on the back of the head.
Well, that's all for starters with points - they need to draw and remember well, otherwise you will have to repeat this material again. And now look again on the drawing from above, see? In addition to points there are also colored lines.
You wonder what they mean and how to call them to magnify? Patience, my dear, now we will analyze them.
These lines are called axes, which are quite logical, schematically divide the head of the person to different certain sections. In the following drawing, more "Obligated"not bone, we can consider both our dots and axes.

- The first line of red - she divides the head into two equal half, in other words, this is the axis of symmetry.
- Blue highlighted a line of abrasion arcs, which divides the head on the upper cranial and lower facial area.
- The green line is that divides the head on the front and the occipital region and it passes exactly through the highest point of the skull and through the ears.
- The yellow line is usually determined by the turn of the head (you know, it is very important for the drawing), that is, this is the axis of three-fourth turns.
- The neck cylinder on which the head is installed.
- And another axis, it is turquoise, which passes through the lower points of the ears and the bottom line of the nose. It shows the bottom of the nasal prism.
BUT! All this is given to you, novice drawers, exclusively for familiarization and so that you better understood the structure of the head. And we will draw on the easier version of the above-described version - these are blanks. So,: front view, side and twist in three quarters.
On these rectangular duals there are all that we need: axes, points, proportional ratios of different areas of the head and, in fact, the most important thing - the structure. That is, as an example, proportional ratios, height from the level of eyebrows and to the level of the nose level is equal to the height of the ear or the mouth and the lower angle of the jaw are located on the same line. But here you can apply: the part of the person, which is closer to us, retains the original sizes and forms, and that in the distance (in turn, for example) There will be a little (a little, dear artists, a little, and not as always ...) Distortize in size, become less.
Fastening the result
Now the final: fix it just read. To do this, we will need to work together with a blank. Now our chief assistant in drawing is a freezing, it seems to be a template, a certain prototype of a real head. It is much easier for it.
You already draw a person's head, that is, the composition is planned and a place for the head, the main volumes too.
The second step will be the search for proportional ratios of the head, its form and character. This will be the sketch of the basis of the head, our uncomfortable blank.
Now the vertical axis - right hand itching split your head on equal areas (Well, not necessarily equal - it depends on all turns and angles). This axis is determined by the location of the nose and gives us already two important points: the highest and lowest.
Since we still determine the turn of the head, then need to find a three-fourth turn line - She would be very by the way. To do this, we visually find the location of the zick bone and carry out a line through the zilly point. With her, we will deal with it later, so so far enough just slightly outline.
That came the line of the line of the Absorbal Arc. Here we just need to use the eye and determine how much the forehead and hair takes, and how much face up to the chin. Wu-a la! Ready.

Now you need to highlight the bottom pyramid of the nose. To do this, it is better to take advantage of such a pattern: the line of the abnormal arc and the line of the lower prism of the nose shall share their heads to the same parts. But at the same time, it is also necessary to take into account the features of the resulting head.
Next stage - search a line separating the head to the occipital and facial part. We already remember that it passes through the ear and the highest point. Now take a closer look: at the intersection of the three-fourth turn line and the previous line there is a temporal point scheduled for us earlier. If you have no shape of the head yet, then adjust all the lines with an eyeball.
 Well, we already have plenty of points and lines, to get on the marking of the nose, the place for which is already cleared and found.
The same with the ear - and for him there is a place (it would be strange if there was no place, you would agree). Its height is equal to the distance between the line of the abnormal arc and the line of the lower prism of the nose, and it goes through the line dividing the head on the front and the occipital part. Better look at the drawing on the right, I think it is clearer than all these twisted phrases.
It remains quite a bit ...
Next Stage - Search for Skylight PointsBut since they are clamped, you can say in the lines, it will be not difficult to find them. And the corner of the lower jaw - it is located at the intersection (again at the intersection) of the mouth line and the line dividing the head on the back and front part (you understand what I mean). Well, your mouth now find a mind even hedgehog 🙂
It remains to find a little bit and among this "Little" Eye place, abrasion bumps (places, especially protruding on the eyebrows - decipher). And the time has come to look for frontal bumps (that is, protruding points on the forehead). It is no less simple to look for them, it is only worth taking lines from the outbreak arc to the most convex points of our forehead. TA-dah! You already have frontal bumps. But in order to better understand them, you need to bind these points to the highest point and to the temporal.
Finally, if the angle allows us to see the parmer borger - the most convex part on the back of the head.
Now twist the blanks, use the lines and points that are remembered. For example, something like this:

Revise once again that we have already passed here and rotate the blanks with all the structural trifles. To begin with, it would be good for you to get blanks in three familiar positions: profile, FAS and three-fourth.

PLEASED? Ready for terribly serious work? Clean your nature and return to the place. Now we will gradually transfer what we learned on the dwarves, on our long-suffering nature. Take a look at her with a new look. Inspect your head from all angles and try to appreciate it as a non-residential thing, understand its "device" ... Abstract from the person's carrier person.
The following task is simple transfer all previously studied structural axes and points to already live, quite curious, asked questions on the type "And How? Looks like it came out? ". Of course not literally - visually (I'm afraid your nature will not be funny at all if you spread her head and face with multi-colored pencils).


Now that you are in zealous search, tell you something about proportions. The ideal proportions are considered to be the so-called "Greek" proportions For it was the inhabitants of ancient Greece that allocated the ideal proportions of the body. But the ideal proportions are somewhat different from those that every person has these discrepancies allow people to maintain their individuality.
You can check the correctness of the proportions by connecting all the most important parts of the person or the design points located one opposite the other - their connection will pass through the ear.
Practice
Now the practical part is to transfer our knowledge to a picture of nature:

- So, we work out the composition, we find a place for the head, neck, shoulders. We work according to the principle: the indentation of the edge of the paper (tablet) in front of the front part (before!) More than above the occipital, and at the top of the indent less than below.
- Now we find a place separately for each subject of the composition: neck, shoulder belt and, accordingly, heads.
- Do you remember our blank? Now they draw a blank, but taking into account all the proportional features of our nature. Do not forget that the neck we do not have a strange rectangle, it is a cylinder - that is, it is a volumetric, as well as shoulders.
- The damper is already in place, now we work with it using the following subparagraphs:
a) Find the lowest and highest point using an axis separating the head into two equal parts.
b) Three-fourth turn line - remember this? As it passes through the sinic point (Of course, you have not forgotten it yet!), then we will have to first find this very point and outline.
c) further according to plan the line of the abnormal arc. It can be carried out in the level of eyebrows (a little further) And plus another detail, which we call the breakfather of the abrasion opposition to the breakfast. This point is exactly where the eyebrows change their direction.
d) Now turn the bottom line of the prism of the nose. It is carried out as in the case of the abnormal arcs, in terms of the level of the nose, only further. Defoche look at your nature, do not look specifically in it. And try not to change the angle of your observation.
e) temporal point, which is pretty well noticeable on our nature. On the same line there are already three points (temporal, high and ear hole) and it falls on the shape of a head.
f) ears and nose. The height of the ear was already found with the help of lines, but we take the form from our nature. With the nose a little more complicated. It is necessary to outline the total volume of the nose schematically with a pyramid and there already understand the features. But! No form on our nature lives in itself, she passes, climbs and flows into something else. Smoothness, comrades, and plasticity, remember this - here's nose, for example, connects with the abnormal arcs.
g) Complete the search for zoom points (Yes, yes, he lasted all this time!).
h) We determine the place for the mouth and in the form we find the angle of the lower jaw.
i) Finally, we find a line for the eyes, which goes somewhere in the corners of the eyes. So that they are drawn correctly, there should be enough space between eyes more for one (the third eye is not necessary to draw, but it is better not to draw at all).
j) And here we approached the frontal beat. They are located with the help of lines that you spend from the above-handed bugs to the most convex regions of the forehead of the person - these lines are located symmetrically to the central axis. And they spend the lines to the temporal points and the highest point. Hurray to us!
I think the question "How to draw a head" was at least a little for you revealed, thank you for what you are with us!
To draw a portrait of a man with a pencil, novice artists not necessarily end the courses, becoming students of the Art Academy or take private drawing lessons. Draw a person's face is easy, the main thing is not to be lazy and develop your skills.
The main thing in the article
Portrait of a man with a pencil with his own hands: What will you need?
To draw a portrait of a person you will need:
- simple pencils;
- white paper sheet A4;
- eraser;
- stationery knife;
- scotch.
Learning to draw portraits of people with a pencil: where to start?
On the working surface should not be unnecessary items. Take a sheet of white paper, put it vertically or horizontally in front of yourself and secure across the edges of scotch. Remember that during the drawing it is impossible to tilt the sheet. You work only brush hands.
Use for drawing a pencil portrait from KOH-I-NOOR Medium softness HB or soft in.
Incorrectly sharpened pencil affects the quality of the pattern. Do not sharpen pencils with a sharpener, and use the stationery knife. This method of sharpening a pencil allows you to roll the rod as much as possible, make it sharp. Correctly sharpening a simple pencil, you will be less distracted from the process and draw longer.
For training, use the usual sheet of paper A4. In the future, if you enjoy drawing, buy professional drawing paper, such as drawing paper, kraft paper.

How to learn to draw a man portrait of a pencil?
To start, take a photo of a person whose person you want to draw. Carefully consider it. The person's face on a sheet of paper consists of geometric shapes, which in the process of drawing change their shape. Remember that people are disproportionate. Therefore, during the detailed draw of the part of the face, it must be considered.
To learn how to draw a person portrait with a pencil, you need to make sketches on paper.

How to draw a man portrait pencil for beginners stepmap
The process of drawing a person's face with a pencil can be divided into the following steps:
- drawing a common contour of the face;
- marking of the main parts of the face inside the oval;
- eye drawing;
- drawing eyebrows, drawing of the nose and mouth;
- detailed drawing: wrinkles, shadows, moles, hair, etc.

Getting Started: Building Head and Common Face Contour
In order to correctly draw a common contour of the face, you need to know quite a bit anatomy of a person. To begin with, drew oval, which will be at the bottom, the above. Next, already change the outlines individually.
Marking of parts of the face and work with planes
Full face
- The skull and the jaw are a flexible sphere, if we say rudely, the face in such a position resembles a chicken egg inverted by a narrow part down. Draw such an oval and spend two perpendicular lines through its middle.
- Horizontal line is an eye line. Divide it right and left part in half. It will be the middle of the eye (pupils).
- The bottom of the vertical line is divided into 5 equal segments. The tip of the nose will be located on the top 2, and the mouth between 2 and 5 marks.
- The upper part of the vertical line is divided into 4 equal segments. Hair must be on 2 segments from above. The bottom of the ears should be at the level of the tip of the nose, and the top is at the level of the eyelid.
Artists use small tips for drawing portraits:
- the width of the face consists of 5 segments equal to the width of the eyes;
- the distance between the eyes is approximately equal to the width of one eye;
- the chin width is equal to the length of the eye.
These standards are adjusted individually.
 Profile
- The profile in form also resembles an egg, but its acute part is shifted into the angle.
- Drawn figure divide by two perpendicular lines.
- Ear is behind the vertical line. The skull depth is drawn individually.
- The correct location of the nose, eye, eyebrows was already soles in subparagraph "Afas".

Face detail: eye drawing, eyebrow contours, nose, lips, ears
Eyes
Since each person's shape for each person is different, it is impossible to definitely describe this process. The middle of the eye has already been marked. Now draw two arcs to the right and left, which you will continue to "turn" into the eyes.
The main points that need to pay attention to eye drawing:
- the outer part of the eye is always slightly higher than the inside;
- eye arches are rounded closer to the inside of the eye and narrowed to the outside;
- if a person looks straight, then the rainbow shell of his eyes is always closed with the upper century;
- eyelashes are always starting to draw from century;
- the lower eyelashes are always shorter;
- do not forget that the eyes must be drawn with tear ducts, the lower and top eyelid.
Very often beginners, drawing one eye, cease to look at the photo and copy the second eye from its drawing. Do not forget that people are not proportional to people. The second eye a couple of millimeters will be wider / already, above / lower. Eyelid over the right eye can be lower than above the left. All these little things should be carefully copied from the photo.
If you draw a face in the profile, then the eye here will resemble the arrow tip form with convex and concave sides. The rainbow shell is poorly visible on the side, but, drawing a portrait, you need to draw it to paint the eye to look strange.
 Eyebrows
The wider part of the eyebrows is often closer to the bridge. Do not start to draw the hairs immediately. Denote eyebrows. If you draw a face into the profile, then their form will resemble a comma.
 Nose
Nose
The easiest way to draw the nose is illustrated in the picture. Draw a circle, then draw your wings and "backs" to it. At the very end, there will be a pencil of the nostrils.
 There is a more complex, but realistic way to draw this part of the face. As shown in the picture, draw a polyhedron. The shape of the polyhedron varies depending on the position of the face. Next, start rounding the geometric shape.
 Lubs
Lubs
Start drawing lips from the inner line, from the place of contact of the bottom and upper lips. This line will never be perfectly smooth, it always consists of several curved lines.
The inner line of the mouth is always darker in the figure than the external contours of the lips, and the upper lip is often less lower.
If you draw a face to the profile, then never output the lip tip sharply up. Draw a medium lip line first straight or down, and then lift it up.
 Ears
Ears
The human ear can be represented in the form of the letter S. Do not forget that the ear has a rim and an inner part that resembles an arc, and a mole. Draw these main parts of the ear.

Halftone hatching and study
It seems that you are already on the finish, but the portrait is absolutely unrealistic. The hatching and study of halftone is something, without which it is not necessary when drawing a portrait of a person.
First of all, determine where the light on the face falls from and where the darkest places. Apply the touches on the face in one direction - from top to bottom. To give the leather mattness, we grow a line with a finger or a conventional napkin. In order to illuminate the plots in the portrait, use an eraser.

Lighting and blackout
The declining and darkening of the sections of the face is necessary in order for the face on a sheet of paper looked volumetric, and not flat:
- If you need to illuminate the already painted area, then use the eraser.
- Start sketching faces with low-fat lines. Do not press a strongly pencil.
- Layers overlay lines. The more lines, the darker there will be a plot of person.

How to draw portraits of people with a pencil in different angles: Afas, profile, head turn
We have figured out how to draw an Afas and a person's profile.
- If you draw a man from the back, then not all parts of his face can be visible.
- With the face turned almost in the profile, the middle line of the lips is very small, the neck line merges with the chin line. Also visible part of the cheek, followed by the nostril of a person.
- When a person turns to you almost back, it is clearly clearly a line of eyebrows, a scarlet, a neckline, which seeks to the ear (if this part is not closed with hair).
- With a larger turn of a person's face, you see eyelashes, a small part of the eyebrows, the protrusion of the lower eyelid and the tip of the nose.

How to draw a person portrait of a person with a pencil: the basics and secrets of skill
- The focus should be a person's eyes.
- Try to draw not only your head, but also shoulders, decoration on the neck, collar, etc.
- Never start drawing small details without correctly designated contours.
- Running out the contours, do not press a lot on a pencil, draw barely noticeable lines.
- Pay special attention to the proportions of human head.
How to draw a pencil portrait pencil: video lessons
The portrait of which you decided to draw, will definitely appreciate your efforts. Such a gift can be done to yourself. If you are afraid of the volume of upcoming work, practice in drawing individual parts of the face. You will be easier for you to draw a pencil portrait.
PAINTING. Academic foundation of man's head drawing.Long searched for a free master class, but did not find it. That came across the book, decided
Copy and text and photos. In this book there is no learning material. will be
Only a very detailed structure of the head. As far as it helps-- I do not know.
The material is big, I will try to cut.
Found natural, planted? Found the appropriate attitudes on the easel at the top of the left. Krepim to the easel of the A2 sheet of wallpaper and take coal.
Now I draw the head of the person-structural sketches, as it turns out, do not worry about cleanliness. Begin...
1. Compose the human head (do not forget about the neck and you can with shoulders) in the sheet plane - to search for the basic proportional ratios of the altitude, we use the eye and check ourselves.
2. Find the basic volumes of the head, neck, shoulder belt. Eyemer works in full force, check your actions several times.
3. Now remember previous lessons. Remember how we painted a cube with you, then geometric shapes, how did the exercises made for the development of logical thinking. Now see, we are not a terrible person, or rather his head. Before us is a form, volume and no more. He does not bite (kidding). At this stage, the head of a person for the coming object.
Now try to watch this volume and transfer all this volume into the sheet plane. How it turns out, just let's see what we can do now. Just start not with the details, but from the main volumes and planes. Quite basic, do not shift the form, do not exercise the eyes and cilia, they are not now. You can prevent your nature that most likely she will not see what awaits you and will not exclaim - "Oh, as it looks like!" - That will not be.
Do not forget about the three-dimensional image of the form. You do not draw a flat picture, feel like a volume, for example, the ball of the head of the head "worst" into the space. Feel the design of the face of the facial part, will help the visible protruding parts of the skeleton. And invisible can be tested to analyze themselves. Try. I need to know (and you first need to understand yourself), as you can see the design of this volume.
2.
So, what did this joint work given us? The main thing: we understand that, to draw a person's head, its volume, first of all, "cling" for something, to understand what to start, to draw to draw the form, what to "catch" the volume, how to build it. There is something to cling. First, it may be some points that are visible during the inspection immediately, their presence is allowed to understand the strongly discovering areas on the volume of the head as large and less. In the figure you can see, as I find the overall scope, as I find these basic points, they are highlighted the strongest. Secondly, I find the main planes that are formed by form of form. It can be seen how I try to find proportional ratios with the help of imaginary three points, you can see how they form corners.
5.
6.
Meaning: In the process of work, it can be understood that the dots and planes are "captured" by "We are not accidental. These are the structural moments of the human head. This is its structure forming the characteristic volume of both the head and the proportions of each person separately.
Nowadays, we are easier for our eyes to be in mind, cheekbones, or zicky points, farther the nose, which of the main planes forms a pyramid (is at the heart of the nose there is a pyramid or also called prisms), the plane of the forehead, discovering the chin, eye balls located in the eyeballs. And we found the height of the head itself at its characteristic point-high point on the skull and the discovered point on the chin.
Well, at the end of our work, you can still designate the light and shadow. So as you can see, the general main planes. To do this, you do not need to look "Vil" in nature, crack your eyes and the main light and the shadow you will be clearly visible. I note only that the human head can also be written into the cube, hence the shadow will not find a problem, both the total volume of head and nose and the nose in particular.
At this stage of work I can still add that you started studying, "prove the proportional ratio of the parts of the skeleton of the human head. The main thing you understood, I hope that a person's head is the same volume where there are planes and facets, so-called design dots, light, height, depth and width. And if you have all this, you can successfully draw a person's head, like all that we painted before. You also understood that even the head can be entered into a cube, as evidenced by the distribution of light and shadows. So here is what closer to us will be more active, what next is to go into the air. There are, we will know how the light is distributed in form.
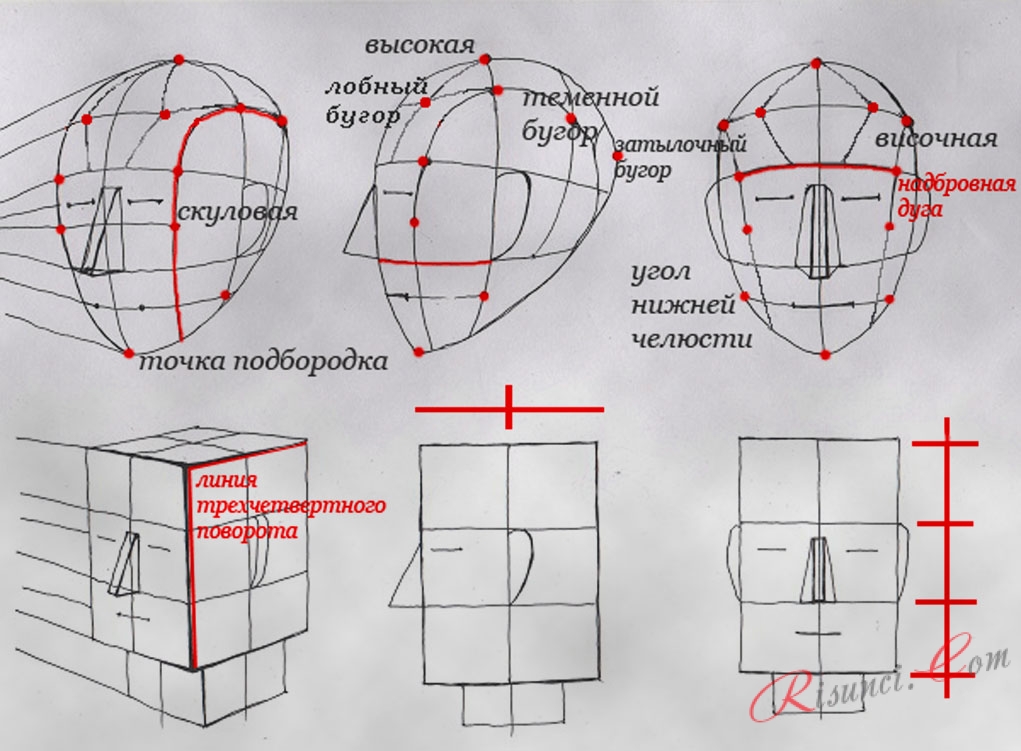
We continue ... From the previous work, we realized that there are some constructive points that form the shape of the human head. In the drawing of the head they are very important. It is on them that there are proportional ratios of all the planes of the scalp, the scalp is built on them. Now we will analyze them in detail and add something else. While we read and catch the essence.
How to draw a head for a person to draw on the right.
Here are the main constructive points of the human skull. Let's disassemble:
1. The very first thing that falls in the field of view is drawing, it is, of course, a society and orpads.
2. Behind them are zicky points,
3. And the frontal bumps.
4. Chin point,
5. Point (angle) of the lower jaw.
6. Further look more in-depth to nature and notice the highest point on the skull.
6.
7. We will pay attention to the temporal point. The temporal bones (in the books) are not the most convex in width on the skull, books are considered the most convex on width-dark bugs. But the books do not say that dark bugs are rarely "used" in the figure. Watch people behind the structure of their skull, refine at least the outline and you will understand it. You still understand what there are points more significant for drawing - temporal points, which, by the way, are very often located wider than dark. It is this training system that insists on the introduction to arsenal to build a head of human-temporal points. How they will apply to speak further.
8. And the most convex in the width of the bone - on the occipital part of the turtle-cerebral boxes, they form another characteristic points, are used depending on the nature of the head of the head in space.
While these points are enough, you need to work and remember. Further pay attention to the multicolored lines that cut the human head. These axes are divided, schematically divide the human head into certain parts.
How to learn to draw on the next drawing on the right. Here, all the design points are preserved here, which we have just considered, can be compared, this drawing is no longer deprived of "muscle mass", such drawing schemes are quite suitable for us and do not interfere with the use of information. Beauty will be litter later.
7.
So, will continue the conversation about the axes separating the human head into certain parts. We look and compare the drawings.
1. Red symmetry is shown in red, which shares the head into two equal half.
2. The input arc line is shown in blue - it passes through the line of the abnormal arc and the bottom of the nape. Share on the top cranial part and the bottom faithful.
3. The line dividing the head on the front part and the occipital is shown in green. It passes through the highest point on the skull and ear holes.
4. The yellow line is a line of three-hard rotation, a very important line for which you can unmistakably determine the rotation of the head. It takes place primarily through a zick point and a temporal point. I repeat, on this line we will define the turn of the head.
5. No need to forget about the neck cylinder, on which the human head "sends".
6. There is another axis that determines the lower part of the nose pyramid and it passes, naturally, through the bottom line of the nose and the lower points of the ears. She shows turquoise.
All schemes that you saw can be simply viewed. This is for visual assimilation of the understanding of the structure of the head. And below I give a somewhat simplified "version" of what is happening. Start learning to draw your head and study the presence of structural points, axes and main planes and the head proportions are better with drawing dwarfs. Just now and go to our freezes
8.
See: I draw blanks immediately in three positions, front, side and three-hard turn and designate design dots and axes.
For a closer understanding, you can start with a shield in the form of a rectangle. You can enter the head into the square, but it is done simply for a better understanding of the distribution of lighting. In fact, the head fits into the rectangle. But the essence of the matter does not change. But in the devices of oval shape, it is clearly visible to the structure similar to the structure of the head - in the skull part very well enter the ball or oval. More approximately in kind.
Here are the main design points in each of the head turns. Showing the main axes that share their heads on the part. Also, already looking at these schemes, it can be noted that there are clear proportional ratios of parts of the head. I will add more: the structure is clearly visible. For example: the height between the abnormal arc and the line determining the lower part of the nose pyramid is equal to the height of the ear, the ear is usually located within these limits. More: on the same line is the mouth and angle of the lower jaw. Understanding this, it can be consciously drawing a head, in advance of its design features, then there is if you outlines the mouth, then you can check its location in its corners and the point of the lower jaw. The above number of mouth you are already refrained. Of course, people are different, like the forms of their mouths, but this is the foundations. Far from them you still do not leave.
By the way, you can make your work out of the prospects. The figure shows how to achieve it. That part of the head, which is located closest to us, will have original sizes. All that will go into space will be a bit (do not overdo) distinguish between the sizes in the smaller.
It's time to fix the material, it remains to pour out the sketch of the head of a person in the form of dwarkes, we draw on the presentation, the nature can distract you and scare (jump again \u003d)) items. Who's stronger, of course, do not oppose from nature and immediately compare the drawing of the blanks with a lively head. But I still advise you to work without nature, according to the presentation. Now we need to look for these the most constructive points and axes. The theoretical part is over, now draw with me.
The dwarf can be a kind of tool for us, prototype, template, matrix in a man's head drawing. Studying a person's head can be understood key moments in building and drawing it based on this simple form-blank. Moreover, it is very easy to understand the promising ratios of the parts of the head on its basis. And finally, understand the course of work in building the scope. See
9.
1. Suppose you draw a man's head. You have already planned the composition on the sheet, found the main volumes, found a place for the head itself.
2. Now you need to find the scalp itself, find proportional ratios of height and width, the character itself is a round head, oval or pear-shaped (for example). Use the principle of drawing blanks. Its form will depend on the nature of the human head. Here, the basis for the head, the disc from us is scheduled.
3. The next step is a great desire to show the vertical axis, which divides the human head into two symmetric parts, left and right. This axis is determined very simply, it is possible to cling for it by the location of the nose. This axis, dividing the head into two parts, will give us two constructive points, high point of the skull and the lowest point on the head of the person - the chin point.
Yeah, we have the hook, the process of building the volume of our head is launched, we lead it further.
10.
4. We began to find a turn of the head, now we will definitely definitely. To do this, it is necessary to outline the so-called line of three-hard rotation, which determines the turn of the head in space.
This line is very simple, it is enough to dwell on the bone, a constructive zick point. We plan the point of cheekbones and spend the line.
In the process of this work, our Eyemer catches proportional ratios of the main front part and the rest of the head.
You can only chateen the zick point, since the exact location will still be defined further, this stage when searching for a biotea preparatory. Enough now simply outline the turn of the head and the preliminary place of the point of the cheekbones (dots cheek). So, we have a total scalp, the axis dividing the head on the symmetrical parts, the point of the chin, the high point of the skull, the line of three-fourth rotation, are the scoop points. We work on.
5. Now we find a line of abnormal arcs.
Our eyemeter should determine this line, rather, it should be noted how much volume will occupy the cranial part of the head, which is located above relative to the abnormal arc (eyebrows lines), and how many facial part of the head, located below the surveillance arc line.
A little effort to pay the observation perspective and the line of abnormal arcs was found. See:
12.
13.
Further turn:
6. Determine the line that defines the bottom of the nose pyramid. It is not difficult to find it, it is enough to look at the nose of nature, but you can check yourself with the following knowledge:
The line of the abnormal arcs and the line determining the lower part of the nose pyramid share our head on equal parts (ideally), we take the basis of this, compare with the peculiarities of the structure of our nature, maybe there may be any deviations (possibly the brain part in nature is large or The chin is too massive, or the opposite is small), and we indicate this line.
13.
7. And now you need to schedule a line that will separate our head into two parts: the facial part and the occipital. This structural line passes through ear holes, as well as through the highest point on the skull.
8. And when you spend it, you automatically there is a temporal point at the intersection of this found line and three-hard rotation line.
The lines are carried out on the shape of the head, if this is not felt in your drawing, then correct your actions by the eye meter. Or analyze- if the line dividing the head on the occipital and front part, when crossing the three-hard rotation line, gives a temporal point, then it is equivalent to the fact that the temporal point will be at the intersection of these lines.
The eye meter determines this convex place on the human skull, there is a temporal point, this is the basis that two lines go through it, which we are talking about now. So you can check your actions at the right time to adjust proportional ratios.
In our drawing already scheduled, a lot of constructive moments have been found, allowing to do the following:
14.
9. First, it was already extruded for it for him.
10. Note your ear.
The place for it is found thanks to the preceding actions automatically. The line separating the facial and the occipital part passes through the ear holes, and the height of the ear (ideally) is equal to the magnitude that was formed with us after the line of the abnormal arcs and the line showing the lower part of the nose pyramid were outlined. There is, the distance between them will be equal to the height of the ear.
Of course, as in the previous case, you can check yourself and in case of errors, correct them. It is enough just to strain your supervisory perspective. But now you can see your mistakes yourself, you yourself can analyze what you draw, every step. Scatter your eyesight more often, see more often on the total scope, the main proportional ratios. And the details will not run away anywhere, they will always have their place inside the main one.
15.
We find the remaining basic proportional ratios. We look at the drawing on the left: 11. We find bile dots- Now their location is easier to find simple when they are clamped into the frame. 12. And we find the angle of the lower jaw: this point will be at the intersection of the line dividing head on the facial and occipital part and the line that is formed when the mouth is found. 13. I think the mouth you will quickly find.
16.
We look at the drawing on the right. What do we have to do? 14. Find a place for the eyes - Once, 15. Find Abrasion Buggers, protruding points on the eyebrows (by simple) - two, and 16. Find the frontal bumps, the location of which is checked visually, there are frontal bumps on one horizontal line and find them simple, It is enough to carry the lines up to the most convex points of the forehead from the inspection bugs. I will add: since the brain part is the cranial part of the man's head has a shape of a ball, then it is simpler to understand it easier for it. We need to tie the frontal bumps to the shape of the head. To do this, we associate the points of frontal bugs with a high point on the skull and with temporal (temporal). So it is better understood from where the volume is that it is characteristic and everything in our form is connected with each other. This is the design of us.
To this, if, of course, the turn of the head allows you to see, we determine the darker borgorm, the most convex part in the width on the occipital part of the head.
17.
So, on the basis of drawing the simplest form, you can find the design of the head and reproduce it all on paper. But in this case, you can fine understand the whole process and in case of failure to adjust it.
Yes, and the light is distributed and the shape of the head of the head with a stroke is much more advantageous when you clearly understand that the shape that is actually going to "lay down" a barcode.
Remove the blanks based on drawing by the design features that we have considered. On the left you can see the work pattern. You can start rotating the blanks so. So far, refine as the material remembered. How much I remember the design points, those and use. Try just to bring them in space.
When the hand becomes a little accustomed to this form, when you digest what I remember right away, then compare with the drawings of the blanks that we have done above. Perhaps all the structural moments are not taken into account. Then "reap" the blank with all the constructive moments, in order to learn all the material. I assume that it is best possible to draw blanks in those positions, profile, three-fourth, with small deviations in head slopes. Well, well, first and it is not bad.
18.
Do not forget that the head-volume form, try to carry out lines in shape, by volume, lie on the volume of the line of the line, then you will not get cut, others, straight, well, and so you learn to "feel" volume, "Touch" His design.
How to draw a man's head
Now what we found, studied on the dwarves, will be transferred to a person's living head. Translate theoretical knowledge to practical. We will slowly approach the living scalp. Now Sit on
Tour in front of myself, who has no pictures, photos and start working. I, whatever you have a job, I use schematic drawings, I'm sorry, I can not show a photo.
So .... consider carefully the head of your simulator, in all three turns, get used to it. It is quite possible. Now you do not look at a person at all as a person and the image itself does not distract you, you are not afraid. You have woke up to understand the structure of the head itself and subconsciously want to understand its volume. Professional glance of the stakeholder, looking for not beauty in the picture, and the "device" of this beauty. Interested, estimating glance, is exactly what we need.
And now all that we have studied above, try to move to a living head. All constructive points, all important lines and axes spread to a natural living head. See:
21.
22.
23.
This is the entire material that we studied above. All that we did with the dwarves are well-lived.
As you can see, here are also accurately present all the design points, all lines and axes. We can still see how it is formed, the ear height is located and the structural point of the lower jaw.
And now everything is also, that you have been shown now, worry with your kind. Find all that I found here.
I don't write the names of the axes and constructive points, you had to remember what and where it is called still working with dwarves. Forgotten, return and study again.
And now, embrying into the process, I will tell you another proportion. There are two things. 1) the ideal proportions of the human head, they can still be called "Greek", since the Greeks created the canons of beauty, which were just based on accuracy and correctness. 2) And there are those proportions that are present absolutely from each person in the design of his head and they can differ somewhat from perfect. And it is discrepancies between them, between each person and help to have their own individuality. This is when you make a drawing, unmistakably find the proportional ratio of the parts of the head of this person and reach the similarity means, caught correctly proportions. Look at the next drawing, the main, large proportions are shown here:
22.
If you connect arranged so to speak, opposite each other's design or points of the most significant parts of the face (nose, mouth or chin), then all of them will pass through the ear. But these radii, if so you can put it, or are simply from the ear hole to a particular point, just can help us in successfully finding proportional ratios of parts of the head.
This such essential detail in any book to me, to great regret, has not met. At the lessons, the drawing on this emphasizes the attention of the teacher. Most likely, this moment refers directly to practical skills, which are captured, are being studied during the work. And it is very important to us.
Naturally, such a principle of searching for basic proportions can be used in a three-hard-fuzzy turn, and in the view, then in the FAS or when the head has an angle, with the difference only, that in the profile these "lengths" or the line are visible to visually practically evenly, And in other cases, they will "go to bed" in shape, "wrap up" in space through the scan volume. The search for them is just a matter of experience, and experience is practice. But you are already warned about this, it remains for small.
And now they will consolidate the material passed. Let's make a head, just consider what passed.
23.
We work in steps:
1. Complete the place of the head with the shoulders in the sheet plane. My man's head is a little clown in a sheet, it was better to be visible. In general, you can make it smaller. But the principle is: in front of the face of the head indenting the edge of the tablet is greater than from the nape to the edge of the tablet. From above indenting less than below. The shoulders can be completely visible, but now it is not necessary. So, you compounded the composition in a sheet of overall width and height (we use the search for these values \u200b\u200busing the conditioned three points).
2. We find the scope, neck and shoulders separately with the main masses.
3. Draw a head blank, given the proportional features of nature. Do not forget about the neck: the scope of the head is attached to the volume, the neck cylinder is not flat. And the neck is attached on the shoulders, as on the pedestal. The shoulder belt is also a bulk form, now it is enough to just catch the main proportional ratios of it and outline the shoulders.
A) We plan an axis that shares the head into two equal half-left and right. Points are formed by high point and chin point.
B) We are planning a line of three-hard rotation. It goes through a zilly point, therefore, the latter will be pre-found.
C) we find a line of abnormal arcs. It can be scheduled along the eyebrow line by spending it on. But here we will add another point in the point, where the zilly torque of the frontal bone passes into the abnormal proof of the zick bone. It is not difficult to see this point, this is a break of a break, where the abnormal arcs change their direction (see eyebrows). Names from the section of the plantatomy, we will not deepen, we simply call it the point of the breakfast of the abnormal arc.
D) Find a line that is located under the nasal pyramid and we also conduct it as in the case of the linte of the abnormal arc. Check yourself with an eye and do not look "Villy" in nature. While finding proportions, try to sit in the same position without changing the angle of view.
E) find the temporal point. Her nature is very clearly visible. On one line there is a temporal point, a high and ear hole. The line falls in shape, over the volume of the head. In my case, this line coincides with the "edge" of the head, "wraps" in space.
G) We hope ears and nose. Ears, the height of the ear was found, the features of the form we get from nature. Now the nose: generalized form-pyramid. We plan it schematically with a total volume that the nose takes. My nose my nose is quite massive, its lower part is very well developed, the lower plane of the pyramid will be visible, outlining it.
Now the following and very important thing: No form on the head of man does not "live" by itself. There is a permanent flow, entry, convention, transition from one form to another. This is how things happen with our nose. It connects with the inscruting torches forming another plane, which is located between the eyebrows and is clearly visible.
H) we find bile dots finally. I note the points of the zicky frontal bone processes and the point of cheekbone will give us a characteristic conditional plane. Every person has it different. Catch the proportion. And from the same points you can mark another conditional plane, having conducted lines from these points to the middle of the ear.
K) Find a place for the mouth. After the mouth line in the form determine the angle of the lower jaw.
L) Find a place for the eyes. While the line on which eyes are located. The line approximately goes in the angle of the eyes. Ideally, if you hold a line from the edge of the pyramid of the nose up, it is cooked with the inner corner of the eye. In a vibrant form, it is not always so possible, you can check yourself as follows: There should be enough space between the eyes for another one.
M) do not forget about the frontal beatings. From the most constructive points that were found in constructing the pyramid of nose-free bugs, we conduct lines to the most convex points on the human forehead, which are also located symmetrically relative to the central axis. So we "tying" the frontal bumps into the general shape of the head and do not give them freely "hang out" in the space of the sheet. And from them you can already tied the lines to high and temporal points are another plane formed.
And naturally, we support all this work by our knowledge of the linear perspective. Look like I do. If all conditionally horizontal lines are further carried out, then somewhere at the point of the horizon lines they will comply. The volume of the head does not have large magnitudes and depth, so I enter the prospect completely a bit, whatever it is felt. After all, our head is the same form volume and is in space.
Everything, at the initial stage, does not need to work. Let us join this material, remember, work, you need to have anything that you feel confident with this portion of knowledge before switching to the next material. The next material will wait here here - draw a person's head with a simple pencil part two.
And, finally, allow you to give a small advice personally from yourself: Sometimes a strong healthy sleep can help you master the information and "digest" it is much better and faster than sleepless hours of work in working with eye-catching eyes and lighted to the hole with the tablet. The work is very important, but also do not forget to rest. It is in a dream that your brain is intended for yourself and it is at that time he "puts everything neatly on the shelves" than you loaded it for the day. Other time- As long as you sleep, he has to bring himself in order.
Bones of Neck Consist of seven cervical vertebrae, which include the upper part of the spine. Large muscleswhich affect the shape of the neck, this is a trapezoid muscle in the back and sternum-bed-like muscle in the front. They pass from the back of the ear down to the inner ends of the clavicle.
Neck Can make movements in all directions: Tilt your head back and forth, in the side of any shoulder, and rotate it from the side to the side of 180 degrees.
In addition to sound-conducting structures in the ears, only the jaw moves from the head joints. All other skull bones are rigidly cloudy and real estate.
The muscles of the face can be divided into two types:
Proportions of human head. Simple construction method
Face, of course, the most expressive part of the body. Here simple construction methodthat will help you see what simple forms consists of a head. The average proportions of the human head are shown in the figure below. The height of the head is about the same as its width when looking at the side, so it fits into the square in the profile. When viewed front, head width is much smaller than its height. 
Start from drawing a head into the profile. Draw a circle for the skull, and then add two lines on the front of the person to designate the jaw, as shown in the picture above. 
The most common bug newcomers when the head is image is that the head seems flat. Therefore, as soon as possible, try to draw type of three quarters, striving to display the roundness and the foundation of the forms. Use light reference lines to designate the central face line and eye position.  The figure shows a pretty soft face, but at this stage the main thing to understand the main forms. Persons of people differ from averaged sample in many ways, as it will be discussed in detail in the following lessons. These drawings are the first step. If you draw hundreds of these simplified goals, you will come to understand all the subtleties of the relief of the human face and will be able to fill their drawings with life and character.
Most important to understand that face is not just a flat surface with the details superimposed on it. To draw faces successfully, you must understand the three-dimensional surface shape - which is why we started with a non-battery average person, which can belong both to a man and a woman. 
If you look at the foggy newspaper photo of the crowd below, then you will see that each face is different from the rest only with the display of light and shadow on it, and not with the shape of the eyes or lips. If you can imagine face as templateIn this case, you will avoid a common mistake of creating lifeless mechanisms of eyes, noses and mouths, indistinguishable from each other.  therefore practice face template drawing with the addition of light and shadowuntil you fully understand its shape.
  On the images above, several basic forms of the face and head at different angles are shown. I repeat once again, now it is important that you understood the real surface shape, not just a plan.
The article used the materials of the book Ron Tiner "Figure Drawing Wort A Model".