How to draw a princess from different fairy tales. How to draw Ivan Tsarevich from the fairy tale of Tsarevna Frog? How to draw Ivan Tsarevich and a gray wolf? Simple illustrations of a fairy tale princess frog
Read also
In profile. Of course, before you take for work, it is better to consider the picture, a toy or even a live frog. When your future sits to you sideways, her body resembles a rectangle supplied to one of the corners and inclined to the ground, and the back leg bent in the knee perfectly fits in the oval.
Put the sheet as convenient to you. The princess-frog, of course, lives, but in fairy tales, even the simplest objects become unusual, so you can surround the figure with rickens and wonderful flowers, but it is better to do it later.
Spend two lines parallel to the bottom and left sides of the sheet. They need it to be easier to navigate. Rates from the point of intersection of centimeters five up the vertical line, put the point.
Start drawing a frog torso together with your head and trapezium. A longer base is the top line of the frog head.
The drawing begins with geometry
A phased way when parts of the object are built on the basis of geometric shapes, quite simple and accessible even to a ten-year-old child. From the point set on the vertical line, start drawing a rectangle. Its parties should be located under an acute angle to the existing lines. Between the auxiliary horizontal lines, draw a long oval. You have the foundation for the body along with your head and the back leg.Oval, like a rectangle, starts from the vertical line, to which the frog will be turned back. The opposite part of the long axis of the oval is under the upper right corner of the rectangle or even a little further.
Rectangles and Ovals turn into a frog
Carefully connect the left lower corner of the rectangle and the end of the long axis of the smooth line. Round the upper corners of the rectangle. In the middle of oval, draw an arc parallel to the top. Under Oval, draw a large flat paw.Draw details
On the head frog, closer to the back of the head, draw a semicircle, and in it - the eye. From the right upper corner, tighten the arc of a little curvature - mouth. Draw a frog hand. It can consist of, for example, of two long ovals located approximately at right angles to each other. The hand ends with a brush. It can be compressed in a fist if your princess holds an arrow.Arrow, Crown and the rest
Draw parts that distinguishes-tongs from other frogs. On my head, draw the crown. On the side it looks like a horizontal strip with a tooth. Teeth can be decorated with small balls. The arrow is a thin straight wand, at one end of which is a triangle-sharp, and on the other - feathers, which are easiest to portray as two long rectangles with beveled short sides. Draw a leaf on which a frog is sitting, as well as different other plants.How to draw a frog? It would seem that such a simple animal, what could be difficult? However, to portray on paper or in a graphical editor, this small creation is needed, specific knowledge and skills are needed.
Masters-artists can draw a frog without special works. But how to be novice or children. It is for them that this material is intended. In it, we will consider in several examples how to draw a frog phased pencil for children or beginners. Simple illustrated lessons will help assist the basic principles that need to be observed during the workflow.
By the way, about the process. On our site there are other interesting materials that will help you and other animals. Although the section is still far from completion and in the future there will be much more texts. If you do not want to skip their output, be sure to subscribe to updates.
How to draw a frog to children
The frog is very often appearing in various legends and make many nations of the world. It is enough to remember the fairy tale about the princess - a frog or a newly released cartoon "Princess and a Frog". Therefore, it is not surprising that many guys want to portray this animal.
Before you understand how to draw a frog to children with a pencil and stages, you should understand a few features that are characteristic of this beast:
- A frog is a common name for a huge number of animals.
- Dimensions and appearance of frogs varies depending on age, type or floor of the animal.
- Most of them live on water bodies and feed on living beings of smaller sizes.
- Toads are a variety of frogs. They are usually much more in size.
These, minor at first glance, for the artist things, however, will help children portray a frog right. Specifically in this lesson, we will not affect such subtleties as realistic, the correctness of the anatomy and other aspects. We decided to depict this animal in the "cartoon" form.
We look at the basics
As in other our lessons, for example, "", we will begin our drawing with the designation of the leading axes. From their location, sizes and shapes, the exact appearance of the appearance will have a frog. So that this stage does not cause difficulties, first imagine exactly how your character should look like on the final stage.
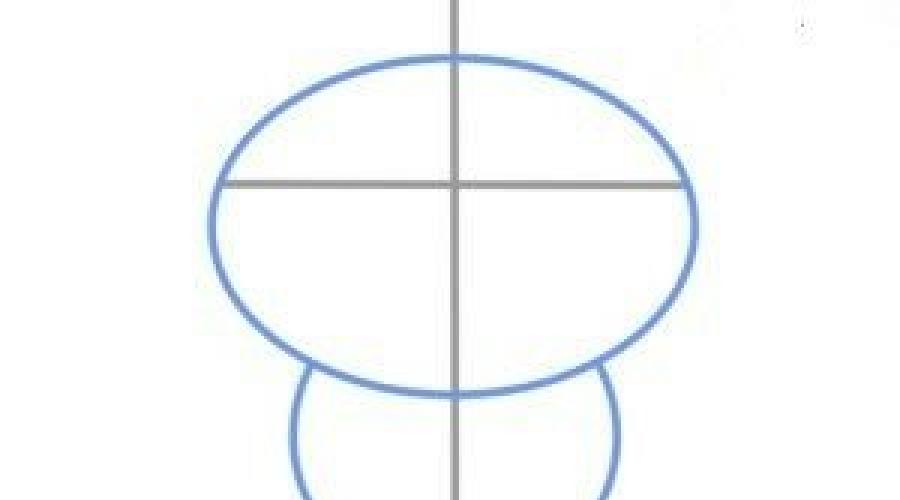
Since we are talking about how to draw a frog with pencil children, we will take the most simple pose - anfas. It implies the immediate visual contact between the image and looking. To do this, we draw in the upper part of the oval sheet, shovel from above and below. After that, we divide the figure into four parts by horizontal and vertical lines as shown in the figure. At the same time, the latter should go beyond the limits of oval.
After that, we will hold an arc, the ends of which will rest in our oval. It will be a torso. At the same time, the vertical line that we conducted earlier should share the resulting figure into two equal parts. If one of the halves succeed a little more than the other, do not be discouraged. There is no fundamental difference in this. However, the same dimensions are desirable. Immediately, on an equal distance from each other, drew two small circles (paws). 
What do you do next?
At the previous stage, we turned out a rough version. It is on it that all further drawing will be built. As you noticed, it is completely symmetrical. If you have not turned out, there is a small trick:
- bend the leaf in half along the vertical axis;
- draw parts of all the above figures with the right side of the axis;
- fold the sheet along the vertical line so that the drawing looks outward;
- apply a sheet to the window. The drawing will be visible;
- circuit your shapes on the other hand and spread the sheet back.
With these steps, you can symmetrically portray an absolutely any shape without the help of any tools. However, we were distracted.
Now connect the lower paws and the torso using multiple lines as shown in the figure. At the same time, the lower lines are smoothly bent, while the upper is broken in one place, forming an acute angle. Recall that this is only a rough version. Therefore, it is not necessary to press too much on the pencil during the workflow. 
First goes head
Inside the top oval, draw two circles that will go beyond the borders of the figure. To draw a frog's eyes in a phased pencil for children, focus on those lines that we depicted at the very beginning. 
Inside each of the figures, draw two very fat points. Connect the circles with a smooth concave line from above, and the same line below. To portray the latter, just enough to circle a tougher pencil. Inside the figure, draw an object similar to an orange or apple slicing. Thus, we got a pretty face of a cartoon frog. 
Do not forget about the paws and torso
Now that the head of the frog is completely ready, we will get up for the paws of our character. Along one of the lines that connects the lower circles with the torso, spend two curved lines. So you depict the front paws of your creation. From them, spend some more lines to draw phalanges and membranes. 


It remains the case behind the hind legs. Spend two curved lines, focus on the location of the entire drawing. If you followed us, then you will do as shown below in the figure. If you have been separated somewhere from our recommendations, then draw limbs so that they look organically. Although it is a cartoon style, certain laws in it still have. 
In completion
At the end stage, we will erase all the auxiliary figures and the lines that we painted earlier. Cut all the lines again. Watch the drawing boundaries not too fat. To adjust the thickness, use eraser. 
In principle, on this lesson about how to draw a frog in a phased pencil for children, can be considered finished. However, we believe the character will be completed if you decorate it. As a result, you may have something like that. 
Some species of frogs have a very bright color. However, the abundance of paints is hidden a specific promise - a warning. Bright colors say that this is a poisonous creature and unsuitable for use by other, larger predators.
How to draw a frog for beginners
In the previous case, we chose a "cartoon" style. Picture with the help of it the character is much easier than to make it more realistic and plausible. This time, to draw a frog pencil for beginners, we will take the basis of a more believable frog.
In order for the drawing to be right, we recommend you to familiarize yourself with photos of living beings. Even better if you manage to see the beast in its natural habitat or, at least in the zoo. So you can understand the habits of the animal, the features of his movements, hunting, etc. All this will be an additional bonus with frogs.
Let's start with the lines
This time we will not use any auxiliary figures. For the image of a realistic frog will be quite ordinary lines. Place a sheet of paper in landscape orientation. In other words, the width should be greater than height. Spend curved in several places in the line as shown in the picture. This is the upper boundary of the creature, his back. 
On the top of the line, draw your eyes. Note that this time we chose the pose "in the profile." This means that one of the sides is hidden for us. Therefore, we depict one eye fully, and the other - only we indicate a small convex up line. You can read more about the poses and run in our article "". 
Spend another one, a slightly curved line from the top point of the main line as shown on the screen. Thus, we drew the body of our frog. After that, one more, which comes out of the previous segment. Yes, at this stage they do not look like that, however, a little later you will understand why we left it precisely in this form. 

Case behind paws
Now it's time to draw the paws of the frog gradually for beginners. From the end of one of the lines, swipe the curved line so that it crosses the lowest of the segments of our drawing. 
Next, spend another line as shown in the figure below. Note that it is much bent in several places. So we will depict the phalange on the animal's legs. Immediately spend two more lines. One of them refers to another one of the thumbs of the creature, to the other - the back paw. 

Since our frog is originally sits on the hind legs, we will show it by depicting a curved line in several places. Then you remain repeat the actions done at the previous stage. But remember the fact that the frog is depicted in the profile. 

Finishing stage
The last thing remains in this lesson - it is to decorate our creature a kind ornament on the back. Remember that all frogs differ from each other. Accordingly, the patterns with which they were born are different. The pattern can be completely any. Look at the photo of the animal and draw a frog in a phased pencil for beginners with such an ornament that you will like more than others. 
In addition to frogs and toads on the planet there are quacs. This is the least in terms of the number of individuals family. Some of his representatives to escape from the enemies, learned to plan in the air. Thanks to this, some call them "flying frogs."
Another way to draw a frog
We reviewed the basic examples that are used in the image of frogs. We looked at the "cartoon" and realistic styles. This time you draw this creature in a mixed style that the features of both directions have absorbed.
Always start from head
As in the previous cases, we start drawing a frog from the head. Picture oval. From it, spend two lines: one long and one very short. From the latter, at the same time, spend another segment that will connect the previous lines. 

Next, light sketches depict the rear paws of the creature. Weak pressure on the pencil is needed that in the final stages it is not to get a painting drawing when erasing the eraser. In the same way, draw the forelimbs. 

As you might notice, the anatomy of our character is different from the traditional. This style cannot be called realistic. However, I also won't call it a "cartoon".
Face - the basis of everything
The next thing we need to portray in drawing a frog pencil in stages is a face. Since we have mixing styles, we will give the character some humanity. We will do it with eye. Draw two ovals and divide them into two parts of a light curved line. The upper part is the character's eyelid. 
Further, with light movements, draw one of the nostrils (frogs are worn! Just like that one you can not call). Immediately depict your mouth. Since we "ignore" our character, make it smiling. At the previous stage, we did not complete the front paws. It's time to do it. 

Finishing stage
Now you can safely circle all the draft lines, erase the extra elements. Do not forget to draw a tubercle on the body and pupils. For the latter to be successful, read our article "". Although it considers a specific Japanese style, there are useful tips and recommendations in the material. 
In principle, this drawing a frog in a mixed style can be considered complete. However, it can be disked to make the image be fully completed. Moreover. You can add additional items, for example, a pita on which an animal can sit. As a result, you can get something on the similarity of this: 
If you liked the material, we will be happy. Write your wishes and recommendations in the comments to the text or to us by mail. Addresses you will learn in the "" section. If you want to continue to learn to draw according to our lessons,
Do you need to portray a frog for school, a serious biological project or just for the soul? Or maybe the child asks the day: "Well, do you draw!"? There is nothing easier! Following simple step-by-step instructions, we'll figure it out how to draw a frog in different styles. In the first master class, it will be similar to this, and in the second - will be funny
What do you need to work?
We will draw with a comfortable soft pencil. In addition to him, it goes without saying that there is a dense paper, an eraser, as well as markers or for coloring. Check if there is green and black shades in the box - without them!
How to draw a frog gradually
Step one. Draw the body of the frog in the form of an elongated oval, and then make one of its side pointed to the bottom. Add two small circles at the top of where the future head is located - it will be eyes. Draw them so that one overlap the other.

Step second. From the body proceed to the limbs: draw the rear and front paws with your fingers. It is quite simple, if you look at the drawing. Well, if the first time it does not work, you can always erase too much. We plan nostrils and mouth in the form of a smooth semicircle, with a protrusion in the middle.

Step Three. Add details: draw pupils, nostrils, upper lip, draw a smile, an additional horizontal line just below the middle of the torso form the belly.

Step fourth. On the back, we draw small circles and ovals of different shapes to illustrate the bearded texture of the bodies of the frog. You should not make them too much - five to six pieces is quite enough. The resulting drawing can be circled with a marker or a black handle, and the pencil sketch erase the eraser.

Pitch fifth. It will be left to add colors - and ready! Use dark and light green shades for the back, and cream or sandy - for the abdomen. The frog turned out well, just like a living!
How to draw a frog-cartoon
This master class is even easier. It can easily handle even a five-year-old child who wondered how to draw a pencil frog? "

First, they draw the reversed oval, and under it - another oval, a squat form, resting in the first. It will be head and body. From below, you need to draw long legs with pointed fingers. At the top of the legs, we will have a single design. On the torso we draw two small front legs.

On the head, where the eyes should be located, draw two quite large circles, and in them - pupils. Under them draw a smile as a rounded line. On the front paws, too, form the pointed fingers, along the same scheme, as on the legs, but much less.
It will remain to circle the outlines of the entire frog marker or stronger to make a simple pencil. Eraser is erased all too much, we remove the errors that have arisen in the process. Coloring the frog at your discretion. You can and you need to use color transitions, from light to dark, so that the drawing is greater and richer. Here will be appropriate pink snacks on cheeks.

That's ready. How much time did you spend on the drawing? And the pleasures got much more!
Today's lesson will go on how to draw a princess frog gradually. This fabulous character actually looks like a plain frog, only with some additional elements in the form of a crown, arrows in the front legs and a good-natured smile on a cute fairytale. Any child will like the idea to draw a favorite hero.
So, for this work it will take a simple pencil, eraser, color pencils or paints, a black gel pen and a sheet of paper on which a frog will be located.

Step 1. First you need to draw a frog's head with thin lines in the form of eggs laid on the side.

Step 2. From the stupid end of the egg closer to the middle, two tuberca is drawn. These are future eyes.

Step 3. On the tubercles should draw the eyes of the princess frogs. From the sharp tip the mouth is drawn. Next soft lines draw your back and neck.

Step 4. Finish the body. The main thing is not to put pressure on the pencil, so that you can then erase unnecessary lines.

Step 5. Since our printed frog is sitting, then the front paws have straight, and the rear bent. To better understand it is necessary, remember the legs of a person who sits squatting. Just at the same time, it is impossible to forget that the rear paws at the jumps are longer than the front. Draw paws.

Step 6. The next stage is your fingers. On the front paws in a frog, four fingers, and on the rear - five. But it seems the side that she has three fingers on her hind legs. So draw.

Step 7. So, how to draw a princess a frog is already clear. Now you should add fabulous realism in the picture. To do this, you draw a crown on the head of Kvakuhi. Her design is a personal matter of everyone. The main thing that the crown does not fall from the head and did not seem too small. According to the plots of fairy tales, it was a frog caught an arrow, so you need to put an arrow in the front paw. Such a real with a sharp tip and lush plumage. As you know, Tsarevna Frog lived in a swamp, so I should draw a reed, flowers, mosquitoes, dragonfly.

Step 8. A black gel handle must be hosted all contours. Gently so as not to draw extra strokes (which is then washed or erased, it will not be possible.

Step 9. The next step will be - wipe all lines conducted by a pencil.

Step 10. A real frog, it is not just green. She has the bulge of a darker color or the cheek lighter. So for coloring the printed frogs, you need to take a few shades of green and even yellow. Dark colors shall with the area of \u200b\u200bthe eyes and nose. And there is already at will.

Step 11. We highlight a brown on the body of a frog strip and stains, thanks to which it masks. Gentle shades of yellow and green need to decorate the belly and neck of the princes.


Step 13. After that, proceed to the background. First, paint the place on which the frog is sitting, then draw the arrow.

Step 14. The next step will decorate all pebbles and flowers.

Step 15. After that, beautiful saturated colors paint the leaves in the picture.

Step 16. By tradition, the crown should be gold, which means yellow. So it is necessary to calculate the crown. After that, the water of the swamps (if such is assumed), toned green and blue in turn.

Everything, a lesson on how to draw a princess frog, completed.

Even if this wonderful drawing does not work the first time - it will turn out from the second. Good luck.
Finally, look at the video, where it is shown, and so that it becomes a princess, it is enough to draw a crown on your own.
Now you can share impressions in the comments, and also show a lesson to friends.
Many fairy tales carry morality and good, but most of them can not understand the usual mind. For example, genetic experiments with dough and sawdust, from which it turned out to be a very alive and thinking bun, which later went to the fodder of the wild animal. But more often in fairy tales there are girls with oddities: they drive in watermelons, then small, like a match, and some and at all. About the latest talk more. We find out how to draw a princess frog pencil. Tsarevna Frog - the top of the matriarchal structure of power among the inhabitants of swamps and sewers. How any self-respecting nausea is constantly silent, and her squabs perceive as the gift of God. Able to turn into a person, which would be very annoyed by Darwin and other lovers. It is a single Russia party, which allows it to be constantly re-elected to the post of princes.
One day, during the tea party ceremony, an unknown flying object of the arrow shape was hit, from which he miraculously died. As much as she is the only representative of his race, which at least can do something, no one could help her, and the rest of the toads went hunting for flies. And she lay so in a comatose state, until the tagged arrows came. Turning on the hypindroke mode, the princess forced the peasant to kiss her. After that, there was a toad in a real girl, and, including the mode of the historic, forced him to marry himself. So it goes. See where you shoot guys. In addition, the princess frog can:
- To annoy the French, turning into a person during the meal, which will force customers to complain about the institution;
- Arrange a strike how to do it in France;
- Being absolutely helpless in New Zealand, where wild tribes eat both frogs and humans;
- Catch the arrows in the mouth;
- With a good mood, it is a licensed version of the Java programming language;
- Work a conductor in the Zabye Chore on the swamp;
- Do not jump, but crawl so that the crown from the head does not fall;
- Posing for us wishing to draw her portrait!
Now we are this and the audience.
How to draw a princess frog pencil phased
Step one. Sketch sketch.  Step second. Draw a crown and lapes of the gills.
  Step Three. Conduct the contours of the body of the princess frogs of a fracture line. Add strokes and draw an arrow as in a fairy tale.
  Step fourth. Remove unnecessary lines. Rent contours.
  Try to portray the heroes of other fairy tales, for example.