How to draw anime the face of a girl with a pencil in stages. How to draw anime face anime face girl pencil gradually
Before moving to the material, let's say goodbye to the previous topic. Namely, how to "join" eyes to the head (see: how to draw eyes).
Draw a schematically headed. And enter it into a rectangle. Below is a drawing, which you can redraw yourself simply now. Also draw the axes, spend them from the angle in the angle.

When the axes were performed, it is clear where to place your eyes. So schematically take and draw them. Now we look at .. proportional to our head looks like a normal adult head. Yes? Yes. And now we will make a small focus. We take another paper and draw the same oval. But now we conclude it in a rectangle somewhat differently. Look in the figure below:

This time make a rectangle more oblong. Stretch it a bit down. Not much, about like mine. Spend axis. Eyes also draw on the intersection of these axes.
Now look at these drawings and find the difference. Eyes in the second scheme are lowered down. Anime Head has its own features in drawing, and the first feature is precisely the fact that the eyes are located on it lower than usual, but at the same time they can "open" vertically as much as possible.
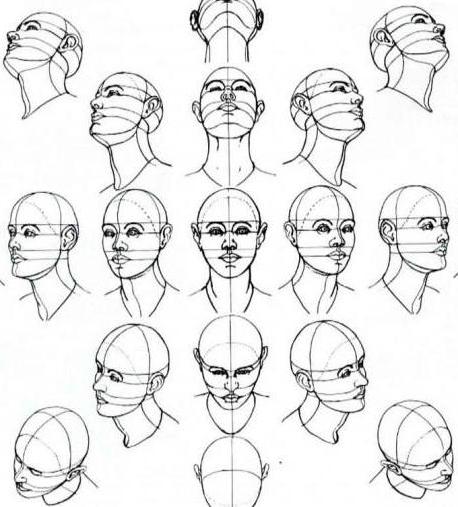
Now subordinate your eyes perspective. When the head turns, and the eyes will change the form. Draw the same oval. We draw an elongated rectangle, with axes, only in perspective. I subordinate to the general movement and eyes, draw them. You should have the following:
As the head of the head, there will be a turn in space and the eyes will be drawn according to the laws of perspective. Make different ways - they will not "lie" on the shape of the head. Drawn schematically, but for ease of understanding. It will also happen in bulk form.
Draw my head in anime style by method number 1
Based on the shape of the head, which we were placed in the grid above, in a rectangle, we do as follows:
Step 1. Draw oval, ovoid shape. It has already automatically laid a circle. After we occupy an axis vertical and horizontal. They will share our oval on equal Chati.
Step 2. We select the eyes you like, nose and mouth, based on the character that we want to get and draw a face as painted in the grid:

In the way, how we painted our heads in the grid in case of its turn, draw on:
Step 1. Draw an oval in an imaginary grid, but already with a turn. And we divide the resulting shape of the head on the axes equal parts, as in the first case.
Step 2. Draw a face in more detail, add your hair:

I draw my head in the style of anime by method number 2
Step 1. To start draw a circle. The basis of the head is necessarily a circle, the head itself is an egg-shaped:
Step 2. Tick the chin to the circle. Than stretching the chin, the more realistic and more seriously the face will be. What he is less weighty - will be suitable for a child or a kavoyny character:
Step 3. We divide the shape of the head in half vertically and horizontally. These axial lines are a nose line (vertical) and eye line (horizontal). After that, you need to divide the lower part horizontally in half again. The lower points of the ears and the nose will be located on this line. And lastly, in order to have it easier to draw the features of the face - we take and outlocate an additional oval inside. Internal oval comes from the hair line - where hair begins on the forehead, before the chin:
Step 4. We divide the lowest part into 3 parts. 1/3 Down from the horizontal nose line - the mouth line. The ears should be plane on the same line as the bottom of the nose and are placed from the bottom line of the nose to the distance just above the eye line. The mouth (in theory) should be as wide as the distance between the inner angles of the eyes.
Step 5. From how you draw your eyes to depend on the character of the character of anime or manga. Small- will give seriousness, narrow- will give masculinity, or malice. Here the eyes are located just above, which gives greater seriousness the character. Position them below and increase - get a more attractive character, more comical, more young. Here the corners of the eyes are placed on the horizontal line of the eyes. You can make them somewhat diagonal. Eyes should be at a distance of each other approximately in the width of one eye, then there should be a conditionally another eye between the eyes. And from the edges of the head to the eye should be placed half the width of the eye.
Now we do the same for three-hard turn:
Step 1. Draw a circle:
Step 2. Add chin. We carry out the curve from the cheek to the eye line and enter the corner for the creation of the jaw. There will be some corrections in the course of drawing.

Step 3. Divide the face in half vertically and horizontally. These axial lines are the vertical line of the nose and the horizontal line of the eyes. The nasal line is drawn along the line curve from the top of the head to the chin. Pay attention to the fact that the jaw lines are found with the vertical lines of the ears. If you carry out invisible lines, it will be similar to how the strings are charging the volume form.

Step 4. We divide the bottom of the face in half horizontally to create a bottom of the nose line. Proily follow this curve of the face going towards the back of the head of the ear also on this line. At 1/3 below from this line there is a mouth line. The tops of the ears should be slightly above the eye line and determine the eyebrow line. At an angle of 45 degrees between the horizontal line of the eyes and the vertical line of the ears there are hair:

Step 5. Eyes located on the eye line. Draw corners of the eye on this line. Eye, located further, is in perspective. Distorted in size, width and form. Since it is drawn in the form, but the form, that is, the head in this place is "wrapped" and entails the change in the picture of the eye. Eye also draw in shape.

We now move on to the next page, where we will consider a couple of ways.
We go to a detailed consideration of the methods of drawing individual parts of the body. Let's start with the face.
Circle
As you probably noticed, the faces of all the heroes of the anime are generally very similar and can be easily divided into several types. With this simple lesson, you will learn to draw almost any character, only slightly changing the main features of the face.
It is worth noting right to notice that the face of the character plays in the manga of an extremely important role, because The entire image of the hero is generally built around his face. In essence, the face is the same distinguishing feature that distinguishes anime (manga) and classical animation. The rest of the body's body, his clothes, scenery, more or less closely come into contact with the traditional style. So, draw a circle ...
Contours
We have a circle, we will now engage in the creation of a beautiful face. Spend crosslines through the center of the circle. Extend the vertical down about half the length, from the edge of the middle of the circle to the resulting lower point, swipe the curved lines. We formed the chin of the character and made the overall contour of his face.
Note that the older the character is, the more chin is expressed. Children's face is almost round, but the old people actually triangular. At the same time, at first, try to avoid especially sharp corners.
Guides
Find the center of the vertical line. Swipe perpendicular - it will be a median eye line.
Middle from the remaining segment - the tip of the nose. And finally, the middle of the last segment is a shadow from the bottom lip. Notice, we still do not delineate the lip line. The fact is to draw a mouth in the correct proportion of an even lesson, so newcomers are easier to start with the shade under the bottom lip.
Add part of the body
It's time to add its organs to face. Ears go from the eye line to the nose line. Nose Only the edge concerns their guide. And the edges of the eyes are located along their line (for large kavai eyes - the top eyelids are located on the line).
An important detail: from the ear to the ear, approximately five "eyes" should be placed, and the distance between the eyes should be equal to their length.
Draw light lines for eyelid designation. Their position on the face is generally not so important as the position of other parts of the body. So you can safely experiment with the position and shape.
And here is the last touch - we indicate the lines of the lip connection. It passes in the middle between the nose line and the mouth line.
Draw anime eyes
Eyes in anime, perhaps the most famous and distinctive feature. The variants of drawing the eyes of the great set, but we will consider the principle of drawing four main types.
The basic rules for drawing an eye in the style of anime:
Manga eyes have defined top and bottom with designated circuits or corners.
- the eyebrow as a whole repeats the form of the upper eyelid.
- The distance of the eyebrows from the upper eyelid is proportional to the height of the eye.
- The top eyelid throws the shadow on the eyes.
- The eyes of girls are more shiny, with eyelashes.
- It is necessary to strive for originality in the image of each character, because the eyes are one of the main techniques for transferring the character of the hero. A well-drawn hero should be recognizable only to several signs, such as clothing, hairstyle and eyes.
- All these "strict" rules are universally violated in many famous anime.
Draw nose
There is complete freedom. The main thing is to remember that in the manga nose is indicated by a simple line and always ends with the appropriate guide. Add shadows or make simple lines. Make a sharp wasp and "potatoes" - no restrictions, and several examples of "classic" noses look in the figure above.
Place your hair
So, our character is almost ready. It remains only to add him a hairstyle. Thread hair line. While you just make the first steps in the drawing of the manga, make the hairstyle as simple as possible. Having collapsed experience you can experiment with various forms.
Do not forget to use photos as examples. So it will be easier for you to explore the main lines of various hairstyles.
The line is contrary, we begin to draw your hair. Pay attention to the timing of hair combing. Even clearly distinguished strands are broken in one direction with the rest. This is done hairstyle more realistic. It is most convenient to divide the hair on strands than to draw each separately. This is true for any haircut.
After we made a general shape of a haircut, color your hair with our character. Gently, manga artists make sharp transitions from light to the shade. They define light areas, set them white or light tone of the desired shade and choose a sharply darker color of the remaining chapels. Carefully look at the drawing above, mark how the transitions between the light and the shadow are made.
Finishing touch
Spend two slightly curved lines from the chin down. Your character now has a neck. In general, the neck in men thicker than women. But you should also take into account age. Olders and young men, as a rule, the neck is approximately the same. You can hide the neck under the collar or leave open. In any case, it should only be drawn by a pair of simple lung lines.
so, we painted our heads and face of our character. In the following lessons, we will pass in parts below the neck.
Draw faces of girls, perhaps, your favorite girl's lesson! Another wonderful face of the girl appeared on our site, laid down in steps - this time is the face of anime girl, or rather, her profile! In the lesson you will learn how to draw animate face with a pencil stages, observing all the basic principles of face drawing anime!
This pretty big-eyed girl with red hair will like you. Take pencils and proceed.
Stage 1. Draw the contour hairstyles, then schematically mark the face. Draw a bangs anime girl. Pro-drawing facial will not be too complicated, because the auxiliary lines are already there. The forehead must be quite convex, but the nose is very sharp. All these are distinctive features of the image anime. And of course, the most important thing is huge eyes almost half a person! Draw them as we - you will succeed!

Stage 2. Next, we turn to the drawing of the mouth of the Girl. He is a little ate, while do not try to draw too chubby lips, otherwise your face will cease to be like anime portrait. Drew mouth? Go ahead. Dorisite to the end of the eye, pupils in them. The eyebrow should be quite highly raised by the nipper. You will only have to trust the hairstyle of this charming and everything is ready! Discover the finished drawing can you like you! Hair can be like classic colors, for example, yellow or even blue.

Cartoons in the style of anime and mango are gaining increasing popularity now! And you can very much to be able to draw these characters with all their characteristic features, I hope that the lesson for you will be truly instructive!
Related lessons
Attach the paper sheet of paper and move it. Simplify hair to "flap", increase your eyes and make big glare in pupils. Anime-portrait ready. But this is enough if you want to know how to draw yourself in
You have read a description of the process of creating many of the heroes of cartoons. But the style of Anime has enough nuances and special details. Manga characters immediately rush, and it is impossible to confuse them with any other heroes of ordinary cartoons. Explore it, and then you will simply draw portraits in the style of anime.
Facial expression
Want to transfer emotions, but do not know how? Draw a face in anime style one thing, the other is to pass the emotions drawn enough simplistic, you can even say symbols.

For example, pink dashes on the cheeks show that the hero is confused, the widely opened mouth with a grind when talking - it is angry, two arcs instead of eyes - eyes are closed, and most likely the character is enjoyable.
However, without studying this "alphabet", you can easily guess the mental state of the hero. If the portrait is smiling at the portrait, see how it is depicted in an anime-style, and do the same.
Dynamics
Draw your head easily in the face. But it is boring and rapidly annoying. How to draw yourself in the style of anime so that the head is dynamic? Imagine that the head is a ball. Draw an exactly in the middle of the line on which eyes will be located. Now turn this ball along with the line to change the angle of movement.
Spend the lines for the nose and lips and then draw your face in the details. Work should always be done, outstanding figures. Distribute in detail - and it turns out that it turned out at all the movement, which I would like.
Main mistakes
Anime in portraits is obeying the general rules. Nose, eyes, mouth, ears occupy their position on the head. If you can not draw a conventional head, about how to draw an anime style portrait, you will think early for you. Mastery depends on experience.
Draw more sketches, practice. It helps to identify errors and ultimately correct them. Thus, instead of opening a portrait-style guide in the style of the Anime, learn the list of common bugs that you must consider, and try to eliminate them.

Are there any eyes evenly on the line? Many novice artists do not work out the same eyes, they do not know what to do with it and how. Draw yourself in anime style - this is not only to make eyes the size of the galaxy. After you draw them, point from below and above the extreme dots and spend the lines through them. This will help find out, evenly painted eyes.
Is the chin in the center between them? Swipe down the center of the face between your eyes and make sure that the chin on this line. It should also cross the mouth and nose. In the center, on a third or quarter, it depends on the perspective in which the head is located.
Are there ears on the same level with eyes? The upper point of the ear shell is located at the eyebrow level. Middle - on the same line with the tip of the nose. But these are individual values, so there may be deviations from the specified rules - consider it.

Watch Anime, shot on the manga of different authors, so as not to wonder how to draw yourself in anime style. Learn the different men's styles and at the same time enjoy watching. Many Otaku (avid animeters), without studying the principles, the first time they make a good "anime", drawing.
If you want to learn how to draw an anime girl's face, this detailed lesson with pictures will help you. Prepare all the necessary materials and can proceed to the creative process. As a result, we will get such a basis for the future, let's start!
Draw a neat oval face. Follow it into four parts. This will be our own anime of the face, at the expense of which the picture will work out beautiful and symmetrical.

We begin to draw a girl's face. In the style of Anime, most often draw pointed chins with clear lines, and the heads themselves expand slightly up. Add a thin neck, hiking two lines.

Approximately in the middle of our oval, in the place where the foundations are intersect, start painting the eyes. They should be very big, in anime style. The distance between them should be equal to the width of one eye. Eyebrows in anime are drawn thin, in the form of a pair of simple strokes.

The bottom of the face of the girl Anime divide into two parts. Draw nose-point and little mouth. The distance from the chin to the lips should be equal to the distance from the lips to the nose. Also at this stage, we carefully draw pupils and iris, eyelashes, the ears of the character. Gradually remove the extra lines so that they do not distract us and did not draw the drawing dirty.

Now we should draw the hairstyle of our girl anime. Do not forget to retreat a little from the edge of the head, starting to draw your hair, otherwise the hairstyle will not look at the volume.

We remove the extra lines, add even more strand hairstyle so that it looks dynamically. At this stage, I will hatch the pupils and the iris, draw an anime girl with a pencil anime to look brightly and expressively. Please note that in some places the line is thicker than usual.