How we learned to draw a chanterelle. Draw and paint a chanterelle in scarves in stages to children (detailed lesson) draw fox with children 4 years
Read also
"Mom, Draw!"
Each mommy sooner or later hears the cherished "mother, draw me ...". And the endings of this phrase are a great set. Children ask to draw a flower, a tree, a house, a dog, a cat, a butterfly and many other things. For parents who are not deprived of artistic talent, it is not difficult to embody any request to your baby on paper. And what about those who do not know how to draw? It remains only to learn how to portray it. In many cartoons there is such a character like Fox or Fox. How to draw fox, we will discuss today and today. Everything is very simple. It is enough to follow the instructions, doing everything neatly and slowly. I want to offer several options for how to draw a fox pencil.
Fabulous fox with mom
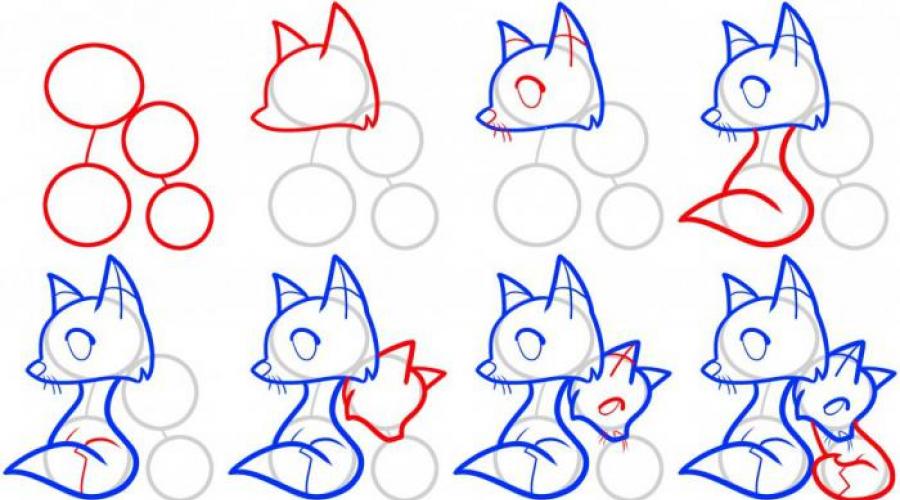
The most cute and most suitable drawing - fox with mom - is performed in several stages.
Step 1. Let's start a drawing from four circles, two for each animal that we gathered to draw. Connecting circles with each other, denote the neckline. This will be aware of the next stage.
Step 2. Now we will turn the upper right circle to the head of the Lisa-Mom. Place its face in the profile. Then make outline ears.
Step 3. Drawing the contour of the face and ears, on the latter we apply additional lines. After that, proceed to the image of the eye, nose and mustache. We finish on this work on the face of the fox.
Step 4. At this stage, we will give the lower circle of the body of the fox. Gently draw the body the same as in the picture in front of you. The tail is portrayed big and fluffy.
Step 5. Draw small arcuate lines, designating the hips of the animal. Next apply the necessary additional lines onto the tail. After completing this work on an adult fox, go to the fox.
Step 6. Draw him a head, face, ears and, of course, do not forget about the fluffy cheek.
Step 7. We apply additional lines on the ears, draw him eyes, nose and mustache. Fully finish the face of the fox.
Step 8. Now draw a torso, again focusing on the sample. Add a lush and beautiful tail. Draw on the tail and torso all extra lines.
Step 9. Clean the drawing from unnecessary parts using an eraser and circle a more bright contour of the pattern. Now you can paint your masterpiece.

I suggest another option of how to draw a fox.

How to draw fox in stages? The following way will help create a redhead beauty, more similar to the real beast, and not on a fabulous character.

Fox from a triangle
Here is an alternative option - how to draw fox, starting with a triangle instead of a circle. Making sketches. Draw a small triangle. We reserve two small triangle - ears. Next, we hold the line of the neck, back and draw the tail. Then - the sketch of the front paw, then the rear and two remaining. We supply the line, smoothing them and giving them softer forms. Draw a muzzle, drawing eyes, spout, mustache. I bring to the final version of the ears and the paws of the image of the animal. We make hatching for wool.

Our wonderful fox is ready!
Everyone remembers the image of the mysteriously smiling deadly chanterelle with pointed ears from children's books, but how to draw fox to the fox with a pencil?

To work, we will need: Pure paper sheet (better album), a couple of sharpened simple pencils and erase.
- If you are sure that you do not know how to draw, try carefully and slowly repeat the following instructions, srinking with an example. Let's start with a simplified version in the animation style, and then we turn to how to draw the fox "in an adult".
- Draw my head and ears
We draw in the center of the ellipse, slightly narrowed on the one hand, and two more eggs in the shape of an egg are future ears.

- Contour torso
The body of a fox looks like a wolf, but longer. We draw oval (you can draw a narrow - for thin chanterelle or more - as in the example). Try not to press a pencil very much, then we will correct.

- Note landing paws
Three paws are visible to us, one more remains out of sight. Sketch three oval, on the edge of each other than oval smaller. Do not draw the paws overly thin, their size must match the body.
- Add a fluffy tail in the form of a question mark.

- Draw a muzzle
I cut our oval a little, make your head more elongated. Before drawing a chanterelle, think: what will it be? Cheerful or sad? At the request of the expression "Face" chanterelles can be changed. Add details on the ears, "pads" on the legs, neat spout.

- We are erased too much
We add bending of the back and curls on the tail, we remove the auxiliary lines. Redade everything you do not like.

Our tricky chanterelle is ready! Try to draw fox in stages, printing this instruction in the form of a collage:

Now let's figure it out how to draw fox more realistic.
- Step 1. Draw a small head. Where ears are ears - triangles with rounded edges. Also, make a future fall - a slightly dropped oval.

- Step 2. Add a circle as in the picture.

- Step 3. Draw the contour of the body - the oval-narrowed on one side, place it "Vansel".

- Step 4. The front paws are long, not thick, of three different oval.

- Step 5. Similarly, draw the rear paws, but a little bigger.

- Step 6. The main focus decoration is tail.

- Step 7. Draw a detail of the ears, paws and a muzzle. Add wool stroke lines.

- Step 8. We remove everything with an excess eraser, carry out the contours of the pencil.

Here is such a beauty we turned out! Ready drawing can be decorated or left black and white. Instructions, how to draw fox gradually, will help you and your child do it quickly and easily. Try, and you will definitely work out!
Now we will look at how to draw a real fox pencil phased step by step for beginners. The fox refers to the pet family, there are also wolves and dogs.
Step 1. Draw a circle, we divide it straight, we note invask, where the eyes should be in the fox, and draw them, then draw the nose and face.
Step 2. First draw the forehead, then the ears, then the hair in the ears. We paint the side pieces of the eyes, teach the lines near the eyes, then draw the wool of the head with individual lines.

Step 3. Draw a mustache, wool on the face, which separates the color of the fox, slightly hair on the head and below.

Step 4. First, draw your back, then the bottom line, the curves should not be too verself, because we will wash part of them.

Step 5. Draw your paws and tail in the fox, the paws we draw not completely, because Lisa is in our snow.

Step 6. We look at the picture, we wash the line and in their place we draw the wool with separate small curves. Tail also make lush.

Step 7. We refress the picture, on the legs, too, we make wool, draw lines about the legs, showing that the legs went deep into the snow, you can still draw a snowy borger with blades in the foreground. So we learned how to draw a fox.

How to easily draw fox pencil in stages - for children and adults. Learning to draw a stickered pencil with a beautiful fox with a child. Learn how quickly and easily learn to draw a beautiful chanterelle.
Each person in his life wants to learn to draw, especially children, they are interested in learning how to draw not only people, houses, flowers, but also different animals.
Today we'll see how easily and quickly learn to draw the fox. Take a sheet of paper and pencil, look carefully on the picture, where the fox is drawn. Look at the location of the fox, as and where the fox is located different parts of the body.
The center of the picture is drawn to the fox torso, on the left of the fox head, to the right of the foxes, the paws of the fox are drawn down. Now, in the same way, mentally, divide your sheet of paper for different parts of the fox body.
Start drawing a fox from the torso, it consists of two circles, between the circles there should be a small distance, one circle draw more, the second smaller, connect these two circles with lines from above and below.
Now to the left of the Fox torso draw a small circle - it will be a fox head and connect the fox's head and body of the line.
Draw a fox face, it should be a bit elongated and pointed, draw four paws, the front paws are drawn straight, and the rear is a bit curved.

Now draw the fox with a muzzle, first draw your ear, it is drawn in the form of a triangle standing up.
Eye draw in the form of a small oval, elongated along the edges of the eye and draw the eyebrows of the fox and pupil.
See what should be the nose of foxes, correct the fox face and draw the tip of the nose. All that must be drawn in the figure is highlighted in red.

Draw a second fox ear, it should be triangular, standing, some stroke both ear.
Connect the fox and torso head, apply a small hatching, so that fox wool can be visible, draw the mouth of the fox.
Now draw the front paw fox and fingers on the front paw, draw the back paw. All that must be drawn in the figure is highlighted in red.

Dorisite all four paws of the fox, apply a small touch to the paws so that the fox wool is visible, draw your fingers on the paws.
At the end of the Fox's body, draw a large fluffy tail, apply a small touch on it so that it can be seen that the tail is fluffy. All that must be drawn in the figure is highlighted in red.

Erase the extra lines in the picture, see which beautiful fox you have turned out. The fox can be painted or shaking a little.

Now let's see how you can draw a little fox

Look carefully on the picture on which the fox is drawn, the fox torso takes the lower part of the picture, and the head and the tail of the Listenka occupy the top of the picture.
Draw first a fox's head, the head should be drawn in the form of an oval on the left side, the oval pull a little to paint the fox face.

Draw a lens ears, the ears must be drawn in the form of small ovals located to the top, the bottoms of oval should be more round, and the top of oval should be slightly pointed. The ears of the fox in the drawing is drawn in red.

Now draw the torso of the fox, it should be located below, under the head of the fox, on the picture torso, the fox is slightly intersects with a leaf head and painted in red.

Draw a foot fox, three paws should be drawn in the picture, the fourth leg is not visible, because the fox is standing sideways. Field legs in the drawing are drawn in red.

Now the fox need to draw a tail. Pickle Lisenka Draw on the right side, it should be big, fluffy, slightly bent to the top. On the picture, the fox tail is drawn in red.

Look at the fox outline, it must be fixed a little, draw the inside of the leson's ears, the fox circuit circle the bore.
Draw the lens eye, the tip of the nose and mouth. In the drawing, everything that needs to draw is highlighted in red.

Look carefully on your fox, erase the extra lines and circle the fox outline again. Look, what beautiful fox do you have turned out.
Lisenka can be painted in any color that you like.

Courses for the development of intelligence
We also have interesting courses that perfectly pump your brain and improve intelligence, memory, thinking, and attention concentration:
Development of memory and attention from a child 5-10 years
The course includes 30 lessons with useful tips and exercises for the development of children. In each lesson, a useful advice, several interesting exercises, task for a lesson and an additional bonus at the end: a developing mini-game from our partner. Course duration: 30 days. The course is useful to pass not only to children, but also their parents.
Secrets of the brain fitness, train memory, attention, thinking, account
If you want to dispersed your brain, improve its work, pump up memory, attention, concentration, develop more creativity, perform exciting exercises, train in a game form and solve interesting tasks, then write down! 30 days of powerful fitness brain are guaranteed :)

Super memory for 30 days
As soon as you sign up for this course - a powerful 30-day training of the development of super memory and brain pumping will begin.
Within 30 days after the subscription, you will receive interesting exercises and developing games to your mail that you can apply in your life.
We will learn to memorize everything that may be required in work or personal life: learn to memorize texts, sequences of words, numbers, images, events that have occurred during the day, week, month and even road maps.

Money and thinking Millionaire
Why are there problems with money? In this course, we will answer this question in detail, will look deep into the problems, consider our relationships with money from psychological, economic and emotional points of view. From the course you will learn what to do to solve all your financial problems, start accumulating money and investigate them further.

30 days
You would like to quickly read interesting books, articles, mailing and so on.? If your answer is "yes", then our course will help you develop a speed and synchronize both brain hemispheres.
With synchronized, joint work of both hemispheres, the brain begins to work at times faster, which opens up much more opportunities. Attention, concentration, speed \u200b\u200bof perception Strengthen repeatedly! Using photography techniques from our course, you can kill two hares at once:
- Learn to read very quickly
- Improve attention and concentration, since with quick reading they are extremely important
- Read on the book on the book and faster
Accelerate an oral account, not mental arithmetic
Secret and popular techniques and Lifehaki will even suit the child. From the course you will not just recognize dozens of techniques for simplified and fast multiplication, addition, multiplication, divisions, calculating interest, but also work them in special tasks and educational games! The oral account also requires a lot of attention and concentrations that are actively trained in solving interesting tasks.

Conclusion
Learn to draw yourself, learn to draw your children, for drawing a fox and a fox in stages, you have left a little time, but now you can draw. We wish you good luck in your future work.
Already painted +21 I want to draw +21 Thank you +. 36
Today I will tell you how to draw a child here such a cute fox in scarf and make it even better, brightly coloring. It is not difficult, good luck !!!
Draw and paint a chanterelle in scarfs in stages to children on the steps
- Step 1
First draw a horizontal line. This is the length of the fox head. Do not give a pencil very much!

- Step 2.
Now draw a droplet. This is a fox head. Pay attention: from the line of the head is symmetrical!

- Step 3.
We plan auxiliary lines. Then, relying on them, draw the foxes of the fox. Do not make them too big!

- Step 4.
Now draw a circle is the area for the nose. We draw it in the form of a triangle. By the way, if you draw correctly, as a result, the outer contours of the eyes and the nose, if you connect them, will resemble an inverted triangle.

- Step 5.
We wash unnecessary lines to not get confused. Below will schedule an arc - this is a chin of chanterelles.

- Step 6.
Excellent! Now draw a cervical cervical, as well as ears. They resemble triangles with rounded corners.

- Step 7.
We draw two circles at a short distance from each other. One circle should be more, the other is less.

- Step 8.
We connect circles with a wavy line. This is what should happen:

- Step 9.
Start drawing the thigh. It's just - we will supply a circle, but pay attention - I brought the line not to the end! We plan schematic paws - curves lines with circles at the end.

- Step 10.
Draw your paws, make them with your fingers.

- Step 11.
Draw a big, beautifully curved fox tail.

- Step 12.
Add details: draw a scarf, breast, draw the tail. Pay attention to changes in the ears!

- Step 13.
Make a clear dark fox loop and draw a fluffy fur instead. It is simple - on top of the barely erased lines in places draw zigzag lines. Draw the land at which Fox sits.

- Step 14.
Coloring a red fox, as shown in the picture.

- Step 15.
Brown flood paws and ears.

- Step 16.
Beige, paint the land on which fox sits. Tailing tail, breast and ears. If you have no beige, take orange.

- Step 17.
Take a black pencil and paint the spout and eyes so that they slaughter, and the look became alive. Dog foot.

- Step 18.
Collect scarf. Take a green pencil and cracked herbs. As needed to strengthen the color to make the drawing even better. Drawing ready.