How to make simple tricks with scarves and cord. Mastery Box with double bottom for toys with "godded" How to make a box for focus
Show the quadrangular box without the bottom and the lid. Thread through her hand, thereby proving that it is completely empty (Fig. "A"). Putting it on the table, take a sheet of paper, cover them the box and top wear the metal quadrangular hoop, which tightly pulls on the paper box. Then turn the box, cover the paper with the other side, putting the second quadrangular hoop.
Thus, you will get a box, tightened on both sides with paper. Now sprinkle the paper on one side of the box - and the pigeon will fly out of it (Fig. "B"). Then break the paper on the other hand and show that the box is empty and has no devices.
The secret of the focus in the box itself. When you show an "empty" box, the pigeon at that moment is not visible to the audience - it is behind the folding valve, thrown into the inside (the pigeon takes place in the width of no more than 7 cm). At the time of showing the "empty" box, you need to move right hand to it from the side from which the bottom of the valve is located, and the left hand should press the valve up to the wall of the box so that the pigeon does not fly out.
Showing that the box is empty, and pulling the right hand out of the box, put the box on the table up the valve that holds the left hand. Cover the box with paper and releasing the valve, immediately put on top of the paper hoop. By supporting the left hand, the pigeon does not break it down, turn the box and put on it the second hoop. Now it remains only, lifting the box, break through the paper and release a pigeon.
It turns out very effectively, if, tightening the box with paper on both sides, you can quickly draw on paper with carbon flying dove and then break through paper, release a real bird.
Make a box does not represent a lot of work. To do this, you will need a thick tin or fine plywood. The inner walls are filled with black paint, and externally paint with enamel oil paints. The valve is also made from tin or plywood and paint black. Its size must coincide with the sizes of the wall to which it is adjacent.

The figure shows a diagram of a box with a valve, which should be easily, without friction, walk from the wall to the wall. From the bottom to the valve, the bottom of the thick double canvas, painted black. One side is attached to the lower edge of the valve, and the other to the bottom side of the box. This bottom can be inserted inside, and when the dove crashes, the box can be shown empty. It is necessary to show its viewers to the top edge of the valve, then it will not be noticeable for the hoop.
Inside the linen dual bottom, make plates-loop. With their help you will be easy to fold the bottom in half the fold. At the same time, they will not allow the bottom to fake the book, which is very important in this focus. For the valve cannot fall, thin metal pins are soldered to its lower edge, which can slide between two stripes at the lower edge of the box, directing and limiting the valve movement.
You want to arrange an unusual holiday to your guests, then travel a few simple focus, which are also available to children. Focuses The eternal charity and the mystery of the focus always remains not affordable for people. Focuses are so complicated, and the agility of the hands is so worked out that the viewer cannot trace the magic taking place. But, nevertheless, the focus is a dexterity of hands and nothing more, the truth is some more technique and preparation of the props. There are several simple focuss that can be mastered by adults for, and you can help children master such tricks. These focuses are shown by famous magicians and beginners, although they are simple, but not a knowledgeable person will seem simply amazing. We do not advise you to become a magician too close to the viewer, but not too bright, or to light the candles.
Focus with scarves. On the table there is a cardboard box with covers on both sides, it can be square or round, but with a motley uniform pattern. The magician takes off the lid from the box and shows that it is empty. Then binds himself or asks for the audience, two headscarves, the scarves should be bright and better than contrasting.
Then the person puts into the box for the focus of the shawl and closes the cover, holds the box in his hands, showing - so I put a handkerchief in her, rotates it in front of the audience and does not noticeably turn the box so that the bottom cover is from above. The magician puts the box on the table and opens the lid. The magic movement of the hand takes the handkerchief, pulling them slowly taking over the tips. Shawls are unleashed. Shows the box to the audience - it is empty.
What is the secret of focus. Everything is just a focus box with a double bottom. And the covers have two boxes, on both sides. Inside the box, the tab is moving freely, which brands it into two parts. The black color tab creates the illusion of emptiness and depth of the box. On one side of the box already laid shawls. And with manipulations, this part of the box turns from the top, and with the associated scarves in another part of the box.

How to prepare for focus with scarves. It is necessary to prepare four thin lungs and no big handker. Two shawls of one color and two handkerchiefs of another color. To glue or take a finished box with covers on both sides, the pattern on the box should be symmetrical so that the viewer does not notice that the box was turned over. We do not advise you to use a monophonic box, a motley, a bright box, distracts the attention of the viewer from the main passages of the magician. Inside the box place a cardboard ring, or a square, freely moving on it, black.
Two scarves are placed in the box before performing the focus, the partition will close them, and everything will seem that the box is empty. When the box is turned over, the partition is dropped, and will cover the bound handkers, and the shawls are unleashed and put it in advance.
Focus with ropes. The magician in the hands of three cords of different colors, they are the same length, allow red, blue and green. The laces are freely hanging on the hand, then showing the focus binds the ends of each lace, clicked them into the ring. Each movement of the magician must accompany the magic silence of hands, making mysterious passes. It puts the cords on the left hand, then removes one lace, and the second and third reaches behind it. How did the cords connected in the chain?

What you need for focus with cords. Three segments of the cord of different color, one length of 80cm and 4-5 cm thick. One of the cords cut, retreating from the edge of 15 cm and entertain the usual button for clothes. Fasten the cord on the button. Then tie the ends from this cord.
Secret focus. When the magician, putting the cords on the hand, keeps the order. The first binds, puts the cord with the button, and the other two puts on the arm so that they are on the button. Here manifests the dexterity of the hands, and the magician does not noticeably unbutton the button, turns the special lace through the other two and buttons button. Then taking any ring, removes them all the chain.
So that the audience do not notice the movements of the magician, he must make magic movements with his hands, rotate around himself and thereby distracting the viewer. In addition, you can pronounce various short phrases.
This focus was first prepared and demonstrated by us in 1928. Props to it is pretty simple. Only tin, wire, cardboard and crankcore are required. The trick is always easy to diversify. You can, for example, execute only the disappearance of objects put in the box and the appearance of the cell. You can expand the number by showing the "Cage Flight with a Bird", where the display is made on two tables at the same time with two devices. This, no doubt, makes a greater impression on the audience. The device of the box in which the various things are put, allows the illusionist to serve the room to your liking and desire.
External effect. On the table there is a small beautiful box of polished wood. The magician opens the lid and shows that it is empty (Fig. 103, a). Taking different things: ribbons, scarves, etc., it puts them into the box. Takes the box in the hands and shows the audience that it is filled with various things to the edges. Then puts the box on the table at the same place where she stood and opening the cover, pulls out a cage from the box with a bird, and the cell of this size is that it takes itself the entire box (Fig. 103, b). A cage with a bird a focker shows the audience.
Props. Box with a secret device.
Cage with sliding bottom and bird.
The secret of focus is in the device of the box and the sliding bottom of the cell. The box is made of solid durable cardboard and are covered inside with the knee. It is equipped with two doors, and inside has a second box with double walls.
In fig. 104, and the box is shown in the context in the position in which there are different things in it. Here 1 - external four walls of the box; 2 - doors, upper and lower; 3 - a cell with a sliding bottom in the context; 4 - an inner box in which different things are put; 5 is a folding wire handle of a cell, it is put on a cell above the bird (see Fig. 104, a). As can be seen from the drawing, the outer box is in this position that the internal - 4 is open, and you can put any things in it. The cell charged in the box is located downstairs, between the double walls of the outer box 1 and internal 4. If you now close the box and the lid 2, turn the bottom up and open the second cover 2 (see Fig. 104, b), then the cell can be easily removed Behind the handle from the box. The moving bottom on which the bird sits, under the influence of its own severity and the weight of the bird goes down to the cooled corners of the cell and it will be a normal bottom.

The cell is made of tin corners and soldered to them with a thickness of 1 mm soldered to them. To the top of the cells are attached to the rings with a wire handle, which can be folded. The bottom of the cell made of a sheet of tin should accurately enter the cells. Rolls soldered to the bottom, freely wrapped around the four corner wires, which are closest to the rose from the tin. Such rings allow the bottom to easily slide on the wires up and down. When the cell is completely removed from the box, the moving bottom lowers with the bird down, and the audience does not have any suspicion. In order for the bottom to be heavier and better descended, you can attach a small load of tin or lead to it.
We do not cite the sizes and boxes: they are determined by the performer themselves and are directly dependent on the size of the bird.
Show Behind the scenes are in advance the bird in the cage (for this, there is a small door in the ceiling). The box is set to the position shown in Fig. 104, B, and the cage is gently lowered down, between the walls of the box. The bottom of the cell will lie still at the bottom of the box 4.
As soon as the cell will enter the box, close the lid 2 tightly and turning the box, put it with a cage down, as shown in Fig. 104, A. In this position, the box put on the table and endure on the scene. During the demonstration, the number opens the cover 2 (from the other side where the box 4) and put things there, then closed the lid, after showing things in the viewers box. At that moment, when the box is put on the table, it is imperceptibly turned over to the cover where the cell is embedded was at the top. Open the lid, get a cage with a bird and show the audience.
The box is painted under a layered tree, and the covers close the flush. Do not forget to make marks on any lid to not confuse them. Both covers also color exactly the same. The box-colored box is loaded inside and outside, the inner part is painted with black matte paint, and outside, as it was said, imitation of a layered tree is made.
When showing the trick "Flight of cells with a bird", the number of the number happens on two tables. The right put a box with a cell charged in it, cover down; The top cover of the box 4 put up and open. Show starting from the right table. Next to the box are put all things that will then be laid in the box.
On the left table, they put a box with charged indoors of 4 exactly the same things that lie on the right table. The box put things down, and the room for the cell is drawn by an open lid up. Near the table there are a cage with a bird.
The magician, showing different things on the right table, puts them in the box, closes the box and, imperceptibly turning it out, puts the cap, and things down. Going to the left table, takes a box in hand and lowers a cage into it with a bird. By closing the cover, unnoticed the box, putting it up with the lid, and the cage down. The artist resembles the audience that on the right - things, and on the left - the cell. Makes the passes and opens the left box. It turns out the things that everyone was put on the right box. Then opens the right box and removes the cage from it, which the public shows.
Disappeared beads
On the stage, a magician with an assistant. He removes beads from her neck and puts them in a net. Then turns the sin, and everyone see that it is empty. The magician again approaches the assistant, turns it through the left shoulder, and when she again becomes a face to the hall, there are beads again on it. Where did the beads disappear?
It turns out, on the assistant two pairs of beads. An elastic band is sewn to one thread that allows them to delay them under the apron. From above, the rubber band is fixed under the collar of the dress. When the beads are delayed, they are fixed on a button, which is sewn on a dress under apron. By turning, the assistant imperceptibly frees the thread beads from the button. So they appear on the neck. And the first thread bus remains in a sacc.
How to guess time
Make a large clock clock and take it on the scene. The arrows show 12. The magician asks someone from the audience to think any hour. Then he takes a wand and begins to knock on the housing of the dial, and then translate the small arrow after each blow one hour ago. The viewer, who conceived an hour, should be considered a blow to herself, each time he adds one to the intended hour, and on the account 20 raise his hand. In the same moment, the magician shows the viewer on the dial conceived hour.
What is the secret of focus! Having like a wand, the magician also thinks about himself, but from the unit. On the eighth strike, it shows on the figure 12, and with each other shock translates the small arrow an hour ago. The digit on the dial, on which the arrow will be when the viewer raised his hand, and there is a conceived hour. It is easy to verify that an hour-conceived hour (x) and the number counted by the magician after the touch of the figure 12 (K) will always be amount to 13. The first seven blows are only in order to distract the attention of viewers (x + K + 7 \u003d 20) .
How to guess your birthday
"Want," says the magician turning to the hall, "I recognize the birthday of any viewer?" Then let any of you raise here on the scene. Please multiply by the 2 number when you were born. Add to the result 5, and multiply this amount by 50. Now add the sequence number of the month when you were born and name the resulting number. And the magician immediately says the day and month of birth.
How does he know it? From among the audience, it is necessary to take 250. It turns out a three-digit or four-digit number. One or two first digits - birthday, the last two months.
Disappeared cells
The assistant holds a tray on which a cage is standing with a bird. Showing the visual head of the handkerchief on both sides and cover it with a cage. Then I take a cell from the tray, and the assistant with a tray leaves the scenes. Throwing a handkerchief up. Where did the cell disappeared?
Let's prepare the props together with you. From five million meter plywood, cut the square with the sides of 40 cm. Coloring it and cover with colorless varnish. That's ready tray. The cell must be twice as smaller than the tray, and its height is about 20 cm. At each corner of the cell, attach metal corners. Put the cage exactly on the middle of the tray. Drill corners along with a tray. Take four bolts with nuts and attach them a cage to the tray. Now sew a double handkerchief, the dimensions of which are 60x60 cm. In the middle of the handkerchief of the wire, its dimensions exactly repeat the upper part of the cell. We will do the focus first. The assistant holds a tray with a cell. Clean the cage with a handkerchief and make it seems that both hands take a cell from the tray. At this point, the assistant unnoticed the tray of the side. Spectators, of course, see the bottom of the tray. Assistant with a tray leaves for the scene, and you show the audience an empty handkerchief.
Transformation of confetti into water
On the table there are a box with multicolored confetti and two cups. The magician pulls confetti from the box and pours into the cup. Filling it with top, poured confetti back into the box. Repeats it several times. Filling once a cup, covers it with a handkerchief. Strins and throws the handkerchief into the table - in a cup is not confetti, but water. The magician overflows it into another cup.
Secret focus. The box has a double bottom, and its posterior wall consists of two half. The lower half is freely moving in side grooves, opening access to the secret compartment. There is a magician back in advance laid another cup filled with water and closed with a special lid. The lid is made like this. Four legs made of tin, curved on the shape of a bunch of confetti moving on the wire ring. Moving fasteners are needed so that the legs are formed and not discharged when the lid will be raised with the handle. A small tin crosstin is attached to the ring with a carnation solder to it - the edge up. All this is tightened by a piece of satin fabric with a confetti nassed on it. The legs equipped with special protrusions are installed on the edges of the cup, and it seems that the cup is filled with confetti. The magician, having imperceptibly lifting the movable part of the rear wall of the box, replaces the cup, covers it with a handkerchief so that the carnations pursue the fabric handkerchief, then takes over the carnations and strips the secret cover with the handkerchief. Spectators see that confetti disappeared, and the cup is filled with water.
Cubes from Cap
On the demonstration table - four identical cap and two multicolored cubes. Pass two caps viewers for inspection. When they are returned, transfer two cubes into the auditorium. Ask someone from the audience to put them in one of the caps that you hold in your hands. Now connect the caps with the base. Two fast waving hands from top to bottom, take off one of the caps and show the hall: the cubes are no longer two, but six.
Want to know where they came from? Prepare props. Caps Make out of thick paper. Paint them with bright colors. The drawing must be at all the same. Now make six bright cubes - three one and three other color. Two multicolored cubes set aside, the remaining four gently stick inside one of the caps. When glue dries, you can show focus. Going to the scene, you keep the caps on the palm of the one in the one in the other, the base down. In this position and arrange them on the table. Put two cubes nearby. Be sure to remember where the cap is with absorbed cubes. Spectators look at the cubes, and you take the right hand of the cap with secret cubes - it must be kept the base down, and the left of any other is to keep it the base up. Spectators You ask to put two cubes in that cap, which is kept in your left hand. By connecting the caps with the bases, you make two quick wagging, turn the caps so that the one that with secret cubes is from below. Now remove the top cap. There are six cubes in each other.
Doll from the box
The magician shows a quadrangular box without the bottom and the lid, makes a hand through it so that the audience make sure that it is empty. The box puts on the table, covers it with a sheet of paper and topped with a metallic quadrangular hoop. Turning the box, it makes the same operation with its other side. Then the magician breaks through the paper and ... takes out a doll out of the box. Breaks paper on the other hand, shows - empty box.
The secret of the focus is in the box itself. It is made of tin or plywood. Inside it is the valve from the same material attached to the bottom side to its edge. The size of the valve is slightly less than the side wall of the box so that it can move freely. It is attached to the top edge. It is made of a piece of canvas, in width of equal width of the box. The second edge of the bottom is attached to the upper side. In the side sides of the bottom, the piano loops are sewn, with their help it develops inside and does not bend outward. Valve, bottom and inner walls of the box are painted black. When the magician demonstrates the supposedly empty box, the doll is between the valve and the wall. And so that the doll does not fall out, it is necessary to press the valve with the left hand to the wall, and to push the right hand through the box. The doll should occupy as much space as possible, so it is better to make it from the foam rubber. After the magician, breaking through the paper, pulls out a doll, it presses the valve close to the wall, and the audience do not see it.
Inexhaustible box
The artist makes a small box, puts on the table, tipping over and opens the lid. Spectators see that the box is empty. Then the magician closes the lid and turns the box to the original position. Opening the lid, the performer takes out a lot of various things out of the box.
The secret is an unusual device box. She instead of a simple bottom there is a swinging bottom wall. On the left figure shows the box at the moment when the magician shows that it is empty. On the right drawing, the box is shown at the same moment, but only from the focker side. The audience take the wall over the bottom of the box, while the bottom remained per box, as the wall - the bottom is attached to the box hinged. So that this focus can be shown several times, you need to prepare a table in advance on which the box will stand. From the back side of the table, a small shelf is attached to which things are put. The magician shows every time the audience that the box is empty, for which turns it forward, and at this time it puts things on the bottom of the box from the shelter.
Plot through a glass
The magician shows the audience an empty glass, which puts a blue thin fabric handkerchief. A thick red-opaque handkerchief covers a glass and pulls a medical gum on the glass cloth. Right hand the magician pulls blue from under the red handkerchief. Then removes a red scarf from a glass along with a rubber band and demonstrates the audience completely whole, but an empty glass.
Secret focus. A glass with a blue scarf. The magician holds in the left hand. When with his right hand, he covers a glass with a red scarf, then imperceptibly for the audience under the cover of this scarf turns the glass upside down and pulls the gum on the bottom of the glass. Spectators remain in complete confidence that the glass is closed. Then the magician pulls the blue handkerchief, and when it removes a gum with a red scarf with a glass, just as unnoticed by a glass with her left hand in a normal position.
Stitched cubes
Showing viewers three wooden cubes. In each cube there is a small through hole. I take the box without a lid, in which there are two holes too - one on each side. I put in the box all the cubes. Spectators see that the holes of the box and cubes coincide. Through the box and cubes by pulling the lace about 1 meter long. Several times pulling the lace then one, then the other hand. Then I give the ends of the lace to someone from the audience, and I myself remove all three cubes from the box, which still shook the cord.
Our props: three wooden painted cubes, with 12 cm sides and through hole in the middle. Its diameter is 1 cm. Drawers make this size so that the cubes are free into it. Now the secret itself. Inside the side of the sides and on the bottom, make a deepening. In these grooves in advance, put a solid thread. Ends to print it into the side openings of the box. One end of the thread ends with a loop. Now watch carefully. Cubes I put in the box. I take the lace and one end to his overlooking the loop. Saving this end of the lace into the hole of the drawer, I imperceptibly pulling the lace at the deepening - first on one side side, then along the bottom and pull out the end of the lace from the opening of the opposite side. Spectators will seem to seem that the cubes and the box are stitched with a cord through.
Cutting ropes
The artist takes a subtle rope, folds it in half. I invites someone from the audience to the scene and asks to cut the rope. The magician binds the ends knot and winds the rope on the left hand. Then he asks the viewer to take the end of the rope and unwind it. And the audience see that the rope is again a whole.
The secret of focus lies in the ability to fold the rope. Let's do a focus together. Take one end of the rope with your left hand between the middle and index fingers, and the second is between the index and large. Right hand take the middle of the rope and take it to your left hand. Quickly and unnoticed for the audience, pull out a part of the rope, the end of which is between big and index fingers, and slightly raise it. Guess where the viewer cuts the rope? And in the meantime, you drop down two ends of a whole rope, and the remaining piece bind the node. Here it is, you show the hall. Spectators see that the rope is cut and is connected by the node. Then, when you turn the rope on the left hand, right tighten the knot from the rope and imperceptibly put it in your pocket. And the viewer unwinds a whole rope.
I invite you to see how I make packing for your toys.
This is one of many options. I make packaging individually to each toy, adjusting to her style and character (and, of course, considering the wishes of the customer, if any)
This master class is only an idea and a set of techniques, not a dogma. It is normal to constructive criticism.
So. Fabris's bears found his mommy, and now go to live to her! And his road home must be comfortable and safe. So, I decided to make this box:


The design of the box in my head was formed immediately, but I left the design, however, as always, for later. As will come up in the process, it will be.
For the manufacture of the box itself, I left for an hour. If they were not distracted, the box would be ready much faster.
Let's proceed?
We will need the following materials:
1. Suitable size cardboard (dense). In this case, I used corrugated cardboard. I have several sheets of the same size (58 x 37.5 cm)
2. LINE.
3. Stationery knife and pliers for bowing the faded tip.
4. Pencil.
5. Scissors.
6. Thin double-sided adhesive tape or glue suitable for cardboard gluing
7. And, in fact, the Bear himself and his "coming" to relieve the measure.

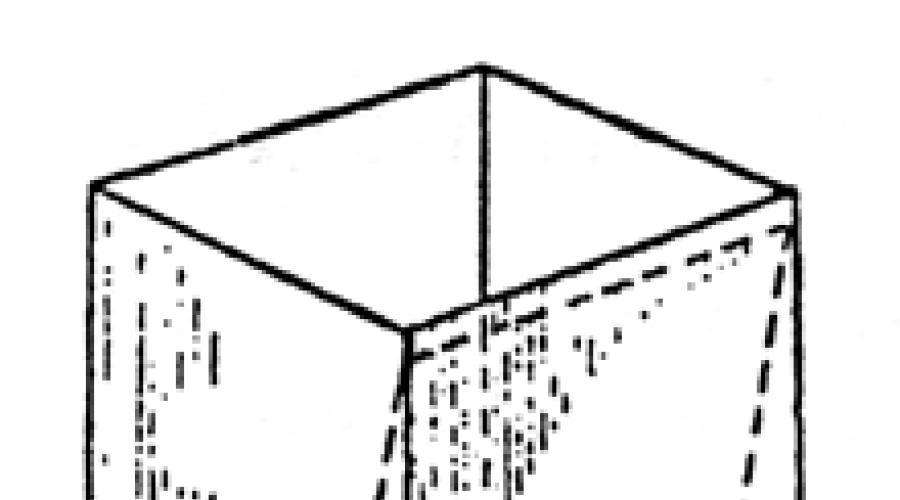
On the cardboard blacksmith grid. Central rectangle - bottom. I do not recommend you immediately outline the board of the same height. After the bending of the cardboard, the board can be different height. It will be quite difficult to cut off several millimeters. Pruning the sides only after bending the cardboard. The main thing: Locate the bottom exactly in the center.

Now, with the help of a stationery knife and a ruler, cut off the rectangle cardboard cameras in the corners. Important! It is necessary to cut on the surface that will not be damaged by a knife or is not sorry to spoil.


Trimming do not throw out! We use them.
According to the outlined lines around the perimeter of the bottom reject cardboard. Important! If you are using corrugated cardboard, then it is necessary to drain on the line of folding a stationery knife along the fold line by making a shallow incision. If you work with a conventional cardboard, then sell these lines, for example, a stupid side of the scissors blades. This is to be folded smooth, clear, neat.

After filling the sides, regulate their height. I cut only two short sides to the desired height. The bent boards raised everything together (as if the box was collected) and the pencil marked the difference points in height.

We stick bilateral scotch to corners:

Remove the protective film and glue corners to the base box. Important! When gluing the corners to the sides, it is necessary that the box standing on the table bottom down. Then the corners will stick exactly. One hand hold the connected two boards, and we apply the corner with the other hand. After sure to hold the top of the gluing place for a better tape clutch with the surface of the cardboard.

That's what should happen:


Then, take another same as a sheet of cardboard, and repeat the entire procedure!
There should be such twins:

One part will be the bottom, the second lid:

Of course, it would be possible to make the lid of the box thinner in altitude, and the lower part of the box is higher, but the size of the cardboard has no choice leave me.

From the cardboard, cut the rectangle with the size of the bottom of the box (- 1 mm on each side). It is necessary to make a measurement on the inside of the bottom.

By placing on top of the cardboard the item that needs to be fastened (in this case - easel), make a selection of holes through which the twine will miss.

We felt in the holes of the twine and tie the easel.


Takes the bear, I secured the travelers in the "tail" of the BACHE, which is tied by Molbert.
I need to fix another palette and brush. We place the palette and pitch the seer of the hole for the twine.


All together it looks like this:


Insert cardboard with fixed "bold" bear.


Then cut a rectangle from cardboard. The two sides are equal to the length of the larger side of the box (- 1 mm on each side), and the other two parties are equal to the length of the smaller side of the box (- 1 mm on each side) + the height of the "bred", which we need to "hide" (I got it 4 cm with each of the two sides).

In places of bend, we do a selection of two holes for the twine, which then give a toy.

And insert the resulting design to the bottom of the box, closing the "bold". This is the "second" bottom. The "second" bottom should be tightly in the box, resting the legs in the cardboard with the "bold."


Now you need to build a side of the box on the inside. To do this, cut out two strips from the cardboard. I made a width - 4 cm. And the length of each strip is equal to the sum of the length of the two sides box, large + smaller (-2 mm for each side).

Bend in accordance with the lengths of the parties.

We glue two-sided tapes at the top of the inner walls of the box.

Remove the protective film and glipulate the cardboard bands.


And try the lid of the box. The lid should "sit" tight.

Here is a box and ready.
Now proceed to the design.
To make it convenient to go fabric to the fabric, I made a mattress of binding fabric and filled it with sintepsum.
Cut from fabric a piece of equal dual area of \u200b\u200bthe bottom of the box.

I decided to decorate the mattress embroidery. Drew a suitable picture (I took it on the Internet) and lasted with ordinary stitches.


With an inside, we sew the fabric in half. One side is left not covered for packing.

Soak. Cut off the size of the future mattress Sinyppon (you can fill, of course, and something else). And get it up. We are sewn outside the secret seam. And voila! Mattress is ready!


Decorating the lid of the box.
On the lid, I drew the same Eiffel Tower as on the mattress. She made a tire perforation and locked pastels.

The printed "business cards" of my store (name and web address) pasted on the frontal part and sides. Stressed pieces of cardboard. Bound the box with a beat and decorated a large button.
That's all! Bear is ready to send!


Thanks for attention!
I hope my experience can be useful ...)