We use the "Administrator" account in Windows. Running a program that requires administrator rights under a standard user account Administrator account windows xp
Read also
In one of my articles, I already wrote that you can add and change the properties of user accounts through the “Control Panel” - “User Accounts”. However, this method is more suitable for ordinary users. But it will be more convenient for the system administrator to manage accounts through the “Computer Management” console - “Local Users and Groups”.
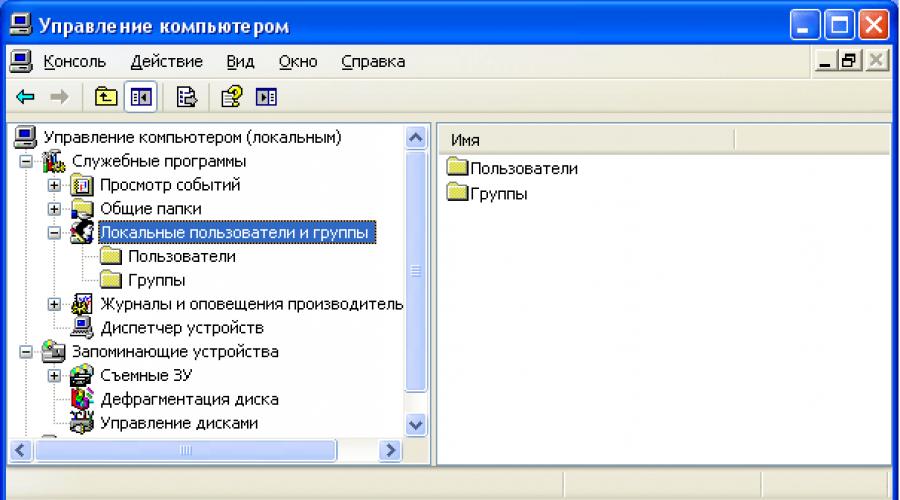
To get to the "Computer Management" console, right-click on the "My Computer" icon on the desktop and select "Manage". Next, expand the “Utilities” section and select “Local Users and Groups”.
The "" snap-in is designed to create new users and groups, manage accounts, set and reset user passwords. 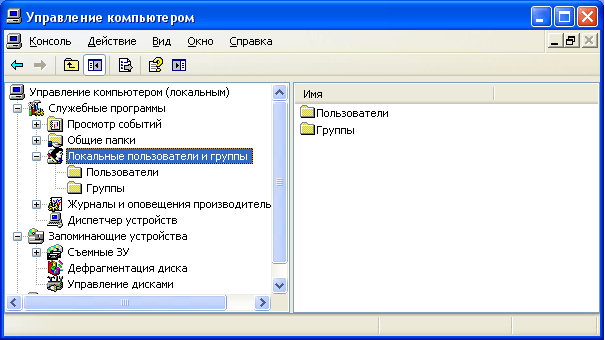 Local user
is an account that can be granted certain permissions and rights on your computer. An account always has its own username and password (password can be empty). You may also hear another user account name − accountt
, and instead of “username” they often say login
.
Local user
is an account that can be granted certain permissions and rights on your computer. An account always has its own username and password (password can be empty). You may also hear another user account name − accountt
, and instead of “username” they often say login
.
The Local Users and Groups snap-in node displays a list of user accounts: built-in accounts (for example, "Administrator" and "Guest"), as well as real PC user accounts that you have created.  Built-in user accounts are created automatically when you install Windows and cannot be removed. When you create a new user, you will need to give it a username and password (preferably) and determine which group the new user will belong to. Each user can belong to one or more groups.
The node displays both built-in groups and those created by the administrator (that is, by you). Built-in groups are created automatically when you install Windows. 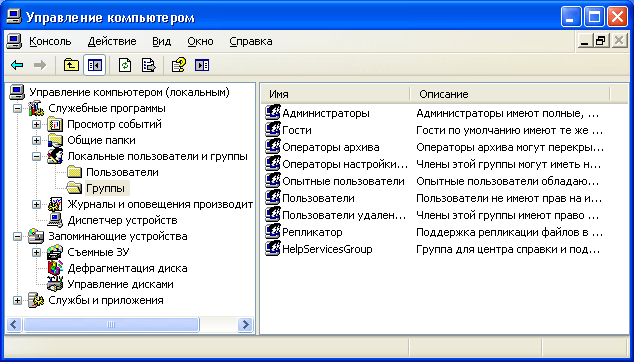 Group membership grants a user certain rights to perform various actions on a computer. Group users Administrators
have unlimited rights. We recommend that you use administrative access only to perform the following actions:
Group membership grants a user certain rights to perform various actions on a computer. Group users Administrators
have unlimited rights. We recommend that you use administrative access only to perform the following actions:
- installation of the operating system and its components (device drivers, system services, service packs);
- updating and restoring the operating system;
- installation of programs and applications;
- settings of the most important parameters of the operating system (password policy, access control, etc.);
- managing security and audit logs;
- archiving and restoring the system, etc.
As a system administrator, you must have an account that is a member of the Administrators group. All other users of the computer must have accounts that are either members of the Users group or the Power Users group.
Adding users to a group Userand is the most secure because the permissions granted to this group do not allow users to change operating system settings or data of other users, install some software, but also prevent legacy applications from running. I myself have repeatedly encountered a situation where old DOS programs did not work under the account of a member of the “Users” group.
Group Power Users supported primarily for compatibility with previous versions of Windows, for running non-certified and legacy applications. Power Users have more permissions than members of the Users group and less than Administrators. The default permissions granted to this group allow members of the group to change some computer settings. If support for non-Windows-certified applications is required, users must be members of the Power Users group.
Account Guest grants access to the computer to any user who does not have an account. To improve the security of the computer, it is recommended to disable the “Guest” account and configure access to PC shares for existing users.
Now let's see how the account is created through the "Computer Management" - "Local Users and Groups" console.
Create an account
When installing the original version of Windows XP (meaning not an assembly from Zver or the like) prompts you to create computer user accounts. You must create at least one account under which you can log in at the first start. But, as a rule, in real life it is required to create several accounts for each user working at the computer, or for a group of users, united by a common task and access permissions.
To add a new account, open the "Local Users and Groups" snap-in - select the "Users" folder - then in the right window right-click on an empty space - select "New User": 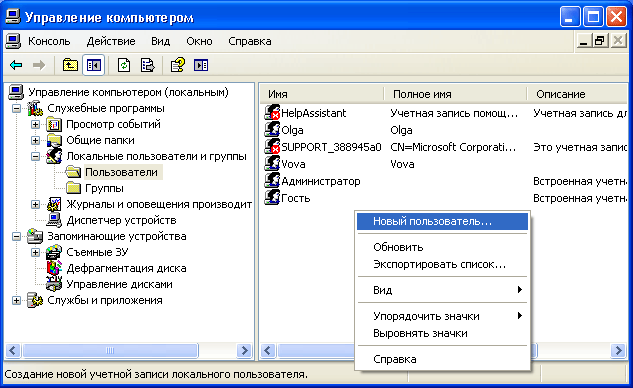 In the window that appears, enter a username and description. Also set a password for the user (you can read how to come up with a strong password for your account).
Then configure additional settings - check or uncheck the boxes next to the items you need: 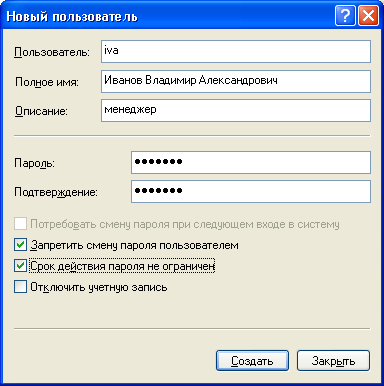 You can uncheck the box next to “Require password change at next logon” and check the boxes next to “Prohibit user from changing password” and “Password never expires”. In this case, the user will not be able to change the password of his account himself. This can only be done by you, working under an administrator account.
After clicking the “Create” button, a new account will appear in the list of users. Double-click on it and in the window that opens, go to the “Group Membership” tab. Here click the button "Add" - "Advanced" - "Search". Then select the group that the user should be a member of (recommended is Users or Power Users) and click OK in all the windows that appear. After that, here in the “Group Membership” tab, delete all groups from the list, except for the one you just selected. Click "OK":  Thus, you have created a new account and included it in the group.
Now tell the user (in our case, Ivanov) his account name ( iva) and a password so that he can log in. On all computers on the network, to the resources of which Ivanov needs access, you will need to create the same account with similar parameters. If there is no account for Ivanov on any network computer and the “Guest” account is disabled, then Ivanov will not be able to view the shared network resources of this computer.
If a user account is no longer needed, it can be deleted. But in order to avoid various kinds of problems, it is recommended that user accounts be disabled first before deletion. To do this, right-click on the account name - select "Properties" - in the account properties window, check the box next to "Disable account" and click "OK". After verifying that this did not cause problems (monitor the network for a few days), you can safely delete the account: right-click on the account name and select "Delete" in the context menu. A deleted user account and all data associated with it cannot be recovered.
Access control
So, let's say several users work on the same computer, and you created your own account for each according to the rules described above. But suddenly there was a need to close access to some folders or files on the computer for certain users. This task is solved by assigning certain access rights to computer resources.
Access control is to grant users, groups and computers certain rights to access objects (files, folders, programs, etc.) over the network and on the local machine.
User access control local computera is carried out by changing the parameters on the tab “ Security” in the Properties window:

Configuring security for the My Documents folder
Tab “ Access” of the same window is used to control network access to shared objects (files, folders, and printers) on computers on the network.
In this article we will talk about access control local users to objects local computer. This feature is only available on the NTFS file system. If the computer has an NTFS file system, but the “Security” tab is not displayed, go to “Start” - “Control Panel” - “Folder Options”. On the "View" tab, in the "Advanced Options" section, uncheck the " Use simple file sharing (recommended)” and click “OK”: 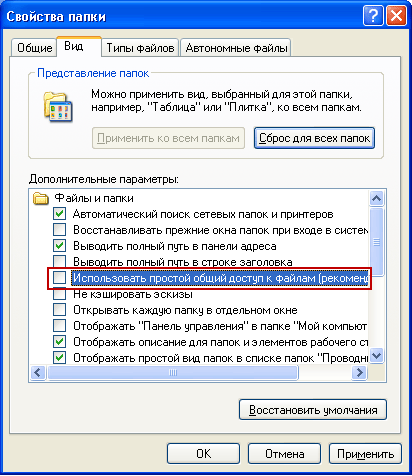 The basic concept related to access control is Permissions
.
The basic concept related to access control is Permissions
.
Permissions define the type of access a user or group has to an object or its properties. Permissions apply to files, folders, printers, registry objects. To set or change permissions for an object, right-click on its name and select Properties from the context menu. On the “Security” tab, you can change the permissions for a file or folder by checking or unchecking the boxes next to the required items in the list of permissions.
You can set your own permissions for each user. You first need to highlight a user in the list, and then specify the permissions for that user. For example, one user can only be allowed to read the contents of a certain file (permission “ Reading”), another to make changes to the file (permission “ Change”), and prohibit all other users from accessing this file at all (clear all the checkboxes under the item “ allow", or check all the boxes" ban”).
To view all effective permissions for files and folders on the local computer, select "Properties" - "Security" - "Advanced" - "Effective permissions" - "Select" - "Advanced" - "Search", highlight the name of the desired user and click "OK ". The items marked with checkboxes are the permissions for this user: 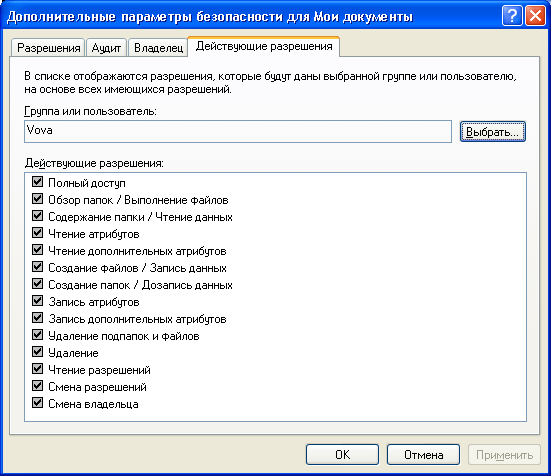 In the same window, you can familiarize yourself with the tabs “Permissions”, “Audit”, “Owner”. I will not dwell on them in detail within the framework of this article, because. it's getting way too big.
If there is no user in the list of users on the “Security” tab that you want to assign permissions to, click the following buttons in sequence on the “Security” tab: “ Add” – “Additionally” – “Search". From the list, select the user account name to which you want to assign permissions and click OK. Instead of an individual user, you can select a group - permissions will apply to all users included in this group. Remember these buttons well. You will follow this procedure in all cases when you need to add a new user to the list of permissions, auditing, ownership, network access, etc.
Access control applies to more than just users local computer, but also to access shared files, folders and printers over a network. I already talked about the differentiation of access rights for network users in relation to the folder in the article.
how to get admin rights on windows xp
- Start-gt;Settings-gt;Users try changing permissions...
- It is necessary for the user under which you come to set administrator rights. gt control panel; user accounts
- They already said here, use windowsfix.ru
- a method of infiltrating a computer with administrator rights using some programs. Account passwords are stored in the SAM and System files, which are located in C:WINDOWSsystem32config and are protected by the system from being copied or changed. Multi Password Recovery will help you copy these files. The capabilities of this program include the recovery of various passwords: mail clients, ICQ, browsers, etc. There is a SAM button on the panel. By clicking it, we copy the SAM file, and with it the System will be copied to the location you specified. Then, install and run the Proactive Password Auditor program. The first thing to do is to read from the computer's memory by checking the local computer memory function and clicking the get button. This action will show passwords of any complexity for all users who have logged into their accounts. But this will work if the reboot was not performed, but the system was logged out, providing the computer for your use. If the required password is not found, check the Registry file (SAM and System) function, click Get and in the window that appears, specify the location of the previously copied SAM and System. If the passwords are not complex, they will be shown. If not, then open the tab Attack by brute force and select the set of characters by which the selection will take place. If you know approximately what characters the password consists of, then you can create a custom set. The time spent on password guessing will depend on its complexity.
- create an account Control Panel Account, create, Account Type Administrator
- if there are no admin rights, and if the admin of the computer is good, then - nothing ...
if you do not know how to clear the profile of any user on your computer
read the fucken manual 🙂 - how to get admin rights in W
indows xp professional - log in with an administrator account!
Sometimes computer users complain that they cannot perform any actions on their machine due to the restriction of rights. The reason is they no admin rights. If the system says you have not enough rights to change something, then most likely you are not working as an administrator, but under a different account (guest, user, power user).
To view the profiles stored on the computer, you need to call the main system menu by pressing the "Start" button, and open the context menu of the "My Computer" element by clicking the right mouse button. Select "Properties".

Then go to the "Advanced" tab in the dialog box that opens. Select "Settings" located in the "User Profiles" section.

A window will open user profiles. Here you can see everything active profiles in the system.

In order to see what rights your profile has you need to call the main system menu by clicking the "Start" button, and open the context menu of the "My Computer" element by clicking the right mouse button. Specify the item "Management"

In the window that appears, select Local Users ---> Users. Here you can see which profile has administrator rights

If you select Local Users ---> Groups, you can see what rights each group has.

You can only add a profile or change user rights from an Administrator account. Now about that how to login as administrator?
In Windows XP, this can be done through Safe Mode. When the system boots up, you must press the F8 key. In order not to miss the moment, after the beep of the computer, or after the appearance of the first inscription, you need to make a series of presses F8 until the boot selection menu appears. Depending on the BIOS (I have it), the Boot boot menu may appear first. In this case, by moving the up and down arrows, you need to select boot from the disk (HDD), press Enter and immediately repeat a series of F8 presses until the boot selection menu appears. Next, in the proposed list, select the Safe Mode line and press Enter. Typically, on a Windows XP system, this input provides admin login.
The Administrator account in Windows 7 is disabled by default. This is done in order to protect system processes from exposure to inexperienced users and malware. To enable an Administrator account you need to do the following.
Right-click the Computer icon in the Start menu and select Manage from the context menu that appears.

In the left menu of the Windows 7 Management Console, open Computer Management --> Utilities --> Local Users and Groups --> Users. On the right there will be a list of Windows 7 users. You need to double-click administrator account.

In the window that appears, on the "General" tab, you need to uncheck the item Disable account and click OK.

Restart your computer. After that Administrator account will be available on the Windows 7 login page.

While working under the Administrator account, all programs, including malware, run as an administrator. User Account Control will not be able to protect the system from malicious impact. So use Administrator account for computer administration only. If there is more than one user on the computer, the Administrator entry must be password protected.
I hope this information will be useful, and you will no longer have to prove to the computer that you are the Administrator.
Today's article is devoted to the extensive topic of protecting a PC running Windows XP from the inept actions of a novice user. The actions that I am going to describe can be useful both in an enterprise where there is a large amount of computer equipment, and there are very few specialists who can correct the changes made by users to the system settings , or it can come in handy at home when a small child or grandmother works with a computer, which is almost the same thing. I ask grandmothers not to be offended! The reason for writing this article was - ending patience. I mean endless fixes for common user errors in the enterprise I work for. So often the following happens:
accidentally turn off a network device;
accidentally disable anti-virus programs;
remote desktop programs (Remote Administrator, etc.);
remove keyboard layouts;
install unnecessary applications (games, etc.);
there were cases when the applications necessary for the work were deleted;
change system parameters;
There is also a theoretical possibility that the prohibition on changing system settings under a user who does not have the right to change those same settings can protect the system from some virus programs.
So my decision to limit these actions and others (see the text) is final and not subject to change. Getting started, let's do the basic steps.
1. Getting Users
1. If you are using Windows builds (Zver, Best Xp and the like)
You know, many smart people can start criticizing me now. To say that screw builds are complete garbage ... but I think that for a simple user it is very convenient.
So this is what I mean, if you have a similar Windows XP installed, then you probably have an additional applet in the control panel called "Win2K User Accounts"
If it is available, this will make it easier for you, go to the menu "Start"? "Setting" ? "Control Panel" ? "Win2K User Accounts"
First, let's look at the system administrator settings.
Here we can change the administrator name. What is it for? The fact is that if you change the administrator's name, then for those who try to hack into your computer this will be one of the additional obstacles, because the standard name admin or administartor will not work. Of course, this will not stop a professional cracker, but still.
Since in this case we are protecting the computer not from hackers, but to a greater extent from the actions of ordinary users, I did not change the administrator's name. Move on.
In the next tab "Group Membership" we look to select a group from the drop-down menu Administrators.
Everything, we figured out the computer administrator, we move on to adding a new user. We give it a name, you can set a description, then move on.
For the user, I would set a password. In any case, this will only be an additional, albeit a small, brick in ensuring the security of the computer.
After creating a password, the setup utility will take you to a menu in which we will set the rights for this user "Limited access"
We save the settings and you're done. To check, you can do a change of user and make sure that by registering under the name of a new user you will not be allowed much of what was said above.
Now consider what to do if this utility is not available.
2. If you are using regular standard Windows XP
First, let's go to the menu. user accounts
:"Start"? "Setting" ? "Control Panel" ? "User accounts"and create a new user.
In the next window, select Limited entry and press the button Create an account.
Congratulations! You have created a limited user account.
Computer user rights management
Create then we created the user, but Windows also provides for more fine-grained user settings. This menu is located in:"Start"? "Setting" ? "Administration"?"Local Security Policy".In the window that opens, find"Local Policies"?"Assigning Rights to Users".
This menu allows you to configure permission or prohibition to perform certain actions for users of this computer. There is nothing complicated there .... Good luck!(jcomments on)(odnaknopka)
Surely, you did not know that when creating a new article, I find the topics for writing them precisely thanks to your comments. Just very often, various questions are asked, how can one do this or that? So, in order not to describe the execution of all actions in the comments, I began to write separate articles, which in the future will allow me, instead of writing a huge comment, to give a link to a full instruction.
In general, this article is also the answer to one question, namely: how to set admin rights for created account. I decided to consider this topic because I left a comment asking for help to understand the current situation. In general, the user decided to create a new account, and delete all files and documents on the old user profile. They tried to do this with a newly created account, but the system did not allow this.
All this is because the new account does not have administrator rights and therefore cannot edit other users' personal folders. I want to note one point that when creating a new account, by default it is created as a regular user, and only then you can give it certain rights.
You can give rights to an account in various ways, both with your own Windows tools and with the help of third-party programs. Which one to use depends on the situation. So if you wanted to know how to give administrator rights to a new user profile then read on carefully.
Set administrator rights for a new account in a Windows environment
So, let's perhaps start from the most common option. By the way, if you have created a new account, then all the steps described below should be done by booting from the old account, which already has administrator rights.
So, in order to give administrator rights to a new user, you should open the “control panel” and go to the settings “ Accounts».


We select the user who should be set administrator rights by clicking on the icon.

Now click on "".

And here you will see the main window in which we will assign administrator rights to the selected account. Further, everything is nowhere simpler, there are two options, the first standard which will be selected by default, but the second " Administrator' is exactly what we need. Having marked it, click on " Change account type».

To complete the process, simply log in to the newly created profile and check the result.
An alternative way to set administrator rights in Windows OS
Now, let's look at another option that most system administrators use very often.
To set administrator rights using this option, we need to call the properties " Management e", which you can find simply by right-clicking on the computer icon.

In the settings window that appears, go to " Local Users", Well, there in "".

A list of profiles that were created on the computer will open, by selecting the desired account by double-clicking on it, open its properties and immediately go to the "" tab.

Here you can see that the created account is in the "" group, but since we want to get administrator rights, we need the "" group to be indicated there, for this we delete the old group and create a new one by clicking on the " Add».


If the name of your computer appears before the group name, then everything is in order, just click on " OK" and " Apply».
This is how I set administrator rights on most computers.
Installing administrator rights using the Sonya LiveCD
What to do if you do not have access to an account with existing rights, but you desperately need to set administrator rights for a new account so that you don’t have to re-do it later.
Well, if you have a password on the administrative account or it is blocked, and you created a new user and did not know what it would be with standard rights, then the LiveCD boot disk, which I am talking about more and more often, will help you do this. I often mention in articles when solving various errors.
If you are not yet the owner of such a miracle, then I recommend you download from here: LiveCD, and, believe me, it will come in handy more than once when setting up your PC.
So, what do we do when the disk is ready? Of course we put it in the drive and boot from that disk. A boot menu will appear where we should select the line with the words "".

After waiting for the system to finish loading, using the start, go to " All programs» – « Passwords". There we run the program "". By the way, we have already worked with her at.

Now, specify the location of the Windows folder using the browse button.


Select for which account administrator rights will be set and click on the button “ Apply».
Literally in a moment, a notification about the work performed should appear.

It remains only to restart the computer and check whether administrator rights have been set on the computer, or rather, on the account you need. These options differ from each other in that you can use the first two only if you already have access to a user with previously set administrator rights, and the third will help you in any case, regardless of whether you are a simple user or administrator.
Setting administrator rights on a computer for any account