The effect of hand drawn photography. How to make a photo as drawn using Photoshop
Today, one of the classical topics is in line - creating an effect of a pencil pattern from a photo. This is one of those fast and easy technicians who brings professional satisfaction, but also makes a lesson useful for beginners. Of course, Photoshop cool and there are many built-in filters and artistic effects, but they will not compare with what we want to show you.
What we want to get:

Step 1
Let's start with the fact that we choose the photo on which we will work. It is desirable that the background is clean, and the photo is high quality. As an extreme version, download such a photo from the drain.
Only with these conditions, we will achieve the desired result.

Step 3.
Drag the background layer over the new layer icon in the Layers panel / layers, or use a combination CMD + J. To create a duplicate layer. Go Image\u003e Adjustments\u003e Invert / Image\u003e Correction\u003e Inversion (or CMD + I.) and choose right click Convert to Smart Object / Convert to smart object.

Step 4.
Choose GAUSSIAN BLUR / Blur in Gauss And change the radius on 40 pixes. Using Smart Object.apply this filter as a smart filter (that is smart!) In such a way that we can simply configure the parameters if necessary, instead of constantly applying this effect.

Change the layer-duplicate layer Color Dodge / Basics Lighteningthat will significantly increase the contrast and give the surface the graininess that we need.

Step 5.
Click on the icon Adjustment Layer / Corrective Layer and select Levels / Levels. Move the sliders of the shadows and Midtones / Current Tone A little to the right to slightly darken the image.

Step 6.
Add new Adjustment Layer / Corrective Layer and now select the option Black and White / Black and White. The default settings will be enough to remove the color and give the image more "pencilism".

Step 7.
Use CMD + A.to Select All / Allocate all, then take advantage Edit\u003e Copy Merged / Editing\u003e Copy the enforced data (or shortcut keys CMD + SHIFT + C). This will make an oblivion of all visible layers. Click CMD + V.To insert this layer on top of the rest.

Now we do this: Filter\u003e Filter Gallery / Filter\u003e Filter Gallery, then go to Glowing Edges / Glow Edges From the menu Stylize / Stylization. We change the parameters as shown below:

Now Image\u003e Adjustments\u003e Invert / Image\u003e Correction\u003e Inversion(or The CMD + I.) to make a negative picture (instead of black on white it turns white on a black background).

Step 8.
Change the overlay mode from this layer on MultiPly / Multiplication, then reduce the opacity of the layer to 50-60%.

Step 9.
Click on the icon New Layer / New layer At the bottom of the palette Layers / Layers, then click Cmd + Backspace.To pour the layer White (this is the default background color). Return to B. Filter Gallery / Filter Gallerybut now choose Texturizer / Texturizer. Change settings on Sandstone.

Change the overlay mode from this layer on MultiPly / Multiplication so that you can see the main lines, then reduce opacity to 50% To achieve the effect of thin paper texture. To achieve to enhance the effect of a colored pencil, turn off the layer with black and white correction.


Outcome
As a result, we obtained a completely realistic effect of a pencil sketch with natural lines and dimming.

Translation - djurka
Turn your photo into an art masterpiece! Softorbits Sketch Drawer will help convert images into pencil drawings with multiple mouse clicks. Our program will create color or black and white pencil drawings from ordinary photos, generating neat pencil strokes. You do not need to be able to keep a pencil in the hands to be an artist. Sketch Drawer makes the creation of a photo from the picture is simple and cheerful things!
Surprisingly, but remade the photo in the drawing is quite simple, even if you are not an artist. To do this, you will need a computer with the installed program for creating a picture from the photo. Sketch Drawer is fast and easy to learn and use. Open the picture, select the type of drawing from the finished set and get a magnificent pencil drawing!
The program has many ready-to-use pencil effects to obtain different types of images. With the help of them you can create both drawings with a simple pencil, as well as colored pencils, as well as drawings with a handle, felt-tip pen, watercolor, coal. You can edit each templates by changing its settings to get those effects you want.


Creating a drawing with colored pencils has never been so easy. You do not need not only to be able to keep a pencil in your hands, but even have it. All you need to convert photos to a color pencil drawing is Sketch Drawer.


Sketch Drawer equally simply allows you to create both color and black and white pictures. To perform drawing with colored pencils, simply turn on the "Color Sketch" setting. You can also make a drawing from a photo, made not a simple pencil, but a pencil of a given color.
Want to convert a large number of images in drawings with the same settings? CJ Sketch Drawer does not matter how many source photos do you have. Available batch mode allows you to easily convert all your photos in drawings. You can add photos one or entire folders. Just check the settings on one of the photos and get excellent drawings from all photos in a matter of minutes.


There are a lot of ways as using photoshop you can turn an ordinary color photo into a drawing made by a pencil. We will analyze the easiest and fastest way with some notes of the cartoon-comic effect.
By the way, this technique can be used to turn vector cliparts in the pictures that can then be given to your children so that they learn to paint them! Or use for commercial purposes to create coloring books :) In general, you will see everything yourself now.
Step 1
Open the donor photo.
Step 2.
Now you need to apply the filter. Run the following command: Filter - Blur - "Smart" Blur.

Step 3.
A dialog box appears with filter settings. Need first from the drop-down list Mode choose Only edges. Then work with the sliders Radius and Threshold. It is necessary to achieve the effect in which the image will contain the maximum necessary details, but it is not necessary to overload the image, otherwise get a tasteless bunch of small.

As a result, it turns out such an image:

Step 4.
Get rid of black color by executing the command - Ctrl + I.

Step 5.
The edges look untidy. We will make them smoother and add the cartoon effect, the kids are very loved. To do this, select Filter - Imitation - Applique.

The following window opens:
(Click to enlarge)

Here you need to configure two parameters: Easy land and The clarity of the region To adjust the thickness and quality of the stroke lines.
Step 6.
Apply the filter and look at the color photo with a pencil drawing:

note that Applique Added gray shade for white. If you wish, you can remove it. To do this, take on the tool parameter panel Related pixels. Changing the mouse anywhere, to remove the entire sulfur background.
I also take the subwindle lines. As a result, it turned out such a result:

Noticed the error in the text - select it and press Ctrl + Enter. Thank you!
Make a picture of the picture is very simple.
Posted by photos of drawing with a pencil or stylize any image under the picture of the painted watercolor, gouache, butter or using other materials can be in several ways.
If you are not particularly important quality and realistic image, and you just need to do quickly - it is possible to do the online editors of the images that are enough on the Internet, for example, these: PhotoFania , Photo Pencil Sketch. or here on this site Free online services from pho.to. There are still many other similar, but all of them have one significant drawback - the low quality image processing, and the choice of stylization effects is very small and the conversion tools cannot be configured. I do not use online services that is why it is monotonous, not qualitatively and not interesting. Elements of own creativity No completely.
The second method is also very simple, but gives a chance to make some individual, author shades in every new image. This is a way using small special programs and applications. There are also a lot of such programs, from very simple, in which quality does not greatly surpasses online editors to quite professional. From very simple programs, I can advise Fotosketcher and Dynamic AUTO-Painter.
In a programme Fotosketcher It is very simple to work, settings a bit and changing them can be achieved quite realistic result.
In a programme Dynamic AUTO-Painter It is even easier to work, but more interesting, the whole process of changing the picture can be observed in real time and stop when you are satisfied with the result, there are quite a lot of profiles in her various painting styles. If you set additional programs to record screen and conversion, you can make animated gifs, for example, this:
Another very good and powerful program, professional level - Akvis Sketch.. In use, this program is not complicated, but its possibilities in styling images under the drawing are comparable to capabilities. Photoshopbut. This programs can work as a plugin to many graphics editors. Sort out the tools and settings of the program Akvis Sketch. Very easy, but even if it is difficult to make it difficult to look at the office. The site of the developer, there are many understandable reference materials and lessons.
From the same series and a program that is intended to simulate different artistic styles. Using programs Akvis Sketch. and Akvis Artwork You can make very realistic stylization of photos in various artistic styles in a few minutes.

And of course, the best quality in the processing of raster images can be obtained in the graphic editor of all times and peoples - in Photoshope ( Adobe Photoshop.). I use the version Adobe Photoshop CS6 13.0 Extended But earlier versions will achieve very high quality and realistic images.
It is very difficult to master the entire photoshop yourself, but you can learn how to use some functions and filters can be quite quickly. Look at these video tutorials, it is on your question and you will not have any problems to make a picture drawing.
- use Graphic Editors, Special Programs that need to be installed on your computer, these programs are used to edit images, including to transform photos in watercolor drawing, paints, pencil
- take advantage of graphic editors online
- use programs that are used to transfer photos from the camera to a hard disk of the computer, they can also be used to edit images and transform a photo into a picture.
You can do without photoshop, on the Internet a lot of free photo edits and photos of photos, in which simply load a photo, and on output; It is displayed with the need you need.
One of them is http://funny.pho.to/ru/ (but their weight)
The portrait effect will look something like this (but this is not the only portrait template, is and better)


There are also a bunch of templates for postcards, but naturally you need to do your exclusive in Photoshop
To date, this is no longer a difficult task, because there are many programs in order to turn the usual photo into a drawn portrait. you can use Photoshop, FotoSketcher, Paint, Dynamic AUTO-Painter. These programs can download free from the Internet.
Everything is very simple:
in Photoshop, there are special filters that will make your photo not only drawn but also embroidered and remembered and how much 🙂
The main thing is that you have been installed photoshop, and we will understand easily
Hello everyone! Nowadays, in order to find an answer to our same questions, you just need to go online.And to the question that you are worried about there are a lot of different and most importantly free photo editors, with the help of them you and you will learn to turn photos into drawn portraits! I myself often I use this siteand I do not have any problems. With the help of this site, you can turn your and other photos to the drawn portrait!
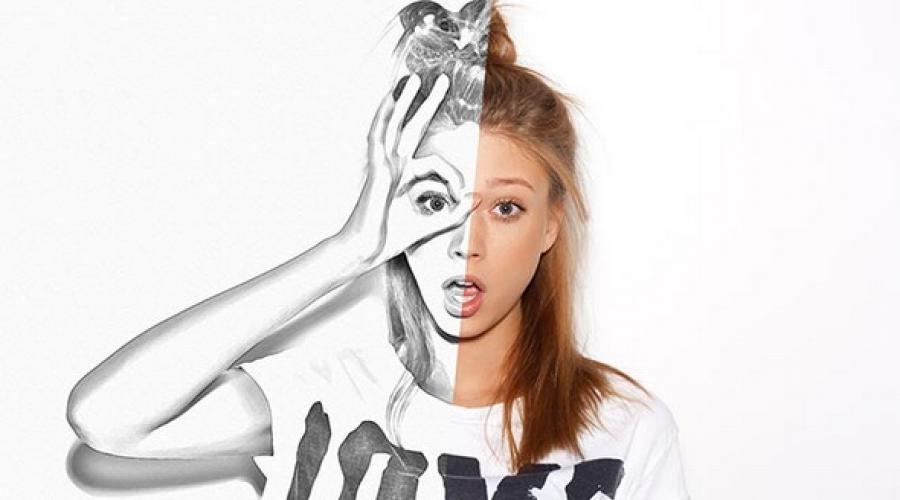
In this lesson you will learn how to turn the usual photo into a stunning drawing. I will try to explain all the details as possible, so everyone can create a similar illustration.
We will create an effect that is depicted on the left side of the image. If you want to make a drawing more colorful, use the finished action.

We will need to work in Stock Photo, but you can take any other.
Begin
Open the photo with which we will work. Go File - Open. (File - Open), choose the desired picture and click the Open button. Before continuing, I will give you a few advice on the preparation of the document:
- Your photo should be in color mode RGB., 8 bits./ channel (bit / channel). To check if it is, go Image. - Mode. (Image - mode).
- To get the best result, the size of the photo should be between 1500-4000 pixels in width / height. To check, go Image. - Image.Size (Image - image size).
- The photo should be a background layer. If it is not, go Layer. - New - Background.from.Layer. (Layer - new - convert to back).
- To perform automatic color correction, go Image. - AUTO.Tone. (Image - Auto), Image. - AUTO.Contrast. (Image - autocontrast) and Image. - AUTO.Color (Image - automatic color correction).

2. Create background
Will we pour the background with solid color. Go Layer. - NewFILLLayer. - SolidColor (Layer - a new layer-fill - color) to create a new layer-fill, and call it "background color".

3. Create a basic sketch
Step 1
Now we will create a basic sketch. Choose a background layer with machines (layer "Background" in the screenshot) and go Layer. - New - Layer.Via.Copy (Layer - new - copy to a new layer) to copy the background layer, then move the duplicate to the top of the layers panel. After that, press D to reset the color to standard. Go Filter. - Sketch. - Photocopy (Filter - sketch - photocopy) and set up filter:

Step 2.
We call this layer "Basic sketch" and change its mixing mode to Multiply. (Multiplication).

4. Create a draft sketch
Step 1
Now we will create a draft sketch. Go Layer. - New - Layer.Via.Copy (Layer - new - Copy to a new layer) to copy the layer "Basic sketch". Take LASSO.Tool. Free.Transform (Free transformation) and increase width and height by 105%, as shown below:

Step 2.
We call this layer "Large draft sketch" and reduce opacity to 14%.

Step 3.
Choose a layer "Basic sketch" and go Layer. - New - Layer.Via.Copy (Layer - new - copy to a new layer) to copy it. Take LASSO.Tool. (L) (Lasso), click right-click on the working facility, choose Free.Transform (Free transformation) and reduce width and height by 95%, as shown below:

Step 4.
We call this layer "Little Black Sketch" and reduce its opacity to 14%.

5. Create a rough sketch
Step 1
Now we will create a rough sketch. Choose a background layer with machines and go Layer. - New - Layer.Via.Copy (Layer - new - copy to a new layer) to copy it, then move the duplicate to the highest panel of the layers. Go Filter. - ARTISTIC - Cutout. (Filter - Imitation - Applique) and configure the filter:

Step 2.
Go Filter - Stylize - Find Edges (Filter - stylization - edge selection) and then Image - Adjustments - Desaturate

Step 3.
We call this layer "rough sketch_1", change its mixing mode to ColorBurn. (Dimming the base) and reduce opacity to 30%.

Step 4.
Now, using the method described above, we will create more layers with a gross sketch. We repeat steps 1-2, but in the first step we use other filter settings:

Step 5.
We call this layer "rough sketch_2", change its mixing mode to ColorBurn. (Dimming the base), reducing the opacity to 25% and move it under the layer "rough sketch_1".

Step 6.
Repeat steps again 1-2, but in the first step we use new filter settings:

Step 7.
We call this layer "rough sketch_3", change its mixing mode on ColorBurn. (Dimming the base), reducing the opacity to 20% and omit under the "rough sketch_2" layer.

Step 8.

Step 9.
We call this layer "rough sketch_4", change its mixing mode to ColorBurn. (Dimming the base), reducing the opacity to 20% and omit under the "rough sketch_3" layer.

Step 10.
We repeat the steps 1-2 again, but in the first step we use new filter settings:

Step 11.
We call this layer "rough sketch_5", change its mixing mode to ColorBurn. (Darkening the base), reducing the opacity to 18% and omit under the layer "rough sketch_4".

Step 12.
The last time we repeat the steps 1-2, but in the first step we use new filter settings:

Step 13.
We call this layer "rough sketch_6", change its mixing mode to ColorBurn. (Dimming the base), reducing the opacity to 7% and omit under the "rough sketch_5" layer.

Step 14.
Now we have to group all the layers with a rude sketch. Select the "rough zescz_6" layer, clamp the Shift key and click on the layer "rough sketch_1" to automatically allocate all six layers. Next, go Layer. - New - Group.from.Layers. (Layer - a new one - a group of layers) to create a group from the selected layers, which is called a "rough sketch".

6. Create shadows
Step 1
Now we will add easy shading in the picture. Allocate the background layer and go Layer. - New - Layer.Via.Copy (Layer - new - copy to a new layer) to copy it, and move the layer to the top of the layer panel. Go Filter. - Stylize. - Find.Edges. (Filter - Stylization - selection of edges), then apply Image. - Adjustments. - Desaturate. (Image - Correction - Dispute).

Step 2.
Go Filter. - Brush.Strokes. - AngledStrokes. (Filter - Strokes - inclined strokes) and apply the following settings:

Step 3.
We call this layer "Shaden_1", change the mixing mode to Multiply. (Multiplication) and reduce opacity to 12%.

Step 4.
Repeat step 1, then apply Filter. - Brush.Strokes. - Crosshatch. (Filter - Strokes - Cross Strokes) with the following settings:

Step 5.
We call this layer "Shaden_2", change the mixing mode to Multiply. (Multiplication), reducing the opacity to 5% and move it under the layer "Shaden_1" to have the right order on the layers panel.

7. Add noise
Step 1
In this section we will add some noise. Select the layer "Shad_1" and go Layer. - New - Layer. (Layer - new - layer) to create a new layer, and call it "noise".

Step 2.
Click the d key to reset colors to standard, then go Edit. - FILL (Editing - fill) and enter the following settings:

Step 3.
Go Filter. - Noise. - Add.Noise. (Filter - noise - add noise) and apply the following settings:

Step 4.
Now we change the mixing mode of the layer on Screen. (Lightening) and reduce opacity to 64%.

8. Toning
Step 1
Now we will add a light tint. Go Layer. - NewAdjustment.Layer. - Curves. (Layer - a new correction layer - curves) to add a new correction layer, which we call "toning".

Step 2.
Twice click on the miniature of the correction layer on the layer panel and set it up:

9. Final strokes
Step 1
In this section we will add final strokes. Go Layer. - NewAdjustment.Layer. - Photo.Filter. (Layer - a new correction layer - a photo filter) to create a new correction layer of a photo filter that we call "Tint".

Step 2.
Twice clicking on a miniature of the correction layer to set it up:

Step 3.
Now add contrast. Click the d key to reset colors to standard, and go Layer. - NewAdjustment.Layer. - Gradient.Map (Layer - a new adjusting layer - a gradient map) to add the correction layer of the gradient map, which we call "contrast".

Step 4.
Change the mixing mode of the correction layer on SoftLight (Soft light) and reduce opacity to 18%.

Step 5.
Now we will configure saturation. Go Layer. - NewAdjustment.Layer. - Vibrance (Layer - a new corrective layer - vibration) to create a new adjusting layer, which we call "saturation".

Step 6.

Step 7.
Now we apply brightness. Go Layer. - NewAdjustment.Layer. - Levels. (Layer - a new adjusting layer - levels) to create a new adjusting layer, which we call "brightness".

Step 8.
Twice click on the miniature of the corrective layer and set it up:

Step 9.
Next, add sharpness. We click the combination of keys Ctrl + Alt + Shift + E to combine all visible layers on a separate new layer. Then go Filter. - Other - HighPass (Filter is another - color contrast) and configure the filter:

Step 10.
We call this layer "Sharpness", change its mixing mode to HardLight (Hard light) and reduce opacity to 76%.

Congratulations, you did it! This is how the final result looks like:

I will give you a few advice as you can additionally change the finished drawing:
- We choose the "background color" layer, twice with a miniature and select another color. Having finished, click OK.
- Play with the opacity of any layer with a sketch to get another result.
- Choose a layer "Toning", double-click on his miniature and on the panel Properties.
- Choose a layer "Tint", twice with a thumbnail and on the panel Properties. (Properties) Apply other settings.
- Select the "Contrast" layer and experimenting with its opacity to adjust the contrast of the pattern.
- Choose a "saturation" layer, double-click on his miniature and on the panel Properties. (Properties) Apply other settings for Vibrance (Vibration) and Saturation. (Saturation) to get another result.
- Select the "Brightness" layer, double-click on its miniature and apply other settings.
- Select the "sharpness" layer and experiment with its opacity to adjust the degree of field.
We get this result:

Great job!
If you want to make a drawing brighter with the effect of paint, use the finished action.

The action works in such a way that you just need to paint the area on which the paint should be, then launch an action that will make the rest of the rest and provide you with a fully customizable result.
Each application of this action will generate a new option, even if you use the same layer painted with a brush. The action has 15 ready-made drawing stylization, including canvas, halftone and mesh texture. With the work of the action you can familiarize yourself in a special
Use photoshop too. There are appropriate filters that make a photo as it were drawn, and there are several portrait options, even watercolor. And it's easy to do it, although there are video tutorials for this.
there are special editors for example Olympus Master there Have functions Drawing watercolor, oil paints, a pencil just need to set up a more real option in manual
If the question concerns the creation of the painted picture from the photo in the photoshop editor, then I propose the following video selection (excluding video already answered):
This question, this question implies the creation of drawn portrait using third-party programs (this method is especially good for those who do not know how to use Photoshop), then here is another story (and there is even an online program where you can make a photo of a hand-drawn portrait or still life - video Just about such a program):
And there is such an option (using CorelDRAW)
Well, I like to make a similar effect automatically on the site - http://www.imgonline.com.ua/cartoon-picture.php (there is called cartoon)
Even with the default settings, it turns out very well!
In order to change the real photo on the hand drawn, you just need a photo editor for this.
I personally always use this site.
Here you can change all your photos in the pictures, that is, on this site you can turn a photo into a drawn portrait.
There are many ways, how to give pictures of the effect of the picture. The most common and, probably, the easiest way that I know is the use of the program Dynamic AUTO-Painter. This program will automatically make everything necessary to give pictures to them to imitate drawing with a pencil.
You can do everything in manual yourself, having mastered photoshop. But it is a little long and requires some effort.
Turn a photo into a drawn portrait or turn a digital image into a different pattern drawn by different styles, in several ways: