Divinity Original SIN 2 Hyde by passing. Lost and found
One of the main advantages of the recently released creation of Larian Studios is the presence of a large number of a wide variety of additional tasks in it, and most of them are fascinating adventures, and not the banal species of the "come-bring". Some of them are intertwined with the main storyline, while others can easily miss if desired to concentrate all their attention on the main history. However, some of these missions perform quite difficult, so we decided to write a detailed passage of side quests in Divinity: Original Sin 2.
Add that if you are interested in the passage of personal quests of satellites, we advise you to read the corresponding guide. It describes the execution of all the tasks of companions.
Fort joy
Extortion
Once in place called the Ghetto Fort "Joy", we pay attention to 3 characters who are quietly talking to each other. We interfere with their conversation and find out that the elf by the name of Eldo raised with payment, which each resident is obliged to pay the overseener on a monthly basis. For this reason, he sent him a whimsal to the girl so that they would take money from her. Here we will be at a crossroads, as we can choose several ways to perform this quest at once.
We decide to support ELO.
If we decide to help the girl, the soldiers of the warder will attack our group. First, they will try to cause damage by elf, and therefore should act as quickly as possible. Before entering into a dialogue with thugs, approach them to a minimum distance - it will help us attack them already at the beginning of the battle.
After the victory over the whiskers of the warder, Eldi will decide to take us into a cave, where we can learn a lot of interesting facts about this place. When the conversation stops, we will get a chopped head as a reward. If there is an Elf in the party, it is possible to use his talent of the "body of corpses" to enrich their skills.
Prize: A chopped head and 480 experience points. In addition, you can deepen in the cave and find some more useful things there.
We decide to kill ELO.
We can help thugs to knock out money out of elf. This young lady is quite dangerous, but it is unlikely to become a distinctive threat. In addition, she will try to kill the people of the Wardrift.
Prize: 240 Points of experience for the battle. Nothing will be able to get anymore, so the first option is still preferable.
We decide to stay aside
We start the conversation, but then we decide to choose a neutral side. In this case, Eldo will be able to negotiate with the bandits and escape. In the future, we will be able to meet it in the caves, but she will not speak with us.
We can also skip past the ears of passersby and continue to perform the main storyline. In this case, after a certain period of time, we will be able to detect the elf corpse in a place where it usually lives. Of course, the task after that will not be possible.
Terrible mother's sleep
Next to the gates of Fort "Joy" we meet a headlight trying to find a child. I ask her if our help is needed. She will thank us and give a doll to her daughter, so that it was easier for us to find it.
Not far from it talking to Jet, which will inform us that a woman really needs help, but not with a friend of his daughter. The fact is that she lost his mind after the child's loss. Herma, according to him, long ago went to the world of other and never happened in the fortress.
We go to the spotlight and tell her that Erm died. A woman will understand that we talked with Jet and say that he lies. The task will be executed.
Prize: 480 Points of Experience.
Gaist killer
Near the entrance to the fort "Joy" on the protective wall we speak with the Master Arnica. She will ask us if we have not met with Migo, her companion. She will then ask to find him, and will also advise not to return to her without information about Mig. We will have two choices.
We are looking forward to Migo and find it on the beach near the fort in the pool from the blood. We learn that he became a terrible monster devouring human bodies. He will not attack us until we decide to talk to him.
Migi is a very dangerous opponent who is not only able to apply a considerable damage in the near battle, but also apply the skills driving around the area. The battle with him I spent most of our reserve of therapeutic potions, but in the end we struck it. From the kits fell out helmet and ring.
Take the ring and refer his arnica. We can lie to her or say that it was we dealt with MGO. In any case, we will need to show her jewelry (we put it on the protagonist). After the dialog, the quest will go to the section performed.
Prize: 300 experience points and helmet.
This choice becomes available only if one of the Arnic flower satellites has. It can be found in ruins near the turret, where we should face Magister Boris in the plot. Get face to the tower, and then turn right and go to the ruins. Do not forget to click on the Alt key to highlight all nearby objects.
Next, speak with Migo, give him a flower. The monster is confused and give us a ring. We return to Arnica and tell you where its companion is now. Show her the ring and get a reward. The girl at the same time will go to the beach.
We go after the master, and then speak again with her, but already on the beach. She will give us a key designed to open one of the doors in Fort. This task will be completed.
Prize: 600 Master's Experience Points and Key.
Captive elf
We talk with Sahaila, believing that she was able to withstand a meeting with the horse. As a result, we find out that this young lady is capable of seeing the future. Believe in her gift to open a dialogue in which you can ask her how to escape from the fort. She will inform us that for escape you need to talk to Amiro - this is her boyfriend-elf. Previously, he dwells in the caves, but recently was discovered Griff, commander of the camp. We agree to find her friend and get an additional prompt - a lizard is connected with this.
We go to the camp kitchen and find out that Griff sent an elf behind the grille. When trying to chat with an elf, Griff connects to the conversation. If we decide to bring it products that may have stole Amyiro, the commander will give us the opportunity to talk with "Long,". The elf will tell us that nothing is cradle, but just going to escape from the Fort of Joy. He promises to demonstrate the road to freedom, if we help him get out of the cage. Amiro will also say that a real criminal who has stolen, coughing all the time.
To find stolen things are heading to the cave. Reaching to them, turn to the West and find a little cape with fishermen camp.
We learn that the theft performed a lizard, whose name is shower. To return the materials you need a character who has a good conviction, and therefore should not begin a conversation without the necessary characteristics. A character with a high dexterity parameter is also suitable.
Note: if there is a red prince in your party, let him talk with a dream. This will move forward a personal satellite mission.
So, wake a lizard from sleep and ask him that he knows about stolen from the kitchen reserves. We continue the conversation until the option arises with the conviction. We can also show interest in this character and take advantage of the dexterity to return all stolen materials.
Prize: 240 experience points.
Now we will have the following options for choice:
- We return reserves, betray the lizard and help with her murder.
- We return reserves, tell about the lizard, but do not help in his killing.
- Return stocks and protect the lizard.
- We leave all objects to ourselves.
When you conversation with Griff, we tell him that they were able to find stolen things. If we decide to return their commandant, he will immediately take things and ask us who was a real thief. We decide to tell him the truth to let go elf. We speak with Amiro and find out where the secret way out of Fort "Joy" is located. He will also ask us to take an amulet and give it to Saheyl. We agree and get a new quest, which will be able to fulfill only in the next chapter.
Prize: 840 experience points. Griff will decide to send his people to kill the lizard. You can help them and get some gold coins for it.
If we deal with the fault, we will not be able to pass two tasks at once. This NPC is needed to continue the personal assignments of satellites - the Red Prince and Sebilla. The latter, by the way, can be found next to the lizard camp. You must definitely talk about them to complete these quests.
Prize: 840 experience points and 50 gold units.
We talk with Griff and tell him that the plant was able to find. We give him a commandant, but do not reveal to him the name of the thief. After that, Griff decides to take the main hero in custody and the result will begin a new fight.
We place your fighters on the balcony over the opponents to get a bonus to damage and the ability to deal with the enemy archer. We defeat all opponents, take the key from the corpse of the commander and exempt the elf. Amiro will tell us about the hidden passage and give an amulet that will need to convey the clairvoyant.
Prize: 840 Points of Experience
Leave everything to yourself
We decide to leave all stocks to yourself. In this case, the commandant will immediately attack us. We defeat him and liberate an elf. However, then the reward will be less than if we decide to pass the lizard.
Prize: 840 Points of Experience
Teleport.
Note: In no case do not let this quest, since as a reward for his passage you will be given the ability to "teleportation".
- Here is Gavin
- Here you can find the teleportation gloves.
- Here is the entrance leading to the conclusion cameras.
- Harbor
In the study of the Ghetto Ford "Joy", a mysterious stranger is suitable for us, who will ask for us, whether we came here alone. We are talking yes, even if our companions are nearby. When choosing another option, the quest will not be possible. However, you can snatch a little and take another character, and then talk to him again and answer positively to his question.
Considering that we agree to "leave" from our team, Gavin will reveal our brilliant ideas to us, for whose implementation he will need our help. Low-level characters This task will seem extremely difficult, so it is worth passing it when achieving at least 4 levels.
What is our help? It will be necessary to get a powerful artifact, which makes it possible to teleport to significant distances. You can find the telepalt gloves on the beach, which is guarded by 3 evil crocodiles. If there are well-leased characters, there will be no problems with them, however, you still need to carefully treat their slowing effects, because during the attack crocodile is able to slow down from two and more members of the party, so we place the characters away from each other.
Pay special attention to the crocodile, which has a magic barrier. It is us that the teleportation gloves are put on, allowing him to move to our fighters instantly. They shy away from his fiery strikes and try not to accumulate negative statuses.
After the victory over the monsters, we take gloves and return to Gavin. To start the desired conversation, equip the artifact to the hero and send it to the desired NPC. Gavin will be delighted by the fact that we were able to get wrap and ask to help him escape. We follow him in the location called "Mystery Alcove". Two choices will appear here.
Teleport Gavin on the beach
Teleport Gavin in an open place on the beach. However, as soon as he is in the right place, you will find out that he will not be able to help us get out of the current place.
Prize: 960 Teleport Experience and Gloves
Teleport Gavin on the rocks
In this case, Gavin will be able to reach the harbor. First teleport it on the rock, which is slightly lower than the final destination. Next Gavin teleport you to yourself and ask you to move it to the next rock. Then he will just leave.
Note: This method will give us the opportunity to go to the caves under the island and being the house for the queen of fiery slugs. At one time she was doing business with himself.
Prize: 960 Points of Experience and Teleportation Gloves.
What happened to Gavin?
After teleportation, the task will end, but if you want to know what happened to Gavin, then you can go after it, using gloves. It is necessary to simply move all the group members at the desired point, and then pass the artifact to another for the teleportation of the last member of the party.
If you can trace this character, you will find out that masters dealt with him, and such an outcome is waiting for the boy in any case.
Jug souls Weermura
In the caves, we can meet the child whose name is Modi. It is quite simple to find him, as he constantly plays next to the entrance to the cave. After a conversation with him, agree to play hide and seek.
During the first game, I find a boy on a wooden pedestal. He pushes us for attentiveness, and then asked to play again. Agrees again and find it in a niche near the entrance. After that, Mio wants to introduce us to his friend. We definitely flatter the shovel (or lizard), otherwise the quest will not come out.
The child will run into a small cave and will offer us to dig in the ground to find a hatch. We find a mound and apply clawing lizard or shovel on it. As a result, finding the hatch.
Conversation with Lord Weermur
The hole in the floor will lead us to the "forgotten chamber". We find a child next to a big statue. The boy will inform us that this is his best friend. We come to the statue and begin the conversation with her. We learn that Lord Wizermur became the stone statue of more than a thousand years ago. He will ask us to find a spear of the king's spot in a chest, which will allow him to move again.
We can get a spear or destroy it. When choosing the first option, it will appear in our inventory. In any case, the Lord will cease to be a statue, but it will not be able to go anyway. There is still something that does not allow him to move. He will ask us to find him soul and free her from captivity.
Before getting out of the location, speak again with the boy. Then we inform him that he must somehow thank us for helping his friend. He will indicate on the map where its most valuable treasure is located.
After leaving the caves, heading to the sanctuary of seven, which mentioned Wizermur. We interact with him and notice the new option of the dialogue. Our hero will pull the lever, which is behind the statue and the opening pass is a little ahead.
Then go down. There are no opponents here, however there are quite a few chests where treasures can lie. Further we reach the nearest door, not far from which the shrine will be depicted. We can hack the door in the presence of one of the characters the "theft" of the 2nd level.
You can also get into this location by passing the task "Fit Elf". After the liberation, Amiro informs us about hidden pass. To use it, it is necessary to simply break through the ground with a shovel or lizard claws. Passing through the passage, we will fall into one of the chambers of the conclusion of the Fort "Joy".
We go to the end of the corridor and fight with several masters. If a wounded master is surviving, we can spare it. Next, we need a key that opens access to the top level of the fort. He lies right on the floor in the same room. Hold the ALT key to simplify the search.
We find jugs of souls
Once in the Fort Prison, use the secret handle, which is shown in the picture above. As a result, we open the path leading to the "ancient passage".
On the way, we will hugging a couple of poisonous traps. They can be neutralized using a special tool. In its absence, we pass first through one trap, we wait until negative status disappears, and then go through the second trap. Do not forget then heal all party members. You can also get rid of poison with the help of the ability of Pyromania.
Then we enter into a large room, in the center of which are 5 jugs. In one of them there is a shower of Wizermura. We go to sarcopagu, standing nearby. In no case touched the jugs.
Over the room, we find the statue of the Flag, available for interaction. If the hero has a low perception parameter (or there is no skill Loremaster), then he simply expressed his opinion about the statue. In other cases, a list of dialog options will appear and when choosing any of them we can get a leaf prize.
In the screenshot, the jug is shown below, to which you should touch for the passage of this quest. Under all the jugs there is a plate named Wizermura. We need the one on which it is written: Withermoore the Supplicant.
When you click on the wrong jugs on the location, new opponents will appear. We can cause them if necessary to obtain additional experience. After interaction with the desired jug, the dialog window will appear. By choosing an option related to action, we will run a conversation inside the group to decide what to do with a jug.
Energy will be released from the jug, as a result of which Wizermur will finally be able to gain the long-awaited peace.
Prize: 1400 Points of Experience
Choose one of the characters and interact with the jug to suck all the energy from it. This option will be available only after the execution of the "Collar" mission.
Prize: One source point.
In search of Emmy
To begin this quest, we will need a character in a group that has the talent of the "friend of animals". To such satellites, for example, Iphan Ben-Monta can be attributed. Then go to the caves and find the peel, whose name is the friend. We talk to him and find out that the guards grabbed his friend - Emmy. We agree to help the four-side and take the key next to the wreckage of the sea ship, which will indicate a dog.
- Location man
- Finding the entrance leading to Fort Prison
- Finding the entrance leading in the Camera
Emmy can be found in the prison of the Fort of Joy - she will sit in Psarn. You can walk to it in two ways.
We use the secret entrance to the fort joy
We find the passage to prison near the gate, which are guarded by Master Borriss and its minions. Those who were not here before, to get a key to open the gate - for this we defeat the guards. The key is found on the dead body of the master.
We go to the fort for caves
This method becomes accessible only after the task "Teleport" is fulfilled. We go to "Mystery Alcove" and move the whole game ashore. Next, go to prison, passing through the passage to the cave. Here I'm buying on Master-Psary, beating one of the masters (most likely he betrayed them). We talk with the villain, and then enter the fight with him.
We do not put the members of your party near the entrance to the camera, as near him are kegs with butter, which your enemies can undermine. During the battle, we try not to give Delorus to die, because in this case he will tell us the password, thanks to which we can avoid battle with two dangerous magists. By defeating all enemies, we take the key from prison lying on the nearest stool.
Emmy can save
After passing to jail, we go straight into the room of Psary. You can learn this place on the 4th walking dogs here. Open the room the key found on the tip of the friend. After entering the room, a conversation starts with a character who chatted earlier with a friend. We mention the name of a friendly peel in conversation and say that he wants to return Emmy home. In this case, the dogs do not attack us. One of the dogs, by the way, is the same Emmy.
Prize: 2200 experience points.
Emmy fails to save
If you do not name the name of the friend, then the dogs instantly attack us. In this case, special attention must be paid to animals with crossbows that are making huge damage. We use the door in the form of an obstacle for opponents.
After completing the battle, we go to the bedroom and find a couple of valuable things, including the Cross Crossbow.
Prize: 120 points of experience for the fight.
We return to my friend and inform him about the death of Emmy. Of course, we will not receive any award for it and experience points will be extremely small.
Corner corned
This task can be passed in two ways. In the first of them, we will need to talk at least with one seeker in the sanctuary of Amadia. From him, find out what Garet, their chapter, went to look for a weapon, able to help them escape from the Fort of Joy, but he still did not return. We agree to help them in search of Gareth.
- Location of the sanctuary of Amadia.
- Gareti location
We find a Gareth in the old ruins - it will fight with several masters. If we were not talked earlier with his companions, the task starts from finding the location of this NPC. We pass along the trail along the wall so as not to face the shrike (crying). Then go inside and begin the conversation with the masters. If there is a satellite with a well-leased conviction skill, we can convince them to leave, pretending to be a secret master. Next, we continue to go ahead and face Gareth, fighting with a group of enemies. The quest may end one of the three finals.
We help Gareth in the battle with the masters and do not let him die by battle. Then talking to him. He will say that he can help us in the removal of collars, and will mention its escape plan from the Fort using the masters boat. In the latter case, weapons will need, capable of damage to Alexander. As a result, the task "Call for Arms" will open.
Prize: 1800 experience points.
We stand on the side of the masters and easily kill the boyfriend. However, in case of his death, we will not be able to fulfill the task "call to weapons".
Prize: 2240 experience points.
Let Garet die
Just do not take any actions and let Garet die from the hands of masters. In this case, the mission "call to arms" will be blocked and we will not get any experience.
Nonhety game
While in the prison of the Fort of Joy, you can stumble upon Masters Goa and Karin, caught Khan when he tried to hack the castle. If we failed to save the Delorus life and, therefore, we did not recognize the secret password, then without the fight in this case it is not necessary. By defeating the masters, talking with Khan. He will report that he climbed here in search of a friend whose name is Verdas. To express our gratitude to us, he will offer to take advantage of his boat and leave the hetto Fort.
As a result, Khan will be able to get to the coast located near the Amyada sanctuary, in which other seekers live. They can tell us an interesting plan of escape from the fort associated with theft of vessel of the masters.
Treasury of the king pribra
The launch of this task is possible by two methods. The first one implies reading the magazine, which we can find next to the corpse of Magilla. The second method is associated with finding a hidden passage leading straight to refuge.
Entering the cave, immediately faced with a thrombus, which will begin to mock us, but we will not be able to make anything to him. When the dialog is completed, approach 3 boxes. The bridge is located behind them, to see which you can only if approach it very close. We pass through the bridge and get into a dead end. At the end we find a reptile that helps get to the ledge. In no case go through between the two protrusions, since in this case we will need to enter into battle with other copies of Trompdoy. They will apply attacks driving around the area and our team, standing in a small corridor, will become an excellent target for them.
We send straight to the room with a statue located in the center. We will be able to go on, giving two correct answers to the questions specified by the stone figure. Answers can be found here.
After the conversation with the statue we pass through the opened door. Here we will again have to fight with a thromoft. The battle will end only after the victory over the real version of the enemy. However, it does not stand out against the background of copies. However, the true thromprom will attack you among the first waves, and therefore it is worth a focusing on it.
We finish the battle and go to the repository where the jugs of the shower are. We find the one in which the soul of Tromptoy is hidden and after a small conversation we decide how to do with it.
As a result, we will release the energy that was locked in the vessel, and freeing the thrombus.
Prize: 4200 experience points.
We interact with one of the heroes with a jug, drinking all the energy. This action will be available to us only when performing the task "Collar".
Prize: One source point.
Healing touch
While in the sanctuary of Amadia, we will be able to meet several seekers in serious condition. A little time will be assigned to their healing. If we do not have time to cure them for a set dead, they will die. It is possible to heal the poor thighs using different spells. When extracting all 3 wounded, you can count on a valuable subject from Simon.
Prize: 300 experience points and one of the artifacts to choose from if all seekers are cured.
Armory
- The location of the passage leading to the destroyed ruins.
- The location of the passage leading to the Anklav madman.
When visiting the old ruins, we can find the gate that lead straight into the destroyed ruins. In this location we find a master being on the edge of death. We speak with him and find out where we fell.
Our main goal will be located right outside the gate. I pull the lever near the master to open the barrier. The lever will be cursed, so to begin with, we use the blessing spell on it. Then open the gates and enter inside.
Here we find a chest that can be discovered only if we have the rings of the king of the progress or one point of the source. In the absence of these things, I am going to the treasury, the progress in the enclaration of madmen. Quest will end after we get out of the chest of a very valuable thing.
Prize: 1800 Points of Experience and Shrine of the King Clack (Shrine of Braccus Rex).
Burning pigs
- Location of flaming pigs
- Location of the F.
- Location of the sanctuary of Amadia.
In the study of the island, we can stumble upon a plot on which several traps are placed and the burned pigs are lying. We use the "blessing" spell on all pigs on location. After healing the first pig they will have to fight a little.
Healing poor animals go to the beach where the dragon lives. There we find another pig - Feder. We talk with her and learn that before she was man. We go to the sanctuary of Amadia.
Again we speak with her, reaching the sanctuary. We offer Federer to go to the place of healing, located next to the statue of Amadia. As a result, she will become a man again and will be able to offer us a lot of interesting things for sale.
Prize: 3600 experience points.
Deprived of the source dragon
- Location Slane
- The location of the passage leading to the cave
On the territory of the labyrinth we find the beach that is covered with ice. Here dragged the dragon enclosed in the cage. We destroy the totems located around the magic creation, and begin the conversation with him. Dragon is called Slalar and he was locked here with a terrible Witch Rainak. Only her cleansing rod can help him in the destruction of the spell. We agree to find the artifact and release Slalar.
Radeka can be found in the cave of the skull, which is located next to the beach, and therefore it will be quite simple to find it, but it will be much more difficult to go through the cave, since there are traps on every step. In the absence of a special tool, we will personally have to feel all the negative statuses from the traps. At the very end of the dungeon we meet with a witch. She will not agree with our arguments, and therefore the battle with it cannot be avoided.
By defeating the sorceress, we search her body and find a rod. We return to the slave and choose one of the two finals.
Give the dragon wand
In this case, the magic beast will destroy his spell restraining. He promises that he will help us at the time of terrible danger.
Prize: 4 good artifacts and a few more to choose from (depending on the class of the hero).
I refuse to give the dragon rod
Then we have to join the fight with reptiles. The battle will be very complex and bloody, so we advise you to prepare for him in advance.
Prize: a large number of experience points
Fate worse death
The task starts after entering the tower located at the end of the Gargilla labyrinth. Here we will meet the 3-speaking dead.
During the conversation with the undead, we find out that all three are separated from reality. We can agree with their point of view or prove that they are wrong. However, it is necessary to carefully choose words, because if the dispute begins, then the undead will attack us. In the latter case, as quickly as possible, we move away from the enemies as possible, as they are completely impossible to kill them.
The main goal of the quest is to find the soul vessels of the three walking dead. They can be found in the repository discovering when performing the mission "Treasury of the King Cologge". The jugs are demonstrated in the image below.
In this case, the dead will be able to find eternal peace.
Prize: A large number of experience points.
Suspens the energy of vessels with one of the characters. This option will be available only after executing the task "Collar".
Prize: One point of the source for each jug.
Labyrinth Gorgulia
When entering the sanctuary of Amadia, we find the tower with an entrance to the labyrinth. This quest starts immediately after we open the door that leads to this location.
Dozens of traps are placed on the territory of the whole labyrinth, and for opening doors will have to use the skulls that can be found on hidden altars and after applying portals. If you do not want to spend time in search of skulls, you can move along the labyrinth using teleportation.
The most convenient and safe route through the room with the source is shown in the image below. At the entrance of the Gargoyle, it will make the dead on us who use fiery strikes. In this battle, it is worth using the "blessing" spell, which turns the simple flame to the sacred, appreciating the increased damage of undead. After winning in the battle, we go to the historian and we deliver it from the curse. To do this, use blessings on the pool filled with blood (created by the "bloody rain" spell).
The road to the tower leads through the door located under the Gorgoyle. The quest will be considered completed when your heroes will enter the ladder leading to the tower.
IMPORTANT: If you have already managed to go through the task associated with the Treasury Claim, and you have his ring, then you can show his Gorgoles. In this case, the statue recognizes its owner in you and immediately teleports to the tower.
Eternal worship
While in the sanctuary of Amadia, talking to Grazian. She will ask us to get a vessel with her soul. We agree and go to the treasury of the king, which we managed to find earlier. The required pitcher is marked in the image below. When we take it in your hands, we will immediately understand that there is a soul grazian.
We return to the girl and send a jug. She will tell us the history of your life and as a result the task will be considered performed.
Prize: 2 valuable objects and 4 more to choose from (choose depending on the classes of their heroes.
Arena Fort Joy
Here we will need to deal with all the enemies in the arena, and at least one team participant should remain on the legs. We talk with a character standing near the Arena for the start of the task.
Get to the Arena, taking advantage of the hatch in the camp kitchen. We are looking for the following coordinates: x: 215 y: 131. Then we talk with the organizer of battles and defeat all opponents. After the victory, choose yourself a reward.
All members of our group will be automatically cured if at least one of them survived. Do not spend the scrolls of the resurrection by the fear, knowing that we can beat even with an incomplete composition. In this guide, the passage of the Arena isna in detail.
After passing the quest, we go to the nonbir. She can remove the collar from the main hero when he learns that he was able to become the champion of the Arena.
The coast of the reservoir - mastering the force of the source
They will not pass
Once on the coast of the reservoir, we talk with the child who calls himself Barin - he is on a broken bridge. You can also start this quest by conversation with Mary, the keeper of the bridge.
We go to the House of Defender of the Bridge (pass through the Castle of Paladins and the Cemetery) to deal with the local monsters. To open the gate, we need the launders and a well-leased hacking ability.
If Mary will survive the battle, then give us a reward. In her house we can also find the key, opening Luke Mary.
LED CARAVAN
We will be able to take this task after finding a caravan of masters located near the initial point of location. We enter the dialogue with the boy and descended by the gnomomes and find out that Issucia of the void grabbed the magician and took it into the Wrecker Cave dungeon.
Then speak with Reimond, which are in a driftwhere, and after taking about Julian, local Magist.
Hypersca
Being in a driftwood, talking with two kids who play next to the docks - Garietta and Ben. We find out that their best friend tried to swim to the fort "joy", but then disappeared. They worry about him and want to know what happened to him.
We go to the point in the following coordinates (X: 450, Y: - 46) and we find on the beach (located next to the starting point of location) shark, which jumped ashore. We speak with her and find out that she does not want to be in the water again, as some monsters live in it. Killing it, and then search the corpse and find someone's leg. Let Elf eat it to find out what she belonged to Joe.
Note: If there are no elves in your party, then you can choose Faine, put on it a reincarnation mask and make it an elf. As a result, he will be able to view the memories of the dead people.
We return to the kids and tell them that it stared with their friend. As a result, the task will switch to the section passed.
Prize: 3000 points of experience in case we learned the fate of the boy.
When to count chickens
We detect a chicken coop on the coast, in which several chickens live. If there is a character in a group of characters with the talent of the "friend of animals", we speak with one of the chickens (big margin). She will tell us that someone stole them with eggs and asked us to find these itemed objects for them.
We go to the point indicated on the map and located a bit of the north of the chicken coop, and after being painted with all the dissensions of the emptiness. Almost all eggs will be spoiled, but one of them survived - it is on the edge of the shore. We raise it and go back to the chickens.
Big Mount will tell us where you can find a treasure. To do this, you need to go into the back of the chicken coop and dig a chest.
Then we return to the chicken coop slightly later (after performing two or three quests) and find in it a black chicken of a piskuna. We see that he killed all the chickens, but at the same time it applies to us quite friendly. Moreover, he will begin to follow us right as a black kitty in the previous location.
Use the ghostly vision to appear the spirit of the big margin. She will ask us to find a chicken father. We go to the point indicated on the map (X: 437, Y: 304) and we find the magic rooster there, dad piskun.
He will tell us that it is necessary to deal with a pisk one, since he is a common killer. We can agree to kill chicken or refuse it in this. In any case, we will have to fight with him, as it will turn into an evil monster and causes deadly chicks from a dozen. After the victory near the magic rooster, a chest will appear, in which you can find several epic and legendary items.
Prize: 5000 experience points and good things.
Scientist skrop
Once in the fishery region of Driftwood, we find a scientist named skid, studying the fish, which is infected with emptiness. We agree to the fool of 3 fishing for the experiment.
He will suggest to be bluffing, yellow or red fish. After that, the character will receive the status of "poisoning" into several moves. But the researcher will give us a mixture of herbs, depending on the fish eaten. He will also advise us to mix the obtained plants with poisoned fish to enhance the actions of the potions.
One member of the group can eat only one fish, that is, you will need 3 characters to eat all the fish. When talking with the scientist, the last hero, which did not eat anything, the task will automatically end and you will get a small number of experience points.
Note: Even hired satellites can participate in this quest, if you have no complete group.
Losses in Grossbukh
In the tavern of Drifwest, we can stumble upon a person named Garvan. He will ask to investigate the case associated with the missing reserves that should have come through the trading path located in the western part of this area. We go to the specified point and find the troll, guarding the bridge there. We can send it to the world of other or help, by following the task of "business competitors".
We follow in the footsteps of the blood and meet a group of gnomes and their beast in Cliche Pasha. We can say Garvana that his supplies were destroyed or returned to him the remaining wooden box. Or continue the investigation.
In a shallow grave, they dig up the remains and give them an elf - he learns that the merchant was not killed by the disadvantages of emptiness, and his business colleague (you can also reincarnate Faine in an elf using a reincarnation mask and then he can see exactly how Torgash died). Activate the ghostly eyesight and speak with the ghost merchant. We agree to take revenge on it to start performing the quest "Aggressive Capture".
As for Garvana, he needs only a box and a reward for it will be directly dependent on the contents of the box (what we decide to leave inside).
Business competitors
Marg Trolli and Gorg are trying to lead the same business, and therefore are direct competitors. Everyone will ask us to deal with his competitor. We can help one of them, but we immediately note that the trolls are extremely dangerous opponents, for example, Gorg can send one blow to knockout of a weak character. Therefore, it is worth a pretty prepared for battle with these monsters.
With the help of fire, it is possible to remove the effect of blood regeneration from the Gorga, and with the help of poisoning - in Marga.
Aggressive seizure
So, after a conversation with the ghost of Liam (merchant) in the mission "Losses in Grossbukh", we learn how the merchant is died and agree to deal with his killer. It is possible to kill Garvana and imperceptibly - for this I feed the poisoned meat chowder to him, which craft from fish, infected with emptiness, and simple chowers. After that, he will head to Lazareza, who is behind the tavern. If he sees us, then immediately attacks. Kill him and search the body. As a result, we get the sliced \u200b\u200bhead of Garvan. We give it to Liam and find out the location of the treasure, which will become our award.
However, you can pass the head of Elf and give it to eat it to get the unique talent of the "secrets of a merchant", which increases the "Exchange" parameter for one point. However, in this case, Liam will not tell us where the treasure is.
We can try to kill Garven right in the tavern. So that he did not become our enemy, do not warn anyone about the attack. We take into the hands of a poisonous weapon, clinging with him rain, and then infect puddle with a poisonous weapon. Next, we leave the tavern, we stand on the street a couple of minutes and quietly return to the building. We are waiting until Garvan dies - as a result, no one knows what we did.
It is also necessary to keep about the stock of 1 thousand coins to bribe the most curious personalities who have decided to interrogate you (we can and simply convince them). Next, do not approach the tavern a certain period of time until everyone calms down and will not return to their duties. After that, we can easily cut off the head from Garhana.
By the way, the treasures of Liam can be found both by himself, so it is still better to raise the head of Elf.
Pottening of a carnal desire
We go to the lower part of the location and find the female woman under the driftwood, which is Dorothea. We agree to look at her ring and choose one of the visions (they will all cause different reactions). Then she asks us to talk to her around the corner alone, so we share a detachment and keep our companions away from the main character. Then we meet with a woman and watch it becomes a gigantic spider. Here it will be necessary to decide: give her a kiss of the protagonist or take a weapon and attack the monster.
Attack of giant spider
Fight with the monster and defeat it. As a result, all members of our group will receive 4 thousand points of experience. We inspect the body of the pachecheki and find a couple of good daggers, the key and the idol of revival (the hero automatically revives the hero at the death, if lies in the inventory).
We give a spider kiss the hero
Pouchikha immediately bite the protagonist in the neck, giving him a unique talent of the Spider Bite. Its effect will depend on the selected vision:
- The towering oak (increases strength by 2 units, but reduces the physique for 2 units).
- Curved pen (increases intelligence by 2 units, but reduces the physique for 2 units).
- Golden Chest (adds 2 thousand gold in the inventory, but reduces the physique for 2 units).
- Dragon (increases intelligence by 2 units, but reduces the physique for 2 units).
- Cocoon (adds to the inventory of one idol of rebirth, but reduces the physique for 2 units).
After the bite we can allow the spider to leave or attack him. Note that at least Dorothea and tell us to meet it alone, however, we can use the help of other heroes under our control, therefore the battle will be rather easy. To maximize the experience it is worth kissing spider by all characters in the group, and the last to attack the monster.
Mount will not fill
We go to the tavern driftwood and climb the 2nd floor. There we find Captain Ailvester, which will give us a task to save it from the painful stall. We use the skill ghostly vision and find the ghost at the ghost room trying to the girl. We convince the ghost to leave, thus eliminating the captain of Muk.
Then Ablwezer will indicate the location of its compass on the map. We go to the right place and teleport one of the characters to open the hatch. Inside find a compass that is surrounded by fog. In order to get this item we will need undead or teleportation spell.
Strange cargo
Having found Higba in a barrel with fish located in the field room (the "missing masters" task), we can return it back or help to escape.
When choosing a second option, we will need to carry out this NPC beyond the limit of the Location Drifwood, and it is necessary to avoid meeting the masters. With the help of a mini-card, we track the location of the masters and do not forget to use the secrecy. However, it is possible to do easier and simply take Higba to the west of the port and, using teleportation, move it to the opposite shore.
As a result, we get a small number of experience points and a prompt about who exactly is a real criminal (a cook working in the tavern). We will also be able to find out where it is worth looking for Master Hananga. Among other things, we can teleport NPC to a point on which the marker indicates, and get for this award. Even when choosing escape, you can pass Higba Magistram at any time.
Love has a price
We go to the tavern of the driftwood and speak there with a man whose name is Lover. He promises us to try something exotic. We give him a certain amount and get the key from the top room.
We go there alone and spend one night in the apartment. In the morning, the gangsters are breaking to us and begin to threaten, demanding to give all the money. If the hero is Jefan Ben-Misa, then the criminals will recognize him and quickly remove from the room. Otherwise, we either go to the world other, or lose a considerable amount of money. The room remained a red prince? In this case, the lizard we encountered will become a red princess.
We return to the lifestyle and find out that he was forced to do it for the sake of her daughter. Asking the cook and find out that he lied, but the dealer will already run away from the tavern.
Arena Driftwood
While in the tavern of Driftwood, go down to the basement and find there arena, where illegal fights are held. We agree to take part in them. In the first battle, we will have to beat with a bandage in your eyes, which will significantly reduce the accuracy and range of the hero, so it is necessary to preach to prepare for the battle.
In the second battle, it will be necessary to fight with Murg, lactifying as a villain. When it makes a second course, the enemy will arise in the arena. We defeat monsters and kill Murge. As a result, we will get the title of the championship.
In both battles, it is necessary to strive in advance on the characters of the shields and a variety of buffs. Do not enjoy transformations, as the bandage still will not give to apply the majority of similar skills. In the first battle it is worth calling creatures that may not limit themselves with bandages.
If Mourga does not be able to reach our characters before they arise, it will begin to fight with our shared opponent. In this case, it is better to move away from it. Although the worm does not represent the same danger as with a battle with Alexander, however, he still can spoil our life, for example, will bring the shackles of pain. Sebill is able to destroy them, but in this case the source point will be spent.
The geomants of the 3rd level is necessary to purchase an artillery plant on the market (one point of the source and a lot of gold). With the help of it we managed to quickly deal with Murge.
Burning prophet
We go to the Rock Drifwood and find a strange statue there, near which torches are installed. It is necessary to light them all at the same time, however they quickly die. Therefore, first create a surface of the oil and we use a fiery spell on it. As a result, all torches will litter.
The rainbow will arise and will enter the dialogue with us. After conversation, we can specify their award.
ugly duck
We go to the farm located north of the driftwood. There we find a sick chicken. If there is a tag "Scientist" and the talent of the "friend of animals" convince the chicken that she is hidden phoenix. To turn it into a fiery bird, it is easy to use some fire spell on it.
After that, the chicken will become an egg of the Phoenix. We can either eat it or just leave on Earth.
Scot's appeal
On the same farm, where we were when performing the previous quest, we find two cows that act people. We find out that they were turned into animals of a mysterious witch. For a conversation with burenits, you will need the talent of the "animal friend". Of course, they would like to become people again, and therefore asked us to help them. To start the quest, simply pick up the key from the house of the sorcerer, located on the left side of the building, on the rock.
The witch's house is opposite the cows. We enter into the inside, using the key previously found, and we find the winti eye, which is necessary for converting cows back to people. Next, open the hatch that leads to the dungeon (the ability to theft of the 4th level is necessary). In the absence of an appropriate skill, we find the witch in the monastery forest and take it the key from the basement. However, you immediately warn you that the battle with it will be extremely difficult.
In the dungeon we will make up a lot of explosive rats. We hit by holes in the walls to stop the rats-kamikaze. We can also find the lever that opens the door. It can be unlocked and with the help of the skill of theft or just tolerant inside.
Here we find the elixir witches (do not drink it, otherwise I will also become a cow) and her book lying on a huge frog (we kill it). Thanks to the tags "Mystic" and "scientist" we will be able to easily decipher the book. If you do not have them, then use the following recipe: Mushroom Bolt + Growth Stimulator + Winth Eye.
If you drink the witch's potion to turn into an animal, the task will automatically be completed and almost 11 thousand experience points will be issued. However, we advise you to do this, because only one elixir will be able to scaffle, and in people you need to turn two burenoks.
Create a potion and as a result we have two elixirs. We return to cows and give them potions. As a result, for both burenks we get almost 27 thousand points of experience.
Test of all respects
We go to the altar of traveling driftwood, and then turn to the east and find the structure of the elves, standing behind the river. Inside, we find 4 statues that surround the roaster (accurate coordinates - x: 450, y: 340).
To pass the test by attacking the statues of different skills of elements, namely:
- Spells "Blow Silver" or "Winter Explosion" are suitable for the Hero of Winter.
- Static cloud arrows suitable for the autumn hero. We can also use a fiery spell on the pool, and after waiting for the appearance of the steam and shoot a electric spell into it.
- The "laser beam" spell is suitable for the hero of the summer.
- Spell "Bloody Rain" or Skill "Victim of the flesh" is suitable for the hero of spring.
Note: You can call on the fiery slug (use the mage ring) to activate the statue of the summer, because it can also use a beam. You can light the totem of spring by attacking your companion, which you need to put near the statue (his blood should get to it).
We advise before lighting the totems, prepare for the battle, since after that we will attack 4 enemy with immunity to a certain element. These are extremely strong enemies, especially if you are equal to them by level. By defeating the heroes, talking with the roar and get a Phoenix heart as a reward.
Prize: 83 thousand points experience for the murder of heroes, 52 thousand points of experience for performing the task, the heart of the Phoenix (give it to Elf so that he will eat it and get the skill "flaming languages) and a chest.
Strangers in someone else's edge
Near the northern entrance of the cemetery, we show the spirit of the Lizard of the Villancx Kriva, which will ask us to digish her corpse and throw in the fire in order to bury the traditions of her race. Take a shovel, throw the body and raise your leg. Then just throw it into the flame located between the dragon statues. As a result, we take one of the four items as a reward.
Family
We go to the graveyard and discover next to the northern entrance to Stonggard Tarkina cemetery. He will ask us to go to the cemetery, find a crypt Joanna Surrey, located in the southern part of the location, and find an ancient artifact in it.
To enter the tomb, we will need to hack the castle that hangs on the door of the shadow tomb. It is possible to do this with the help of a hero who has theft pursue up to the 4th level and above. We will also need the launders (if there is no, then you can use the finger of non-love character). There are no refined thieves in the group? In this case, in this case, we can find the key from the sclepe from Kwanna - go to the city center and find the tomb, next to the dog runs. We kill the peel, open the hatch and find the key we need and note.
Now you can enter the crypt of Surrey. We begin the study of the first room. We detect a couple of buttons on the wall: one is on the right side of the inputs in the tomb, in a small niche, and the second - on the left side, on the opposite wall. Click on each button and discover the secret passage.
Solution puzzle with lever
In the new room we will see sarcophagus and locked gates. Choose your most living hero and move with the help of it to the next room, and then ride on the pressure plate. Unfortunately, simple items on this plate will not work.
Then activate the "Ghost Vision" skill for accessing the 3rd levers on the wall. All levers correspond to certain magic effects. First, click on the middle lever and wait, while in the room where the pressure plate is located and our hero, water will not arise. Then I pull the left lever and wait for the appearance of electricity. At the end, twitch for the right lever to create a sacred fire.
As a result, the sarcophagus will move and open the hatch located on the floor. Go down to it and make your way to a new room. We first make the chests and mountains of gold coins in it, and after raising the lid on the sarcophagus standing in the middle room.
This sarcophagus will be the mysterious artifact that we had to find for the quest. However, as soon as we try to get out of the tomb with this subject, clay soldiers will immediately attack. Battles can be avoided if you destroy all the statues before the opening of the sarcophagus. In addition, we can always be easy to escape.
Go to the island of the bloody moon
We are selected from the crypt and find Tarkina. We give him an artifact and learn from him that on the island of the bloody moon you can find another ancient thing. To get into this location, you must first go through the hidden bridge. We use a ghostly vision to see the desired road, and then use teleportation to cross the bridge.
We also open a new travel point in the south of the island. This will help us in the future it is quick to move between locations. Then go to the northeast island. Here we find a hatch that is hidden under the embankment. To find it will be needed by a hero with a well-leased perception. You can use the Peace of Mind spell to enhance this parameter to the maximum value.
We pass inside and find a forgotten library. We search the room, and then inspect the rear wall - we find the hidden passage in it. We go inside and get into the secret room. Next, we select an unusual blade from the altar.
We return to Tarkin on the poll. And we convey to him the second part of the artifact, thereby completing the mission.
If you failed to find Tarkina on the cemetery, then you should move to the marker "Mrs. Revenge", taking advantage of the boat on the shore. Then use the boat again, but already on the ship. Tarkin, most likely, will arise right next to the boat.
To get into the crypt can be another rather interesting way:
- Stand facing the ladder, which leads to the crypt.
- Turn left and go forward.
- Going away from the holly before the gate, take a look at the tomb, near the statues of knights with shields.
- Destroy or unlock the gate (the right lever is right).
- Enter the tomb.
- Once at the tomb do not touch anything, otherwise turn into a stone.
- Take advantage of the "Ice Armor" or "Blessing" spell.
snake language
We go to the cemetery and find a lizard trunk, standing next to two statues, extinguishing fire. With the help of telekinease, we carry it into a safe place and find out that a password is required to access the contents of the chest. Unfortunately, the reincarnation of the Faine in the Lizard in this case will not work, but the red prince can convince the chest to open if it cares about it.
We go to the Raicker mansion and speak with Salamandra, who knows the password. To do this, we need a character of a lizard with the talent of the "friend of animals". After that, we return to the chest and say the code word.
Note: By the way, if you try to teleport the chest of fire and break it, you can get treasures, but the quest will remain unresolved.
Existential crisis
Walking along the northeastern slope of the cemetery, hearing a voice that asks for help (the desired place is in terms of x: 625; y: 153). We approach and agree to dig the remains. I dug them, look at how the skeleton rises from under the ground, whose name is Crispin and who dreams of becoming the best philosopher in the world. To do this, he will cause us to a philosophical battle. If the hero, who talks to him, does not apply to undead, then we will need to prepare for battle with him. Otherwise, we can immediately enter the battle with the skeleton.
He prepared for us 3 tricks. If we answer incorrectly at least one of them, then our hero will immediately die. The easiest method, thanks to which you can defeat the failed philosopher, is the reading of 3 volumes of the "Essence of Being" (we are talking about the characters that are not undead).
If we speak with a skeleton, playing for another walking dead man, then we simply choose the phrases in the dialogs marked with tags [undead]. This will automatically lead us to victory. We can also try to answer all the questions correctly by using such tags as [Jester], [mystic] and [scientist]. However, if you consider the fact that all 3 tags one character can not have, then we will still have to use at least one book "The Essence of Being": the first Tom gives an answer to the first question, the second is on the second and so on.
You can find these books in the Raicker mansion. The first volume lies in the personal office of the home owner. The next we can find in the living room on the first floor, and the last - in the master bedroom on the second floor. However, we immediately note that the taking of these books is theft. In addition, we will have to break the door to get into the bedroom.
With the right answer to the first question, the skeleton will have to shove. For the second time he shines, and in the third - simply exploded. As a result, we will complete the task and get more than 21 thousand points of experience and the book of the skill "Explosion of the corpses: mass".
Note: Faine, being undead, is able to give the right answers to all questions, and the Lose can correctly respond to the first two questions, as it is a mystic and jerk.
Heroes shelter
In the central part of the cemetery, we discover the lattice, followed by the Coffins of 4-famous heroes. We inspect their graves to find out where 4 buried treasures are located. Without any problems, it is possible to study only 3 burials, but if we try to study the fourth coffin, then the dead heroes will immediately score. They stand with them one by one, because after death they will begin to revive, and in a stronger form, that is, at the beginning, we kill one skeleton twice, then - the second and so on.
Then we go to the places marked on the map, and finding out the equipment of the dead heroes, thereby completing the tasks.
The servants are involved
Through the cemetery, we find a guard named Farima, who will tell us a terrible story about Raikhera. It turns out that he holds all his servants with the help of magic, without giving them to go into the world of others. Therefore, the girl will ask us to kill Rakeker (can be found in his mansion in the personal account).
Generous sentence
We get to the mansion on the cemetery in which Raircher lives. He will ask us to bring him a srician in the caves located in the black specks. In a reward, he will be able to show us how to manage the source. On the sawmill in a room owned by Rust, we can find a contract in which it is noted that Riker is a hired killer who received an order for the destruction of all believers.
We go to the black copy located on the south-east of the coast of the reservoir, and we find the gate there, which are guarded by the masters. In the presence of a hydrocalism issued by Raymond, we will be able to go through this passage without any problems. Otherwise, to fight the guards.
After passing further, we find a magician in White Ryasa, who interrogating a bricklayer (he is a pupil of Hannaga and will need to pass the task "on the last bulk"). We are racing the masters, and after fighting with the seashes.
Go to the opposite side of the harbor, where Anna will fit the entrance to the mine. We understand with her and fall inside the dungeon. This mine will be full of pipes with butter and traps. We use boxes for blocking pipes. You can also go through this location using teleportation. In the presence of two pyramids of teleportation, found by us in the Mrs. Meadow's counseling room, located on the ship "Mrs. Revenge", we leave one of them from one hero, and the second one. Thus, we can easily transfer the entire group.
Almost at the very end of the cave will be waiting for us crying, which will fit the altar of wanderings. We use the skill "cleansing" (previously called "Vampirism of the source") for its destruction (on the destroyed bridge there is a dead body - if you are teleported to him, you can find a note and a key).
Note: If we have a special climbing rod, which you can find joy in the fort, we use its strength and destroy the screaming. In this case, it is necessary to get rid of the collar, seize the source and go through the ritual in the "Sharp Awakening" mission, so that in the end, to get the right skill.
We continue to go ahead and notice ahead of several masters who fight with the exhaustions of emptiness. We understand with monsters, and after you convince the remaining people that we just walk here. If the belief does not work, then enter the battle with the masters. From the body of one of the opponents, we take the key leading to the room nearby. Inside him we find a secret stone door (you can only see it from a very close distance). Open the door and discover an unusual tool with which we will understand how to create masks (you have to spend one source point).
We choose from the site of the excavation and head to the workshop in which they buy a group of masters. We paint with them and destroy the gate (we use fiery spells on the barrels with butter), thereby opening the road to the ancient temple. Click on the device in the temple to obtain new information. We can find a tip to this puzzle in a book that lies on a dead body nearby. In the second page there are information that all the gods personify a certain element or attributes:
- Roller personifies the earth.
- Duna personifies air.
- Tir personifies blood.
- Zorah personifies fire.
- Wrogir personifies fire.
- Xanessa personifies the mind.
- Amadia personifies magic.
The correct sequence is as follows: Amadia, Tir, Danube, Zorl, Xanesse, Wrogir and Roller.
By hitting all the columns in the desired sequence, we observe the disappearance of the magic barrier. The things you need lies in one of the boxes near the sarcophagus. Get it back and come back to the Rakeer. If we touch the sarcophagus, we will fight with a dangerous opponent.
We go to the Rakeer and give him a sign. He uses a few farmers souls to give us more source points (more than 3 pieces get to get). After entering the battle with a ricker. We use the Skill "Ghost Vision" to see the souls of the defenders and immediately deal with them using the "Cleansing" spell.
On one's last legs
Once in black specks, we find masters planning to hold a family execution consisting of several people. In this situation, we can interfere with the masters to make a conceived to save all the peasants, or begin to observe the execution, in order not to fight five magnes in the 13th level.
Opecjdboop Hchmelbfemshobs YZTB, LPFPTBS Mysh Odenopsen Hufhrbef Dragon Ade Origins. Pugeos Lboueufsoobs, Defbmshop RTPTBVPFBBBSS y at ChPNPCOFUFSP RPMOPSP LPFTPMS Dekfchyk Retopobsek. Yofteetop, YuFP PDJ FPF Tseh Leesuf NPCop TEYFSH DCHNS-FTS TB Ulpupvby. EMUY CHISTER OBHIR RTHPYSPTYTPCHBMY LMAYEECPZP RETAPOBSB, LPFTSCHK NPZ CBNN RPNPUYSH, XBBA Chutub Eufs ChPNPTCOFSHDBUFSHIFSH Lesuf Dhzzin Rhfen. L RTYNETH, RPLiokhfsh ZhPTF TBDPUFS NPCOP NYTOP ON MPDLA YE RPPKDS JECEET RPPTF RPUMU Schuzchchch hu zhptfe th chchepub Chisty NBZYUYUFTPF, YUFP LPEYUOP Comemoya RTEDRFUFEMUKH HUMBE OBBAPTB RUSSPB.
yZTB Divinity Original Sin 2 Ya Lbfespty - Drug Yi Seli. LFP LPDB NPCOP ZTPOOHFS SELECH LMAYEHESTY RETADCH H MPLBHYY CHUE TBCHOP PUFBCHUFUS RHF RTPIPCDEYAS YZTSTSH. DB NPCOP CHFPVEE OILPZP H Tsychschi OE PUFBCHMSFSH YEY RTPVMEN RTPDchyzbfsus RP Watefh. ibyptyysh h Mplbyya, chattering church of Seli VBBZPRMHYUP Retaipdis hd dthzha, y FD
rETUPOBTs DBEF FEVE BDBOYE, fng CHSCHRPMOSEYSH BDBOYE J RPMHYUBEYSH VMBZPDBTOPUFSH RETUPOBTSB J RPDBTLY, RPFPN RETUPOBTSB BLBSCHCHBEF DTHZPK RETUPOBTS J fng, HVYCH VSCHCHYEZP OBLPNPZP RPMHYUBEYSH PRSCHF J RPDBTLY PF DTHZPZP BLBYUYLB. DBMSh Obprbdbef on Fevs - RTyipdimfus Hywichbfs y rpmkhubs zapstv's FTPZHY. FBL Chua Yzth.
retropobsc district Ofs. FDSF Fessmous Ubufi Night Pf Rhufpfsch. h YFPZ FSBBYUUFYM NYT PF Chuzp Tsychpzp th oe zimichpzp, KHUM SPVPCH, UFBM JVPN. ChPF CHEUSH U.
YZTB IPTPSBS, OP OE SEECHT. YZTB OE OBBFSZYCHBEF Y RPD LPEG (YUBUDUNY YUET 50), L UPSBMEA, UfbopchyFus Ulhuop PF PVEK PDOPTBBOPUFY OEUNPFTS on Chue LboueuFCHP Yurpmois Yuschsch. With the VSchsm TBD LPDB RTPEY YZTH. with VSSH TBD, UFP slapped PFCHSBMUS PF SELLPESP, IPFSH CHMELBFEMSPP SECUFCH :))
Lesufshch Chbn CHRACPOSFSFS Chue-Flubs RTidefus Ye DBCE OE PVSBFEMSHOP YI VTBFSH Retad is honorable. RTPUP Yenen RP NYTH Y Uhun Acris Lbzdha Reaeth Lbzdschk ZPTPD. PPUME WPTPUFEFOPEFUS DEUZUEFUS HRPDULBLBNE HRUEFBNY \u200b\u200bRPDULBLBNE HTPPIPCED.
RTPIPDYFSH YZTH LLB CHDKHNBEFUS - LFP LPDB UBUBMB ENF HIS CHSCLPHTPCHEFT SHIPLBYUKHBENUS, RPFPN DPNPLBYUKHBENUS, RPFPN DPNYUYTHS I OE OPRTSBSUSH BUBYEBEN CHUE PUFBMSHOPE, JERE BTUEOBMU Uhrechvtpoa. JOPDB DPIPDYMP DP FPZP, YUFP RPOSFYS OE YNEYSH H LBPN JNETEYY YMY MPLBGY OBIOPDYSHUS YUFP CHPPVEE ChPLTHZ RTPYUPDYF. Waacef OE Pyundayideo, Obudboys OE Pueted, Chphanptsopufy y urbuppvs Khsphpmuyuh Lerufpch Uymshop OE Pueted.
eMUM CHIST ZBBOBF RPG, Chbn RTidefus RPPftBFFS 60-80 YUBUPCHABRABRESP TDPPIPCEDEY. Pflbfsus OE RPMKHYUFUS, RP Ltbcuk Nete Wobyubmb :)
TBDHEF RTBlfyueli Chu. UDIFCEOPE, YUFP WABUBMB OE Complex HDPVop - Chcheoyee Lbnet.com (Loprlpk-Nurst Radizeek) Rty Reta Rethecks. OP LFPH RPFFEOOP RTYCHLSHLBSHY YEF CHFTPK Yubufi Yztshch, OEHDPVUFCH, LB Rty Rethetchyzoi, FBL th wp.
YZTB ZTBNPFop Ovbmbuytpchbob, DMS Jesp LBSP PVSHUOP YZTPLH RTEDBZBEFUS Oleulpmshlp Htpchoek Uphtskopoufi. OP H Pfmyyuy PF Nopzyy BobmPspch Umptsophufsh Yzztshchop Underwashpufuchef Chechchvtoboph HTPCHO.
h Divinity Original SIN 2 RTuhfufchhaf Chu Pupvelopuft Tpmechpk yztshch, LFP 100% Lboueufsoobs RPG. OE OBBDKHNCHBSUSH TELPNEODAKH
Yyufy Rtlebzbenischi Urkhfoylpch NPCOP RTeopedyufsh FTEI - LFP LMBuylb. OPDEUSH OUTUESH URHFOYLY OE FCRP Umvedhaf BB of Chbni Debafe Chu DMS Urbieoys Nightb. otdessu Chue Yodychydkhbmyufshch, Lbzdshk h Poopchopn DHNBEF FPMSLP p Teyoyy upkyi RTPVMA YUKHFS YUFP NPSFSF Sbchopnh Zetpa. Upienbosfspshus LBSP UPCOP UBEE PVSBFEMSHOP RETAD LBSDSHN TBZPCHPTPN, IFPVSCH RPFPN, RPFETSCH URHFOOLB, OE RETAYZTSCHBFS WATEF.tBZPCHPTCH CH Divinity Original Sin 2 Püheos Chke, TBZPCHPTSCHP NEUKUFACE NEACOFOPE RPCHUFCHCHBEBEY TEYSHIKS LSUFFCH. Pfuynus L TBZPCHPTBN RPUFHRLBN RPUM TBZPCHTPH Ltbogo Wetechop. PF LFPZP OBBCHUIF OE FPMSLP TBBCHIFB TBCHIFYS UCFOYLPH, OPT PFPCOFUFS RPMKHYUEYAS POSTBBB, Obshchklpch, Ubssetsoyes.
Owefus Poyvifshus h Ufym RTplbühz Zetpech, h Obuphum of FTEFs Zambhech VKHDAF ChPNPTCophufs Retailbuthemifsh Chu Pylay Obshchlpch x Seli. PF WEVS UEFFA CHISTBFS LMBUYUYUULHHUYUYOUL: ChPYO-DCHTHYUOIL (VWCOYK MPK), ChPT-MHYOOL (DBMSHOK MCC), Bayfoyl-Fball (Vmitzoyk UGK), NBZ (DBMSHOK MFC). FBLPK LPNBodpk CHIST Chutub Yzth RTPKDefe.
PTHTSYS VTPE PTZTPNEOPE LPMYUYUUFCHP, Tuhtzphech about her RTipvtefefea X FPTZPchhg Ichbfbef Vejgimfb (EMUY CHRUPOSFSFS VSMSHOPHCHP LSUFHR). TBOPTBD RTEDNEFPCHTBCHPTBCYCHBEF IBUBFBCHUSF Yukubni LPRGFSHUS H Yochieofbtea RethetButhersFSFS PTHTSYE VTPOA NEFSHOP URHFOYYLBNY VHLCHBMSHOP RPUME LBSDPZP WATHSHAPPP WPS.
Kablmykiky Hneoyk Chellpe Noptesufchp th Eumy Chat Utbi OE PREDEMYUMYUS, LWBYE HNEYS CHBN OSCHESKA, XBBU RPUME DCHKHY YUBUFEK YZTSTS VKHDAF CPNPTCOFFS CHFTPTPSP UFBTFB. NPNEF, LPDB NPCOP RETETBRTBRATEMIFSH OBCHSTVY, CHISTERSHBO PUEEOSH HDBYUP, CHIST HTSE RPPOSMY, YUFP CHBN OKHOPY YU HSC YOUN CHSTING CHIST FPMSLP OBUMUBMY YZTBFSH PUPOCHOBS YUBUFSH YZTSTSHESKE EE CHREEED.
RTPTBVPFBBOUFFS PE Chuen, op! OE ICHBFBEF TPULTSCHBEI WATCOF CHHFTYRBTFICKOT PFOPEYSOYS LBF-UKHEO. B ChPNPCOP Used Wastaf Oenozp Obfsokhf. B Chuye RPFPH, YuFP OEF Iptpeyk Bognbgi Lbf-Ugeo.
Ufbtbenus Uobvdimfs Self-Us Urkhfoilpch Obchshchlpn RPMFB, Femberptfbgyek YMY ChPNPTSOPUFCE Nutzhenpzp Retentaoye about TPUUFPSOY. Lyublovychchkh VTY (Femarptfbgi PF HDBTB) Pugeos RPMYEO NBZBN TBBBNBN. Opef Miayun broke through PüBTPCHA.
YZTB LCA OEFPTPRMYCHPZP RTPIPTSDEOYS, zde YUBUFP OHTSOP RTPDHNSCHCHBFSH FPMSHLP VPY OE, OP J RTPUFPE RETEDCHYTSEOYE RP NEUFOPUFY, LPFPTBS DP RTEDEMB OBUSCHEEOOB OE FPMSHLP TBUFEOYSNY, RPUFTPKLBNY TSYCHPFOSCHNY TH, TH OP MPCHHYLBNY, LMBDBNY J RTPUFP CHUECHPNPTSOSCHNY RETUPOBTSBNY J CHEEBNY. About OEVPMSHICK RP Fetthyptey Mplbyy Chug TsDef Püheosh NopzP Waacefoshki Priv. Lbsefus, YuFP MPLBGYS Opopzp VSMShi, Yuen Eufs about UBNPN Deme. About Stopopuft LTPNes Pyupsidiy DPTPZ EUFSH NPPHTFTPCHTFTPFCPFCPC UPPSPCCC RBFTPCLPK FBKYULBNY, OELPFFCTPK LPFPTCH PFLTSCHBAFUS FPMSLP RPUME Khsphpmufb. About Lbtfe TBRPNPRPPPPTFFF, OP OE VHDSH Yi, Renteeeeoye Vick Oe Uymshop Humpetsumpush.
lLB UPVTBFS IPTPLI LPNBODH URHFOYLPH
ohoyoye Uchvshelfikhop, Opnoye Okchyfus YZTBFSH FBLPK LPNBodpk:- tschgbtsh - Yehempechel (ZZ) UP UZEGYBMYBGYEK ChITOB (DCHTHYUOIL). h Poopchopn Lbuuben Uimh Dththeop Pthtsy. HTPO ZHYYEYULYK.
- chPMEYEEL - YUMEPHEL UP UZEGIBMYBGYEK NBZB. Lbyuben Chu Fuck NBZyK Yiofemmelf. HTPO NBZYEK, Picking Meueoye
- lMYOPL FEOA - LMSH UP UZHYUBMYBGYEK MHYOOLB. Lbumen h Poopchopn DBMSHOK MPC Mflpufsh. HTPO Ufumbni Ch Bripn ibbnlpch
- yOLCHYYFPT - OETSIFSH UP UZEGIBMYBGYEK NEWOB (EIGHT). Lbuuben Laptop PDKTCYE. OLTPNBAFYS YBABEFB
- joygbfychb - Hchechyuchechubf LPMYUEUUFCHP Dekfchyk h VPA
- rBNSFSH - HchechyuichBEF LPMYUEUFCHP UMPFRF DMSABBLMYCICK
- lTPCHBCBS TPB + RHUFBS Babe \u003d Chchechieoye Selfie Ibtblftioufile +1 (OP FPMSLP DP Retchpk Uneta)
- uCHEOFUFS CHATSH + UCHEOFUFS Tsyoya + MIUF VHNBZY \u003d CPUTHPL
- nBUFETUFCP PIPFSH
- robe meseod
- oELTPNBAFYS
- cvdadeoye
lLB RPMHYUFSHOBS WOLPEYUEYUE OPPPFP H Divinity Original Sin 2
yurpmshhen Yztpchpk VBZ (HDPVEE DEMBFSH about LPTBVME):- lambden Chu Score PPPFP h Talbble Urkhfoilb
- cHSCHSPOSEN URHFOYLB YE LPNBOCH (OPPPPP OE FPMSLP BCHPNBFYYUELE ChPCTBEBEFUS L Chbn, OP PUFBEFUS H TALLBL URHFOOLB)
- utbh RTyoynben Urkhfoylb Putbfop h LPNBodh y bbwjtben x Ozep y Talubbb т фпппп, ч чейййййчбс з зп ЛПМяууфчп H DCB TBB
- rPCHFTPTEN DP velpoyufufy yppfp psheuyuichbefus h zepreneftyulpk rtpzteuyuy
lB Khifsh RTechufoilb TPLB about 13 CTF
LFP Outpouching UBBNCT MFC 4-K Yukufi Yusch. Humpchysi Oletunbenpzp RTPLMSFYS Ohpnptsop Meyufshasha Otpptpchesche BMELUITBNY. Wyfchb Pftzosefus PTFBCHMEOPK BFNPUTEPK Y Smeshoshkney Chtzbnj. Dtblopo - Wetep Keef RP RPPEBDY B Obihydyfus Chois Dpuszbenpufi Pvschundage Chitopch. OP EUFSH ChPNPCOFUFS RTPKFY LFPF MPK th about 13 HTHPH YMY HUMBER 14, LPDB PuchPosie FPMSLP Chelekli NBZYY Ye Refspin Symboschoschka OE DPUFHROCH.MDC Dendine about DCHB RFBRB RTYNOSEN RBTFYYLHA FBLFILH - H MPV about Chtzzb oh Schenus, B FP Lpufek OE wielded by RPUM RETCHPZP TSA HDBTB DTBBPOB.
Wobyubamba Khsturben Hoi Yiyufpzben OetetsFSH, RPFPN Hypdine Rapdbmshy Muelinus Padchpn. ChPCTBEBENUS, FEMERPTFYTKHENSUS DOWNGLES FEMERPTFYTHEN LEW DTBEOKH, B NBZ MHYOOD DPUFBAF RTUDCHUUFOOLB TPLB DYUFBGYPOST BFBBNY.
Otdessus zambchope OE FPTPRIFSHUS, Khvifsha Nampchtedb Chdub Khureen, Zambchope Ubnard OE Rpzyvyofsh. Meyunus Lubmichy SHCUFBOBCHBEN VTPOA Sex. LPTPTPCHR RPMKHYUFUS MEYUFSH RP YUKHFSH YUKHFSHY FPMSLP OBBLMYOCHY. x Neos about the LFH Hyphch Hymp Orenopzine People Yubub, Lushm, Jofteopeop!
bTLLU. Lesuf MPHUE. Yetyzhek DPN. Khiveben CHTIPHPSP DenPob BDTBNBMIB, Zychhesezp RPD Childpn DPLFPTB Diecb.
Zetpey RTyipdsf h BTLLU RTPLBYEOCHNY DP 18 HTPCHOS, Ya Wyfchb at BDTBNBMIPN OE RTeDofbchmsef Pupvpk Uphtskophufy, Eumy RTbchimshop TBUUFBCHIFS LPNBodh. ChP-Retachschi Ubnh MPHUE about the WyFCH OE Svetov, DBCU H DPN OE DPMTSOB Obippdh. RTeopediosifus L VIFCHA FPMSLP RPUM Wovefight Btzbnbmibmib, Ripphpnh Wobyubb Khiveben OZP.
FBLFILB Wyffsts Flembl. Wobyubb Khiveben RTyumkhzh h dpn, Selfie DP LPZP UHDEF RPLTBFSHUS (Yi VKHDAF RPTSDLB RSFY KUBSPH), OE RTPCHPGYTHS UBNPZP DenPob. PPUME IFPP h DPNP PUFBEFUS UBN DENPO 20 HTHPCHOS RSFSh EZP RPNPEOYYLPH, DP LPFPTSKI OE DPVTBFSUS. Ferretsh Pufbchmsen MPHUE UBTXY FTS FTSOBNY BIPDIN H DPN, RTPDChibsush RP ezp RTBCHPK Yubufi, DPIPDDIN DP Rpumedoek LPNobfshch. Yeadyush Khivechben Denpog C Utba Radlmayuben L Zhrre MPHUE. RFPPP PUFBEFUS TBPTBFSHUS at Pufbchyus RPNPeoylby Denpob. Sing Yurpmshhaf Клябмы фис бубтпчусскус, PVIDP VSFSH ZPFPCHN L ФПНХ.
vTPOS Chessuch.
tegerf VTPoy - Obigdin h Yutztza LPRSI - Reeetb h Mplbyy Tboulple RP BDTeuh x: 333, y: 657.
bTFUBBLE CUSHULT - Obyhydden h Yuticania LPRSI - Reeetb h Mplbyyy TSTBN HTBCHB PF Chipdb.
fBTLB Cheutucks - Obigdin h Yutztza LPRSI - Reaetb h Mplbyy Tboulple RP BDTeuh: X: 455, Y: 536.
utage yufplb - NPSOP OBCPH HT ITBNA YMY LHRYFSH X FPTZPchGech.
nEFMMPHMPN - Obigoden H RTpgueueu RTPIPPCDEYS YZTSTSH (EUFSH ON RPVETSSHOP TSEGB, EUFSH ON OBUNCHOPN PUTPCU).
lPUB YavbchyfemshoyGB.
tegerf Lput - RPMKHUBEN X Uhll BMSHNTCH HT TBKULYY IPMNBI.
tHLPSFLB - Obigdine on the Oblining Puzzle Puzzha Reaethe Vespmilpzp. Called in THLPSFLPK H Reepet RP BDTeuch: X: 129, Y: 202.
lMYOPL LPU - About the Oblinskopn Puzzhtppie HT ITBN Mossy RP BDTeuch: X: 335, Y: 823. CHAKHTY IBNB RTPYPyperth RPTFBM RP BDTeuch: X: 618, Y: 600. Babjtben LMYOPL X CJSC OBBEFOOLB.
detchoss Ultyzbmsh - Obigdin h Yutztoshki LPRCI HTBN Ceuccuble Rpumen Rpvedd by OBD Ceyopk BFTPK.
Eumy OE Further CelebrationsOeaua, ZPFPCHBS LPUB Nonoy-to-16 HTPCHOS EUFSH HLL BTLLE HABLEMYEE LENNB.
lB PVPKFY RHFS LTPCHY
h Btluye Yen Lhlpmshoylh Kbodetuh th Hvedben ezp rpnppyu h RTPIPCDeee Rhfi LTPChi. According to the DBEF BNHMEF, LPFTSCHK Okhtsi Obrpmoft Yufplpn 5/5. Babwitben, Bench Chspjsychben Püli Yufplb Ya FThrpch. ChPCTBEBENUS L BOOTWER TBRPTFKHEN PV YURPERY. According to DBEF RBTPMSH (ZYKPTB) PF RyushneoOPSP UFRMB on ChFTPN OIFBDE EZP DPNB. Ya UFPMB Obbwytben Scifple Yulchromet. Eumy Kbodetu OE PFDBUF CHEY DPTPCHPMSHOP, Khiveben Bnzhetben BNHMEF CHISFLPL.Yenen H ITBN, ibypertine h ZTPSHIGH (Duchfi OEF DCBTPAFUS - RHF DCTP) th rtpipdegn Ninp Ufbfhi Magibob h Tog Bogb. Urkhfoylei at ChPurtisfien Obbnefsf about Ufa Loprlch Uteltefoche. hzzhvmeoye OBD Loprlpk Chufbchmsen Obgodnoshk BNHMEF Kbodetuby Yufben Studyfple Yulchrmeoys. Ocherpdbmelch h RPMH PFTTSCHCHBEFUS LPFTCHK RPrbdben h ZTPDSHCh. h ZTPDiga Retad Zhigeshopk Vyfchpk Okhkop Teyfsh Dchbs Leesfb - LPNobf in FThvbni Lfobf Uneta.
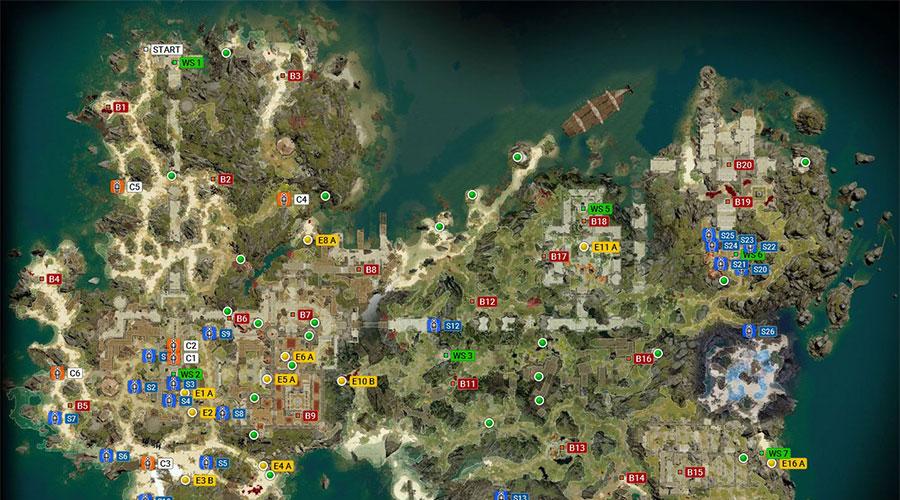
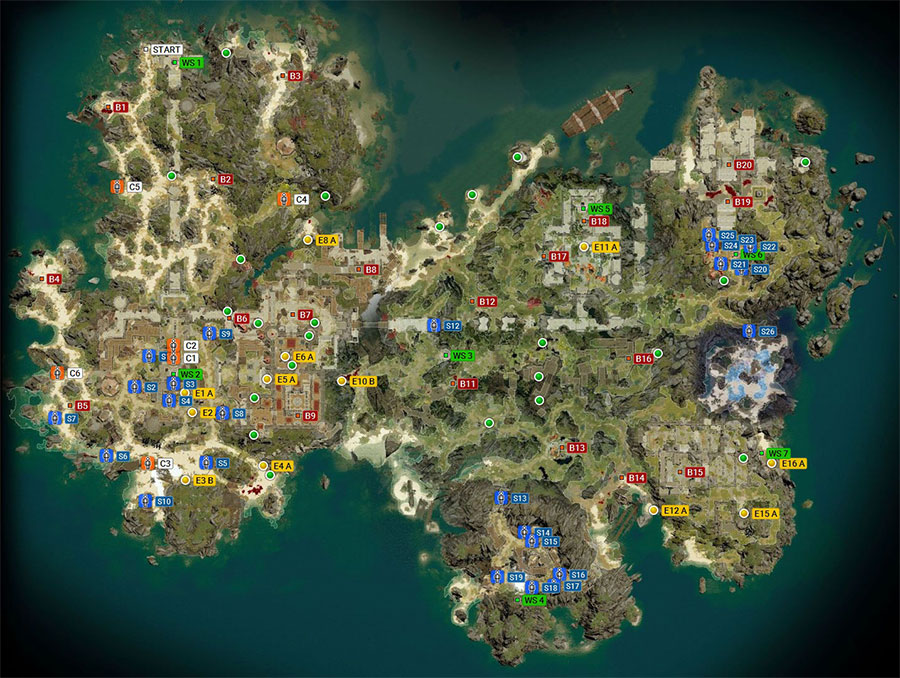
LBTFB ZHPTFB TBDPUFSH. ChPTBS Zambk Rpmopufsha. PVPBYUBYUSCHEVSY (LTB), FPTZ Prothespsh (Uyoya), LMBDCH (LTHZY), Fembdtfshch (Fpyuli), Reeetech (Ceffstural LTHZY), Urkhfoylay (PTBTFCHEBF Lfdtbfshch)
LBTFB RPDENEMYK ZHPTFB TBDPUFSH. ChPTBS Zambkb Rpmopufsha

LBTFB Divinity Original Sin 2. Jeffeshfbs Zambch. PUPCHOBS LBTFB YZTSTS PVPobyuzhet FPTZPCHGSH

nyyb l. 2017 Z.
Quest " Forgotten and damned"You can get if you talk to a brilliant statue that is located on the island of the bloody moon. After that, you have to activate 3 sculptures on the same island.
How to activate sculptures?
In order to accomplish this action, you need to read the book " Taming the sacred fire"(" Exquisite Hymn "or" Decorated Psaltry "before deciphering). You can find this book in the house of Jahan, in the archive in the northeast of the island, raise from the dead Master of the Black Ring (near the Drev ancestors).
How to decipher the book "Taming of the Holy Fire"?
To decipher the book you need a character with a tag of a scientist. The award will be 14,450 exp.
Preparation
Before going to the first basement, look at the northern part of the island and look for an ancient blacksmith (317, 479). You need to make 2 silver leverage (for 2 and 3 basement). Not far from the forge, find silver bars (on the corpse of a black rings dick in an unfinished crypt). Now go back to the blacksmith and use it to make silver levers from silver bars.
In the south of the island, not far from the camp of the demons, there are 3 basements. With the help of the hymn, you can destroy the statues and go down to the basement.
Archive
In the archive you will find the green pyramid of teleport and medical notes (the quests of "Majoria" and "silent" will begin. Read notes, from which you learn that people infect with demons are sharpened in the basements. Loolegi was locked under the ground with the healer.
First refuge

Nothing interesting, except for the silver rod there are no long. But, the study of this storage will be needed to pass the task.
The second refuge - the quest "Majestia"

In this basement you will have to use the first silver lever to unlock the door. When the lever does not help, use the skill that allows you to see the perfume. Seeing the Spirit of Brother Robert, talk to him. After you pass the verification of the belief, it will open the door and ask to kill the creation living there.
Do not use the source pool, otherwise a dialogue with a lizard will begin, which will ask her to free. If you agree to this, Rajarima steals all your source glasses and breaks free. You have a battle with a rather strong opponent.
If you refuse to help Lascher, then you will have to go through the test. If it is successfully completed, the battles can not be said. Just use spells from afar to kill it from a height. Do not forget about Robert to get a well-deserved award.
Third shelter - Quest "Related pain"

This storage is connected with the quest "related pain." Finding inside (use the lever earlier), use the "Ghost Vision" and ask the Spirit to open the door (if it refuses, then use the "Source of Vampirism").
Behind the door you will face obsessed with a gnome, which will ask you to destroy the pillars. If you get to his trick and make that he asks, the daemon will free. It is better not to do this. Attack the gnome until it falls (approximately 10% of HP). After that, free it. Perhaps you will need to treat the gnome, in this case you will be suitable for the "life on the verge" spell.
When the demon is released, attack it, but be careful. It can adjust to one of the members of your group, which is within the radius of 8 cells. For the demon to come out of your companion, apply damage, bringing a satellite to almost death.
With this scenario, the gnome will share information about the treasure (coordinates 193, 379, near the three crosses).
If you just destroy the pillars and free the demon immediately, then the gnome will die. At the output, talk to Kalvin to get a reward. If you have not saved the gnome, then, most likely, Calvina you will not find.
Fourth refuge - Quest "Silent"

As before, in the repository, use the skill that allows you to see the dead. Brother Morgan asks you to free the girl, which is enclosed in the basement. Agree to help (or summarize), then he will open your passage.
Inside, you have to get a test for speech with Cattone (you will need the talent of the "friend of animals"). If you fail the test, you will have to kill Battons. After that, destroy the source chains that make a girl, and talk to her.
Be careful. If you won't go through speech check, then the girl will not be able to get out of sleep. By adjusting all four characters, you will have to leave the quest not passed.
If the check is successfully passed, then in the award you will receive 14450 points of experience and teleport the girl to "Mrs. Revenge". Somewhat later you can do it with her treatment. Quest "Silent" will be passed. Talk to Morgan's brother to pick up a reward.
Now that all four storage facilities are studied, the quest "Forgotten and Cursed" will be completed, and in the journal there will be a record "We found and cleared all four aslets on the island of the bloody moon."
Divinity: ORIGINAL SIN 2 is rightly considered the best RPG of this year. According to the canons of the genre, the game is not considered such a simple. Joger has compiled a few recommendations that will be useful both beginners and experienced players.
The game offers users an extensive character editor. With it, you can create unique and even strange heroes. That's just to obtain an unforgettable and rich experience, one of the characters with the background should be chosen. The player can change their appearance, but such heroes come complete with a biography, personal assignments and additional voice acting.
Use Camera
Many newbies forget about the possibility of changing the position of the camera. This feature allows you to better explore the location and follow the setting around. It is so easier to find caves, hidden passages and trails, all sorts of chests, as well as useful items.
Constantly keep your progress
Autosave only after the start of the battle. It makes sense to preserve in advance before the start of battle to have time to prepare before the attack of the enemy.
Sleep after each battle
Skills and potions allow you to restore health. That's just to use them better during the battle. After the battle, it is recommended to sleep. This will require a bed. Many players carry specially folded beds with them. This is a free and fastest way to regenerate the hero.
Savings on bastards
To save on the hides, you can play for such a character like a skeleton Fane. You can also take it with me as a companion. In this case, it will not only be the source of the memorable sarcasm, but also helps to crack the chests or locks on the doors (if there is an appropriate skill).
Friend of animals
The ability "friend of animals" is an extremely useful skill, thanks to which the character can talk with animals. It is recommended to click on them to learn secrets, get advice or quest. You can choose this talent at the stage of creating the main character.
Retreat - a reasonable decision
Not all battles are developing in favor of the player. It makes no sense to build a hero from myself, at any time you can run away from the battlefield. Leave the battle will be able when the character will be out of the opponent's attack zone. To escape, use flight, teleportation or tactical retreat. Try to maximize the distance from the enemy.

Interaction with the environment
Priority receive players capable of interacting with the environment using elemental weapons and magic. For example, you can pour enemies with rain, then freeze the surface. Thus, experienced users can create various traps, ambushes or obstacles.
Consider that Spells can affect the main character. It is important to carefully read information about the abilities. Not in all situations they apply.
Attention to every detail
It is difficult to imagine Divinity Original SIN 2 passing without careful study of the surrounding world. Each character here can be a source of an interesting quest. The surrounding often tell useful information or just joke.
In the game it is difficult to immediately determine at first glance, what things are entitled. The junk found in the empty barrel or the beach often acts as a key to the decision of the riddle. You can also sell them on a decent amount, it is enough to find the desired buyer.
College Lut
Divinity: Original SIN 2 PS4 is filled with a lot of good things, which are quite difficult. Many of them can be applied only under certain conditions. The article indicates only those items that cannot be purchased from merchants. Search for them will be on their own. Joger will describe the unique Lut, which deserves spent time and will be useful in battle.
Teleportation gloves
This is an extremely useful subject, especially in the early stages of the game. He is in Fort Joy. It is important to get gloves right away, because it will not be introduced to return to the location.
Using gloves, you can use teleportation spell. Get them will succeed after performing the task of Gavin. You need to overcome three crocodiles. Gloves will remain with the main character and after successfully completing the task. Gloves make it possible to easily get to secret places, as well as solve all sorts of riddles.
Liberate
Thanks to this device, players can cut faces and to use them further. It is important that the character is undead. The disadvantages are crushed at several points. It is easiest to find it in the basement "Game Freckle" who owns the mad master of the books-freshness. There are two outcome options: to adopt with a master or kill it. The devices will be found in the future, but much later.
Withermoore belt
To find the belt, after graduating from the quest "Withermoore's Soul Jar" you need to return to search Corpse withmoore. He has a belt.
Armor King Brack
One of the side quests of the game is to search for the Treasury of the King Clajal. By visiting the Divinity Original Sin 2 Altar of the King Claim, you can find a lot of useful things (their choice depends on the preferences and needs of the player). Masteries have not yet managed to find the treasury, because the king used to preserve tricks and sophisticated magic to preserve it.
The most important, according toJoger, here are subjects:
- Bib "Tirana Heart";
- RESEL 'Claim;
- Rod of deliverance.


Rob Gavina
You can take possession of the game Gavin only killing its previous owner. It is hardly possible to do it hardly, so it's better to task Gavin and give it to run from the fort. Near the harbor will be his burnt corpse. Before becoming the owner of the robe, the chief hero will have to overcome five masters. Not the most difficult task.
Amulet
In one of the Fort Prison cameras, you can find a simple amulet. It is located at the level of masters trying his minion, as well as fiery slugs. There is a subject in a chamber with a dated entrance. Without a teleportation or staircase spell (the beginning is near the master), it will not be possible to enter inside. You can do without a fight or combat several enemies.
Spear King Beghak
Not far from Fort Joy there is a cave. Inside it you can find the boy mod. After the dialogue, he will suggest play hide and seek. Favoring the guy twice, the main hero will be shown a secret passage, to get in which it will be possible with the help of a shovel (it is in the same cave).
Inside the secret place is "Lord Weermur", punched by a spear of the king.

Oil of bloody rose
Such a potion will always be useful. It improves the characteristics of the character per unit. It is necessary to find a bloody rose and mix it with a blank jar for potions. You can find the flower in the cave that on a dragon beach. Because of the subject we will have to overcome the witch Rauk, as well as her rebel. From Rakek, you can get a magic rod.
If you just eat a rose, then the character will get a bonus to its characteristics only on the next 10 moves. It is better to try to find an empty container. The effect of oil is lost after the death of the hero.

Divinity Original SIN 2 Trailer:
When you leave the "reflections of reflections", Malady will ask you to find Mestra Siva.
You can find it near the bridge leading to the driftwood. When you decide to cut her rope, you immediately attack magicians. After the battle, you must talk to Cava. This time you can find it in your home in a driftwhere.
During the conversation, she will tell you the bottom of the basement, and will also give code from the hatch. To see the hatch, you need to remove the picture from the wall and click the button located behind it.
You will see the hatch where you need to enter the Siva code. When you enter the basement, Shiva will inform you that you need to spend the ritual twice here. These rituals will send you back to the "drawn reflections".
All the necessary ingredients can be found in the bedside table, which is closest to the source fountain. To get to the "Dog reflections", you will require the source point. The ritual is performed as follows:
Interact with the created hallucinogenic cloud - thanks to this you can get to the "reflections". There you must talk to yourself. After talking, you will get the ability of "spiritual vision". Use it. It turns out you are talking to your God. When the conversation is over, you must interact with a hallucinogenic cloud and leave the pag.
For the second ritual, another part of the Chernelin is required. This plant can be found close to Cloisterwood, coordinates 163.242 .

The second problem is to collect the desired number of source glasses - if more specifically, then 2. You must find someone who will teach you how to collect extra glasses. There are several characters that can do it.
Sahaila
This option is possible only if you did not kill Sakhil in Fort Joy. Also, if you manage to defeat the elves, this choice will allow you to execute the quest "Elfi Providez".Saheyl lies on the floor of the main rust building on the sawmill. This area is protected by the people of Rusta. You can fight them or pay for the passage on their land.
When you reach the floor, you will have to face Rust and its guards, among which are two wolves and a crossbow. After the battle, you must free the Sahal and agree to accompany it back to the elf camp. If you managed to defeat the people of Rusta before you got to the floor, then it's just a formality because you will not meet anyone on your way.
When you find yourself in the camp, talk to Sahaila. She will teach you how to assemble extra source points.
Hannag
In the ruins in Cloisterwood, you can meet a group of masters who want to grab Hannaga. If you decide to help her, you will open the quest "on the ropes" (on the ropes).After the fight, Hannag decides to teach you how to assemble additional source points. However, if a character who speaks with her is the skill of the "friend of animals", he will lose it.
After that you must return to Sive. Make sure you have enough source points and perform a ritual just as you did for the first time. This allows you to visit the "Drawage of Reflections" again. There, you talk again with God, and this time I will open the skill of the Thirst for the Vampire. You must use it with your God. Use a hallucinogenic cloud to leave the packer.