The atmosphere of the holiday and heat: candles with their own hands. How to learn to make candles with your own hands at home
Candles - attribute of many holidays and. Candles create the very atmosphere that helps to relax and plunge into the world of harmony. To learn how to make candles with your own hands, the master class will be extremely necessary, this is the easiest way to master the manufacturing technology and create the most real works of art from paraffin.
Master class for beginners: Multicolored decorative candle in a glass
We will not need special devices or expensive materials. Buy in the store:
- several white candles;
- plastic cup with thick walls;
- thin wooden wand;
- clothespin for linen;
- wax pencils;
- several cans from under condensed milk, green peas or corn.
Candles cut into small pieces, wick will postpone, it will come in handy to us for the manufacture of our candle.
We prepare the phytyl
So that he securely kept, we will do a small hole in the bottom of the cup and shifted the wick to it, we will give a wooden wand to it from the outside. We stretch the wick and on top to fix it with a clothespin.
Melt wax
The basis of the master class on decorative candles with their own hands is the process of cooking wax. To do this, find a saucepan, in which five cans with wax can fit at the same time. We heat the water in it, put the same amount of wax into each jar, add finely chopped pencils into jars. We are waiting when the wax melts, and the masses will become homogeneous.
Plive the shape of paraffin
At the very bottom there are white paraffin, in which we did not add a pencil, then in turn pour wax of different colors, the faster it is to do, the softer the boundaries between the colors. The brightness of the color can be changed by varying the number of added pencils.
Remove the candle from the form
Let's wait for the paraffin completely freeze (1.5-2 hours). After that, you can carefully remove it from the glass.
Ideas of decorative candles do it yourself
When you have mastered the manufacturing technology, you can proceed to experiments and unusual decoration. We offer you some simple, but original ideas.
Candles with ice
You will need a round shape, paraffin, ice, wick, bank and saucepan with water to interleave paraffin, wax chalk for color. All stages of manufacture are the same as described above, but the wax must be one color. In the form, we fix the wick, pour out slices of ice, then pour paraffin so that the surface is smooth. Let's leave the workpiece to completely dry the paraffin, then the water with a salt and get a candle. The more slices of ice, the more massive patterns.
Round Candles in Japanese Style
To create this option, we will need special round forms for the manufacture of candles. They can be purchased in the store or order via the Internet. Paraffin melt and fill in the form, after a few minutes by passing the mass in the middle of a wooden stick, insert the wick and fill the hole with paraffin. When the wax completely freezes, carefully pulling the craft from the form, print the hieroglyph on the computer and applied to the candle, spend several times around it with a hot iron to glue.
Candle-aquarium
If you were invited for a birthday or any other holiday, and you do not know what to give the perpetrator of the celebration, you can create a whole work of art - a candle-aquarium. To do this, we will need a small round capacity similar to aquarium. It should be pouring ornamental petty pebbles, fasten the wick and place as close as possible to the glass of fish figures and jellyfish, seashells. Before the fill, the wick learn to the chopstick so that he stood smoothly and did not go to the side. So that the composition is transparent, it is impossible to add to paraffin.
Master class on the manufacture of gel candles
Recently, gel candles are particularly popular. The manufacturing process is exciting, because you can invent any compositions using shells, figurines, sand, flowers. The gel can be poured into any glass container with thick walls.
We offer you a master class on gel candles with your own hands, with which you can cook gifts for loved ones for the new year.
First prepare materials:
- glindin glass with thick glass;
- pouring gel (you can buy ready or to do at home);
- 3 cinnamon sticks;
- dried carnation flowers;
- dry lemon pieces;
- small snowflakes of solid material;
- wick.
Fit wick in a glass, pour the tank gel, then gently lower all the decorations into it. The liquid is quite viscous, so all items will be on the surface or in the thickness of the gel. If you want part of the jewelry to be on the bottom, then they need to put them in a glass before the fill.
To prepare the gel will need
- gelatin - 10 gr.;
- water - 40 gr.;
- glycerin - 70 gr.;
- tanin - 4 gr.
We satisfy in water, add 50 gr. Glycerin, put the mixture on a slow fire and interfere until it becomes homogeneous. Then we prepare the second mass - the remaining 20 gr. Glycerin connect with 4 gr. Tanina, the mixture will be muddy to achieve transparency, it must be boiled for a few seconds. CONNECT BE BE SPECIAL, GEL FOR CUT CUT!
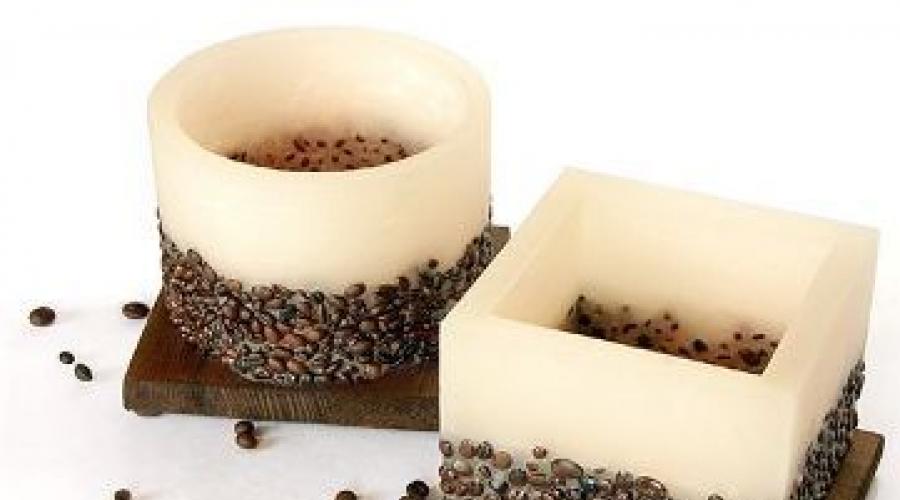
Candles with aroma of coffee
In the home conditions you can prepare flavored candles that will delight not only a beautiful appearance, but also soothing or tonic smells. We present to your attention a master class on coffee candles with your own hands.
Required ingredients:
- paraffin;
- box from under the juice (it will replace the shape for the fill);
- wick;
- coffee beans;
- ribbons for decoration;
- vanillin.
 We put paraffin on a water bath, and at this time prepare a form for the fill. To do this, it is better to use a small box from under the juice, cutting off the upper part from it. In our case, the candle will get a square, but at will you can take another form and make a round.
When the form is ready, fed wick. One end is tied to the toothpick, which you need to put on the upper part of the form, and reinforce the wick with a few drops of molten paraffin. Pay attention to the thickness of the wick: the wider and massive candle, the time it should be thicker.
Return to paraffin. When it was completely melted, add vanillin and coffee grains, warm the products on the fire for another 10 minutes - before the appearance of a pleasant fragrance. On the bottom of the form, we put 10 grains of coffee, fill in paraffin half of the form, we are waiting for 2 hours. Then, on top, smear 10 more grains and pour the remaining paraffin. We leave the wax for 12 hours, after carefully cutting the shape and take the finished candle.
Making wedding candles at home
Traditionally, two thin candles are used at the wedding, which symbolize the bride and groom, and one big is a family hearth.
You can make your hands wedding candles. The master class will help create real works of art. Prepare materials:
- shape for thin candles;
- form for a round candle "Family hearth";
- paraffin
- 3 Fitil
- lace, Fabric flowers, Ribbons for decoration;
- contours on glass for decorating thin candles.
For the manufacture of wedding candles, paraffin must be white. First, prepare a large round candle. To do this, install the wick, pour the paraffin, wait a few hours until it freezes. Candle "Family Framed" is ready.
Carved Candles - Work for True Masters
If you decide to find out how to make carved candles with your own hands, the master class will not be enough. Initially, you need to prepare multi-colored containers where the candle will be dipped, the constant temperature (75-90 degrees) should be maintained using a water bath.
So, for work, we need to prepare materials and tools:
- container with paraffin of different colors;
- paraffin billet (candle basis);
- capacity with cold water;
- acute knife;
- acrylic candle varnish.
The workpiece can be made independently, the paraffin bay in a round or square shape, the most difficult work begins later. When the candle is ready, it needs to be dipped 30 times in containers with paraffin of various colors, but after 1 time it is necessary to lower in white wax. Then put it on the cold water for a while, cut off the leaks to align the base and can be started. Remember that the drawing or pattern should be thought out in advance, as it will have to do everything very quickly - the paraffin will freeze in 15 minutes. The easiest way of carving is a thin knife to put into small areas and bend tips. The first row slopes in one direction, the second to another, etc.
To protect the thread, the finished handy is perching into acrylic varnish.
The manufacture of candles at home is a fascinating occupation that requires care and prettiness. Try to make one simple candle, and you will not notice how to learn how to create carved compositions. We will also open the secrets.
Hello, my darlings! Six months ago, I was fascinated by such a kind of craftsmanship as a sparkling. Of course, the master in this business is difficult for me, but nevertheless, I already know something. Basically, I make them for myself, as a gift to loved ones and friends. I want to say that from the entire process of making a candle, I get a huge pleasure.
Quite a little bit of stories ......
Candles appeared in everyday life in the Middle Ages. They had only rich people, since their value was very high. They were made from various materials - paper, papyrus, plants, fat. Later, American colonists invented the technology of receiving wax. Next, some research and experiments were carried out, but everything was not that. While in the twentieth century, a group of chemists invented paraffin. Since then, this is the most common material for the manufacture of product data. The most common, but not the only one ...
This article is suitable for newcomers, people who just want to start making candles with their own hands. Experienced masters this article will most likely not be interesting. But do not rush to close the page, at the end of the text you can see the slide video with the ideas of the decor. I hope you will enjoy!
First of all, I want to briefly tell you from what candles are made, what materials and substances are used for their manufacture.
Variety of candles
Wax - As can be seen from the name, made entirely from the beeswax, this group also includes church candles (long and thin), created for a certain ritual. When burning, you can hear crackle. They are considered the most useful, because for their manufacture, the material of nature itself is used. They do not contain harmful impurities, even dyes there are nothing. Candles from beeswax have a yellowish color, and a pleasant fragrance exudes with burning. In addition, they are beneficial to light in cold weather, for purification and disinfection of air. Recently, natural and environmentally friendly steel are very popular candles from the coaster. This is the same beeswax, only with the extruded pattern of cells. The wax melting point is about 60 degrees. But the higher the wax quality than the melting point is higher. You can store them with decades, and the quality of this will not suffer. In my opinion, such candles do not need decoration. The only minus is the high cost.
Paraffin - Made from a fairly cheap material - paraffin. This substance is the product of oil refining. Most candles on sale are made from it. It is believed that they are strongly inferior to wax. For their manufacture, only the highest quality and purified paraffin should be used. It has white color and does not have a pronounced smell. But, unfortunately, our industry is neglected and often sells us a cheap mass of paraffin. When burning, carcinogenic substances that poison our body are distinguished. They burn much less in time than wax. Most often decorated and flavoring precisely such a kind of candles, which is greatly popular. There is no limit on fantasy in this matter.
Gel candles Basically poured into transparent, glass containers. They look very beautiful and modern, and decorations for them are beads, seashells, flowers, etc., which are added to the candlestone. The main plus is the duration of burning, transparency, the absence of any unpleasant odors during combustion. They are completely safe for humans. The jelly mass with burning completely evaporates, leaving a small precipitate that is easily washed with water. Their duration of use 4 times more than the paraffin candle.
What form to take for the manufacture of candles?
It can be different, depending on what size and form you prefer. For these purposes, glass transparent tanks, tea cups, baby food jars, tight cardboard boxes, plastic cups (from yogurt, cottage cheese, cookies, etc.), orange peel, aluminum forms (for tea candles) ....
Wick do it yourself for candles
It can be purchased ready, take from the finished candle, if you overpay it or do yourself.
For this we need:
- claywood chopsticks or bamboo
- olive or sunflower oil
- scissors
- slippet.
Cut the wand of the desired length, place it in olive oil for 20 minutes. It will prolong the burning time of the phytyl. Remove them and blot with a paper napkin.
And the second version of the manufacture of wicks from cotton thread. We need:
- cotton thread, you can take threads Moulin
- salt
- water
- bura
Cut a few strips of x / b threads. In a glass of water, mix 1 tablespoon of salt and 3 tablespoons of the boos. Put the threads there and leave them to cry for 12 hours. Next, give threads to dry completely.
Several dried threads twist together. Get them in molten wax or paraffin. Let go well. Fitil is ready.
Flavors
Essential oils are ideal as flavors. After evaporated, they are saturated with air notes of fragrance, which act on our body is healing. Optionally, it is possible to make a mixture of oils for a specific purpose, for example, for relaxation, excitement, lifting mood, air disinfection, etc. The more you add essential oils into the candlestone, the smell will be more intense. In addition, it is better not to use them in candles from beeswax. Synthetic liquid and dry flavors I do not recognize, only plants esters. But if you are not against their use, then pay attention to quality and naturalness. As they say not harm!
The combination of essential oils for aromatic candle
Dyes
The next component for the manufacture of candles-pots. It is also not a mandatory ingredient. You can safely do without it. As a dye, an ordinary wax chalk for children can perform. It should be erased in a small crumb and add to the already melted candlestone. Liquid food dyes will not suit, as they are made on a water basis. The replacement of them can serve oil paints or special, intended for the spuriousness.
How to make a candle with your own hands at home?
So, with the shape, dyes, flavors and the most candle mass we decided. It's time to do the product itself.
We will repeat what we need:
- paraffin or wax
- the form
- flavors (if necessary)
- dyes (if necessary)
- pan with water and metal tank for melting base on a water bath
- wick
- adhesive Pistol
- wands to maintain phytel
The first thing you need to do is install wick in the container where we will fill wax or paraffin. With the help of adhesive guns, we glue it to the bottom of the cans and fix using a wooden stick (pencil).
On the water bath we melm the candlestone. As soon as it takes a liquid look, you can add dyes and flavors.
Fill it into shape. Let cool a few hours. Cut your wick as you need.
Decor
As decor you can use a huge amount of material. Some of them are easily harvested on their own. For example, dried citrus fruits are suitable for aromasvines: oranges, tangerines, grapefruit. To do this, cut them on the slices, on the baking sheet of laying paper for baking and put them in one layer. Install the degrees in the oven 60-70. It is at such a temperature that the fruits will not be drunk, but to dry. When notice that the blanks purchased the view of the dried fruit, you can get it.
Another embodiment for candles is tapes, lace and decorative threads. Since these are flammable materials, you need to be careful. Refine, attach better to the candlestick itself.
Cinnamon sticks, whole grains of coffee, cones and shells are perfect for this purpose. The main thing to show fantasy and creativity. As for gel candles, there can be no restrictions here.
In order for you to play fantasy and inspiration came, look at the video presentation that I specifically prepared for you. I am sure you will find a sea of \u200b\u200bideas for my work.
If you prefer aromatherapy and plan to make candles with the smell, I advise you to use good quality essential oils, and not cheap flavors. Esters are capable not only to give a charming particular atmosphere due to their smells, but also to benefit.
That's it! Now you know how to make candles with your own hands. Enjoy your creation! I hope you understood my master class! Leave your comments at the bottom of the page. All the whole! Bye Bye!
Decor
Candle like source lighting, used by a person since the III Millennium BC. It costs expensive, and it could only buy it only a wealthy family. Today the candle does not have the best value, and in interior is used for decor. or aromatherapy. And candles made do it yourself- also a beautiful hobby, an excellent option for a gift.
From which materials and how to make a candle at home - Read in our article.

Wax Candle - Step-by-Step Master Class
For the manufacture of candles you will need:
- wax or paraffin (economy candles are suitable);
- cotton thread or moulin;
- saucepan for water bath;
- forms for candles (tin, glass or plastic);
- wooden wands for fastening wicks (1 candle shape \u003d 1 wand).
Tip! If you first decided to make a candle with your own hands - ask someone from loved ones to help you. Wax freezes for 15 minutes, so you need to act quickly.
In each form for the candle, place the Cotton thread in the center. The top edge of the thread fasten on a wooden wand.

Place the water bath with wax (paraffin). To speed up the melting process - it can be cut into it with small blocks or grate onto the grater. Melt the wax on slow fire, constantly mix. Finished consistency should be uniform, without lumps and pieces of paraffin.

Fill on the bottom of a small melted wax. By this you lock the bottom edge of the wick in the right place. If necessary, adjust its position. Wait about a minute so that the wax thicker and wick fixed, and go to the next step.

Fill out the form by the remaining melted wax.

After a day, after a complete cooling and hardening of the candle, cut the extra edge of the wick.


Note! The cooled candle is not necessary to leave in the jar - after the manufacture, it can be removed from the form. Before starting work, select a filling tank with a direct smooth edge, not narrowed up. You can also use plastic cups, ice molds or self-made tetrapak templates.
Colored and flavored candles
Understanding the essence of the manufacture, you can diversify the variations and create more complex homemade candles with your own hands.
To make a color candle, in the tank for melting along with paraffin, put pieces of wax pencils. The shade of the finished candle will fit color Added pencil. The combination of several multicolored pencils will paint the candle in a bright rainbow print.

Idea! Consistently melt and fill with layers in the wax of different colors - you will get the original striped candle.

Use in the manufacture of essential oils - and you will get an aromatic candle with your own hands. To give a candle flavor - add a few drops of oil into a melted wax before the fill of the form.
Combination of oils lavender And Bergamot has a relaxing effect, and lemon and rosemary - eliminates negative thoughts. For sincere equilibrium and tranquility, add to the wax on one part of the oils gerani and roses And two parts of lavender oil. The mood is a combination of orange oils and carnations, and lemon and cedar - relieves stress.

Transparent gel candles at home
At home, you can create another type of candle - gel. The technology of its manufacture is the same as in paraffin. The difference is that the shape is filled with no wax, but a special candle gel.
Gel for the manufacture of candles - transparent. This makes it possible to create incredibly beautiful products. Inside the candle can accommodate seashells, beads, stones, Glass balls, beads, buttons, twigs flowers, and even candied fruit or pieces.
Tip! You can independently choose the location of the decor inside the candle. The elements, lowered to the bottom to the pouring gel, and remain at the bottom, and the already flooded shape - "hang" or remain on the surface.
The shape for gel candle should be transparent (glass or plastic) - otherwise it will not be visible created inside the beauty. Special gel dyes will help to give color shade. In this type of candle, aromatic essential oils can also be added.
Tip! Before pouring the melted gel, het the prepared form. By this you prevent the formation of bubbles.
"Delicious" candles - fruit and coffee
You will probably like the manufacture of candles at home, and you will definitely want to create something creative and extraordinary. Interestingly and unusual candles, made of fruit peel - oranges, limes, grapefruits look unusually. Special aroma and presentable species have candles created with the addition coffee beans. Create and experiment, and a couple of our ideas will help you with this.
Lemon Candle
Necessary materials:
- wax or paraffin;
- four cotton wicks;
- saucepan for water bath;
- capacity for melting wax;
- two lemon;
- food dye violet;
- lavender essential oil;
- dried lavender flowers.
Cut lemons along into two parts. Gently remove the flesh.
Melt the wax on the water bath. Add lavender flowers to it, essential oil and food dye, mix.
In the center of lemon halves, fasten the wick. Fill the "fruit candlestick" molten wax.
Put ready candles in a cool place before final cooling and hardening.
Important! Do not cool the candles in refrigerator - wax can frost unevenly!
Candles with coffee beans
Option 1
The easiest way to create a coffee candle is to add coffee grains to melted wax, or fall asleep them in an already flooded shape.
To do this, you will need all the same materials for the usual candle, plus coffee beans.
Coffee grains differ in a form and size and added to wax, they also sacrificed in different ways. Therefore, each candle you created will have a unique design.
Option 2.
Another manufacturer can be the decoration of the finished candle with coffee beans.
For this, except for coffee grains, you will need glue.
Tip! Coffee beans can be glued without glue - still hot soft wax. To do this, the uncomfortable and unexighted candle can be carefully removed from the shape and "lick" her coffee grains, slightly pressing them with their fingers.

Candle decorated with coffee grains
Individuality in the design of your interior will always be his advantageous side. Nothing gives the home comfortable apartment, like things made by the owners. And if you still could not boast of needlework with such fruits, you have a great opportunity to fix it. We suggest you try to make candles with your own hands.
Candles are a wonderful souvenir, which on the occasion can decorate the atmosphere of any family holiday. Candles have long been the attribute of the celebration, significant dates, romantic evenings. Yes, just sit in silence, listen to your favorite music under the thrill of a gentle light - it is so sometimes not enough.
For someone, the candle is nothing more than a cute piece of decor. And this is also there is nothing bad, similar products serve as an excellent decoration in the house. But flavored candles are capable of becoming a real psychotherapeutic agent: they will help create the necessary atmosphere for relaxation, to carry a person to the world of Greaz and pleasant memories.
In addition, the candle is a wonderful gift. The warmth of your hands and the light of a beautiful candle will be the best wishes near a person. Candles will decorate even the most modest environment, emphasize the flower range of your apartment, will be evidence of the wonderful taste of the owner.

It is worth saying that moms on maternity leave may even earn at such a pleasant lesson. And not only moms - everything that carries the process of creating a candle. And those who wish to acquire such man-made beauty, be sure there will be.
So, we have many reasons start finally our creative process. But for the manufacture of candles, we need to be built with certain materials and tools.
Materials for making candles
Indeed, how to make candles with your own hands without special materials? In our work we will use:
- Vessel for melting wax
- Candle forms
- Pan (for water bath)
- Sticks (first - mount wick, second - stir wax)
- Decorative Product Decoration Elements
- Wax crayons
- Economic candles or spars of old candles
- Paper threads (100% cotton)
All this will help us create if not a wax masterpiece, then an excellent original candle. So, start!
Fitle for Candack
Now we have to find out how to make a wick for a candle with your own hands. We make gel, paraffin or wax candle, in any case we need a wick. In order to make it, we will need a natural cotton thread without any impurities there. Alternatively, take color threads as a wick, Moulin. Looks very cute and unusual.
The thickness and texture of phytile depend, first of all, from the thickness of the part of the candle, which should be lit. For example, there are candles, partially consisting of combustible materials. Roars from them exclusively the core.
For those who are going to cast a candle from wax, you need to take thick threads and not very tightly cross them. Paraffin and gel candles, on the contrary, need a tight of the weave of the threads (otherwise, with burning, the phytel will smoke).

Wick for wax candles

Fittle for gel candles
It is necessary to be attentive to the next part: if the candle is painted with wax crayons, small chips can score wick, without dissolving in paraffin or wax. In general, there is a lot of nuances in this matter, be prepared for choosing a wick to a certain type of candle to have a sample and error method.
If you take very thick wick, it is not excluded excessive melting of the candle, and this is fraught with soak. If you do a very thin phytille, it will constantly go out.
There are several options for the design of the wick: it can be born with a crochet, heat the pigtail, twist the rope. Before filling the candle, it is possible to impregnate the thread with wax, you can also make both the fill and impregnation.
If you do not want to spend time on the manufacture of wick, then use the wick from the finished economic candles.

Candle form
In this matter, the defining role is played by your fantasy. You can use any plastic or metal forms that seem pretty and relevant to the manufacture of candles. Do not limit yourself only to ready-made molds: their role can be perfectly played and packaging from yogurt, jars from cream, baking molds, cans, glasses or circles that can withstand the high heating temperature. Some use even a milk tetrapak as a mold for a future candle.

Candles flooded in tea cups

Candles are made in eggshell
But for your first experience, it is better not to be so wise fishing: take something simple. For example, a cup of yogurt. Be sure to pre-remove the paper label, because it can light up.
We take our cup and in the middle of his Punchka Polly needle pierced a hole - we are already inserting ready-made wick. From the back of the cup, the wick need to tie a nodule. In this very place, the nodal will be the top of our candle, because it will be "upside down" it will be "upside down": the nodule minimizes the flow of paraffin, stearin or wax through the hole that we did at the bottom of the cup.

Go ahead. Alternate on the cup we need to put any wand - toothpick, brush or pencil. On it we need to tie the other end of the wick. It should be located strictly centered in a vertical level position. So, you guarantee yourself that the candle will be evenly lit and melted.
Candle coloring
Really beautiful candles will turn out with the condition if you do not forget them to paint. The easiest and most reasonable way is to dye the candles using simple children's wax chalk.

It seems to you that it will be wiser to use watercolor or gouache? Indeed, the palette of these colors is richer than the color variety of chalks. But the problem is that both gouache and watercolor manufactures on a water-soluble basis: these dyes are unsuitable for working with a candle. They are poorly mixed with wax or paraffin, they can swim in them incomprehensible flakes, and after and settle at the bottom.
Candle decor can be carried out only with dyes on a fat-soluble basis, and this is our wax chalk.
Often, many craftsmen in the decoration of candles use lipsticks or shadows. If you do not feel sorry for your cosmetics, please you can follow their example. But be sure that the fragrance of lipstick will turn around the house, which is not always pleasant. Many this smell may seem intrusive.
If you have taken to make decorative candles with your own hands, it is better to use less aggressive materials. Choosing wax crayons, stop on the soft types of this dye. Especially good candles made using pearl wax chalk.
If hard chalk fell, their melting procedure will be difficult. And they are pretty problematic to strict them. So, we chose chalk, with the help of a grain westing it and added this chips into wax flats. Pretty mixed chips and disharges with a wand.
However, there is another variant of staining. Special stores are easy to find tableted pigments of different colors. They can be mixed with each other, dose. Using such pigments, you will be able to do a truly unusual, bright or delicate candle. Pigments in tablets significantly expand the possibility of obtaining interesting shades.

It is not necessary to refuse from using dyes: they give a candle a unique appearance, create a unique pattern.
Pour candles
Here is already ready wick, it's time to fill. We will need an ordinary cans. It will have a little to surpassed to form a kind of nose. This is necessary in order to make it easier for the process of pouring molten material.
Pre-harvested form is better lubricated with a thin layer of dishwashing liquid or simple vegetable oil. And then, and another tool is equally good.
In the bank we need to fold the chips of the candles (the candles should be the same in quality). If we are going to make a paraffin or wax candle, you can take a saucepan or bucket for the melt, which is not very sorry. In any case, this container should be placed in that pan, which will be used as a water bath. In principle, you can use everything you like, in addition to glass dishes.
So, we fill with water with water, boil water, and after immersing the capance with wax or paraffin there. So our material will melt.

When the material and chips were completely melted, you can start the pouring of the candle.
The bottom of our molds poured wax, let me cool. Do not rush to pour the whole form right away, otherwise a lot of wax or paraffin can be found through the hole in the bottom. Wax fill with layers, what flowed, re-send to the smelting. When already candle is completely filled, it needs to be cooled. The temperature should be room.

Many at this point allow mistake: trying to speed up the process of cold, placing the candle in the freezer. In this case, it can grow unevenly.
This is not critical if we pour a candle "upside down". If you use another method, you should leave a little wax, in order to fill the recesses next to the phylet. And after drying, they will definitely appear.
When the candle temperature is already equal to the temperature of the room, you need to unleash the nodules on the bottom of the form. At this moment, we remove the product itself, carefully pulling the wick.
If it does not work, it can be cut. Or put it for a minute in the refrigerator, and then for a few seconds to substitute hot water.
After that, we cut an extra part of the wick, leaving the tip in 1 cm. If we have ugly sutures, they can be removed with hot water. But with these manipulations, the candle can be poisoned, the shine can fill it. Therefore, the optimal solution will choose a candle form that does not contain seams.
Aromasveti with their own hands
Make aromatic candles with their own hands quite real. In particular, it is worth making those who are a real fan of aromatherapy. In order for you to get exactly the aroma, before casting into the wax you need to add any essential oils. The choice of oil depends on your taste: you can add any oils, except that the pink take is not worth it. After all, his smell when burning will be suffocating, severe.
It is great if the decor of the aromasvea will correspond to the plant whose oil we use. For example, taking the lavender oil as the basis of aroma, pink or lilac dyes should prevail in the candle decor.

Using laurel oil or mint, decorate the candle is better green shades.

Vanilla or cinnamon will be organic in warm, beige-brown candle tones.

Not only oils can make your candle aromatic, ordinary coffee is a strong and pleasant flavor.
In principle, to achieve the fragrance of the candle is not so difficult. Aromatic oils are added to paraffin, wax or gel. And then the process of manufacturing an aromatic candle is no different from creating a conventional candle.
We advise experimenters to mix oils: an unusual bouquet of flavors is guaranteed. If you are afraid to "start" and synthesize the incompatible smells, look at the recipes of perfume. Follow their instructions, just do not add rose oil.
Gel candles
Now let's talk about how to make gel candles with your own hands. In order for us to get gel candles, it is better to use ready-made gel wax. On packaging with him, the formulation of candles creation is often written, it can be used.
The same who is accustomed to do it yourself, can help the following recipe:
- 5 g gelatin
- 2 g Tanina
- 20 ml of water
- 35 ml glycerol
First, we need to dissolve the tannin in glycerin in the heating process. We continue to heal by adding glycerol and gelatin to the residues. In the resulting transparent solution, add water. The mixture is brought to a boil. Some clouding of the solution should not be frightened: soon it will disappear. While the water is not entirely evaporated, you need to boil the solution.

In gel candles, you can also add essential oil, it does not contradict the recipe. Separate, especially pleasant process, decoration of gel candles. At the bottom of any transparent capacitance, freely labeled decorative elements: beads, beads, pebbles, seashells, sequins, coffee grain, dry plants or flowers. Then pour everything with gel transparent wax. It seems such a candle is simply incredible: transparent, gentle, with a magical pattern inside.

Coffee Candles
Decorative candles make it no particular difficulty. For example, you can make the original coffee candle. Decor - naturally, grain coffee. The principle of operation is: in a large form inserted small. Between the walls of the two forms, you need to float the coffee grains, and after pouring them with a candle mass.

As soon as the mass with coffee grains froze, the walls need to be blown up with a hot hairdryer. Thanks to this, extra paraffin stalks, coffee grains will be clearly visible.

Here is the outer layer with coffee grains. We put it back into the form, pour from the inside paraffin / wax of another color.

Coffee candles can be like:

In the same way, marine candles can be made: instead of the grains, there will be pebbles or seashells. As an option - transparent gel candles with small pebbles or cakes.
Candle decoration options
How else can you decorate a candle created with your own hands? The first way to give your candle originality is to use unusual, unexpected forms. Sometimes an interesting form can be advantageous even the most skilled decor. Wonderful element of candle decor - a different kind of glass stands.
In a specialized store you can find special stickers for the decor. Or decoupage is a great way to decorate candles. By the way, professional candles are very fashionable in the medium. Most often, napkins are used as the basis of decoupage. Do not forget about safety technician: Use special varnish for candles.

For lovers of the original decor, the following option is suitable:
Before the fill on the edges of the form, spread the shells, pieces of dried fruit, cinnamon, seeds, dried flowers. Or let it be coffee grains in the ensemble with rhinestones and beads. But in the latter case, it will be more appropriate to talk about the decoration of the finished product: decorative elements we insert into the sweatary paraffin / wax.
Already frozen candle can be placed by bamboo or cinnamon sticks. You can add stars of Badyan or all the same coffee pieces. It will be a beautiful decoration for aromasuals.

If you use dried plants (or any other decorative elements capable of becoming flammable), the wick candle should be thin, so that the candle melted only in the middle.

In principle, if you have the opportunity to seek material into specialized stores, there you will get a lot of useful funds. For example, markers and contours are sold there, they are not burning, and during the purification of wicks are melted along with wax / paraffin.
Do not want to collect old candle flames - use paraffin balls or a candle gel. In specialized stores you can find even ready-made phytilites (with a metal holder). For floating candles, you can purchase specially designed wax.

Today, the fantasy of a creative person is almost uncomfortable: the prices for materials for the manufacture of candles "do not bite", the process is fascinating and not so much, as it may seem. Having created one day a beautiful candle with your own hands, you are unlikely to refuse yourself the pleasure of experimenting more.
And for inspiration, we suggest you watch a wonderful video master class about creating carved candles
Rubric
Candles are an excellent souvenir that can decorate a family holiday and create a romantic setting. Easy to make candles with an extensive selection of material, allows you to pour the decor in the home environment. This article will help you understand in all the intricacies of the cooking candles.
How to make a candle - preparation of materials and tools
For the manufacture of a candle decor, you need to prepare tools and materials. At the first stage it is important to clearly fulfill all the recommendations in order to correct the candles to correctly.
- The foundation. One of the cheapest materials for the candlestone is soy wax. It has a natural basis that is made from soybean oil. With such wax it is easy to work and clean the form from it.
- In addition to the wax on a so-based, the bee wax is used, which is known for its healing properties. But such a wax has a high cost. An analogue of natural components is paraffin - cheap, but is made from refueling products. Transparent candles have a gel base.
- The form. As a case for candles, it is convenient to use if it is with a glass surface. The structure of the candle is visible through it. Also used for spacing metal, silicone and plastic forms.
- Wick. For him, a thin cord or thread moulin is often used. Pre-impregnate it with molten wax, then install it in a metal holder.
- Fragrances and dyes. The wax color gives the dye. Instead, you can add oil paints. Essential oils complement the candle with aroma. Use your favorite oil or a mixture thereof.
- Instruments. In addition to materials for making candles, prepare the following tools. Scales for determining the mass of a solid base, a knife and grater, measuring glasses and a container, a wooden spatula, a thermometer. Additionally, take paper towels and tacks, as the wax will be hot.
How to make a candle - work
- If you do not have special forms for low tide candles, then the cups are suitable from the old tea service or even empty banks. Billets Before use, rinse in warm water. Or lower in boiling water.

- Well wipe the shape of paper towels. The wax must be pouring into an absolutely dry capacity, otherwise it can bounce.


- To determine the volume of the required mass of the wax, resort to small tricks. Form pour water to the desired level.


- Then reclose the liquid into the measuring glass. So you will find out the exact mass for the preparation of the candle.

- Weigh the water without taking the container. Wax grind on the grater or with a knife. Try to make the same pieces so that they melt evenly. In a separate bowl, shift the wax equal to the double weight of the fluid.


- Wax must be melted in a water bath. Pour water in a large saucepan to her half. Put on the fire. Wax mixture put in a jug or other container with a handle. When water boils, lower the dishes in the pan.


- Often stir wax until it melting it. So the mass will have a homogeneous consistency.


- If the wax externally began to resemble olive oil, it completely melted. Remove the container from the fire.


- The hot mix should not immediately pour into the form. Before adding other components, it is necessary to reduce its temperature up to 60 degrees.

- While the wax mass is cooled, install the wick. Its base Lock with hot glue at the bottom of the form. So during the freezing of the wax, it will not shift.


- It is also important to consolidate the wick in the central part of the workpiece. This can be done with a segment of a satin ribbon. Fold the ribbon in half, keep it on the fold line.


- Grip wick through the hole of the tape. Additionally fix its edges with scotch.


- In the cooled wax add essential oils. The optimal ratio of aroma with a candle mass: 1 drop of extract for 400 grams of wax.


- Mix warm wax well. So the aroma is evenly distributed along the mixture. Instead of aroma oil, use spices or grains of coffee. If you wish can add dyes.


- Thin pouring liquid wax into the shape. Try to do it slowly and avoid getting a mixture on the wick and ribbon. Such a fill will help to avoid the formation of bubbles during the freezing of wax.

- When the wax fully solids, cut the wick to the desired size and remove the tape.


- Now you can walk the candles and enjoy the cozy atmosphere in the room.


At first glance, nothing complicated in the manufacture of candles. But there are several recommendations on the fill of the fragrant decor, which will make it easier for the process and help avoid errors.
- To achieve uniform wax color, it is impossible to use food dyes. They have a water base.
- If you failed to purchase special dyes for candles, then use colored wax-based pencils. Grind them and add to warm candlestones.


The process of making candles at home is becoming a fascinating occupation. In addition, the candle decor, which is made with his own hands, gives comfort and warm.
How to make a candle with multicolored wax, look at the video: