We knit the “Royal Braid” pattern according to the pattern
The most common pattern, which is most often used by needlewomen, is the braid. This pattern is suitable for both adults and children. It can be knitted in a single pattern on the product, as well as in combination with other patterns. There are many types of braids and ways to knit them. The “royal braid” is considered the most beautiful; it will be discussed in this article.
Royal braid knitting pattern
To make knitting this pattern easier, you can purchase special knitting needles that are made specifically for this purpose. They also knit tourniquets like this. In the photo they are shown with a curved middle. In order for the royal braid to turn out beautiful and neat, you need to have two things: the main one and the auxiliary one. The auxiliary tool is always one size smaller than the main one.
A lot also depends on the selection of yarn. If you want to knit a pattern of sufficient width, then use thick and fluffy yarn. Narrow braids are knitted with cotton threads. They can be directed to the left and to the right. If you want the pattern to look to the right side, then leave the tool at work. And if you want the royal braid to look to the left, then leave the yarn before work.
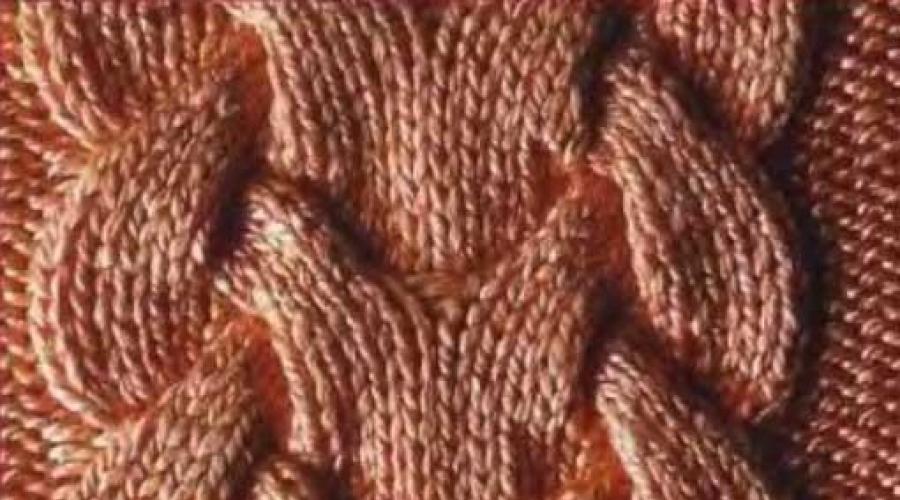
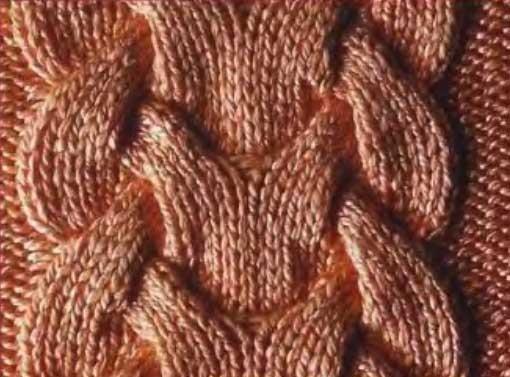 The royal braid looks like a wide ornament, which consists of two smaller braids intertwined with each other. It is performed on a background that is knitted in purl or stockinette stitch. It is knitted by crossing 5 stitches from the left side to the right and vice versa. The number of loops should be a multiple of thirty. The drawing diagram will be presented in the article.
The first row begins with all buttonholes being made in the face method. Starting from the second stripe, all purl lines should be knitted with purl stitches. The third row is knitted according to the following pattern: remove 5 stitches without knitting and transfer them to an additional needle. Leave it before work. New 5 stitches should be knit, then the transferred buttonholes are knitted. way. Next 10 persons. p. and again 5 p. need to be removed to another tool and left at work. New links are knitted on the face, and after them the transferred loops are also knitted. way. The fifth and seventh stripes are performed by persons. buttonholes.
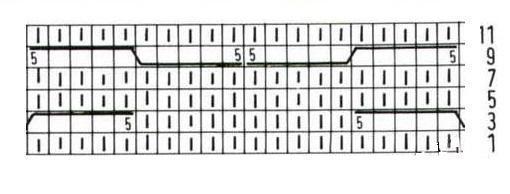 The ninth line is performed as follows: 5 persons. p., 5 p. remove to an auxiliary tool and leave for work. After that there are 5 faces again. p. and five that were transferred, knit with your face. Next, again throw as many links as described above, but leave them in front of the canvas. Then five face buttonholes. method, the removed ones are knitted with the face and five more links that are the last ones left. The eleventh row is completely knitted. loops. The pattern of the ornament is repeated when the thirteenth stripe begins.
Beginning craftswomen may think that the royal braid is a very complex and intricate pattern that simply cannot be repeated. But this is not true at all. You just need to understand the specifics of this work with knitting needles, since in rapport there is almost the same tendency for knitting links. Make a small sample first to practice with the pattern. When you understand that everything is working out as it should, you can start knitting a full-fledged product with knitting needles. If the diagram with the description was not entirely clear to you, we suggest watching the current video.