Stencils for walls for painting large sizes. Stencil painting
Stencil painting. Decor of the box "Freedom at the tip of the brush". Author: Olga Pavlova It is very easy to draw with the help of stencils, and somehow I have already shown the process of decorating an interior panel using stencil painting. But is it just as easy to paint a voluminous thing, for example, a box? I decided to give it a try, because painting through stencils is a fairly simple technique, and it's also a great idea for decorating a box. To decorate the box using the stencil painting technique, you will need the following materials: blank box; the soil is black; acrylic paints "Acryl-Hobby De Luxe": Olive, Khaki, Forest green; acrylic paints "Acryl-Art": Magenta, Yellow-green, Titanium white, Yellow ocher; acrylic paint "Decolor" Old Bronze; relief paste Graphite; stencils that we will use for drawing; matt acrylic varnish. To begin with, ground the workpiece with black acrylic primer in two layers. The primer, in addition to its main task (primer), will play the role of a background, so I cover it on top with one layer of matte varnish. Stencil painting. Jewelry box decor. With the help of a stencil, a stencil brush and paint "Acryl-Hobby De Luxe" Olive (a gorgeous color, as if filled with the sun, real, I highly recommend!) I decorate the frames on the lid and on all four sides. The brush works in a circular motion, rubbing in, semi-dry. I wipe the excess paint from the brush on a napkin. Using the background stencil and the same paint in movements reminiscent of dusting, I decorate the background inside the resulting frames. I make the painting uneven to create the illusion of focal blurring of the background behind the resulting grating. For subsequent work, I create a stencil for painting: the stencil drawing was downloaded from the network and cut from a simple stationery folder for papers. In this stencil, both a general bouquet of flowers and flowers are cut out separately, which makes it possible to draw many and different of them. Along the edge of the stencil, part of the flowers masks are also cut, which allows you to create shading around the resulting flowers (I will not do this). The stencil can be twisted as you want and create either a twig with one flower, or a huge bouquet. According to my idea, it will be a branch with several flowers, making its way through the fence-fence to freedom. On the sides of the box, I will draw young buds with leaves with the same stencil. Using Khaki, Olive, Magenta + a drop of Black, I create an underpainting (the bottom layer of the whole picture). Further, in the design of the petals, I use only white color, somewhere highlighting more, somewhere not very much. .. I use Ocher yellow, Forest green and Yellow-green to decorate the foliage and the heart of the flower. I work mainly with a stencil brush, but in some places other brushes come to the rescue. After the branches are drawn, I will draw a lattice here and there with black paint in order to visually remove some of the branches for it. Paint "Decolor" Old bronze, also with a stencil brush through a stencil, I make out the inscription. I fasten the lock and, in spite of the fact that the given fittings are bronze, I also powder it with Old Bronze to make the inscription and fittings a single shade. Again I take the stencil with the inscription and, precisely aligning the stencil with the already received inscription, I spread it with a re-embossed graphite-colored paste. After drying, I again combine the relief with the stencil and cover the entire relief with old bronze decolor paint. I needed the first paint layer, since the stencil drawing of the inscription has very thin lines of letters, through which the relief paste categorically did not want to lie down, and without these lines the letters would not be intact ... the hope that the relief laid out afterwards would not interfere with drawing thin lines were too few to risk. Using a sponge, I powder the edges and edges of the entire box. That's all, three strokes of the brush, droplets of paint, and she herself did not notice how the box was ready. Simple, fast, easy! As I love :) Source
Stencils for walls for painting are the best opportunity to decorate the interior with your own hands.
Wall decor using stencils
It is necessary to choose a painter's suit, a roller, a brush, several colors of various paints and buy your favorite stencil for wall decor at Olstik. Next, clean the wall of old paint, putty the mother-in-law and cracks, level the surface. After that, open with a layer of screed.
For finishing work, water-based paint is suitable. If it is decided to leave the walls pure white, then it is necessary to repeat the procedure for applying the water emulsion a second time. And if you plan to paint in a certain color, then you need to let the walls dry. You can also add color to the water-based paint and make the coating a specific color. Note that the more color you add, the darker the color will be.
After the base dries, beautiful stencils for wall decoration should be applied to the surface. Fix the stencil with small pieces of tape at the top and bottom so that the picture does not "slide out". Step back and analyze whether the drawing is evenly placed, whether the stencil is correctly fixed. Next, apply paint to the places where the parts were cut. If the drawing is large, use a paint roller to apply paint, and for small parts, use a brush.
The choice of stencils for various rooms
The unique selection of drawings presented in the "Olstik" company allows you to act in any direction and decorate the surface of the walls in the following types of interiors:
- Entertainment facilities: centers for children's creativity, youth clubs, exhibition pavilions, theater foyers, cinemas, sports complexes, dance floor.
- Business complexes: trading houses, bars, mobile communication salons, restaurants, spa centers, massage rooms, work offices.
- Living areas: living rooms, hallways, corridors, bedrooms, kitchens and dining areas, loggias and balconies, bathrooms and toilets.
Almost any room can be decorated in an original way, using stencils of colors, ornaments, patterns, etc., if you buy stencils for the walls in the "Olstik" company. We work throughout Russia, including remote regions.
The advantages of buying stencils for decoration
The online store site offers to buy stencils for self-decor of the walls. The products are made in accordance with five basic rules and requirements for compositions.
- Possibilities. With these convenient elements, the client will be able to independently decorate his home, workplace, business center.
- Uniqueness. Stencils for wall decoration are made of original material, which allows you to draw a clear line between the picture and the wall without blurring the image.
- Exclusivity. Many models are designed in our design office.
- Convenience. Wall stencils for painting have a unique structure, which makes the product comfortable to use. Even a non-professional designer can handle it.
- Quality. The peculiarity of stencils for painting walls allows you to successfully combine several types of drawings, paintings, panels in one room.
Contact us, the quality of interior decor is guaranteed by the manufacturer "Olstik"!
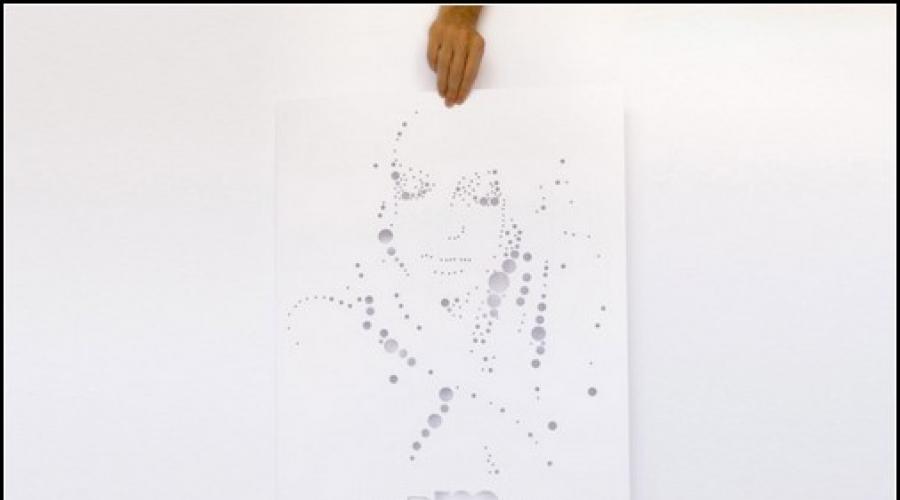
It turns out that the holes decorate not only cheese and human ears. They can be used for creative purposes as well. For example, members of the French community of artists and designers Murmure create real paintings using holes.

The "hole" art of the guys from Murmure has a lot in common with the people who are engaged in stencil painting. They also use sheets of paper that are punctured in such a way that certain images are produced.

Only after that, they do not need to take cans of car paint, look for free walls and paint on them using a stencil. Murmure believes that the stencil itself is already an art. Moreover, it is much more reliable and durable than the drawings on the walls.


It turns out that Murmure is doing stencil painting the other way around. After all, the main thing in their work is the stencils themselves. And, in order to see images on them, you need to attach the form to some background different from it. Then you can see the pictures painted with holes.

Moreover, in order to create such pictures, you must have a very delicate artistic talent and taste. After all, here, making holes in the paper, you need to very clearly understand what exactly you are doing and what result you expect.

Well, in order to view these unusual paintings made by holes, you also need to have a very broad view of art, as well as be able to see, pay attention to the whole, and not to the details.
Having decided on the style, you can begin to select materials for the future work:
- Paint and canvas.
- Cardboard, designer paper, magazine clippings, old photos.
- Textiles, leather, ribbons, braid.
- Glass or crystals.
- Buttons.
- Dried flowers, shells.
Advice! Don't throw away old children's drawings, scraps of fabric, magazines, decorations- all this can become part of the picture. Store them in a separate box, reviewing and assembling from time to time.
We draw with paints
The easiest way to create an original painting for the interior with your own hands is to paint it. The theme is limited only by the imagination of the creator. Even in the absence of artistic skills, a masterpiece can turn out: use abstract techniques, study master classes and photos of finished works.
Oil, watercolors, acrylic paints will become faithful helpers in creating paintings for the interior. As a base, you can use both a professional canvas and ordinary thick paper or a primed board.
Advice! Inspiration can be drawn from nature, if there are picturesque places near the house. If you are not lucky with the place or the weather, feel free to draw your household, pets, fruit compositions - whatever. The accuracy of the reproduction of reality does not play any role, the main thing is to approach the process with a soul.
Modular paintings are suitable for almost any room: from kitchen before living room, but it is important to choose the appropriate images. If you do not have time at all to create a masterpiece with your own hands, then we have good news for you - today you can buy them in any specialized store!
Photo printing
The technical side of the issue is taken over by a photo workshop, which can print a suitable image on almost any basis: canvas, paper, ceramics, etc. These can be ordinary posters depicting interesting places, people, ornaments.
Advice! A poster is not just a picture, it should carry a certain idea, correspond to the interior, the theme of the room and the character of the owners of the house. Recently, pin-up and retro posters have gained particular popularity.
If the poster is large-format, you can divide the image into several segments and, when combined into a single canvas, beat the joints, making it look like a modular picture.
If there is a child in the house, then you can scan his drawings and, choosing the appropriate color, shape,. A photo of the artist himself can complement such a poster. All that remains is to print the poster and place it in a frame that matches the color and style.
Collage of old and new family photos can be hung as a picture in the bedroom or living room, and posters with the image of the corresponding paraphernalia, fruits are suitable for the kitchen. Finally, it is worth noting that it is recommended to choose posters and panels for the kitchen in rich and bright colors, however, no one forbids you to go against the rules and create stylish ones.
Textile
From all kinds of scraps, fabric with beautiful patterns, ribbons, braid or lace, you can create real masterpieces in patchwork style with your own hands... Fabric paintings are most often made using the applique technique. The basis is taken from dense textiles with restrained and inconspicuous ornaments (stripes, polka dots, etc.), and the main elements are cut out of bright patches.
Most often, kitchens and nurseries are decorated with textile products, since these premises are characterized by a certain simplicity present in the application.
Advice! From felt, flannel and other fabrics that keep their shape well, you can cut fruits, animals, cars, houses. You can safely combine various textures and patterns on fabrics, use braid, decorative cord, buttons for decoration. For the living room, you can make a textile picture of crinkled silk with abstract patterns.
From buttons
With their help, you can create original things by sewing on or applique. This type of hardware is often used to depict leaves on trees. Buttons can be originally pasted inside any contour, for example, a silhouette butterflies or cats. In sewing stores, you can pick up parts of various shapes, colors and materials and lay them out like a mosaic, according to a previously prepared scheme. These button-like pieces will fit perfectly into the kitchen, however, they can also be used for the living room and bedroom.
Advice! Buttons can be glued around the perimeter of the picture frame, giving it a personal touch.
Wallpaper and panels
Often, after renovation, large pieces of beautiful wallpaper remain, which will be useful for making unusual interior paintings.
- Framed wallpaper is the easiest option for creating something like this panel... A piece of the desired shape is cut from the roll and placed in the frame. Moreover, the ornament may coincide with the pattern on the walls or differ from it. Such elements can go in a row of 2-3 pieces.
- To revive a boring canvas in a frame, golden paint and a stencil or small black and white photos, stylized in antique style, will help. Such wallpaper pictures will fit perfectly into
The time of change is a moment in a person's life that can come for everyone, when everything around is boring and no longer brings joy. The way out in this situation is to change the environment around and fill it with cute things. For example, go on vacation, change an apartment, move to another city, or just start a renovation.
At the same time, repairs do not have to be major with a radical redevelopment of the premises. Correctly selected wallpaper or wall color can improve the situation.
And there is a way that will take and bring joy to the whole family, while giving a new look to your nest. There is no need to spend money on expensive materials and a brigade of finishers, to make a commotion in the apartment.
Consider some ways to decorate a room without serious time and money. The process promises to be interesting and exciting for all family members.
The first way
Painting the walls with flowers.
We need:
- Brushes, roller.
- Pencil.
- Level.
- Stencil.
- Paints.
- Masking tape.
- Paper towel.
- Rags.
To begin with, you should paint the walls with plain paint and leave to dry completely. The walls look neat, but you need to make the interior unique. In this case, paints and brushes come to the rescue.
Initially, you need to draw a border. At a distance of 0.8-1.0 m from the floor, draw two horizontal lines using a pencil and a level. Glue 3m tape along the lines. We paint the border in a dark color. Until the paint dries completely, it is important to remove the tape from the wall. Now you should apply paint along the contour of the border, which will be darker than it, but lighter than the base paint. This technique will avoid sharp contrasts between colors. The paints must dry completely.
If the paint is completely dry and the tape has not been removed, i.e. the tape was left to draw the boundary line, then it should be removed after the last line has completely dried. In order not to damage the already applied pattern, you can use a hairdryer. After holding the tape in hot air for a while, remove it from the wall. This method will prevent the paint from crumbling. However, the method is not suitable for all paints, so it is better to remove the masking tape before the drawing dries.
The most exciting stage has come - the creation of a decorative pattern. Prepared stencils of colors, paints and brushes are taken.
It is better to start drawing small flowers from the corner. The joints should be marked on the stencil, this will help create a proportional composition. To avoid paint spills on the wall, wring out the brush on a paper towel. With a rag, you can remove excess paint from the stencil, this will ensure the accuracy of applying color to each new flower. The stencil is attached to the wall with masking tape.
If the stencil needs to be applied to a previously drawn drawing, then the first one should be allowed time to dry. This will prevent the colors from mixing and will insure against getting darker shades.
Decorating the border with flowers is the final stage of wall decoration. Use a ruler to keep the distance between the stencil pattern the same. Flowers on the border should be at the same angle, for this, horizontal lines are applied on the stencil: they must coincide with the border line when creating a picture. Due to this, the desired, and most importantly, the same inclination of the flowers is achieved.
The colors of the paints may vary. You can stop at several shades of the same color, or there can be completely different colors. It already depends on your design preferences.
Second way
Drawing geometric patterns on the walls.
Geometric shapes are easier to apply to the wall than flowers. It will take less time. Figures made with silver, gold and bronze paint look interesting. Such paints look unusual in different lighting conditions, creating a mysterious riddle of the room.
A stencil for geometric shapes can be easily made from plain paper and without special skills. The set of necessary accessories is the same as for applying stencil colors. You can spread paper or newspaper along the wall to make it easier to clean.
For depicting simple elements, it is better to use conventional spray paints in cans. These paints are easy to apply and dry quickly.
The picture that should be obtained as a result should be depicted on a sheet of paper or on a computer. The randomness of the figures does not always look attractive, and so the result will be expected and will allow you to avoid some mistakes.
The stencil must be at the correct angle before painting. Sometimes, to achieve the desired tone, applying a double layer of paint is simply necessary.
Stencil painting is a fun and interesting activity that is accessible to everyone and does not require mastering special skills.