Couple portrait from a photo in the style of fantasy. Fantasy photoshoot Fantasy portraits
An original painting has always been a great gift for any occasion. As a rule, nominal portraits are ordered for the birthday person, the hero of the day, for wedding anniversaries and other significant events of the family - patrimonial, family portraits.
As a rule, work on a painting can take more than one month, so it is worth ordering such a present in advance. But what to do when you need to present an unusual gift in the shortest possible time? In these cases, you can order a photo print on canvas. So, for example, a pair portrait from a fantasy photo can be made in just a couple of days.
Where to order a pair portrait from a photo in the style of fantasy?
The fantasy style attracts attention with its unusual execution, mesmerizing lines and spectacular colors. Spectacular paintings in this style will perfectly complement living rooms in a futuristic style. They will also look spectacular in modern eclectic designs of the kitchen, living room, hall and even a nursery.
You can make a pair portrait from a photo in the style of fantasy in the shortest possible time at the SPB Pictures company. Thanks to the work of professional designers-artists, you can create a real picture in any style from the most ordinary photo. By far, the most spectacular style that will appeal to both adults (fans of science fiction and everything unusual) and children is fantasy. It allows you to create a unique picture that will delight you for decades.
This is created in several stages:
- the customer sends 2 separate portraits or a finished paired photo (on the basis of which the picture will be created) to e-mail or uploads to the site;
- then the company manager contacts the customer to clarify the details (the term, size, type of processing, the use of additional fixers and other nuances are discussed);
- after that, several options for the layout of the finished work are performed, which are sent to the customer for clarification;
- after selection, printing is performed.
After the paints dry, a pair portrait from a photo in the style of fantasy is almost ready! But the finished canvas still needs to be pulled onto a stretcher. The specialists of the SPB Kartyi company do this using a unique gallery technology, which avoids the appearance of irregularities and “wrinkles” on the canvas.
For what occasions can you buy a portrait from a photo in the style of fantasy?
Designers are advised to decorate rooms with such canvases in cases where their style provides for unusual decor. Fantastic canvases will decorate the interior, made in the styles of futurism, kitsch, eclecticism, fantasy. In addition, they look impressive in classic and minimalist directions.
Most often, a pair portrait from a photo in the style of fantasy is ordered for young people. The spectacular portrait will be appreciated by those who are interested in the world of fantasy and prefer everything new and unusual. Stylish portrait in a fantastic style will also be appreciated by children. You can depict a child with a brother, sister, or with one of your favorite friends, or you can draw him together with a cartoon character. In any case, you will get a wonderful birthday present that will delight the baby and his parents.
Also, a pair portrait from a photo in the style of fantasy can be presented to newlyweds or married couples with experience for family celebrations. Such a picture on canvas will be an excellent gift for anniversaries, the birth of children, as well as moving and wedding anniversaries.
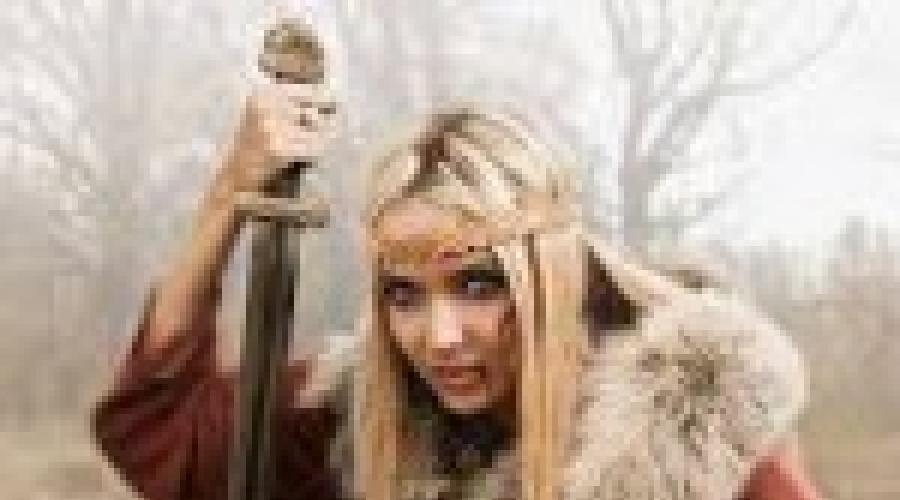
 Princesses, elves, vampires ... Girls in the style of fantasy fascinate, because nowhere in everyday life you can not see this. The photo session, which will be conducted by our professional photographers, will replenish your collection and bring a piece of fairy tale and fantasy into your reality.
What is Fantasy Style?
Fantasy style is a direction of the literary genre, which goes back to the stories of folklore and ancient myths. The image of fantasy has always been nature, which implied the presence of dragons, elves and other incredible heroes. Huge castles and palaces, where such images lived, harmoniously fit into the world. The fantasy style has always described a wonderful life, where magic, tragedy and beauty reigned. Today, the fantasy style has become incredibly popular not only in literature, but also in art.
clothing
What is clothing fantasy? This is, of course, a magical world of secret desires and real images. These are all kinds of space suits and chain mail, long cloaks, hoodies, blisters and swords, fur capes, elongated dresses, as well as a huge number of massive accessories. On the way to creating a fantasy-style look, fabric velvet and chiffon dresses, which, with their airbrushing, resemble this style, will help you. For fantasy photography, you should come up with your own image. It can be a literary hero or your favorite magical creature.
Makeup and hairstyle
Choosing a hairstyle in the fantasy style, you need to be sure that such a hairstyle would be worn by a fairy princess or fairy. If you have long hair, you can make multiple ponytails and tie them together to create a large mesh. The main thing is fantasy, where there is no place for ordinary and standard hairstyles. When you apply a fantasy style to yourself, do not forget about the importance of makeup and accessories to help you create a complete look. However, it is imperative to do everything as naturally as possible, not intimidating. Even in this style, restraint does not put you down.
Props
Decorations can be used as props. These are huge bracelets, massive rings with multi-colored stones, necklaces and earrings. If you chose the image of an elf or a fairy, take care of the wings. They should be bright and colorful.
Place for photo shoots
Think about where you want to take the photo session. After all, it can be a park, a forest or a street in your city. However, the season is important here. You can also shoot in a photographer's photo studio or in a beautiful palace, if you have the opportunity. Always ask your photographer for help, as he can help you not only with choosing a location, but also with your image.
Fantasy images, sample photos
Fantasy photo shoot cost
Services | Price |
Renting a Photo Studio without our photographer
| 600r / hour |
Photo session with our photographer in the studio
| 2 900 rub / hour |
Photo session with our photographer on the road
| 2 500 rub / hour |
Subject photography
| 100 rub |
Stylist / makeup artist services
| 2 900 rub |
Professional photo retouching
| 300r / photo |
Photo slideshow
|
The work of this artist is quite extraordinary, but quite modern and relevant. Selene Regener gives particular preference in her art to portraits of women, both portraits of ordinary girls and portraits of fabulous girls. These works can be called not only beautiful, expressive and professional, but even symbolic. Some part gives the paintings a special atmosphere, and their heroines a special character. Using elements of fabulousness, the Swiss artist tries to show the magical nature of every girl and woman, their romance, a penchant for dreams and reflections. Each girl is a fairy tale, both externally and internally. The artist only emphasizes this through special symbolic means, endowing her heroines with the attributes of a fantasy world. Striking beauties in her works, through external qualities and features, demonstrate their inner world, their dreams and aspirations, reveal to the viewer what is hidden in the depths of their souls and hearts. It is extremely interesting and exciting to watch this.
Fabulous, mythical, and sometimes even mystical portraits of girls are remarkable not only for their fantasy atmosphere and the depth of the artist's idea, but also for their professionalism. Selena's work looks very accurate and detailed. I am glad that the artist pays in her work both the quality of the image and the semantic component, making her works unusually expressive and attractive.
Do you want to become a full-fledged inhabitant of the fantasy world and go on exciting adventures? Fantasy mmorpg games are a great way to do this. Visit the GameXP website for the most interesting and popular games in this genre.
Selene Regener (Selenada) portraits of girls in the style of fantasy
|
|


In this tutorial, I'll show you how to create a fantastic sci-fi portrait. You will learn how to blend a portrait photo against a space background, add effects using textures, work with blend modes, enhance color, and more.
1. Create the background
Step 1
Create a new 1500 x 900 px document with the following parameters:

Fill the background with # 010e27.
Step 2
We pass Layer - NewAdjustmentLayer - Curves(Layer - New Adjustment Layer - Curves) and decrease the brightness by pulling the diagonal line down. On the layers panel, select the mask of the adjustment layer and activate BrushTool(B) (Brush). With a soft round brush in black, paint on the sides of the document so that the background in these areas is not too dark. We'll add details later.


Step 3
Move the space background to the canvas and change the layer blending mode to Screen

At the bottom of the layers panel, click on the button Addlayermask(Add Layer Mask) to add a mask to the space background layer. Using a soft black brush, randomly paint over some areas in the center and on the sides.

Step 4
Higher Curves(Curves) and transform it into a Clipping Mask by pressing Ctrl + Alt + G. Decrease the brightness of the picture to get a softer and more accurate effect.

2. Add the model
Step 1
Open the photo with the model, cut it out using PolygonalLassoTool(L) (Straight Lasso), and the tool MoveTool(V) (Move) move to the center of the working canvas.

Use a soft black brush to edit the mask to hide the model's neck, shoulders, hair and forehead.

Step 2
Create a new layer and transform it into a Clipping Mask (Ctrl + Alt + G). We activate StampCloneTool(S) (Stamp) and remove the earrings:

Step 3
Add an adjustment layer to reduce the brightness on the bottom edge of the chin and cheek. Use a soft black brush to edit the mask in those areas where we don't need the effect of the adjustment layer.

Step 4
Add an adjustment layer Hue/ Saturation Saturation(Saturation) to -16:

Step 5
Add an adjustment layer ColorBalance(Color Balance) to adjust the color of the model to match the background. Configuring Midtones(Midtones):

Step 6
We take LassoTool(L) (Lasso) and select the mouth. Then we go Layer - NewAdjustmentLayer - Curves(Layer - New Adjustment Layer - Curves). Increase the brightness of the lips.

3. Create makeup
Step 1
Open the picture with the light ring and paste it on the working document using MoveTool(V) (Move). Change the blending mode of this layer to Screen(Dodge) with 100% opacity.

Step 2
We pass Filter - Liquify(Filter - Plastic) and activate TwirlClockwiseTool(C) (Clockwise curl). Then we twist the ring until we get the result like in the picture below, pay attention to the central area in the shape of an eye. Transfer the resulting shape to the model's eye.

With the help of a mask, remove the excess.

Step 3
Duplicate the layer (Ctrl + J) and reflect the copy. Edit - Transform - FlipHorizontal(Editing - Transformation - Flip Horizontal). Move the copy to the second eye.

Step 4
Select both eye layers and press Ctrl + G to add them to the group. Change the blending mode of this group to Screen(Lightening) with an opacity of 100% and above add an adjustment layer Hue/ Saturation(Hue / Saturation) to change the eye color.

Step 5
How to create an adjustment layer ColorBalance Midtones(Midtones):

4. Add the nebula
Step 1
Move the Nebula 1 image onto the working paper and change the blending mode to Screen(Dodge) with 100% opacity. We pass Edit - Transform - Warp(Edit - Transform - Warp) and distort the shape of the nebula to match the perspective of the head and eyes.

Use a mask to correct the edges of the nebula.

Step 2
Duplicate (Ctrl + J) this layer several times and distribute the copies around the head and face, trying to achieve a clearly visible effect on the cheeks. If necessary, use a mask to get rid of unnecessary details.

Step 3
Select all the nebula layers and add them to the group (Ctrl + G). Set the group blending mode to Screen(Dodge) with 100% opacity. Then add an adjustment layer above. ColorBalance(Color balance) and customize Midtones(Midtones) and Highlights(Light):


Step 4
Add an adjustment layer Levels(Levels) to hide the remaining borders and soften the effect a little.

Step 5
Add the second Nebula 2 image to the canvas and place it at the bottom. Activate Free Transform (Ctrl + T) and rotate the image as shown below. Set the layer blending mode to Screen(Dodge) with 100% opacity.


Step 6
How to create an adjustment layer Levels(Levels) to hide the border of the picture and soften the effect.

Step 7
Add an adjustment layer ColorBalance(Color balance) and customize Midtones(Midtones):

5. Add fantastic lighting
Step 1
Insert the Fantastic Light picture onto the canvas. Place it on the head and set the blending mode to Screen(Dodge) with 100% opacity.

Using a filter Liquify(Plastic) (tool ForwardWarpTool(Warp)) to warp the image and get the result as shown below:

Step 2
Duplicate (Ctrl + J) this layer twice and distribute the copies all over the head and on the right side of the model. Use a mask to remove all unnecessary details.

Step 3
We open a picture with a fantastic light separately, take LassoTool(L) (Lasso) and select the part. Copy (Ctrl + C) and paste (Ctrl + V) the selection in the lower left part of the head. With a tool ForwardWarpTool(Deformation) give the fragment an arched shape.

Using a mask, hide the hard edges on the fragment.

Step 4
Select another piece and using the same technique, paste it on the right side of the head.

Step 5
Using the same method, we add more small details.

Step 6
Group all the fantastic light layers and above inside the group add an adjustment layer. ColorBalance(Color balance). Configuring Midtones(Midtones):

Step 7
Add an adjustment layer Hue/ Saturation(Hue / Saturation) and reduce Saturation(Saturation) Blues(Blue) to -81:

Step 8
Add an adjustment layer Levels(Levels) to completely hide the remaining visible borders:

6. Additional makeup
Step 1
Create a new layer. We take EllipticalMarqueeTool(U) (Oval) and draw a small circle. We activate GradientTool(G) (Gradient) and fill the circle with a radial gradient using the colors # f8b2f2 and # 834115.

Through ForwardWarpTool(Deformation) extend the circle in length and place it along the contour of the model's jaw.

Step 2
Change the blending mode of this layer to ColorDodge(Dodge Base) with 100% Opacity. Add a mask and edit the effect so that it looks soft enough.

Step 3
Duplicate the layer twice. Place one copy near the nose on the cheek, and reflect the second horizontally. Edit - Transform - FlipHorizontal(Edit - Transform - Flip Horizontally) and paste on the second cheek.

7. Draw the lighting
Step 1
Above all layers, create a new layer and paint with a soft brush (color # 746482) around the model's face. Change the blending mode of the layer to ColorDodge(Highlight Basic) at 100% Opacity.


Step 2
Use a soft brush (color # 81a3ef) to paint over the forehead, cheeks and chin. Change the blending mode of the layer to Overlay(Overlay) with 100% opacity.

Step 3
On a new layer with a soft brush (color # 8c8dcb) paint over the lower part of the canvas in the head area. Change the blending mode of the layer to HardLight


Step 4
Change the brush color to # a797c1 and paint over the top of the head. Leave the blending mode HardLight(Hard light) at 30% opacity.


8. Final touches
Step 1
Above all the previous layers add an adjustment layer. GradientMap(Gradient map) using colors # 912d1d and # 004460. Reduce the opacity of the layer to 20%.

Step 2
Add an adjustment layer ColorBalance(Color balance) and customize Midtones(Midtones) and Highlights(Light):


Step 3
Add an adjustment layer PhotoFilter(Photo filter), choose the color # ecde00.

Step 4
How to create an adjustment layer Curves(Curves) to add warm colors and increase the contrast of the image.

Step 5
Create another adjustment layer PhotoFilter(Photo filter), change the color to # dab9f4.

Step 6
Finish the color correction with an adjustment layer Vibrance(Vibration).

Congratulations, we're done!
I hope you enjoyed my tutorial and learned something new. Feel free to leave comments, suggestions and share your results.