Master class "Puppet theater" Three little pigs ". Tale Three little pigs do it yourself from paper
Do-it-yourself three pigs from corrugated cardboard using the quilling technique. Master class with photo
Volumetric table composition made of corrugated cardboard "We are not afraid of a gray wolf ...". Master class with step by step photos
Fabulous workshop. Master class with step by step photos.
Cherepanova Christina 9 years old, student of the association "Fantasy and Skillful Hands"Supervisor: Ivanischeva Svetlana Evgenievna, teacher of additional education, MAU DO "SUIT", Novouralsk, association "Fantasy and Skillful Hands"
1. Description: a detailed master class with step-by-step photos will allow even a beginner to make fairy-tale characters using the corrugated quilling technique.
Purpose: this master class is intended for elementary school students, teachers of additional education, as well as for those who are interested in the topic "Fairy Tales" or the technology of making toys from corrugated cardboard.
Target: creation of characters from the fairy tale "Three Little Pigs"
Tasks:
- instill an interest in creative activities, the desire to create unique works with your own hands;
- develop and practice skills of working with corrugated board
- to educate accuracy and artistic taste, to form a positive outlook, love and interest in the culture of the Russian people.

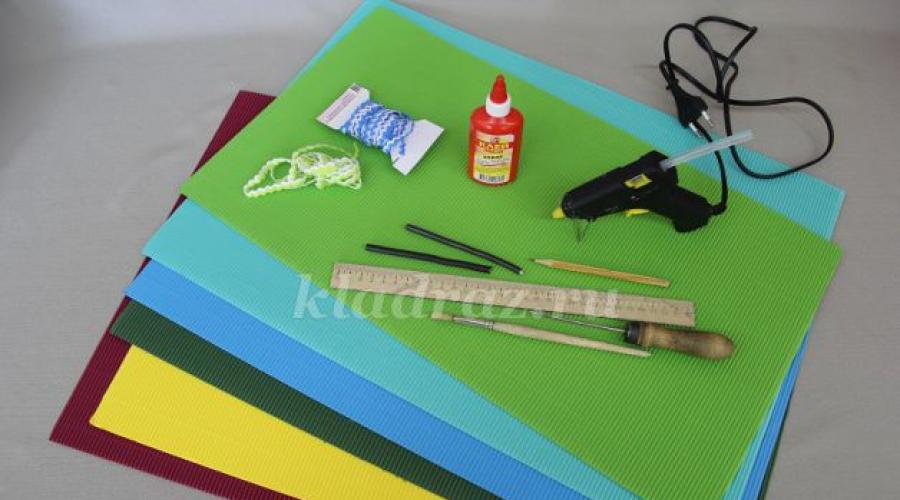
2. Required tools and materials: sheets of corrugated cardboard of different colors, ruler, scissors, braid "loach", yarn, PVA-M "Super" glue, thermo gun with rods, awl, eyes
Safety precautions when working with scissors:
When cutting, open the scissors wide and keep the ends away from you.
Be careful not to injure the fingers of your left hand.
Rotate the paper when cutting a part.
Pass the scissors closed only, rings forward.
When working, do not hold the scissors with the ends up.
Do not leave them open.
Do not work with loose scissors.
Use scissors only at your workplace.
Rules for working with glue:
after finishing work with glue, close the lid tightly
if glue gets on the skin, wipe it off with a damp cloth
at the end of work, wash your hands with soap and water.
An amazing material - corrugated cardboard - so simple and at the same time extraordinary, affordable and pleasant, its strips are dense and elastic, figures from them are voluminous, beautiful, and little time is spent on making. Working with corrugated board develops fine motor skills, creative thinking, teaches the basics of design. Unlike paper, work with corrugated board is not so long and painstaking. Products are obtained much faster and more voluminous, which makes it possible to engage in creativity with children from preschool age.
Currently, corrugated cardboard is found in Russian, German, Chinese and Korean production. It can be sheet or already cut into strips 1 cm wide. Cardboard from different manufacturers differs somewhat in length and density. Therefore, it is advisable to use cardboard of the same brand when working on a product.
If it is not possible to purchase ready-made strips, you can get by with corrugated cardboard from kits for children's creativity by cutting the sheets into strips using a clerical knife or scissors. The main thing is that the stripes must be of the same quality and the same length. In our work, we use sheet corrugated cardboard 40 by 55 cm, cutting it into strips 1 cm wide.To obtain large parts, we will have to glue the strips of the desired colors sequentially, lubricating the ends of the strips with glue. From the obtained strips, we will glue the necessary basic shapes, fix them on the inside with glue to make the structure hard, and then, like from a designer, assemble the images we need from the dried parts.
A funny song of little mischievous pigs:
“We are not afraid of the gray wolf,
Gray wolf, gray wolf!
Where do you go, stupid wolf,
Old wolf, dire wolf? " we are all familiar from childhood.
We invite you to look into our workshop, and if you like the crafts, then thanks to our instructions you can not only make your fairy-tale characters, but even play a fairy tale.
There are three piglets in a fairy tale and all have a head, ears, nose, mouth, paws, tail. Let's prepare all these details, taking into account the fact that there are three piglets, that is, in triplicate. Then we personalize the image of each pig with clothing and decorative elements.

3. For the head we glue two ovals (on the strip we count 6 edges, bend and twist), 5 strips each.

4. Shifting the turns, we give the shape of the dome.

5. We coat with glue and dry.

6. Glue the dried parts together. The resulting joint between the parts is glued with a strip of cardboard.

7. For the heel, cut the strip lengthwise with scissors (now its width is 0.5 cm) on the strip, count 4 ribs, bend and twist into an oval.

8. For the ears, also cut the strips lengthwise with scissors (now its width is 0.5 cm). For one ear, take 0.5 strips of light yellow + 0.5 strips of pink. We twist it into discs, fix the end and use our fingers to give the ears a triangular shape.

9. By pressing with your thumb, give a slightly curved shape, coat with glue and dry.

10. For the mouth, take 7.5 cm strips of red color and 7.5 cm strips of pink color (0.5 cm wide), glue them sequentially, twist them into a disc, shape them and fix them with glue.

11. For the lower leg, take a pink strip, count 8 ribs, twist into an oval and make two turns with black cardboard. So we will prepare four legs for two piglets. And for the third piglet, we will count 6 ribs on a strip of pink color, twist it into an oval and make two turns in black, so we will prepare two legs.

12. For one upper foot, take a 13 cm long strip, count 4 ribs and twist into an oval. On one side, give the oval shape as shown in the photo.

13. For the ponytails, fold a strip 15 cm long and 0.5 cm wide in three, coat with glue, glue and bend in the shape of a hook. The general details for the piglets are ready.

14 Let's Make The First Piglet, Let It Be Nif - Nif.
For the shirt, glue a disc of 4 yellow stripes and 4 discs for sleeves, one yellow strip each.

15.For the trousers, glue a disc of 4 green stripes and two discs of 1.5 strips each, these will be the trousers.

16. Take a large yellow disk and a large green disk, shifting the turns of the disk, give them the shape of a dome, fix them with glue, and let them dry. Then we glue the resulting domes together.

17. Glue the resulting joint between the parts with a strip of dark green cardboard. This is the body of a piglet.

18.Two small green discs, shifting the turns, give the shape of cones. We fix it with glue and dry it.

19.Glue the torso to the legs. The gluing area in this case is very small and it is wiser to use a thermal gun (this help can be provided by the teacher or the student will do this under the supervision of the teacher after having previously said the safety precautions when working with this tool).

20. Fastening the head with a wire. Using an awl, the teacher makes a hole in the pig's head and in the upper body. Then, with the help of a knitting needle, the hole is increased to the desired size, a wire with a length equal to the length of the body + the height of the head is inserted there. This attachment allows the pig to twist its head, tilt the head, making the image more expressive.

21. Put on the head, glue the ears and heels.

22. Glue the mouth under the heels.

23. From strips of dark green color we make straps on the pants and decorate them with buttons. We make a collar from a strip glued into a ring.

24. Back to the shirt. We have prepared 4 yellow discs, 1 strip each for the sleeves (see photo # 14). We give the two discs a dome shape by carefully shifting the turns. We give the other two discs the shape of a curved cone, on one side we shift the turns as usual, on the other a little. We fix it with glue and dry it.

25. Glue the dome and the curved cone in pairs. We decorate the sleeves, in place of gluing, gluing a strip of green cardboard.

26. We put the pig on the legs, glue the upper legs. We decorate the face, glue the hairstyle, flower eyes, finalize the heels with half beads. To complete the image, we give a bunch of straw to the foot.

27. Now it's turn Nuf - Nufa... Let's dress it up differently. For the shirt, glue a disc of 6 white stripes and 4 discs for sleeves, one strip at a time.

28. For panties, glue a disc of 3 green stripes and 2 discs of 1.5 strips.

29. Shifting the turns, we will give the large white disk (shirt) the shape of a blunt cone, and give the large green disk the shape of a very low dome.

30. Glue the green piece inside the white cone.

31. Two small green discs, shifting the turns, give the shape of cones. We fix it with glue and dry it. These are the legs.

32. Glue the body to the legs. The bonding area in this case is also small and it is wiser to use a thermo-gun (this help can be provided by the teacher or the student will do this under the supervision of the teacher after having previously mentioned the safety precautions when working with this device).

33. The head is attached in the same way as that of the first piglet (see photo no. 20).

34. We return to the shirt. We have prepared 4 white discs, 1 strip each for the sleeves (see photo # 27). We give the two discs a dome shape by carefully shifting the turns. Give the other two discs a cone shape. We fix it with glue and dry it.

35. Glue the cone and the dome in pairs. We decorate the sleeves, at the gluing site, gluing a strip of green cardboard and the "loach" braid.

36. Decorate the shirt with green cardboard strips and braid "loach", decorate the muzzle, glue the sleeves, decorate the pig's neck with a collar made of braid.

37. We put the pig on the legs, glue the upper legs and chupchik. Nuf - Nuf is ready.

38. For shirt Naf - Nafa glue a disc of 6 blue strips and 2 discs for sleeves of 1.5 strips.

39. For the trousers, glue a disc of 4 dark blue stripes and two discs of 1.5 strips each, these will be the trousers.

40. Shifting the turns, we will give the large blue disc (shirt) the shape of a blunt cone, and the large dark blue disc we will give the shape of a very low dome.
We fix it with glue and let it dry.

41. Glue the dark blue part inside the blue cone.

42. Two dark blue discs (legs), shifting the turns, give the shape of a very blunt cone, as shown in the photo. We fix it with glue and let it dry.

43. Glue the resulting trousers with the wide side under the shirt.

44. Return to the small blue discs (sleeves), shifting the turns to give them the shape of a sharp cone. We fix it with glue and let it dry.

45. Decorate the edge of the sleeve with a lilac strip of cardboard and "loach" braid.

46. We put the pig on its legs. The head attachment is the same as for the first piglet (see photo no. 20). We decorate the hem of the shirt and the collar with a lilac strip of cardboard and "loach" braid.

47. We glue the sleeves.

48. For the upper legs, take 0.5 strips of pink cardboard, count 12 ribs, coat with glue, fold and give a slightly curved shape. We dry it.

49. Glue the legs into the sleeves. We make out the muzzle. Here is Naf - Naf is ready.

50. That's the whole company assembled ...
Once upon a time there were pigs
Three cheerful friendly brothers.
In the summer they ran, played,
The cold was not expected at all.
Autumn soon came
Piglets warned:
"Everyone needs to build houses:
Winter is coming soon! "
(Vitaly Likhoded)

51. This photo shows well where to glue the ponytails.

52. Well, what is a fairy tale without a gray villain?
We master wolf... To make the head, we need to glue two discs, 4 strips in length. Let's give the discs a high dome shape. We coat with glue and let dry.

53. Glue the dried parts together.

54. Glue the resulting joint between the parts with a strip of cardboard.

55. For the ears, glue two discs from one strip of light yellow cardboard and 0.5 strips of gray cardboard, fix the end and use our fingers to give the ears a triangular shape. We coat with glue and let dry.

56. For the upper part of the muzzle, glue a disc of 1.5 strips of gray cardboard and an oval of 0.5 strips of red and 0.5 strips of gray (0.5 cm wide), counting 4 edges.

57. Give the disc for the upper part of the wolf's muzzle the shape of an oblique obtuse cone, coat with glue and dry. Smear the lower part of the muzzle with glue. All the details for the wolf's head are ready.

58. The wolf shirt consists of three parts. For the top of the shirt, glue two discs of 4 burgundy strips each.

59. For the third part, glue a disc of 5 burgundy strips.

60. We give the prepared parts a shape: part 1 - by shifting the turns of the disk, give it the shape of a dome; detail 2 - by shifting the turns of the disk, give it the shape of a cone; detail 3 - by shifting the turns of the disk, give it the shape of a very low dome. Smear the resulting parts from the inside with glue and let them dry.

61. We connect the dried parts 1 and 2 together with glue, the resulting joint between the parts is glued with a strip of cardboard - this is the top of the shirt. Glue the resulting part to the convex side of part 3 (we connected the top and bottom of the shirt).

62. Now let's prepare the details of the sleeves. To do this, twist 4 discs of 2 burgundy stripes.

63. Give the two discs the shape of a dome, and the other two disks the shape of a curved cone on one side of the turns we shift as usual, on the other a little - a little less. We fix it with glue, dry it.

64. Glue the dome and the curved cone in pairs. We decorate the sleeves, at the gluing site we glue a strip of green cardboard and the "loach" braid.

65. For the pants, twist 2 swamp-colored discs, 3 strips each.

66. We give them the shape of a curved cone, and on one side we shift the turns as usual, on the other a little - a little less. We fix it with glue, dry it.
Marina Lipetskaya
Good day to all! I would like to introduce you to joint work with children tabletop theater based on a fairy tale"Three piglet"
A very exciting experience. Children actively participated in it, making preparations for piglets from rolls of paper towels, dyed and glued pig faces

The wolf turned out very realistic

Very positive emotions were left by the joint work of children in the manufacture, playing fairy tales characters made by them.

The work turned out to be interesting, emotional, exciting, vivid and memorable, making the characters and decorations did not take much time.


We also made the following box for storing our theater which they took from the tea.
Theater helps children to experience and accumulate emotional and sensory experience, you can say that theatrical activity is a source of development of feelings, deep experiences and discoveries.
Related publications:
Theatrical activities provide an excellent opportunity to unleash the creative potential of the child. By doing theater with children, we make life.
Consultation for parents. DIY finger theater Do you want your child to find himself in a magical world where you can enjoy and play, and while playing, learn about the world around you? Then make him a finger.
With the help of these heroes, you can play several fairy tales: "Kolobok", "Teremok", "Snow Maiden and the Fox", etc. The heroes are crocheted, elongated.
The most exciting area in preschool education is theatrical activity. By participating in theatrical games, children become.
It's no secret to anyone that children love fairy tales. And each child has his own favorite fairytale hero: Masha or the bear, Little Red Riding Hood or the wolf.
Theatrical activity plays an important role in the education and upbringing of children, not only of preschool but also of school age. In the dramatized.
Master class - do-it-yourself theater from nylon pantyhose based on the fairy tale: "Morozko" In preparation for the teacher's council on the topic: "Do-it-yourself theater".
When the baking paper runs out, a cardboard tube remains of it. I decided not to throw it away and make dolls out of it for home puppet theater. From one tube, four characters turned out at once - a wolf and three pigs. This is exactly how many dolls are needed to stage the fairy tale "Three Little Pigs".
Materials and tools for the master class "Puppet theater" Three little pigs "
cardboard tube; gray felt, beige felt, pink polka dot fabric, doll eyes; three pink buttons, one black button, threads, double-sided tape or PVA glue, blue, green and crimson ribbons, scissors, a stationery knife, a needle.
Instructions:1. Take a cardboard tube (from baking paper, foil or plastic wrap). As a last resort, it can be glued from cardboard.

2. Cut the tube into four parts. You should get three small tubes 7 cm long and one larger - about 10 cm long.

3. Cut a 10 x 10 cm square out of gray felt.

4. Cut out three rectangles from the pink polka-dotted fabric approximately 10 x 11 cm in size.

5. Wrap the gray square around the long tube and sew the edges.

6. Around each short tube, wrap a pink square and sew the edges too.

7. Cut out the face and paws of the wolf out of gray felt.

8. Sew a black button nose to the muzzle and glue the doll eyes.

9. Sew the muzzle and paws to a long tube lined with gray felt. We will embroider claws on the paws.

10. Cut out the faces and legs of the pigs from beige felt.

11. Sew a pink button-nose to each muzzle and glue the doll's eyes.

12. On each short tube, wrap the edges of the fabric inward and glue them with double-sided tape or PVA glue. Sew the muzzles and paws to these tubes.

13. To distinguish the piglets, we will make them bows of different colors. We will tie small bows of blue, green and crimson ribbons.
Such performances can also be shown at children's parties, involving children and guests.
We offer two master classes on making shadow theater for children at home. You will learn how to make a screen and actors for a theatrical performance out of light and shadow with your own hands, get acquainted with the theater of manual shadows, download templates for figurines of fairy tale characters and find useful tips for working with shadow theater.
Shadow theater helps children to get acquainted with theatrical activities in a fun way, develop speech, show imagination, encourage children to actively interact, communicate, etc. Theatrical performances can be carried out with children of all ages both in a group and in an individual form.
Shadow theater from Lego
We present a step-by-step master class with photos on how to make a shadow theater from Lego Duplo or its analogues.
Necessary materials:
- constructor Lego Duplo (on, on)
- building plate Lego Duplo green (on, on)
- A4 sheet of paper
- phone with flashlight function or other light source.
How to do
Build the frame of the theater stage from red blocks and adjacent turrets from multi-colored bricks.
Source: lego.com 
Place a white sheet of paper between the structures.

Build a stage behind the screen and stack up a phone stand. Place the light source against the paper sheet.

Decorate the theater and prepare the actors to perform.

Turn on the flashlight on your phone and start the show.

Shadow theater "Gruffalo" out of the box
Create with your own hands a shadow theater based on the popular book by Julia Donaldson "Gruffalo" (,).
"Gruffalo" is a fairy tale in verse for reading by adult children. A little mouse walks through a dense forest and, in order to escape from a fox, an owl and a snake, invents a terrible Gruffalo - an animal that loves to eat foxes, owls and snakes.
But can a resourceful mouse outwit all hungry predators? After all, he knows very well that there are no Gruffalo ... Or does it happen?
 Source: domesticblissnz.blogspot.ru
Necessary materials:
- hero templates for printing (download);
- A4 paper;
- black cardboard;
- wooden skewers;
- Scotch;
- glue;
- cardboard box;
- scissors.
How to do
1. Download and print shadow theater hero templates. Paste on black cardboard. 
2. Cut out the figures and glue a wooden skewer to each.

3. Making a screen (screen) for the shadow theater.
Lay the box out in one plane. On large rectangular parts of the box, draw a frame, stepping back 1.5-2 cm from the edges. Cut along the marked lines.


4. Reassemble the box in its original state, but with the colored side inward.

RECOMMENDED ON LABYRINTH.RU
5. Take a sheet of A4 white paper and cut to fit the box. Cut a rectangle of the same size out of black cardboard.

6. Cut the trees out of black cardboard and paste onto a white sheet.

7. Glue the paper to the inside of the box as shown in the photo below.

8. Make a cutout for the figures at the bottom of the box.


9. Secure the screen to the edge of the table with tape.

10. Install the lamp at the back at a distance of 2-3 meters from the screen. For the shadows to be clear, the light must fall directly, not from the side. Remember to warn your child to be careful with the hot lamp.

Shadow theater is ready! Turn off the lights, invite spectators, and act out a shadow show.
Hand Shadow Theater
Hand shadow theater is one of the simplest forms of shadow art. For his equipment, you will need the most common items - a table lamp and a screen - a large sheet of white paper or cloth. If the room has light walls, a theatrical performance of light and shadow can be shown directly on the wall.

The pictures show how with the help of hands you can create silhouettes of animals, birds, people. With practice, you can bring shadows to life and tell your own story.


- You can start acquainting children with the shadow theater from 1.5-2 years old. The first lessons should be held as a theatrical performance, when the roles are played by an adult, and the children act as spectators. After the child understands the rules and traditions of theatrical art, he can be included in the game as a participant in the action. Children play and voice roles, learn texts and poems. At first, trust small, uncomplicated roles. Then complicate things gradually.
- Cardboard figures of shadow theater actors should be black, then they will be contrasting and noticeable on the screen. For DIY figurines, use curly stencils. If you plan to reuse homemade figurines, we recommend laminating them.
- In order to make the shadows clear, place the light source behind a little to the side of the screen. The light source will be an ordinary desk lamp or flashlight.
- The size of the shadow on the screen depends on the distance from the figure to the lamp. If you bring the figurine closer to the screen, then its shadow will become small and clear. If you place it further, the shadow will increase in size, and the outlines will be blurred.
- To prevent the decorations from moving during the performance, attach them to the screen itself with tape or paper clips.
- Whatman paper, tracing paper or white sheet is perfect as a screen. The smaller the screen you use, the thinner and more transparent it needs to be, and the brighter the light source is needed.
- In order to create a theatrical atmosphere, you can draw a poster, tickets and even arrange an intermission.
********************************************************************