How to assemble a cube in a cube. Quick Rubik's Cube
Read also
Even if we assume that the record holder was very lucky, then the world ranking table based on the average of five results leaves no doubt: if more than 80 people fit on average in 12 seconds, they obviously know something. In this brief overview, I will try to reveal the secrets of high-speed assembly. I'll make a reservation right away that after reading this article you will not become champions: here are only highlights and links to more detailed information. In addition, even after learning the method completely, you will need long training sessions to achieve good results. But you will get a good idea of how this is done, and if you want, you will know where to go next. I think with enough perseverance after several months of training, many will be able to achieve an average result in the region of 30 seconds.
I will refer primarily to the SpeedSolving Wiki and Badmephisto. So let's go.
CFOP method
The most popular speed cube method is the CFOP method, aka Jessica Friedrich's method, who developed and popularized it, although other people contributed as well. If everything is done correctly, on average, the cube can be collected in 56 moves (alas, not in twenty). There are other methods with which you can get good results: Petrus, Roux, etc. They are less popular and for the sake of brevity we will limit ourselves to considering the CFOP method.CFOP is the name of the four build stages: C ross, F 2L, O LL, P LL: 
- Cross - assembling a cross, four edge cubes on the bottom;
- F2L (First two layers) - assembly of two layers - lower and middle;
- OLL (Orient the last layer) - the correct orientation of the cubes of the top layer;
- PLL (Permute the last layer) - placement of the cubes of the top layer.
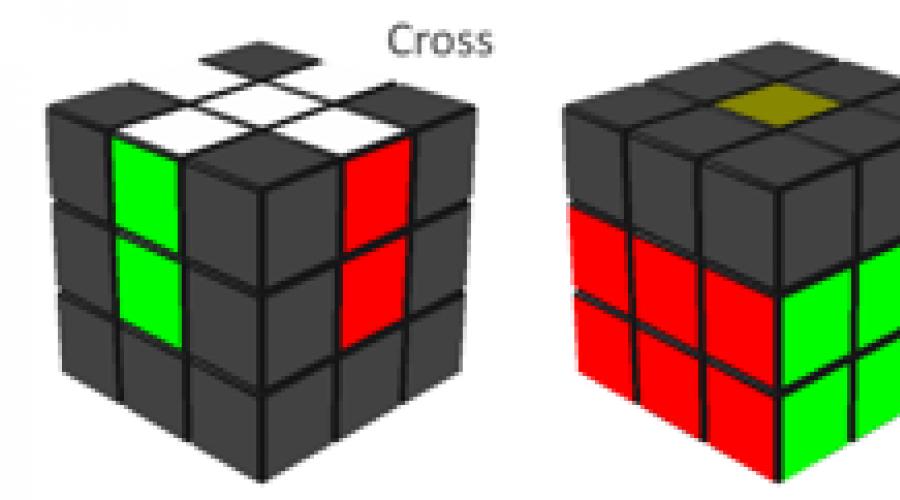
Cross - cross
 The goal of the stage is to correctly place four edge cubes on one of the faces. Anyone who knows how to collect the cube somehow can cope with this, but collecting the cross in a few seconds is not so trivial. According to the rules of the competition, before the assembly, you are given 15 seconds to study the combination (inspecting), for which at least you need to find these four edge cubes, and it would be nice to form a complete sequence of moves in your head. It has been proven that assembling a cross on a preselected face always requires no more than eight turns (a 180 ° turn is counted as one), and eight are extremely rare, and seven infrequently (the average is a little less than six). In practice, it takes a lot of training to quickly learn how to find the optimal sequence.
 You can select a face for assembling a cross in different ways. The most popular way is to always collect it on the same face (often white). Then, at all stages of the assembly, you know exactly the relative position of the colors, which makes the process easier. Some people pick the edge that is easiest to pick first. On average, this saves one turn, but you constantly have to rearrange to a different arrangement of colors. A compromise option is also used - to collect one of two opposite faces (say, either white or yellow), then the set of colors of the side faces does not change.
The main trick of assembling the cross is that it must be assembled relatively. For example, if you collect a cross on a white facet and a white-blue edge cube is already on it with white color towards the white center, then it is not so important for you whether the blue side of this cube is aligned with the blue facet. It is enough to place a white-green cube on the opposite side, and white-red and white-orange on the left and right. During the assembly process, you can twist the white face as you like, and at the end, in one motion, immediately align all the lateral centers with the cubes of the cross. It is only important to remember the exact order of the colors on the cube: if you look at the white edge, then blue, red, green, orange go clockwise (yellow behind).
Professionals collect the cross on the lower edge. For beginners, this seems difficult, since it is almost impossible to see what you are collecting, but this gives a great advantage when moving to the next stage: you do not need to spend time turning the cube, and during the process of assembling the cross you can notice the arrangement of the cubes needed to assemble the F2L and outline a plan for further assembly.
Some advanced cross assembly tricks are described in this video.
F2L - first two layers
 Perhaps the longest stage, the purpose of which is to completely collect two layers: a layer with a cross and an intermediate layer. Basically, you need to place eight cubes in place: four corner layers on the bottom and four ribbed sides in the middle layer. Unlike the assembly methods for beginners, a pair (column) of a corner and an edge cube is assembled immediately (that is, you need to collect four such pairs). Depending on the initial placement of the cubes of the pair, you need to apply one or another algorithm (sequence of turns). There are more than 40 such algorithms in total, you can just memorize them, but almost all of them are deduced intuitively. There are two simplest cases when a pair gathers in three movements:

Two more cases mirror these. All others need to be reduced to one of these four. This requires a maximum of 8 moves, that is, in total, no more than 11 moves per column are required. Perhaps you will not find the most optimal way, but if you first learn to intuitively collect any combination at least somehow, you can then look at individual cases in the cheat sheets.
The main difficulty of the stage is to quickly find paired cubes. They can be in 16 different places: 8 places in the last layer and 8 in columns. The columns are more difficult to view, and the fewer columns you have collected, the more chances that the uncollected ones contain the cubes you need. If you didn’t pay attention to the blocks for F2L when assembling the cross, you can waste a lot of time when you go to this stage just searching. It is also not always wise to start with the first found pair: perhaps it is assembled with a long algorithm, and if you start with another, then in the process the first will be rearranged into a more successful combination.
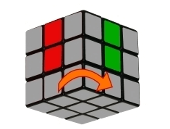
OLL - orientation of the last layer
 At this stage, the cubes of the last layer are oriented so that the last (in our case, the yellow) face is collected. It doesn't matter that the cubes do not actually stand in their places: we will deal with this at the last stage.
 There are 57 different initial situations, each of which has its own assembly algorithm, from 6 to somewhere up to 14 moves. It is necessary not only to learn all these algorithms, but also to quickly identify which one needs to be applied at the moment. Here's an example of one of the OLLs: 
On the left, the picture shows the initial situation up to rotation (it is assumed that we are collecting the yellow edge). To apply this OLL, the location of the yellow squares must coincide, not only on the top face, but also on the side ones (we ignore the squares of the other colors). It is not always necessary to match the cube completely with the scheme, you just need to match enough squares to distinguish it from the rest of the combinations. On the right are two algorithms (it is more convenient for someone to do one, for someone else) in standard notation, below the OLL number and the probability of its falling out. Almost all of them come up with a probability of 1/54, some with a 1/108 probability and two with a probability of 1/216 (including the lucky combination when the OLL came together on its own).
For beginners to memorize 57 combinations, it may seem like torture, so a simplified but slower version was invented - 2-look OLL. In this case, the OLL is divided into two stages, the cross is assembled first, and then the corners. Here you need to memorize only 10 algorithms (3 for the cross, 7 for the corners). Having gained experience in 2-look OLL, you can slowly take up the study of the full set. In this case, 2-look will come in handy in any case: firstly, they are all in the full set (say, if the cross assembled by itself, then the full OLLs coincide with the 2-look OLL for the corners), and secondly, if you come across more unfamiliar OLL, you can go back to 2-look.
PLL - rearrange the last layer
 The final stage of the assembly is to arrange the cubes of the last layer in the right places. The approach is approximately similar to the previous stage, but there are fewer combinations and algorithms, only 21 (13, if we count mirror and reverse as one). On the other hand, they are somewhat more difficult to identify, since here you need to take into account different colors, and the colors on the diagram may not coincide with your colors (up to cyclic permutation):
The arrows indicate the cubes that are rearranged by this PLL. The probabilities of most combinations are 1/18, occasionally 1/36 and 1/72 (including the lucky chance when nothing needs to be done).
Again, a simplified version is proposed - 2-look PLL, when the corners are first placed (two combinations), and then the centers (four combinations), they are quite easy to learn.
Cube and grease
Even if you study this method perfectly, you will not achieve good results with a bad die. The edges of the cube should rotate easily with the push of one finger, while it should not be too loose. The layers should hang on springs so that one layer, not completely rotated, does not interfere with the continuation of rotation in the other direction (within reasonable limits, of course). At the correct cube, the central squares can be pulled out and tightened the bolts that are under them. It is difficult to find a good cube in ordinary stores, it is recommended to order on the Internet, for example,.For best results, the cube should be lubricated. Sometimes the grease comes with the cube, or is purchased separately. Silicone grease, available from auto dealerships, is suitable.
Dice rotations
Rotating the entire cube in your hands (and not individual faces) takes a significant amount of time, so when assembling it, they try to avoid it as much as possible. For example, at the F2L stage, it is sometimes easier to collect a column in the corner farthest from you, without seeing it, than to turn the cube with this column towards you. At the OLL stage, in order to rotate the cube in the same way as in the algorithm diagram, it is enough to rotate the upper layer, and not to rotate the entire cube as a whole - this is faster (the position of the upper layer relative to the lower ones is not important at this stage).Look ahead - looking ahead
After completing the next stage, you must move on to the next without pause. While you are automatically performing the next algorithm, your head is free. Use this time to find the cubes that are important for the next step and figure out which algorithm you will need to use next.Fingertricks
Also, the key to significantly speeding up assembly is fingertricks, skillfully using all fingers to rotate. Some commonly used combinations are lightning fast, 5 turns per second and higher if the fingers are used correctly. Please note: it is not always faster to make a shorter algorithm; may be. that you have to make awkward turns. BadMephisto has several videos about fingertricks, for example, about F2L.Practice
Without long training, nothing will come of it. Get ready that the cube will have to be collected thousands of times.Tags: Add Tags
Surely everyone from childhood knows the famous puzzle, named after its creator - Ernö Rubik. She quickly gained popularity and reached the most remote corners of the planet.
Without the proper skill, it will not work to put the puzzle together, even after doing a hundred manipulations, but relatively recently, experts from Inc. learned how to solve a Rubik's cube in 20 moves. They managed to achieve this phenomenal result with the help of a computer, which was given the task of analyzing all possible combinations.
Where did the Rubik's cube come from?
Back in 1974, Ernö Rubik, a Hungarian architect and teacher at the Academy of Applied Arts, thought about the optimal way of learning
He wanted a new invention to help students in the study of the world, and one day he had a sensational idea - to create a puzzle. The task, it would seem, is elementary - to rotate the rows of the cube until each side becomes one color. But the scheme for assembling a Rubik's cube is not so simple and can take even several hours in time without giving a result. The students appreciated and took a great interest in the new toy. At that moment, the creator did not even suspect that in many years scientists would puzzle over solving the puzzle until they figured out how to assemble a Rubik's cube in 20 moves.
How worldwide popularity came
At first, the original toy was not popular with investors. It was believed that its production would not be profitable, since the assembly of the Rubik's cube could be of interest only to intellectuals. Nevertheless, one small enterprise decided to invest in this unusual project, and the puzzle began to conquer Budapest.

A few years later, Tibor Lakzi, an intermediary of one of the German firms, arrived in the city and became interested in the original puzzle, which at that time was very popular among the townspeople. Realizing that the spread of an amazing invention around the world could bring huge profits, he decided to promote the Rubik's Cube. For novice businessmen Lakzy and Rubik, the main difficulty was finding investors. But thanks to Tibor's economic education and commercial streak, the owner of Seven Towns Ltd, Tom Kremer, was soon involved in the project. He took up large-scale production and distribution, which helped the cube become popular all over the world.
"God's Algorithm"
Since 1982, competitions have been regularly held in many countries, in which the main task of the participants is to quickly solve the Rubik's cube. In order to solve the puzzle as quickly as possible, it is not enough just to have good dexterity and ingenuity. A person should be aware of the optimal scheme for solving the Rubik's cube, which allows him to spend as little effort as possible. The minimum number of steps required to solve a given problem is the "Algorithm of God".

Many learned minds and ordinary amateurs have tried to find a solution. At one time it was believed that the minimum number of steps from any position was 18, but later this theory was refuted. It took many years to find the optimal sequence, and only in 2010 scientists managed to find out how to solve a Rubik's cube in 20 moves, regardless of the position of the puzzle before the start of the assembly. It is currently an absolute record.
Who is faster - a car or a person?
Colin Burns, an American high school student, is currently the fastest human being - he managed to solve the puzzle in less than 5.5 seconds. And the robot, assembled by British engineers from EV3 construction kit parts, coped with this task in 3.253 seconds. The advantage of the mechanism is not only that the work of all its parts is more harmonious than human actions. Scientists gave him as many as 4 hands, which allow him to perform all operations 2 times faster.
How to learn to collect it
There is more than one standard Rubik's cube scheme that allows you to quickly learn how to solve this original puzzle. Different build systems allow you to approach the issue in different ways. Which one to choose is up to you. Of course, it is unlikely that without the computer power of Google, you will learn how to solve a Rubik's cube in 20 moves, but you will learn how to find simple solutions in a short time. The main thing is that you have enough perseverance. No technique will help you solve the puzzle without problems if you are not ready to spend your precious time learning.
But you shouldn't give all your time to this toy. Doctors have noted an increase in the number of patients in psychiatric clinics after the appearance of the Rubik's Cube. And traumatologists began to regularly encounter symptoms, later called "Rubik's syndrome". It manifests itself in the form of acute
Assembly diagram
There are several schemes that allow beginners to quickly learn how to add a Rubik's cube. One of them is attached to this article:

- First you need to collect a cross, the ends of which have a continuation on adjacent faces. There is no universal method - everything comes with practice.
- Next, you need to complete the entire side on which the cross was assembled and assemble the belt from the parts around it. It is important to make sure that each belt is the same color.
- Now you need to collect the second belt and go to the opposite side of the cube.
- We collect the cross on this side in the same way as at the very beginning.
- We complete the entire side.
- Now we put in order the corners of the cube - we make it so that the colors on them correspond to the colors of the sides to which they are turned.
- It remains only to correctly rotate the parts that have only 2 sides. The cube is assembled.

Now you can learn how to solve one of the most popular puzzles in the world. The universal Rubik's cube scheme will help you with this.
749 1 750 397 0
Numerous attempts to solve the Rubik's cube have not been crowned with success? All presented instructions on the Internet are written by professionals, but for “dummies” the solution seems very confusing? Do you think this puzzle is impossible to solve? By following our step-by-step instructions, you can not only fully assemble the world's most popular puzzle-free puzzle, but also understand how you did it.
You will need:
Where to begin
So, your goal is to collect the Rubik's Cube. To do this without knowing how it works, what it consists of and how it functions, will not work.
The standard Rubik's cube 3x3 is a mechanical 3D cube, each face of which is painted in a different color.
The traditional options are blue, green, white, yellow, red and orange. Facets:

In total, there are 20 movable elements in the Rubik's cube (12 edges and 8 corners) and the solution depends directly on knowing how they can change their position.
When we rotate one side, we see that the center pieces stay in place, the edge moves to where the edges should be, and the corner takes place in the corner.
It follows from this that each element has a certain type, which does not change after the rotation (the edge remains the edge, the center - the center).
Frequent "questions and answers"
What should be a rubik's cube?
If you are not going to participate in competitions, you can take any die. Young people and children are better off buying a puzzle from Chinese manufacturers. When choosing, consider the following:
- It is better to take the cube of the latest models, it provides for the shortcomings of previous versions, and it is more improved.
- The correct cube should rotate easily and cut corners well.
- Cubes for professionals can be disassembled and adjusted.
How many ribs does a Rubik have?
The classic Cube consists of 12 two-color side or rib elements (12 "ribs").
How many schemes for solving a Rubik's cube?
There are many ways to solve the Cube. There are those that allow you to collect a couple of formulas, but in a couple of hours. Others, with the help of memorizing a couple of hundred formulas, allow you to collect a cube in 1 minute or even 20 seconds.
The basics
Our goal is to put all the elements in the right places. To determine the direction in which you need to turn and the "right place" of this or that square, you need to pay all your attention to the central elements, because, as we have already said, they have a fixed position.

For example, the edge that is located between the red and green centers, respectively, is red-green, so you need to focus on the fact that an edge of the same color is located near the green center, and a red edge near the red central element.
The corner is always tricolor, so make sure that it is placed between the central elements of the corresponding colors.
Step 1. Gathering the edges of one side
The first thing you need to do is choose the color you will start with. In this example, the main color is yellow, it will be presented in all diagrams. Everyone is free to choose the option that he likes best and start with it.
So, if the upper central element is yellow, then the bottom, respectively, is white (it is located on the opposite side in almost all Rubik's cube models).
In order to collect a 3x3 Rubik's cube, you first need to fold a cross on its upper face - put all the edges of the selected color (in our case, yellow) in the appropriate positions around the central element.
This must be done in a specific order so that the second color of the edge matches the nearby central element.

This step is the most difficult to explain to those who do not know how to solve a Rubik's cube. This task is easier to solve on your own and you will undoubtedly be able to do it after a short training session.
It is at this step that most beginners stop - they collect the cross, then one facet - further, unfortunately, few people advance.
For those who cannot do this, below is a diagram of how to assemble a cross. Note that you will have to repeat this step 4 times - one for each side.

- Take a Rubik's cube in your hands and turn it over so that there is a yellow center on top (or another color of your choice) and white on the bottom.
- Look for yellow edges on the bottom plane. Pay attention to both rib colors.
- If you find a yellow edge on the bottom, rotate the layer until the edge with the yellow square is positioned below its "place" on the top edge.
- Perform one of the following actions:
a) Yellow "looks" down

b) Yellow looks forward

c) Rib in the intermediate layer

Note: if the yellow square is on the top layer, but it is not positioned correctly and is not correctly oriented, relative to the nearby center, change its position by putting another element in its place.
After that, the edge will be in one of the three above-described positions. Using the diagram, put it in the "correct" place. Repeat all steps for each yellow edge and collect the cross on the top layer of the Rubik's cube.
Step 2. Putting together the top face
If you were able to fold the cross, then it is worth collecting the entire top layer, that is, putting the corners in place one by one. We cannot put them as we want, because each corner has a specially designated place for it, which determines the colors of which it consists.

Just like in the previous step, there are several solutions that we will follow.
Remember that you will have to repeat all the steps 4 times - one for each corner.

- Flip the Rubik's cube so that the yellow layer is at the top and the white layer is at the bottom.
- Look in the bottom layer for the corner with a yellow square. Please note the 2 other colors on it.
- Rotate the bottom layer so that the corner is under "its" place.
- Use one of the solutions below:
a) yellow looks to the left

b) yellow looks to the right

c) yellow is at the bottom

note
: if the yellow corner is not in the bottom layer of the Rubik's cube, it means that it is in the top layer, but out of place.You need to put any corner from the bottom layer up (executing the first solution, for example). This will give you a yellow corner in the bottom layer.
Repeat for each corner until you have collected the top layer completely.
Step 3. Algorithm for assembling the second face
We want to collect the second layer of the cube. Remember that the center pieces are fixed, so there is no need to swap them and think about how to place them. Keep in mind that you will have to repeat the steps below 4 times - one for each edge.
- Take the cube so that there was a white layer on top, and yellow on the bottom - the one that we have already collected
- Look in the top layer for a non-white edge on both sides.
- Rotate the top layer until that edge and center piece on the side match, forming an inverted T.
- Follow one of the solutions below, choosing an example depending on whether the edge is placed on the left or right.
There are several possible options:
1) The edge should move to the right from where it is.

2) The edge should move to the left from where it is now.

Note: if the top layer does not have an edge element without white on either side, this means that they are in the middle layer, but not in their places.
Put any other edge from the top layer in its place. In this way, you get the edge in the top layer without the white square and you can move it according to the instructions above.
Repeat this step 4 times - one for each edge.
Step 4. Second cross
So, we have assembled the first 2 layers of the Rubik's cube. Now we need to make sure that the 4 outermost elements of the top layer are white, forming a cross. At this stage, we will only focus on the edge elements, not paying attention to the corners.
The top face of the cube may have four white edges, or two, or none. If all four white edges are on the upper side, then you can skip this step and move on to the next. If there are two edges, then you need to use one of the following options, depending on how they are located relative to each other: next to or opposite.
1) Adjacent edges

2) Opposite edges are white

3) No white squares are right
If there are no white squares in the top layer, do one of the above two options and you will get 2 white squares in the top layer. After that, do the necessary sequence of actions, depending on the received situation.

Thus, we have folded the second cross.
Step 5. How to place the second cross
In the previous step, we folded the second cross. At this stage, we will make the side parts of the cross match in color with the center elements of the corresponding faces. We will concentrate our attention only on the white edges of the cube, disregarding the corners.
- Rotate the top layer of the Rubik's cube until the two edges match in color with the center piece of the respective faces. If only one edge matches, keep rotating.
- Use one of the following examples depending on whether the side edges will be sequentially or opposite to each other.
a) adjacent edges

b) opposite edges

This will position the second cross of the Rubik's cube correctly.
Step 6. Placing corners
We have already put in place all the elements of the Rubik's cube, except for the corners of the last layer.
The goal of the penultimate step is to place the corners correctly, regardless of their orientation. Thus, you need to know exactly when the corner took the correct position.
So, the corner is placed correctly if the nearby center pieces match the color of the 3 parts of the corner.
Let's look at a few examples of when the corners are placed incorrectly and when they are in the correct position in order to solve the Rubik's cube.

It is possible that all 4 corners will be in place from the very beginning (feel free to go to the next step), or only 1 corner is placed correctly, or none. If only one corner takes "its" place, follow one of the examples below, choosing the one that will place all the elements in their place.
1) 3 corners not in their position (a)

2) 3 corners not in their position (b)

3-4) No corner placed correctly
If none of the 4 corners take "their" place, do one of the above examples - this way, you will be able to put one of them in place. Next, follow the steps depending on what you get.


Thus, we have solved the Rubik's cube 3x3, putting the corners in their positions. The last step is to rotate the corners of the last layer to solve the puzzle completely.
Step 7. How to assemble
In the previous step, we put all the elements in their place. All that remains is to rotate the corners to solve the Rubik's cube and complete it. At this stage, there may be two, three or four incorrectly directed corners in the last layer.
If there are 2 incorrectly oriented corners, follow one of the examples below, depending on the situation that occurs.
Be sure to read this before rotating the edges of the cube.
Very important! This step is not as easy as the others, but it is also much more difficult. Before proceeding with the implementation, it is worth knowing a few points. Option 1 has several sub-options, so first of all you need to understand which one is right for you. To solve this step, follow the first sequence of actions. After that, take the necessary steps, depending on the version of the red table that you received.
Option 1. The two corners are not oriented correctly. Please note that the "adjacent" corner - needs to be rotated clockwise.

Option 2-3. Three corners are incorrectly oriented.
If the 2 corners are not oriented correctly, solve the Rubik's cube following the first example - this way you will get only 2 incorrectly oriented corners. Finally, follow the sequence of actions, depending on the situation that came out for you.


Option 4. All corners are not oriented correctly.
If none of the 4 corners are oriented correctly, follow the first example given. Then find a solution that suits your situation.

If you did everything right and followed our instructions so far, then congratulations! You solved the Rubik's cube yourself!
And other logic games.

And here, by the way, there is something to show oneself in:
- You can be the fastest. The current record is 5.5 seconds. People who are engaged in high-speed assembly are called speedcubers.
- Maybe you want to be the most original? Rubik's cube is collected with closed eyes, legs, etc. Here, too, there are records and you can beat them.
- And the most creative and inventive draw with the Rubik's cube and, by the way, create real masterpieces of incredible beauty.
We hope we have inspired you and helped you understand how to solve the Rubik's cube. If you are interested in thinking games and puzzles, you will probably be interested in learning the secrets of the game of dominoes.We can use a mixture of options 1 and 2, as a last resort option 2.
If you lubricate it with very liquid, the sides will start to stick too tightly together. The thick one picks up the rotation speed. If you mix the two types of grease, this is the optimal consistency.
I can't solve the rubik's cube ...
Many people ask the question: "How to solve a Rubik's cube, if I disassembled it, I can't put it back together?" Most often this happens on the last layer. You may not be following the algorithms exactly. But if you follow the diagrams exactly, then you should get together. If not, the problem may be the following - Chinese manufacturers make cubes of different quality - from professional to falling apart in the hands at the very first spins. If the cube falls apart, it must be assembled correctly.
On a cube with two layers assembled with a flat screwdriver or a knife, pry the cover of the central cube of the third layer, remove it, unscrew the screw with a small Phillips screwdriver (do not lose the spring put on the screw). Carefully pull out the corner and side cubes of the third layer and paste them in the correct color to color. At the end, insert and screw on the previously unscrewed central cube (do not tighten too much). Twirl the third layer. If it turns tight, loosen the screw, if too light, tighten it. It is necessary that all the edges rotate with the same effort. Then close the center cube with the lid.
Even if we assume that the record holder was very lucky, then the world ranking table based on the average of five results leaves no doubt: if more than 80 people fit on average in 12 seconds, they obviously know something. In this brief overview, I will try to reveal the secrets of high-speed assembly. I'll make a reservation right away that after reading this article you will not become champions: here are only highlights and links to more detailed information. In addition, even after learning the method completely, you will need long training sessions to achieve good results. But you will get a good idea of how this is done, and if you want, you will know where to go next. I think with enough perseverance after several months of training, many will be able to achieve an average result in the region of 30 seconds.
I will refer primarily to the SpeedSolving Wiki and Badmephisto. So let's go.
CFOP method
The most popular speed cube method is the CFOP method, aka Jessica Friedrich's method, who developed and popularized it, although other people contributed as well. If everything is done correctly, on average, the cube can be collected in 56 moves (alas, not in). There are other methods with which you can get good results: Petrus, Roux, etc. They are less popular and for the sake of brevity we will limit ourselves to considering the CFOP method.CFOP is the name of the four build stages: C ross, F 2L, O LL, P LL:
- Cross - assembling a cross, four edge cubes on the bottom;
- F2L (First two layers) - assembly of two layers - lower and middle;
- OLL (Orient the last layer) - the correct orientation of the cubes of the top layer;
- PLL (Permute the last layer) - placement of the cubes of the top layer.
Cross - cross
The goal of the stage is to correctly place four edge cubes on one of the faces. Anyone who knows how to collect the cube somehow can cope with this, but collecting the cross in a few seconds is not so trivial. According to the rules of the competition, before the assembly, you are given 15 seconds to study the combination (inspecting), for which at least you need to find these four edge cubes, and it would be nice to form a complete sequence of moves in your head. It has been proven that assembling a cross on a preselected face always requires no more than eight turns (a 180 ° turn is counted as one), and eight are extremely rare, and seven infrequently (the average is a little less than six). In practice, it takes a lot of training to quickly learn how to find the optimal sequence. You can select a face for assembling a cross in different ways. The most popular way is to always collect it on the same face (often white). Then, at all stages of the assembly, you know exactly the relative position of the colors, which makes the process easier. Some people pick the edge that is easiest to pick first. On average, this saves one turn, but you constantly have to rearrange to a different arrangement of colors. A compromise option is also used - to collect one of two opposite faces (say, either white or yellow), then the set of colors of the side faces does not change.
The main trick of assembling the cross is that it must be assembled relatively. For example, if you collect a cross on a white facet and a white-blue edge cube is already on it with white color towards the white center, then it is not so important for you whether the blue side of this cube is aligned with the blue facet. It is enough to place a white-green cube on the opposite side, and white-red and white-orange on the left and right. During the assembly process, you can twist the white face as you like, and at the end, in one motion, immediately align all the lateral centers with the cubes of the cross. It is only important to remember the exact order of the colors on the cube: if you look at the white edge, then blue, red, green, orange go clockwise (yellow behind).
Professionals collect the cross on the lower edge. For beginners, this seems difficult, since it is almost impossible to see what you are collecting, but this gives a great advantage when moving to the next stage: you do not need to spend time turning the cube, and during the process of assembling the cross you can notice the arrangement of the cubes needed to assemble the F2L and outline a plan for further assembly.
Some advanced cross assembly tricks are described in this video.
F2L - first two layers
Perhaps the longest stage, the purpose of which is to completely collect two layers: a layer with a cross and an intermediate layer. Basically, you need to place eight cubes in place: four corner layers on the bottom and four ribbed sides in the middle layer. Unlike the assembly methods for beginners, a pair (column) of a corner and an edge cube is assembled immediately (that is, you need to collect four such pairs). Depending on the initial placement of the cubes of the pair, you need to apply one or another algorithm (sequence of turns). There are more than 40 such algorithms in total, you can just memorize them, but almost all of them are deduced intuitively. There are two simplest cases when a pair gathers in three movements: Two more cases mirror these. All others need to be reduced to one of these four. This requires a maximum of 8 moves, that is, in total, no more than 11 moves per column are required. Perhaps you will not find the most optimal way, but if you first learn to intuitively collect any combination at least somehow, you can then look at individual cases in the cheat sheets.
The main difficulty of the stage is to quickly find paired cubes. They can be in 16 different places: 8 places in the last layer and 8 in columns. The columns are more difficult to view, and the fewer columns you have collected, the more chances that the uncollected ones contain the cubes you need. If you didn’t pay attention to the blocks for F2L when assembling the cross, you can waste a lot of time when you go to this stage just searching. It is also not always wise to start with the first found pair: perhaps it is assembled with a long algorithm, and if you start with another, then in the process the first will be rearranged into a more successful combination.
OLL - orientation of the last layer
At this stage, the cubes of the last layer are oriented so that the last (in our case, the yellow) face is collected. It doesn't matter that the cubes do not actually stand in their places: we will deal with this at the last stage. There are 57 different initial situations, each of which has its own assembly algorithm, from 6 to somewhere up to 14 moves. It is necessary not only to learn all these algorithms, but also to quickly identify which one needs to be applied at the moment. Here's an example of one of the OLLs:
On the left, the picture shows the initial situation up to rotation (it is assumed that we are collecting the yellow edge). To apply this OLL, the location of the yellow squares must coincide, not only on the top face, but also on the side ones (we ignore the squares of the other colors). It is not always necessary to match the cube completely with the scheme, you just need to match enough squares to distinguish it from the rest of the combinations. On the right are two algorithms (it is more convenient for someone to do one, for someone else) in standard notation, below the OLL number and the probability of its falling out. Almost all of them come up with a probability of 1/54, some with a 1/108 probability and two with a probability of 1/216 (including the lucky combination when the OLL came together on its own).
For beginners to memorize 57 combinations, it may seem like torture, so a simplified but slower version was invented - 2-look OLL. In this case, the OLL is divided into two stages, the cross is assembled first, and then the corners. Here you need to memorize only 10 algorithms (3 for the cross, 7 for the corners). Having gained experience in 2-look OLL, you can slowly take up the study of the full set. In this case, 2-look will come in handy in any case: firstly, they are all in the full set (say, if the cross assembled by itself, then the full OLLs coincide with the 2-look OLL for the corners), and secondly, if you come across more unfamiliar OLL, you can go back to 2-look.
PLL - rearrange the last layer
The final stage of the assembly is to arrange the cubes of the last layer in the right places. The approach is approximately similar to the previous stage, but there are fewer combinations and algorithms, only 21 (13, if we count mirror and reverse as one). On the other hand, they are somewhat more difficult to identify, since here you need to take into account different colors, and the colors on the diagram may not coincide with your colors (up to cyclic permutation): The arrows indicate the cubes that are rearranged by this PLL. The probabilities of most combinations are 1/18, occasionally 1/36 and 1/72 (including the lucky chance when nothing needs to be done).
Again, a simplified version is proposed - 2-look PLL, when the corners are first placed (two combinations), and then the centers (four combinations), they are quite easy to learn.
Cube and grease
Even if you study this method perfectly, you will not achieve good results with a bad die. The edges of the cube should rotate easily with the push of one finger, while it should not be too loose. The layers should hang on springs so that one layer, not completely rotated, does not interfere with the continuation of rotation in the other direction (within reasonable limits, of course). At the correct cube, the central squares can be pulled out and tightened the bolts that are under them. It is difficult to find a good cube in ordinary stores, it is recommended to order on the Internet, for example,.For best results, the cube should be lubricated. Sometimes the grease comes with the cube, or is purchased separately. Silicone grease, available from auto dealerships, is suitable.
Dice rotations
Rotating the entire cube in your hands (and not individual faces) takes a significant amount of time, so when assembling it, they try to avoid it as much as possible. For example, at the F2L stage, it is sometimes easier to collect a column in the corner farthest from you, without seeing it, than to turn the cube with this column towards you. At the OLL stage, in order to rotate the cube in the same way as in the algorithm diagram, it is enough to rotate the upper layer, and not to rotate the entire cube as a whole - this is faster (the position of the upper layer relative to the lower ones is not important at this stage).Look ahead - looking ahead
After completing the next stage, you must move on to the next without pause. While you are automatically performing the next algorithm, your head is free. Use this time to find the cubes that are important for the next step and figure out which algorithm you will need to use next.Fingertricks
Also, the key to significantly speeding up assembly is fingertricks, skillfully using all fingers to rotate. Some commonly used combinations are lightning fast, 5 turns per second and higher if the fingers are used correctly. Please note: it is not always faster to make a shorter algorithm; may be. that you have to make awkward turns. BadMephisto has several videos about fingertricks, for example, about F2L.Practice
Without long training, nothing will come of it. Get ready that the cube will have to be collected thousands of times.Before you start studying the algorithm for assembling the Rubik's cube game, you need to find out the history of its origin. The cube was invented by the Hungarian professor and sculptor Erno Rubik in order to explain the basics of mathematics to his students.
However, the math of the Rubik's Cube soon struck the minds of others, including Tibor Lakzi, who promoted the game. By the end of the 20th century, the assembly of the Rubik's cube had become a new hobby for many, and the circulation of the game exceeded one hundred million copies. The world record was set by Mats Wolf. He collects the Rubik's cube best of all in 5.55 seconds.

How to disassemble a Rubik's cube, if it is already assembled and why is it needed? Disassemble the structure in order to make sure that all parts are placed correctly. To do this, you need to mechanically arrange the parts in their places and only then proceed to the initial stage.
What are Rubik's cubes? It should be said that the varieties of the Rubik's cube range from 2x2 to 7x7 inclusive.
The types of Rubik's cube are also varied. For example, there is a very original Rubik's cube - in the form of a 3-d pyramid, munks, a mirrored Rubik's cube. However, it is the 3x3 Rubik's cube puzzle that is most often used.
Before you learn how to put together a disassembled game, it's worth learning a little theory for beginners. To begin with, this is a Rubik's cube device. The whole cube consists of 6 edges and 12 faces, as well as fasteners on which all parts of the structure are held.
There are three positions of small elements:

- Central. There are only 6 such positions, the element is located in the center of the face. 1 part belongs to one side position.

- Side. Such elements form a cross of 4 pieces on one face. 2 elements belong to one side position.
- Corner. They are located in the corners of the structure. There are 3 cubes per corner.
It is also necessary to learn the language in which any formula for solving a Rubik's cube is written. Rubik's cube notation scheme.


After the basic designations have been studied, you can proceed to the assembly of the structure itself.
How to solve Rubik's cube 3x3 - quick and easy. Best practice for beginners.
Stages of solving the Rubik's cube

There is a simple instruction that proves best of all that even a child can fold an ordinary figure, as well as a mirror Rubik's cube. How to solve a rubik's cube 3x3 scheme for children - the Friedrich method.
First step. The Rubik's cube always starts with a cross. Assembling an ordinary cross on one of the faces is quite simple, you just have to decide on the color: most often it is yellow that is used. At this stage, you can ignore the position of the flowers on the other sides.

Second phase. The most important thing is to learn how to collect the correct cross. This means that the tops of the mating sides must have the same color as the centers of the same faces. If this did not happen, that is, at most two sides did not match, you should use one of the following algorithms.
In this case, an important criterion is that the cross is always at the top.
Stage three. It is necessary to completely assemble one of the sides, that is, put the corners in place. If you turn the cross over and make it the bottom side, you will notice that the upper corners of the adjacent sides contain the one that you chose as the base. Accordingly, three options for the position of the yellow element are obtained: top, left or right, and for each of them there are their own combinations in order to combine them with the bottom side.

As a result, it should turn out so that one side is completely ready, and the top layer of each adjacent side and the center have the same color.

Fourth stage. Before you start to collect a cube for speed, you should remember some more formulas.
First you need to turn the finished side up again. Then scroll the bottom edge so that one of the colors of the side element matches the color of any side and forms the letter “T”. Thus, you will need to move the side cube from the bottom layer to the middle one so that its two colors coincide with the colors of the adjacent sides. In this case, there can be two positions.

Fifth stage. Now we need to deal with layer 3. First, you need to turn the cube over so that the “untreated” side is at the top. If you chose yellow as the main color, then the diametrically located color should be white. It is necessary to apply the following algorithm to a certain position of the cube (s) with white color.
Sixth stage. Assembling the correct cross, in which the colors of the upper face must coincide with the adjacent ones, implies two cases, but if none of the cases suits, you can take any algorithm.

Seventh stage. It will be quite difficult to place corners in your position at this stage. There can be confusion between layers, but with proper assembly, everything will fall into place easily.
Eighth stage. To rotate the corners correctly, you need to consider two cases, again associated with movement in a circle.
If you need to change the angles crosswise or opposite angles, you can use any of the algorithms.
The same method can be used to collect a mirrored Rubik's cube. The small Rubik's cube will be much easier to solve, but the Rubik's cube record will be considered only for the 3x3 variant.
Secret technology

If your goal is to solve the Rubik's cube in a minute, or even less, and to become the best in this business, you need to know some secrets of the solution.
- It is best to start the assembly by choosing white or yellow as a base.
- Correct rubik's cube technique implies that you need to spend as little time as possible on turning the cube. Even if you do it quickly, there will be a difference of precious seconds or milliseconds, which can change the world record. Therefore, many people start assembling the initial cross on the bottom edge.
- A good result is always shown by someone who knows how to look a step forward - at stages where strong mental stress is not required, you need to think over the next move.
- The high-speed Rubik's cube 3x3 is of high quality and the ability to rotate, but for this you can use a special lubricant even for not very expensive structures.
- A professional Rubik's cube implies the ability to use all fingers when solving, and this often helps to set a new world record.
How to assemble with your eyes closed using the algorithm

How to solve a rubik's cube with your eyes closed? You just need to remember a few rules..
- Pictures of the Rubik's cube should always be in memory as before your eyes. To do this, each time you need to start the assembly with one color and remember that the centers of the sides are always motionless relative to each other.
- The invented method of assembling with closed eyes is the best way to quickly start to amaze others. The algorithm assumes that you first need to correctly orient the corner elements using the formula “P V P’ V P V2 P ’L’ V ’L V’ L'V2 L ”, since each corner contains either white or yellow.
- Then you need to do the orientation of the side elements. It is necessary to determine if the element is in the correct orientation. If it is correct, then the color of the element coincides with the color of sides B and H and does not coincide with the rest of the sides. If the element belongs to the middle layer, then the orientation is correct, if the color of the element on the same sides is also on the F or Z sides.
Thus, by repeating these algorithms, you can come to the original position of all elements. In the same way, you can learn to collect another unusual type - a mirror Rubik's cube.
How to solve the Rubik's Cube the simplest instruction