How to make soap with your own hands. Solid soap from remnants
Homemade soap from scratch is a fascinating creative process to create soap masterpieces with your own hands. Soap makers who have been familiar with this method for a long time note a lot of positive properties and advantages of such soap. Indeed, for its production, only well-known, completely natural ingredients are used, which have such a beneficial effect on the skin of the face, hands, body, hair and scalp.
How to make soap from scratch
Making soap at home from scratch can seem like a super difficult process for beginners. However, there is nothing difficult about this. On the pages of our site, we try to lay out the exact recipes for soap from scratch, with step-by-step instructions and mandatory safety measures.
In order to figure out how to make soap with your own hands from scratch, it is enough to carefully read a few recipes. The main ingredients for this soap are lye, water, and a base oil such as olive oil. Of the three listed components, you can already make soap with your own hands. Perhaps, for beginners, this is the simplest recipe, which is also presented on our website. Having dealt with the nuances, you can proceed to other, no less interesting recipes.
Home soap from scratch
Various types of oils are added to the soap, scrubbing organic particles, herbal decoctions instead of water, etc. As a result, cooking soap for you will turn from an unknown kind of creativity, into an attractive world of soap making, constantly beckoning with new recipes.
Soap recipes from scratch
The Do-it-yourself website already contains a number of attractive instructions on how to make soap from scratch, and we don't stop there. In the future, we plan to deal with other recipes, and we will definitely post the most interesting of them on the site.
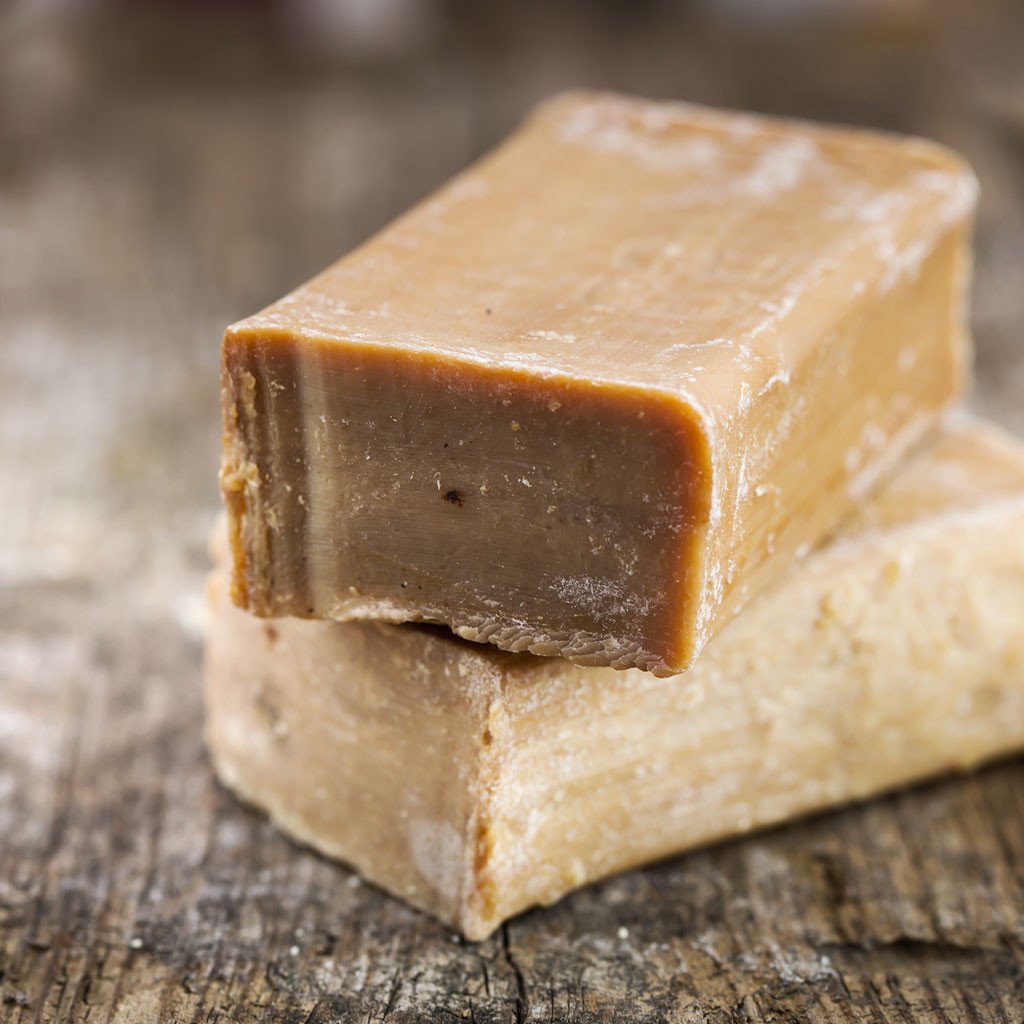
In the past, making handmade soap at home was ubiquitous. Using ash and animal fats, the families produced their own detergents for their own needs.
At the beginning of the 20th century, thanks to the discoveries of German scientists, it became possible to make inexpensive soap at the production level, which gradually replaced the homemade one.
But recently, interest in everything natural and homemade has been growing more and more. Therefore, soap making at home is becoming popular. Handmade soap has significant advantages:
Security measures
When making handmade soap at home, you will be working with a caustic substance such as sodium hydroxide, or lye. In any form - grains, flakes, granules - it can damage various materials, peel paint, and most seriously, burn skin and eyes.
Exercise extreme caution by wearing high-cuffed gloves and eye protection and when adding lye to water. Avoid breathing its vapor. They are flammable, so ventilate the area when working.
If the alkali gets on the skin, it must be neutralized with a vinegar solution, if it gets on other objects - immediately remove it and wipe this place with a detergent.
Make sure children or pets are out of the way before starting work. Do not use foil, sheet metal, wood or aluminum containers when making soap. Take only glass containers, sturdy plastic, enameled or stainless steel dishes. Store your soap making materials out of reach of children.
How to make handmade soap at home?
Now that you are familiar with the precautions, we can get down to business.

First, make sure you have all the ingredients you need at your fingertips, it will be very inconvenient to search for them in the process. You will need:
- Lye, namely caustic soda (in another way - caustic soda).
- Water (or other liquid as per recipe).
- Fat, oil.
- Rubber gloves and eye protection.
- Two mixing bowls. Better if one has a spout (for easy pouring of liquid).
- Kitchen scales.
- Various spoons for mixing and measuring. At least one heat-resistant plastic or stainless steel for stirring liquor, one wooden, whisk or rubber spatula. A measuring spoon will be needed when using essential oils.
- Two accurate kitchen thermometers
- Electric blender (preferred) - Saves you a ton of effort when making handmade soap at home.
- Measuring cup for liquids.
- Soap molds. Best made from glass, plastic, silicone, or stainless steel. Wooden or cardboard can also be used, but only if you cover them from the inside with waxed or oiled paper.
- Rags or disposable towels to wipe up spilled liquid.
This is a rough list, it will change depending on what kind of soap you make and whether you add essential oils, fragrances, natural decorative elements, etc. to it.

Measure seven times
When making homemade handmade soap at home, measure each ingredient accurately.
Whether you are making it from scratch or using scrap to make new pieces, the recipe must be followed strictly.
One inaccurate measurement can cause the soap to be foul-smelling, unattractive, or unusable.
To ensure a good result, you need: a scale, 2 thermometers and a so-called alkali calculator or soap calculator. Typically, this is an online service for calculating the required amount of ingredients.
Different oils require different amounts of alkali, so make sure you know the saponification number.

How do you turn individual ingredients into a finished product?
There are three main ways to make handmade soap at home:

The hardest handmade soap. We do from scratch
This method has two subspecies - cold and hot. The sequence of work in the first case:

Hot way
The initial steps for making soap in this way are the same as for cold soap, namely up to the "trace" stage. Then we just continue to cook the saucepan with the mixture in a water bath or in the oven (if the required temperature can be clearly maintained in it). The liquid must be stirred periodically until it becomes gelatinous. It will then begin to harden and become like wax. So the soap is almost ready, it's time to add essential oils and other ingredients and pour into molds. With this manufacturing method, you do not need to wait a month until the product is ready. The soap can be used in a day, but if you let it lie down for two days, it will only get better.

Which way to choose?
Each method has pros and cons, as well as a ton of variations.
If you are a beginner, then you will like the second method - the simplest and cheapest. But since baby soap is opaque, it will not turn out to be very decorative. Therefore, if you want to make beautiful pieces, but are afraid to work with lye, then choose 1 method. But do not forget that the further you move away from soap made from lye and fat, the more expensive the final product is and the less natural its composition becomes.
And if you carefully read the safety measures and are in the mood for serious and neat work, then you can try to make homemade handmade soap from scratch. Of course, this is the most difficult, but also the most interesting way, however, you control every ingredient that goes into the soap.
Space for creativity
Perhaps one of the main reasons why handmade soaps at home are so popular is the opportunity to use different ingredients and experiment with shape, color, scent and caring properties. If you decide to take up this business, then make the most of your freedom of choice.
When you make soap from scratch, you can use both animal fats and vegetable fats (based on sunflower oil or rapeseed oil). And instead of water, you can add broth, tea, milk.
Also add to the soap:
- essential oils: rose, mint, rosemary, bergamot, vanilla, lavender, etc.;
- vegetable oils such as palm, coconut, olive;
- natural dyes: clay, spices, herbs;
- decorative items such as flower petals;
- scrubbing particles: grape seed powder, poppy seeds, loofah pieces, etc.
Your best bet is to find a basic homemade soap recipe that you like and then experiment with additives.

However, do not be lazy to learn more about additional ingredients - some of them may be ineffective in the soap, others can ruin it. Essential oils should be mixed with a base oil such as olive oil to neutralize their irritating properties.
As you work on soap, your home will be filled with a variety of scents. And you will inhale vapors of essential oils in high concentrations, which can cause allergic reactions. Therefore, choose them carefully and make sure that, just in case, the medicine cabinet has the appropriate medicine that is right for you.
When you make homemade handmade soap at home, you will end up with small pieces or failed copies. Instead of throwing them away, use them. Rub and redo or sprinkle shavings in the water when you take a bath, or add small bits of leftover soap to new soap to create colorful splashes.
The secret of how to make handmade soap is not known to everyone. Otherwise, the business of selling natural soap would not bring such a profit and people would not bring a new odorous bar of magical action from each business trip.


Among the advantages of handmade soap is not only the purity of the product, but also the uniqueness and individuality. You can independently select and add to the bar those nutritional components that are needed for a particular skin type. When giving a gift to a teenager, you need to consider the increased likelihood of acne. Men need to soothe their skin after shaving. And confident women should be given, along with soap, care for the skin, youth and freshness.
Ingredients required
To make your own soap, you need to purchase the necessary components:
- Soap base (special transparent or regular baby soap).
- Any base vegetable oil (olive, apricot, sunflower, almond, or others).


- Essential oil, depending on the characteristics of the skin type (ylang-ylang is suitable for sensitive, tea tree, aloe, for cellulite - orange, grapefruit).
- Dishes for dissolving soap and curing molds.
- Alcohol to hold the layers together and lubricate the mold surface.
After preparing all the components, you need to start soap making.


We begin to conjure
First, rub the soap base on a grater so that it melts faster in the microwave or in a water bath. The base oil is added at the rate of 3 teaspoons per 100 grams of base.
Milk, cream or water is added while the base melts to obtain a creamy mass. Excess water tends to delaminate the soap, so it's best to add sugar to melt the base faster.


The soap is poured into a mold and sprinkled with alcohol so that there are no air bubbles on the surface. Leave in the refrigerator or other cool place for 2-3 days until completely dry. It remains only to take it out of the form and give it to a loved one.
Everyone can make such a soap on their own at home.


Advice!So that the finished soap does not deform while it is delivered to the recipient, it must be wrapped on top with cling film.
Master class with step-by-step photos on making handmade soap


Better than flowers only a bouquet of handmade soap
If you do not know what kind of original gift to give your friend, mother, mother-in-law, beloved - always remember that the most appreciated is a gift made with your own hands. Taking into account the love of flowers for women, these two points can be easily combined and get the perfect bouquet - from handmade soap.


If desired, you can make a bouquet for any number of flowers. Given that roses are considered universal, they must be learned to make first of all. Knowing the basics, you can easily make any other flower. To make soap roses you will need:
- 200 grams of baby soap;
- 1 tablespoon edible gelatin
- 7-8 tablespoons of water;
- flavors, food colors, it is advisable to use to resemble a rose;
- smooth knife;
- a knife for peeling vegetables.
Gelatin is poured with cold water and left to swell for half an hour - 50 minutes. At this time, the baby soap is grated and, constantly stirring, melted in a microwave oven or in a water bath until smooth. At this stage, fragrances and cosmetic oils are added.


Add the already swollen gelatin to the mixture and pour the soap into various forms (caps for hairsprays, baking dishes, empty cases for watercolors or cosmetics are suitable). It is better if the containers are silicone, since it will not be possible to get soap in its original form from glass or metal. Put the resulting masses in the refrigerator for 10-15 minutes until they harden.
The soap cylinders will be slightly damp and still warm. Use a vegetable peeler to remove thin, round layers of soap. These are already petals for a future rose. They can be of different shapes and sizes. That's the beauty of it. To create the core, you need to twist one soap petal slightly diagonally. The next few petals need to be wrapped around the core.


To make the rose look blooming, you need to wrap the edges of the next petals outward a little. Continue until you get a flower of the required splendor. If the cone is too elongated, you can cut it off with a knife.
Bouquet leaves are made of soap in the same way as flowers, but in a different color. The veins are drawn with a toothpick or needle.
A rose with a leaf can be made as a separate flower to make a bouquet. And you can use it to decorate a bar of soap. It all depends on the desire of the master.
Advice! Soap flowers are a great gift, because you can not only wash with them, but also put them in the bathroom for decoration. Thanks to gelatin, the moisture will make the roses smell and cheer up the hostess.
How to make a drawing on soap
Handmade soap with a pattern is one of the most original gifts that seems to be very difficult to make at home. If you choose a drawing that is close in spirit to the person to whom the product will be presented, or even a photo of him, you will donate not just your own soap, but a work of art in which your soul is invested.


First of all, you need to choose a thematic picture and print it on special water-soluble paper. It will be better if you use a color laser printer, since it accurately conveys all the colors that are not distorted during further manipulations. Before starting work, the drawing must be well dried and sprinkled with hairspray.
The soap base or baby soap should be melted in a microwave oven or water bath so that there are no air bubbles. Dyes and flavors are not added to this layer, since they reduce transparency, which is necessary for the clarity of the image.
The resulting melted soap is poured into a pre-selected form with a layer of 2 mm thick and a picture is superimposed on top with a pattern down. To avoid air pockets, you need to immediately determine the location of the printout. On top of it, you need to evenly sprinkle it with alcohol and pour a 1.5 mm layer of soap on top. This is done so that the white layer does not spoil the picture if it bleeds under it. Alcohol treatment is necessary to eliminate surface bubbles.


The next layer is white. The picture is best seen on it. Therefore, a little soap in shape is melted so that it is enough and poured on top of the already frozen transparent layer treated with alcohol. After complete hardening, the next, thick layer can be decorated in an original way using soap shavings, glitter, coffee beans, dried flowers or other decorative elements. If chips are selected, they must first be force-frozen so that they do not melt when they are poured with the next hot layer.
Advice!You can add a different number of multi-colored layers, depending on your imagination, but the main thing is not to overdo it, since the layers may not stick together.
Step-by-step master class on making multi-colored soap


How to make handmade soap with lettering: cute, fast, cheap
To reach out to the heart of a loved one or just to cheer up a friend, you can give an original handmade soap with an inscription that is relevant to you or a person. Experts distinguish two main ways of decorating a product.
To implement the first method, you need to pour a small amount of pre-melted baby soap on plastic wrap and let it harden a little. On this basis, they cut out with a sharp object, preferably with a needle or a toothpick, the letters needed for the phrase. After complete curing, the base easily comes off the film. The main thing to remember is that you need to write letters in a mirror image, since the front of the soap will be at the bottom of the form.
 Place the stencil on the finished bar of soap, take a sharp object such as a wooden skewer, and circle the letters
 The second method involves a ballpoint pen and plain paper. It looks a little cheap if not written neatly. You need to write a phrase in bold type and fill it with a thin layer of soap base. After hardening, the inscription easily remains on the soap, and the paper is torn off with a sharp movement. After the performed manipulations, the printed phrase is placed in a soap dish and poured a second time with the melted base. In order for the layers to stick together, do not forget about the treatment with alcohol.
Advice! To make the gift touching and individual, it is better to choose a meaningful phrase for the person. This will indicate your attention and understanding.
Useful properties of laundry soap in handmade soap
Laundry soap in the XXI century has lost its popularity due to its unattractive appearance, smell, shape. However, everyone over 30 knows about the beneficial properties of the brown substance:
- suitable for washing;
- kills bacteria;
- improves hair condition;
- considered a folk remedy for the treatment of acne and acne;
- treats inflammation and gynecological diseases;
- disinfects the wound from infection;
- eliminates fungus.
There are three known methods of soap making based on laundry soap.
One of them is a three-layer kitchen one - it removes any contamination, including grease stains and food debris on the plate. The main rule of use is to wear gloves, as the product dries out the skin.
To prepare kitchen soap, you need to take 100 grams of household soap, grate it, pour 180-200 ml of water and melt it in a microwave oven or in a water bath. When the resulting liquid resembles honey, beat it with a mixer at low speed. Collect the foam in a separate bowl. The mass, which has already been melted, is divided into three parts. In the first add a tablespoon of mustard powder, in the second - 2 tablespoons of thick coffee, which will get rid of the unpleasant odor, and a spoonful of castor oil.
To glue two pieces of soap together, sprinkle the first layer with alcohol and pour the second one on top of it. Alcohol also removes air bubbles.
Third layer with baking soda to enhance the cleansing effect. It is mixed with the foam that remains after the first whipping of laundry soap, and a tablespoon of baking soda. When laying this layer on the previous one, do not forget to moisten it with alcohol.
Heart-shaped soap is a cute gift for loved ones Leave the handmade soap to dry for at least a week. There will be no characteristic smell, the cleansing properties will increase several times.
The second method of making handmade soap will appeal to girls who monitor the condition of the skin, as this product nourishes and moisturizes it. It is necessary to dissolve 150-200 grams of laundry soap and mix thoroughly with components in the amount of one tablespoon of honey, sunflower, sea buckthorn and castor oil, 100 ml of boiling water and one dessert spoon of apple cider vinegar. After obtaining a homogeneous mass, add 1 teaspoon of anti-cellulite oil, chlorophyllipt, vitamin E and 0.5 teaspoon of glycerin or baby cream.
For a pleasant smell, add 10 drops of lavender essential oil or men's eau de toilette to the soap. After cooling, it is enough to place it in the freezer for just one hour. Then you can use.
The third recipe contains milk, so the soap is perfect for delicate and sensitive skin.
80 ml of milk is mixed with 100 grams of laundry soap, previously grated, and the mixture is melted in a microwave oven or in a water bath, stirring occasionally. To speed up the process, add 1 tablespoon of honey. When the soap dissolves, beat it with a mixer until clarified and cooled.
Add a tablespoon of apple cider vinegar, olive oil, castor oil and vodka to the mass that has already cooled down. Almond essential oil helps to completely remove the aroma of laundry soap, but it is contraindicated for pregnant women and children under 6 years old, so it is better to use chocolate, cocoa, ginger, cinnamon and other aromatic additives.
Advice! For the soap to foam well, you need to add coconut oil or other vegetable fats to the composition.
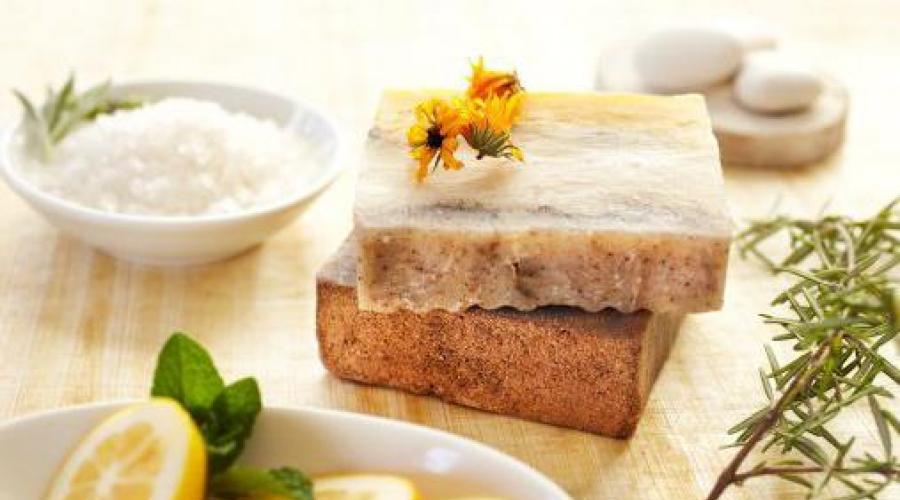
Soap from scratch is popular among soapmakers. The cooking recipe may be different, but the essence remains the same. This soap differs from the usual gels, lotions, shampoos with absolutely natural ingredients! Such a product does not dry out or irritate the skin, does not cause rashes, redness, peeling. But not every handmade soap will be "zero", as the soap makers call it.
Soap varieties
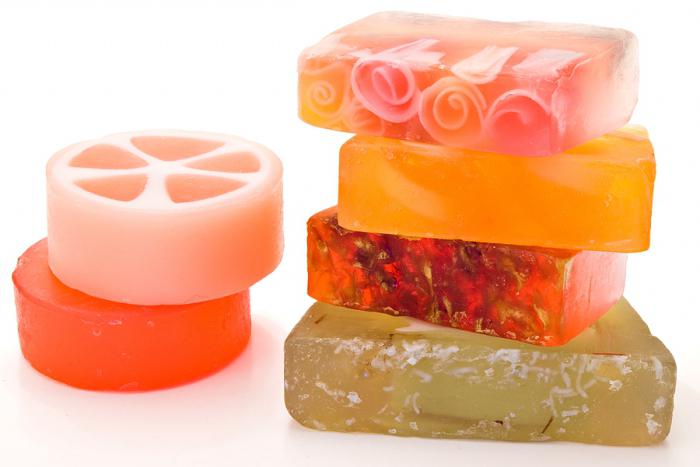
Soap, which is made flavored in the form of various soap base figures, can be classified as unnatural. Since it is the basis of industrial production, where surfactants (surfactants), cheap oils, foaming agents are added.
Despite the addition of aromatic natural ingredients, the soap is still synthetic. It is more often used for gifts, as the preparation process is simple. It is enough to melt the soap base and add oil.
Soap from scratch is another matter. The recipe does not contain harmful chemical additives, but includes natural ingredients (honey, essential or vegetable oils, herbal decoctions, chocolate, nuts, coffee). This soap is obtained by saponification of vegetable fats with alkali to form glycerin and fatty acid salts. Cooking "zero" requires calculations of proportions, time, experience. Beginners often make mistakes, as a properly made soap must be alkali-free.
When there is no soap base or alkali at hand, many novice soapmakers resort to a simple but lengthy method. Take baby soap (it is practically free of chemicals), scrape, melt over a fire with water or herbal decoction in a water bath until smooth with frequent stirring. Then the mass is removed, oils are added. By application, soap can be divided into baby, household, shampoo. According to the manufacturing method, soap makers distinguish between hot and cold methods.
Where to start soap making?
Even simple soap recipes from scratch cannot do without special tools and materials. For soap making, you will need the following tools and ingredients:
- Scales for measuring water or oils.
- Scales for measuring alkali with an accuracy of hundredths of a gram.
- Thermometer for measuring the temperature of liquids.
- Hand blender.
- Disposable cups or other dry containers for lye.
- Mixing spoons.
- A heat-resistant vessel where the alkali will dissolve.
- Stainless, enamel or glass heat-resistant container for mixing soap.
- Glasses, gloves, respirator, overalls.
- Wooden or
- Alkali sodium and potassium hydroxide (the first is used in the preparation of solid soap, the second is suitable for liquid soap).
- Vegetable oils.
- Soap calculator (used to check the proportions of all ingredients, especially alkali).
- Water, herbal teas, milk, coffee, zest.
Please note that the utensils in which the soap is boiled cannot be used for preparing or storing food.
Safety regulations
It is very dangerous for beginners to start soap from scratch right away. The recipe for any manufacture requires safety.

Homemade soap recipes from scratch
"Zero" soap is made by hot and cold methods. In the first version, it is cooked in the oven. In the second, the soap "reaches" in a water bath. In both cases, the soap needs to mature from several weeks to a year.
For beginners, it's best to start with the cold method. The recipe data should be entered into the calculator, which will give the exact ratio of water to alkali.
- 7% overfat (SF or superfat).
- 10% linseed oil.
- 20% palm and coconut oil each.
- 50% olive oil.
The superfat protects the skin, and the oils, when exposed to alkali, form soap (from scratch). The recipe is as follows:

Marble soap from scratch
Soap making recipes involve 5 stages: boiling, mixing (or trace stage), drying, gel and storage stage. Therefore, after preparing the soap mass, proceed to the next step. You can divide the mass into two parts, paint with different pigments to get a two-tone soap. Stir each part with a blender. Then add essential oils, perfume. Combine colored soap bases without stirring. Pour the mixture into a mold. To remove any bubbles that have formed, simply tap the mold on the table and top up with the base. Draw a pattern on top with a brush.
This is followed by the gel stage, that is, the hardening stage. Almost any baby, household, toilet, shampoo soap passes it from scratch (we will consider the recipe below). Put the soap in a heated, but turned off oven (40-50 degrees) or wrap it near the battery for several hours, then dry it for a day at room temperature.
The last step is to cut the soap into pieces, put it in a box with holes, and leave it to “ripen” for several weeks. Only then can you get it, pack it for a gift, or start using it.

Making laundry soap
Soap makers, in addition to a toilet product, make natural products from scratch. Recipes usually consist of inexpensive oils (corn, sunflower, palm, coconut). Consider one recipe for such a soap:
- 64.52% coconut oil;
- 24.19% olive oil;
- 11.29% castor oil;
- 2% overfat;
- 33% water;
- 1% citric acid;
- 103.93 grams of alkali;
- 1 tsp soda (with a slide);
- 10 ml of essential oil of lemon and peppermint.
The total weight of the oils is 620 grams. Melt all oils with superfat in a water bath. Dissolve citric acid in a little water. Next, prepare an alkaline solution from powder and water. After the alkali is completely dissolved, pour in the lemon solution, stir.
When the oils dissolve until smooth, remove, leave to cool to the same temperature as the alkaline solution. Mix both masses with a blender until a "trace" is formed, put in a preheated oven to 60 degrees for 2.5 hours.

Continuation of soap making
We continue to make laundry soap from scratch. Recipes, by the way, may allow the use of overfat not at the first stage of melting with oils in a water bath, but when rubbing it along the walls of the mold. In our case, we simply cover the forms with baking paper.
As soon as you got the soap out of the oven, you need to work quickly, as the mass hardens quickly. Add soda to it, beat with a mixer. Pour in essential oils, stir, put in a mold. As soon as the soap hardens completely, take it out of the mold, cut it into pieces, you can use it right away. This is the advantage of the hot manufacturing process.
This laundry soap smells good, copes well with limescale, it can be used to wash dishes and a bath before bathing children. And the best part is that after working with it, you do not feel discomfort, peeling or dryness of the skin.
Whether it's laundry soap, toilet soap, or baby soap from scratch, a recipe requires clear calculations. Otherwise, with a large amount of water, the soap will quickly wash out, if there is an excess of overfat, the product will deteriorate, and the soap base will not thicken from the busting of alkali or base oil.

Making shampoo soap
Soap makers also brew shampoo soap from scratch. The recipe includes useful decoctions, oils, hair supplements. Only it turns out not a liquid shampoo, but a bar of solid soap. This is why it may not be suitable for some individuals. Experiment with ingredients to get your type of soap.
For a cleansing and strengthening shampoo soap, take:
- 40% rapeseed oil;
- 34% coconut oil;
- 26% sunflower oil;
- 1% citric acid;
- 33% water;
- 10 ml of essential oil petitgrain;
- 15 grams of laurel oil;
- 76.48 grams of alkali;
- 3% overfat for the mold.
The oils are designed for a weight of 500 grams. The cooking process is similar to laundry soap, that is, the oils are melted, a lemon and an alkaline solution are prepared separately. Pour acid into not hot, but room temperature alkali. Then add the mass to the oils, beat with a blender until a trace forms.

Also send to the preheated oven for 2.5 hours. Add superfat, essential oils to the soap base, mix, put in a mold. After a day, cut into pieces, leave for a couple of weeks to harden, although it is already ready to use.
Brief summary
If you want to have clean and well-groomed skin, then prepare soap from scratch. Recipes differ in ingredients, manufacturing method, but the process itself is repeated. A beginner should first study the information on the interaction of oils with alkali and practice with a soap calculator.
More and more beautiful ladies are turning to home cosmetology, and this is not surprising. Making soap at home is a fun hobby ideal for beginners. Recipes vary greatly, you can make a hard bar or liquid soap. Let's take everything step by step!
Soap making for beginners - what should you have in your arsenal?
Since do-it-yourself soap is made exclusively on a natural basis, all the necessary components must be prepared in advance. You may have some of them at home.
The foundation
1. Soap making is so popular that today you can collect all the ingredients. The base means a hard block or a shaving mass, which includes natural oils, alkali, and water.
2. The base can be matte or transparent. Swirl bases can be found in creative shops that sell soap-making supplies. This base will allow you to make a squiggly soap. Its structure is viscous, viscous, the final soap turns out to be very beautiful.
3. If you have no desire or opportunity to buy a base, use regular soap for children. This option is fine if you don't mind getting a matte bar.
4. However, if you are just starting your soap making career, remember that special base dries and lathers better than baby soap. It does not cause irritation, does not smell.
Oils
1. Soap making at home is good because it is suitable for beginners. Also, all recipes assume the presence of base oils. They have nourishing, moisturizing, softening properties.
2. Such additives have almost no smell, but at the same time they are considered quite fatty. The best option would be sea buckthorn, peach, argan, olive, almond, coconut, sunflower, wheat germ oil. 0.1 kg. the basis is supposed to be 10-25 ml. oils.
Dyes
1. In the process of making handmade soap, it is worth taking care of the presence of dyes. At home, food grade pigments are used, they are safe for the skin. For beginners, we recommend choosing mineral-based dyes.
2. In addition, it is allowed to add fruit, berry, vegetable juices, decoctions on medicinal plants.
3. In some cases, vegetable oils already make a bar with a certain shade. For example, fir oil makes soap green.
4. Freshly ground cinnamon powder will not only give the detergent a scent, but also brown it. And the substance E171, which is otherwise called titanium dioxide, gives the soap a matte finish.
5. Dyes with pearlescent particles are sold in shops for soap-makers or “Everything for needlework”. When added, the finished bar will shine and shimmer.
Related accessories (molds, alcohol, etc.)
1. Since soap making at home is a rather painstaking process, in particular for beginners, you need to study all the recipes and prepare related materials.
2. Select cells of any size and type as shapes. Thanks to them, you will create impressive outlines of detergent bars: in the form of animals, flowers, geometric shapes, etc.
3. Molds should be made of silicone, plastic, rubber, but in no case glass or metal.
4. In addition, you will need a spray bottle (spray bottle) with alcohol poured into it. This is necessary to prevent bubbles in the finished product block.
5. Of the related products, you need Chinese sticks made of wood for mixing, cups and spoons made of plastic, a pipette, toothpicks, thin medical gloves.
Ethers
1. They are added to impart a pleasant smell, the necessary useful properties (disinfection, tightening, whitening, nutrition, etc.).
2. Depending on the problem to be solved, add citrus ether (rejuvenates), fir (disinfects), shea (soothes). You can choose ethers at your discretion.
3. It is important to remember forever that it is strictly forbidden to add these ingredients in large volumes. 0.1 kg. a maximum of 20 drops are discharged from the base.
Additives and decorations
1. Homemade soap making includes beneficial additives and various decorations. For beginners, the process of creating a fragrant product will not be difficult, all the recipes are painted step by step.
2. Sparkles, seeds of any nature, coffee beans, pieces of fruits (berries, plants), dried fruits, nuts are used as decorations.
3. From useful additives, grated chocolate, ground coffee or grounds, cream, milk, cereals and bran (ground), salt are distinguished.
Simple soap making recipes for beginners
Making fragrant soap is pretty easy with step-by-step instructions. Most importantly, do not forget to spray the mass with alcohol to eliminate bubbles.
Recipe number 1. Lavender paradise
- base - 90-100 gr.
- lavender ether - 14-16 drops
- lavender inflorescences - 5 gr.
- vegetable oils (any) - 10 ml.
1. Rub the base, then pour it into a glass bowl and send to simmer in a water bath. You can also melt the base in the microwave, the main thing is not to overexpose it. Otherwise, you won't be able to prepare the soap.
2. Pour in vegetable oils (olive, almond, etc.) in small portions, as well as ether and dried flowers.
3. Prepare the molds, sprinkle them with alcohol from a spray bottle. Pour the composition for the future soap into the cells, sprinkle the mixture with alcohol on top to eliminate bubbles.
4. Leave the prepared molds with soap for a while for the liquid to harden. Then remove the finished bars, keep in a dry place for 5 hours.
5. As you can see, making soap at home is a simple matter even for beginners. All recipes, including lavender paradise, are clear and simple. The soap has a pronounced antibacterial effect.
Recipe number 2. Coffee yoghurt pudding
- base (transparent) - 100 gr.
- freshly ground cinnamon - 12 gr.
- titanium dioxide (dry or liquid) - in fact
- food coloring (purple) - 2 drops
- food flavoring (cappuccino) - 4 drops
1. Melt 25 g. base, combine with cinnamon powder and stir. Sprinkle the mold with alcohol, pour this liquid into it. Leave the layer to dry.
2. Proceed to the next step. Melt another 25 g. base, mix with titanium dioxide until matte. Inject a drop of dye, 2 drops of fragrance.
3. Arm yourself with a toothpick, pick up the cell with the first layer of soap (frozen). Scratch it to roughen the mass. Pour the second purple layer. Sprinkle with alcohol from a spray bottle.
5. On top of the third tier is the fourth, cook it like the second. Sprinkle, dry, apply!
Recipe number 3. Massage citrus mix

- loofah (dry plant) - actual quantity
- base (transparent) - 180 gr.
- grape seed oil - 14 drops
- dye (yellow) - 9 drops
- dye (red) - 7 drops
- food flavoring (orange or lemon) - 6 drops
Home soap making is carried out with the help of additional components. For beginners, this technology may seem complicated, you can consider other recipes.
1. Loofah is a dry plant from Asia, you can buy it in the shops "Everything for needlework". Measure out a small piece and place in a round cup.
2. Soak in water and wait a quarter of an hour, the loofah will take the shape of a container. When the plant becomes soft, remove it and squeeze out excess liquid. Otherwise, moisture will interfere with the soap making process.
3. During this time, send the entire base according to the recipe to the water bath, heat it. Then pour in equal proportions into two cups. In the first of them, add half the volume of grape oil, 7 drops of yellow food coloring, 3 drops of citrus flavor.
4. Add the ghee base in the second glass with the remaining grape oil, 3 drops of flavoring, red dye in full according to the recipe, 2 drops of yellow pigment. You will receive an orange mass.
5. Wait until the two masses in the glasses become thick. You will notice a thin film on the surface. Prepare the loofah, put it in the mold compartment.
6. Take a glass in each hand, start pouring both masses into a mold with a loofah, not chaotically, but neatly from both sides. The colors will connect, slightly smooth the border between them with a toothpick. Sprinkle with alcohol, let harden. Ready!
Recipe number 4. Coniferous hurricane
- base - 0.1 kg.
- food coloring (green) - 3 drops
- purified water - 5 ml.
- titanium dioxide (E171) - in fact
- fir oil - 60 ml.
- alcohol - in fact
Making soap at home is quite an interesting activity that is great for beginners. The recipes for the product are quite varied, so don't be afraid to experiment.
1. Melt the soap base in a steam bath. Dilute the dye with water in one. Add soap base, stir. In another container, combine the melted base with titanium dioxide. The result should be a matte mass.
2. Each container should be filled with 30 ml. fir oil. Mix the ingredients thoroughly. To easily get rid of the bubbles, you must first sprinkle the containers (empty) with alcohol. Repeat spraying after base insertion.
3. Use a square or rectangular silicone mold. Pour in the liquid from the two molds one at a time. Spray alcohol over the mass. Once the soap has set, chop it into pieces. There will be a beautiful pattern inside.
Recipe number 5. Scrub soap

- coffee grounds - 65 gr.
- olive oil - 60 ml.
- sea salt - 55 gr.
- base - 190 gr.
- water - 15 ml.
Consider how to make a scrub soap at home. The recipe is simple even for beginners. Go for it!
1. Melt the soap base using the classic technology. Add oil and stir. Gradually start adding boiled water. Do not stop mixing. After 2-3 minutes, the mass should acquire plasticity and homogeneity.
2. Pour the coffee grounds and salt into it. Stir the ingredients again. Lubricate the molds in advance and spread the soap over them. The products will be ready for use in 3 days. The finished soap will be dry with a homogeneous dense structure.
Recipe number 6. Honey soap
- argan oil - 30 ml.
- base - 100 gr.
- honey - 30 gr.
- pearlescent dye - a pinch
1. Warm up the base in the usual way. Enter the components into the mass. Stir while adding dye.
2. Ultimately, the soap will have a magical tint. Send the base into a mold, sprinkle with alcohol and wait for solidification.
Recipe number 7. Cleansing soap
- base - 110 gr.
- grape seed oil - 30 ml.
- algae - 25 gr.
- sea flavoring - 3 drops
- olive oil - 30 ml.
- blue dye - 3 drops
Using this recipe for soap making, you can get rid of acne and similar skin problems at home. For beginners, the procedure is pretty simple. Recipes are available to everyone.
1. Steam the soap base until it is liquid. Enter into the composition of all the listed components.
2. Stir the prepared composition thoroughly for a while. Pour the soap over the molds, sprinkle with alcohol, use after hardening.
Recipe number 8. Coffee peeling soap
- rosewood oil - 5 drops
- matte base - 120 gr.
- white clay - 50 gr.
- sea salt (fine) - 30 gr.
- ground coffee - 20 gr.
1. Introduce all components into the warmed base gradually. Remember to knead the mixture thoroughly. Pour the soap into molds, sprinkle with alcohol, wait for it to solidify.
2. The finished soap has a pleasant aroma and is used as a peeling. The product perfectly removes keratinized particles, soothing the epidermis.
Recipe number 9. Olive soap

- bee honey - 80 gr.
- olive oil - 90 ml.
- base - 320 gr.
- green dye - 4 drops
- ground basil - 10 gr.
Soap making at home will appeal to many housewives. It will not be difficult for beginners to make a quality product. Recipes are available to everyone.
1. Use a steam bath and melt the soap base. Begin to gradually introduce all the components in turn. Do not stop stirring the mass.
2. Pour the ready-made composition into beautiful shapes, which are designed for 3 pieces. This soap perfectly nourishes the skin, cleansing and softening it.
Recipe number 10. Liquid soap
- baby soap (bar) - 100 gr.
- glycerin - 30 ml.
- fragrant herbal decoction - 1.8-2 liters.
- colors and flavors - according to your taste
- almond or lavender oil - 50 ml.
Liquid soap can be made with your own hands from various ingredients. At home, you can take any components you like.
1. To prepare a herbal decoction, it is enough to purchase it at the pharmacy and brew it according to the instructions on the pack. After insisting, strain the product. In the meantime, grind the bar of soap on a fine grater.
2. Heat the herbal base in a saucepan. Introduce the chips gradually. Do not forget to mix the composition thoroughly. The result should be a homogeneous liquid. Once the component has dissolved, turn off the stove and wait for it to cool.
3. If necessary, dispose of foam if it appears. When the mass has cooled, add glycerin and all the necessary components to it. The composition can be supplemented with liquid vitamins. Play around with colors and flavors.
4. Stir the ingredients until smooth. After a few hours, the composition will acquire a thicker consistency. Liquid soap should be poured into portioned containers. You can use it as directed.
As you can see from all of the above, making soap at home is an extremely fun and easy process even for beginners. All recipes are step by step, so you shouldn't have any difficulties with the implementation of your plan. Create your own miracle!