How To Draw Summer Vacation. How to draw summer? Tips for Young Artists
Read also
We all love summer - a time of rest, vacations, games, adventures and swimming. Personally, I just love summer for a whole bunch of reasons, and therefore I suggest that you draw this time of year with me in pencil in stages.
So, what do you associate summer with? For me personally - with a clear sky, sun, greenery and a house in the village. Let's try to paint a light-hearted landscape that's perfect for illustrating your vacation and summer story.
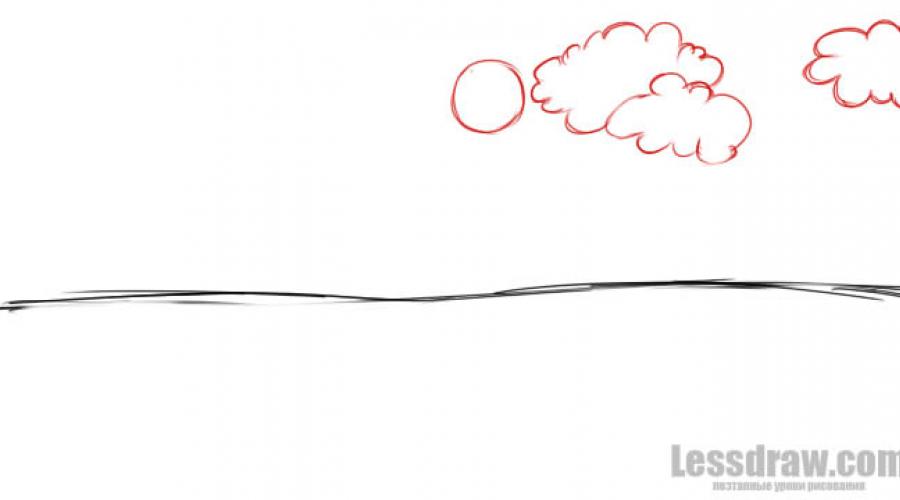
First, divide our sheet with a line, marking the horizon. Draw with a simple pencil so that you can sometimes erase all unnecessary lines.
Draw the sun and clouds at the top of the sheet. You can draw a very cloudy sky, or you can draw a clear one.

Add a couple of tree trunks.


And, of course, what summer is without juicy, bright foliage? We draw lush crowns of trees.

The general landscape is ready, now is the time to draw a house away from the trees. By the way, in the next tutorials I want to show you how to draw at home. So, we draw the base of the house from two rectangles.

Add a roof to the rectangles. Do not forget to remove all unnecessary lines along the way so that they do not distract you.

Add another element and a pipe to the roof.

Draw the doors and windows.

Help your child draw his summer: a river, sea, meadow or a house in the village. Learn to draw a girl who symbolizes summer.
Summer is a fertile time, a vacation time that children spend walking in the streets and parks, relaxing on the sea or by the river, being close to nature in the village with their grandparents. In September, when they return to school, they have a story to tell. Sometimes there are so many emotions that you want to create - paint a picture on the theme of "Summer".
What can you draw on the theme of summer for children? How to draw a drawing for children - "How I spent the summer"?
What is summer in the child's understanding? What can he depict in his drawing?
Summer is a bright, hot sun, green trees, blooming flowers, butterflies and bees. A child can draw a meadow or a clearing - summer nature.

Children's drawing "Summer".
If a child spends summer vacations in the city, he can depict a playground with slides and swings, children playing in the sandbox, riding bicycles, roller skates and scooters.

Children's drawing "Summer on the playground."
Another popular theme of children's drawings about summer is the river bank. The child draws sand, reeds, running water, the sky and the sun, birds in the sky and, of course, himself and his family, swimming and sunbathing.

Children's drawing "In the summer on the river".
Did the child go to visit his grandparents living in the village in the summer? He will draw their house, garden, friendly dog in the yard and domestic animals: goats grazing in the meadow, cows and horses, geese and chickens running in the yard, a pig with piglets eating from a trough.

Children's drawing "Summer in the village".
Summer vacation at sea for a child is very diverse. He will draw what impressed him the most: dolphins, sailboats and ships, a lunar path on the sea surface, people relaxing on the beach and swimming in the sea.

Children's drawing "Summer at sea".
How to draw summer with a pencil step by step for beginners and children?

Summer is a blooming meadow.
In the drawing on the theme "Summer", the child draws a sunlit glade with grass, flowers and green trees. In this clearing, he can portray himself.
- The child takes a sheet of paper, a pencil and an eraser. First, he needs to mark the sheet - draw a line - the "horizon" separating heaven and earth.
- His task is to draw a meadow. With thin pencil lines, he should mark where the grass bushes will be.
- Each blade of grass should be drawn.
- At the next stage, you can add several colors to the image of the meadow, and erase the auxiliary lines.

Summer meadow: step 1.

Summer meadow: step 2.

Summer meadow.

Methods for drawing grass.
You can draw summer flowers, for example, chamomile and cornflowers.

Cornflower step by step.

Chamomile step by step.
Now the child moves on to drawing himself, for example, a girl picking summer flowers.
- You should start with the designation of the girl's head, torso and arms, they are denoted by ovals.
- The line of the hips (the girl will be in a summer dress) is drawn in a semicircle.
- On the face, draw lines of symmetry for the eyes, nose and lips. Next, the face is detailed.
- With smooth, light movements of a pencil, draw the girl's hair.
- Draw the girl's dress and her hands. A flower is being painted in her hands.
- Erase construction lines. With the help of pencil shading, they make the figure of the girl in the figure three-dimensional.

Girl in the meadow: step 1.

Girl in the meadow: step 2.

Girl in the meadow: step 3.

Girl in the meadow: step 4.

Girl in the meadow: step 5.

Girl in the meadow.
Let the child enliven the drawing - supplement it with images of insects: butterflies and ladybirds.

Addition to the landscape "Summer": the ladybug in stages.

Supplement to the landscape "Summer": a butterfly in stages.
VIDEO: Draw a summer meadow
How to draw summer in a village?

In the drawing on the theme of "Summer", the child often draws a house in the village.
- On the sheet, they first designate the horizon line, thinly, so that it can be easily erased where it will not be needed.
- The sun and floating clouds are depicted in the sky (several pieces to make the weather look sunny).
- Trees will grow near the house, their trunks will be drawn.
- The trees are detailed - their branches and crowns are drawn.
- Draw a house. So that he does not look flat, they look at him as if from an angle. Designate a house with two rectangles.
- It will be easier for a child to draw a roof if he looks at the drawing - instructions on how to do this.
- A pipe is drawn on the roof. An attic is being drawn over the future entrance to the house.
Draw the windows and the entrance to the house. - It's time to add bright details to the drawing - a fence, grass, a path leading to the house, flowers.

Summer in the village in pencil: step 1.

Summer in the village in pencil: step 2.

Summer in the village in pencil: step 3.

Summer in the village in pencil: step 4.

Summer in the village in pencil: step 5.

Summer in the village in pencil: step 6.

Summer in the village in pencil: step 7.

Summer in the village in pencil: step 8.

Summer in the village in pencil: step 9.

Summer in the village in pencil: step 10.

Summer in the village in pencil.
You can also add animals to the drawing - a dog in a booth, a cat on a fence, or even a goat nibbling grass.

Addition to the landscape "Summer in the Country": a doghouse.

Supplement to the landscape "Summer in the Country": a dog.

Addition to the landscape "Summer in the Country": a cat sitting on a fence.

Addition to the landscape "Summer in the Country": a goat.
VIDEO: How to draw a house in a village?
How to draw a summer landscape in stages with a pencil and paints?
For many children, the summer landscape is associated with the sea, the beach and sand castles.
The simplest version of the drawing "Summer Holidays at Sea" is an image of the water surface, the coast, a sailing ship floating on the water and seagulls flying in the sky.

The sea in summer.
You can also draw an exotic beach with palm trees.
- Mark out the sheet: draw a horizon line and a line where land meets water with thin lines, determine the places on which palm trees, a beach umbrella, and a chaise longue will be depicted.
- They draw and hatch trees, detail the umbrella and chaise longue.

Beach: step 1.

Beach: step 2.

Beach: step 3.

Pencil drawing "Beach".
The drawing with children building sand castles on the seashore looks very summer-like.
- A horizon line is drawn, as well as a line dividing the coast and the sea.
- Figures of children, a boy and a girl, as well as the outline of a sand castle are drawn on the shore.
- They draw faces, hairstyles and clothes for children. They draw shoulder blades in their hands, and a bucket on the sand.
- They detail the sand, decorate the sand castle with shells and starfish.

Children on the beach in summer: step 1.

Children on the beach in summer: step 2.

Children on the beach in summer.
VIDEO: How to paint a summer beach in watercolor?
How to draw the nature of summer in stages with a pencil and paints?
The beauty of nature in summer can be conveyed by drawing a river bank. It is so much fun for the whole family to have picnics!
- Have your child sketch the shoreline with a thin pencil line. You also need to outline the horizon. There will be a fishing boat on the shore. It is necessary to outline its contours, and then detail it.
- The river will be surrounded by forests, so the outlines of the trees are drawn in the background first, then the trees are detailed.
- Also, hills overgrown with grass and bushes are drawn, framing the river.
- Reflection of trees on the water is indicated by hatching.

Summer river bank in pencil: step 1.

The river bank in summer with a pencil: step 2.

The river bank in summer with a pencil: step 3.

Summer river bank in pencil.
In the foreground of such a drawing, you can depict a picnic scene - a girl sitting on a wicker basket, a bedding, a fire.
First, they draw the outlines of the girl's figure, under her hips - a rectangle, which will later turn into a basket.
- Draw the ears and hair of the girl. They detail the shoulders and arms, draw them with smooth lines.
- Draw the girl's face.
- After that they make out a wicker basket.
- They draw clothes for the girl and a wide-brimmed hat with a bow. Wrinkles are depicted on clothes with light strokes.
- Remove auxiliary lines.

Girl on a picnic: outline.

A girl at a picnic: detailing the picture.
The bonfire is drawn according to the following scheme.

Bonfire in stages.

Summer: picnic in nature.
How to draw a girl Summer?
A girl symbolizing summer, sun and warmth, as a rule, is depicted in a light sundress, with her hair loose, developing in the wind, surrounded by greenery and flowers.
You can portray summer in a feminine form as a little girl, teenage girl, or young girl.
You can draw a summer girl according to the scheme, as in the picture below.

For sketching: summer on the river.

VIDEO: Fast Drawing | Her name is Summer | Watercolor
Summer ... For everyone, this time of the year is associated with something of his own. For some it is the sea and volleyball on the sand, for others it is the first love. Someone sees summer cool, in the canopy of dense green trees, and someone - bright and sunny.
How can you draw summer? There are many answers to this question. After all, every person is an artist at heart, even if he does not have professional skills. Human fantasy is limitless, and the more memories a person has, the brighter his ideas. This article will discuss how to draw summer. It is very important for aspiring artists to learn the sequence of actions in order to paint a good work. In fact, there is no single algorithm, but knowing a few useful tips, you can create a decent picture.
How to draw summer: getting started
The easiest way to depict summer is to paint a landscape. It can be an image of the sea, a flower field, an urban view, or green mountains.
Select the size for the picture and the layout of the sheet. Horizontal or vertical orientation - depending on the composition you want to paint.
Divide the sheet into two unequal parts: heaven and earth. The sky can be either smaller or larger than the earth, depending on what the artist considers the main thing in his drawing.
Decide immediately which detail will be the main one. In the case of the field, this is a few elaborate blades of grass and flowers in the foreground; if this is the sea - the waves closest to the artist. If you are faced with the task of depicting the sky, it is worth "writing out", that is, to draw in detail, to clarify several clouds. The background is usually drawn blurry, indistinct, however, the shapes of objects should be guessed from the outlines.
How to draw summer: landscape
If you work with color (gouache, oil, watercolor, acrylic), this is called picturesque landscape. In this technique, colors and their shades should be evenly applied to different parts of the work, leaving no empty spaces.

Remember to mix colors on the palette. It could be a plastic palette or a piece of paper. The main thing is not to write with pure colors "from a jar".
Graphic landscape is another, no less interesting technique. Working with pencils of different softness, pens, liners, etc. is another way to draw summer. A classic example of a graphic landscape is any work of Shishkin. Graphics do not require special rules, the main thing is accuracy in the execution of details.
The most important advice regarding not only graphics, but also painting: at the very beginning of the work, determine what will be the main and what will be secondary. In the case of graphics, without selecting the main thing, it is very easy to darken the background. After that, it will be almost impossible to emphasize the main thing.
Trees can be depicted as shaded clouds of leaves, shadows as dark spots, and any object in the foreground can always be highlighted by making it more contrasting (black). Unlike painting, where mood and general impression are assessed, accurate rendering of form is important in graphics. The shape of tree trunks, stumps, leaves and branches - all these seemingly insignificant nuances create a coherent work.
Summer-image
This version of how to draw summer is suitable for those who like to portray people. The main idea of the painting "summer-image" is the image of someone who personifies the idea of this time of year. For the image of summer, the presence of attributes is required: ripe fruits, impenetrable foliage, bright flowers or golden ears.

People are usually chosen for images. Summer can represent a child, a woman or a man. The image of the summer image does not exclude the writing of a full-length figure.
Summer portrait
Let's consider the option with a portrait. Portrait- just for those who want to know how to draw summer in stages. Use a medium-soft pencil to outline the main lines. These are the head, neck, hair cloud and image attributes. Make sure that the compositional picture looks competent: do not draw a person too large or too small on the sheet. It is advisable to retreat from the top and bottom of the sheet by approximately the same distance (a little more from the bottom). If everything that you have in mind fits into the paper and there is still space left, the first step is passed.
Start working on different parts of the face with the material that you have chosen. If it is a pencil, be attentive to contrasts: light and shadow are very important points in every
Don't forget to paint the background at the end of the portrait. It can be fields, sea or something related to summer.
Summer mood
Abstraction- the simplest and most interesting idea of how to draw summer. Such a drawing is especially easy for children: they are emotional and sincere, therefore they are not afraid to splash their feelings on paper with bright colors.

Such work is done with any materials, you can even make an applique, mix several techniques in one drawing. Complete freedom of the artist is the main
feature of abstract works. Patterns, irregular lines, colored spots, various textures - all this can be combined into a general idea of \ u200b \ u200bthe summer.
Summer still life
Still life painting is the best way to learn all about shape and color for aspiring artists. Still life is a group of objects united by some common idea. Usually in still lifes they paint vases, fabrics, food, cutlery, flowers and other things that come to hand first. Objects are united according to their belonging to a certain sphere: bathroom still life, kitchen or garden (country) still life. However, it is possible to distribute items by the seasons as well.
Summer still life will look like a transparent vase or glass with a bouquet of small flowers of different colors and shades. Nearby you can put a light, the same translucent fabric and a few berries or fruits. Such a composition will look light and colorful at the same time.
The best materials for such a painting are watercolor or oil. Depending on the technique, you can clarify different details on a glass, a bouquet, or draw subtle folds of fabric.
Summer color combinations
Such a drawing will be unforgettable if you make it bright and balanced in color. Color combinations in paintings are a fine line between beauty and illiteracy, which is very easy to cross. When creating a drawing, remember the basic rules for combining colors.

The main contrasts that look advantageous in the works:
- Red Green.
- Blue is orange.
- Purple is yellow.
By combining these and their shades, you can achieve good results. But you cannot add them to the drawing in equal proportions. Each of the two colors should be present in smaller quantities, as if diluting the picture.

Do not use pastel, that is, light, diluted with white tones, they are more suitable for fresh spring. For a summer painting, juicy colors are suitable. It can be a contrast of primary colors or some few bright tones with black. Here you need to be careful: there should not be many dark areas in the picture, this will ruin the color balance.
In this lesson, we will look at how to beautifully paint summer with gouache paints in stages. Let's draw a bright sunny day.
Very little time was spent on this sketch. She worked on A4 format, that is, a simple album sheet. The space of the sheet was divided into approximately three parts. The top two will be the sky, and on the bottom we will draw the earth.
I used white and yellow paint for the sky, gently mixing and creating white and yellowish areas.

Approximately in the middle of a horizontally placed leaf, start drawing tree trunks. If you don't have brown paint in your kit, you can easily get it by mixing red and green paint. By adding more of this or that color, you can achieve different desired shades. You can add quite a bit of blue to get a darker, almost black, color.

We will not draw the bark of the tree realistically, it is enough to generally divide the tree into separate branches. You can add yellow and green to brown. without waiting for the gouache to dry.

Let's draw branches and white highlights on the trunk.

Draw the second tree in the same way.

First we draw the foliage with a total mass, then we will highlight the details. For her, I used green, yellow, a little blue for a more realistic color. I painted with a large brush. In some places I applied gouache with an almost dry brush.

Determined with a thin brush the location of the trees in the background. The foliage was made with a brush and a sprinkling method. I sprayed with a hard brush, but you can also use an old toothbrush for this. It depends on usability. Sprayed on the trees of the foreground, first with dark green gouache, a little yellow and white.

In the necessary places, I straightened the crown of trees with a thin brush, mixing green gouache with white and yellow.

On the right side, I painted a distant forest, mixing blue, white and yellow paint. Note that the edge of the nearby tree's foliage should be light yellow. This will create a backlight effect. 
To make the glare of light in the gaps of the foliage bright, we first apply yellow spots in the right places, and then put a small dot in the middle with white gouache.

Draw a yellow stripe with gouache where the grass in the foreground begins.

But before drawing the ground, let's draw a distant forest on the other, right, side. We also mix white, blue, yellow gouache. With darker paint, paint the barely distinguishable tree trunks and sprinkle with a little white gouache.

Use wide strokes to paint the ground in the foreground.

Draw a shadow under the tree and some yellow spots of light.

Put white strokes in the middle of the spots and sprinkle with white paint from a hard brush or toothbrush.

Author: Marina Tereshkova

How to draw a summer landscape in stages? If you asked yourself this question, then, most likely, it is already summer outside your window, and you do not remember about cold long nights.
Today we will learn to draw, let's get started!
Stage 1
Our landscape will be quite standard, it will consist of a piece of a house, trees and a narrow path.
Let's start at home. By lightly pressing on a pencil, outline a building with perspective lines extending into the distance beyond the horizon.

Stage 2
According to the laws of perspective, we outline the windows and their frames. Please note that we are drawing only a small piece of the building on paper, so the top window is not fully visible.

Stage 3
Now it's time for paths and trees. We draw three trees, you can read about how to work with trees. We also depict a winding path that goes to the center of the horizon.

Stage 4
We continue to detail the vegetation of our summer landscape. We draw more trees and depict their foliage with careless strokes.
Try not to press too hard on the pencil, because you may have to redraw something or you will paint over the drawing with watercolors or gouache in the future.

Stage 5
We transfer the most important attributes of summer to paper. Namely, a cat and flowers. In the foreground, right on the path, we depict a cat. At this step, it is not necessary to make it too detailed, it is enough to sketch the base.
We plant flowers nearby, again, you don't need to draw them in too much detail. We don’t need it yet.

6 stage
So, it's time to erase all the lines drawn with a pencil and trace around them with a pen. We need to depict the relief of the boards near the building, work on the bark and foliage.
In the foreground, working on the grass, cat and flowers. Also, don't forget the grass in the background. The farther a piece of land is from us, the less grass there should be - this is the law of cartoons :)
Already at this step, our landscape looks very impressive, but we have not even begun to paint it yet!
Of course, you can get rid of the elements that you don't like. For example, you don't have to depict flowers or trees. Experiment and come up with something of your own :)

7 stage
The final step is coloring, so find crayons or paints.
We paint almost all the grass and the path. The area behind the house will turn out to be slightly darker than the rest of the drawing, since less light falls there.

The right side of the trunks will be darker than the left, because the source of light, that is, the sun, will be on the left.

We are finalizing all the grass and trunks. Also, with shades of darker, depict the shadow on the path falling from the trees. Well, don't forget about the fluffy animal ...

Greening the foliage and starting to work on the background. The crown over the horizon should be painted in a slightly different shade of green, this will give the drawing a more expressive effect.
The sky is, accordingly, blue, the closer to the horizon, the brighter.

Finally, we paint the house and flowers and our drawing is ready!
Also, there are other options for drawing summer landscapes:
