How to change nylon strings on a classical guitar. Instructions for Replacing Strings on Acoustic Guitar
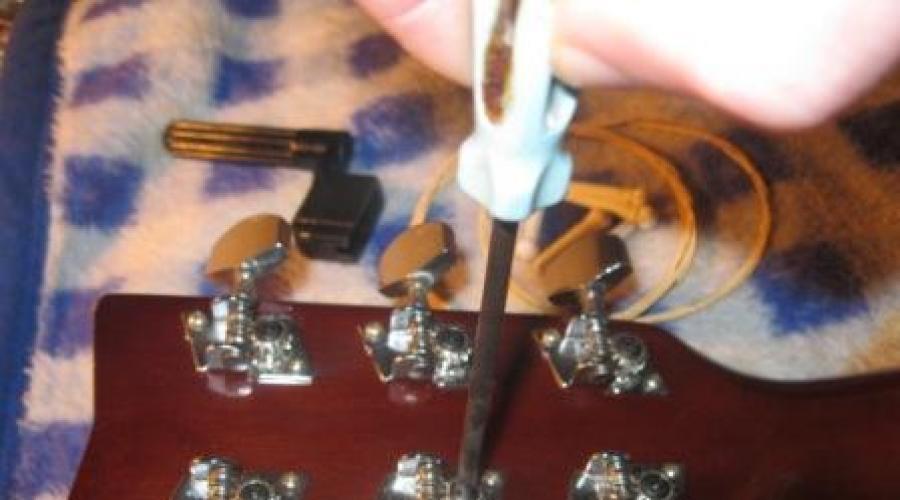
Now that the instrument has no strings, it's time to make a marafet for our tuning pegs. We turn the instrument upside down, and if you have tuners of about the same type as mine, take a screwdriver and clamp all the screws all the way. If the tuners are closed, you need to first remove the cap and do the same.
Both acoustic and electric guitars are always tuners, and the rest of the fasteners are loosened by the resonance of the wood - this is normal. You can also immediately lubricate the rotating mechanisms with graphite paste, or machine oil. Apply grease, and rotate the peg ten times forward, then backward, so that the entire worm gear is lubricated. Remove excess grease with a napkin. 
Also, while there are no strings, you need to tidy up the neck and deck of the guitar, cleaning the surfaces of dirt and dust. Do not use alcohol to clean the neck; this should be done with special instrument care products. As a last resort, do it with a dry napkin, since the working part of the bar is lubricated with special oil at the factory (at least it should)
Well that's all there is to it before playing new strings. 
We can now play the strings.
The order of installation of strings: 3; 4; 2; 5; 1; 6;
This installation order is required to avoid neck skew.
We take the string and attach it to the tailpiece so that the string lies in the groove and rests with a barrel against the end of the tailpiece. 
Then we insert the tailpiece together with the string into the hole and press it against the body, just not very hard, so as not to break the guitar (I heard about this case) 

Now that we have inserted the tailpiece into the body and have not broken the instrument, we pass the second end of the string into the hole of the tuning peg from the inside (between the rows of tuning pegs) 
We leave 8 centimeters of strings at the output and we can bite off the rest with pliers, or then remove the excess. Bend the short edge of the string, and hold the peg with your finger on the fretboard and twist the peg until the string stops hanging from the fretboard. You do not need to pull tight yet. I don’t knit any knots, (then it’s only harder to untangle them when changing strings) I made a string through the hole, and under her down
the rest of the turns. The guitar will keep in tune normally, unless the tuning pegs are broken. There should be up to 4 turns on the tuning machine, it is no longer necessary, and there is no need to overlap the turns either, from this the guitar will not keep the tuning better, on the contrary, you will then suffer with tuning. 


That's the whole string setup. As you can see, nothing complicated.
Wish you success!!!
Consider installing nylon strings using a classic pigtail attachment and one hole for each string. Attaching strings to guitar tuners in a separate article
In this article, we will discuss in detail how to tie strings. We will also learn some principles that are important to remember so that the strings do not come loose or unravel gradually.
I must say right away that we will consider fastening the strings on a stand using two holes for each string in a separate article, as well as fastening with beads in a separate article.
So we are considering a simple but tricky knot.
You yourself have tied the usual knot for attaching nylon strings more than once, you can imagine it well and you can see it in the first photo. It's simple.
This method is used everywhere. The knot is easily and clearly formed, push the string into the hole, wrap the tail around the base from either side and thread it into the loop. Like a regular knot. But there are a couple of points to pay attention to.
Wrong stringing and two golden rules
The first rule of a good installation is:
In order for the string to hold securely, you need to wind the end of the string over the edge of the string-holding socket.
I see the wrong fixing of the strings on the stand all the time. It doesn't matter what qualification the guitarist is. Moreover, the slipping of the string due to the edge can occur with a slight loosening during pulling. Those. the guitarist ties everything correctly, but then, when he turns his attention to tightening the strings on the tuning machine, he weakens the string, the knot unravels a little, and this is enough for the tail to pop out.
We look at the wrong engagement in the photos, which are even posted on photo services.
In the photo above, you can clearly see that the 6th and 4th strings were tied incorrectly when the tails of all the other strings are thrown over the bone edge. Although there is an interesting fact that the tails of the wrong strings are pushed under the adjacent string. More photos.

The one who understood everything from the above, in this photo sees the wrong fastening of the 6th, 4th, 3rd and 2nd strings. Very bad - only two out of six, four penalties! And there are no knots.
The insidiousness of the situation lies in the fact that such an unfinished knot will hold for some time, and for bass strings with a gimp, it is possible that even for a long time. But I recommend that you do not tempt fate, because if it pops up it will be ugly and painful.
But that's not all, there is second rule which is best done when setting the strings:
The first and second strings of the guitar should have a knot that will prevent the string from slipping out.
Oh, never slipped out! What are you talking about!
Never slipped out, because everything is the first time. As the string unfolds, it hits the soundboard with such force that if your guitar is lacquered, not lacquered, it will punch a decent ditch or dent.
Thin and soft strings slip, and these are not cheap carbon kits.

How to set the strings correctly on a guitar
Let's repeat two rules for those who, instead of reading, run through the article - I play a concert "Aranjuez" with an orchestra so that I, yes, do not know how to tie the strings! Nevertheless:
- Tie knots on the first and second strings of the guitar.
- When weaving the strings around the stand, we put the end of the string behind the edge of the string-holding panel ( the red line in the photo below). This is what wedges the string.
The first, second and fourth strings are best braided several times before leading over the hem.

Also, a few turns, but a little on the other side.

The option for thick strings differs in that they can be immediately wound over the edge. This is especially true for the sixth string.

The number of threads or turns can be correlated with the width of the string-supporting panel of the stand. The first thin string allows you to make several turns without any clutter. In this case, the knot will not spontaneously dissolve when the tension is released, and the additional knot will itself go beyond the corner of the stand.
Do not leave the tails of the strings too long - they can scratch the deck at the same time these tails are necessary if you do not tie additional knots. While the main knot is being tightened, the string can slip and the long tail is pulled up. The ponytails can then be cut off at the very end, when the strings are already taut. Of course, don't cut them too short.
The string has no direction, i.e. it doesn't really matter which end where you install it. But on some strings there is a sparseness of the gimp for ease of threading. Secure in such a way that this sparseness does not hit the saddle of the guitar. Trouble with gimp may occur.
The time will come, and every beginner who decides to master a musical instrument will have to face a problem changing strings on acoustic guitar... At first glance, everything is quite prosaic, but in practice, many novice guitarists make typical mistakes, sometimes with disastrous consequences. I propose to analyze in more detail all the rules for replacing the old kit with a new one.
Let's start a step-by-step analysis of the whole process.
Removing the old kit.
1. First you need to loosen all the tuning pegs, for convenient rotation, it is advisable to purchase a turntable. The price of such a device is minimal, and the benefits are maximal. We twist the tuning pegs until the strings are completely weakened, until they begin to sag freely.
3. Once the strings have been removed from the neck side, remove them from underneath the saddle plugs. We will remove the plugs carefully, using a special device. It is categorically undesirable to do this with pliers or nippers, after such a careless attitude, traces of damage may remain on the pins (corks) or even on the sill. After - we take out the metal string from the hole.
 Installing a new kit.
Before putting in a new set, be sure to wipe the instrument in particularly dusty places. Then clean the body and neck using a special acoustic guitar care product.
1. Let's start stringing new strings. To begin with, we pass it (the side where the coil is) into the hole of the saddle and tightly clamp it with a cork.
2. The next step is to fix the string on the other side, for this we pierce it through the hole in the peg, so that the end looks no more than 7 cm.
3. Keeping the tail under tension, we make one turn with the main part of the string around the tuning peg, so that it is on top. Further, with the help of twisting the splitter, we make another 1-2 turns, but already from the bottom under the tip.
 We do this in order to fix the strings with a minimum number of turns, so we create a certain knot that will not allow them to slip out.
It's important to know.
1) It is forbidden to bite the strings when they are under tension! During this process, a bitten string can hit your hands at best. Plus, sudden changes in tension can damage the neck.
2)
A large number of turns will damage the tuners. We do no more than 4 on the first, and no more than 2 on the sixth.
3)
When the string starts to create tension, reduce the speed of the tuning peg, otherwise the pin may fly out.
4)
In no case do we tune the new strings immediately to the required sounds, otherwise they may break. We stretch it on a tone, or even two less (if the caliber is less than "ten"), wait 15-20 minutes and finish building.
5)
For the first few days, the strings will still be actively stretching, so get ready for constant adjustments.
6)
If this is your first time for you, do not rush to cut the "extra" string with pliers, there is a possibility that it will slip out in case of poor winding. Leave the ends for 1-2 days, the cut string is very difficult to re-tension.
You will also find useful an article on how
The principle of fastening the strings on the tuning shaft is similar to fastening on a stand - the string must be clamped with a tightening loop. The more the strings are pulled, the stronger the loop holds. Of course, the turns around the shaft are also of great importance, since this is all the frictional force that additionally holds the string.
There is nothing special to write about the dismantling of old strings - they unscrewed them, pulled them out and threw them away. To rotate the tuning machine, it is very convenient to use special twists, which you can buy, or you can make yourself from ebony, amaranth, Indian rosewood and mahogany.
Unfortunately, you cannot see the mother-of-pearl buttons at the end of the handle. Replacing guitar strings with such a twist is a pleasure.
Strings Installation Procedure into the guitar pegs is not of fundamental importance, but it is more convenient to start with the 1st and 6th strings, moving in order, then the already tucked strings will not interfere with the installation of the next ones. In other words, the string order is: 1st, 2nd, 3rd and also 6th, 5th, 4th.
A few more tips before we look directly at how to thread the strings:

Fastening the string on the tuning pegs, form a knot
Keep the string under tension so that the knot on the stand does not come loose. The string is threaded once or twice (for the fifth and sixth, just once is enough). It is not necessary to wind too many strings on the shaft so that the turns are piled up on top of each other. 

Now wrap the free end around the string and start winding. The string should start winding along with its ponytail. A couple of overlaps are enough. Remember to stretch the string with your hand until it stretches on its own. 

After the tail has been crossed several times, move it to the side opposite to the winding direction and lay the turns of the string neatly one after the other. 
Hello beginners, you are reading the School of Rock blog and today we are going to talk about how to change strings on an electric guitar.
Strings are one of the most important elements of sound formation on an electric guitar, however, unfortunately, over time, they stop sounding (here are the bitches) in a proper way, as a result, we lose the sonority of our instrument, people are not stupid and in addition to buying their strings came up with change at the same time. It should be said that the moment when it is necessary to change the kit (do not screw up) does not come when the string has already broken, but much earlier
When to change strings
So, we change the strings when they already cease to keep in tune, especially for the third string, she is usually the first to behave like a walking girl - in an inappropriate way, which means that such a girl should, rightly, be changed, preferably for a new one. The option when the strings are boiled down is far from the best, as a rule, the sonority of the metal is completely different, and besides, when the strings were boiled, they oxidized and immediately fucking broke, so we go and buy new ones to the store
Changing strings on an electric guitar

Depending on the breeches (consider the Fender Stratocaster and Gibson Les Paul), the strings change in different ways, but in general, the process is the same. So, first of all, we loosen the tuning pegs, unwind our metal friends, if laziness overcame you, then we just take the piles and cut the strings. Further, it is worth wiping the neck, because most likely from a long game you have dirt left, with a cloth it back and forth, and there is no more dirt, do not forget to wipe the pickups from dust. Next, as a matter of fact, we need to install new strings. On the Fender Stratocaster, the bridge is a set of saddles, therefore, the strings must be removed carefully so that the saddles do not move from their positions, follow this, thread the strings first through the bridge, and then to the tuning pegs. The number of turns on the tuning pegs should be moderate, try not to do more than five, as confusion on the tuning pegs cylinder can lead to a constant raster tuning (I don't know how to put it differently)). At the same time, when you pull the strings especially zealously, you do not need to work with the tuning mechanism, the string should be stretched smoothly, the metal still, also during the tensioning the string should not dangle, for this purpose we take its middle and pull it up or (if you have a Stratocaster) down (bass strings), so we press it against the headstock, then, although there are traces, it saves a lot of time.

Answering the question how to change strings on an electric guitar it is worth saying that Les Paul's bridge is completely different than that of the Fender Stratocaster and everything is a little simpler here, except that the headstock is completely different, if on the Fender we can give the string tension (we do this so that the marine knots on the peg does not come out) down, then here, alas, it will not work, besides, the varnish on such guitars is not colorless, scratches will be more visible

It is definitely worth saying that when you have tuned your electric guitar, let it "settle" for at least 12 hours, thus, the metal will stretch without stress and the strings will stay on your instrument much longer. At the same time, they installed the strings, pulled, checked the correctness of the tuning with the tuner, five minutes passed, checked again, pulled again, so several times and then, as they said, we do not touch the guitar for 12 hours.
Also, try to take care of the metal, wipe it from dust and dirt, and most importantly, from sweat, as a rule, for rehearsals, and at home, your hands sweat, so get a special cloth to remove sweat from both the strings and your hands.