What is a truss rod for a guitar? Adjusting the Bend of the Neck and Tuning the Trunk of an Electric Guitar How to Twist the Trunk on an Acoustic Guitar
Read also
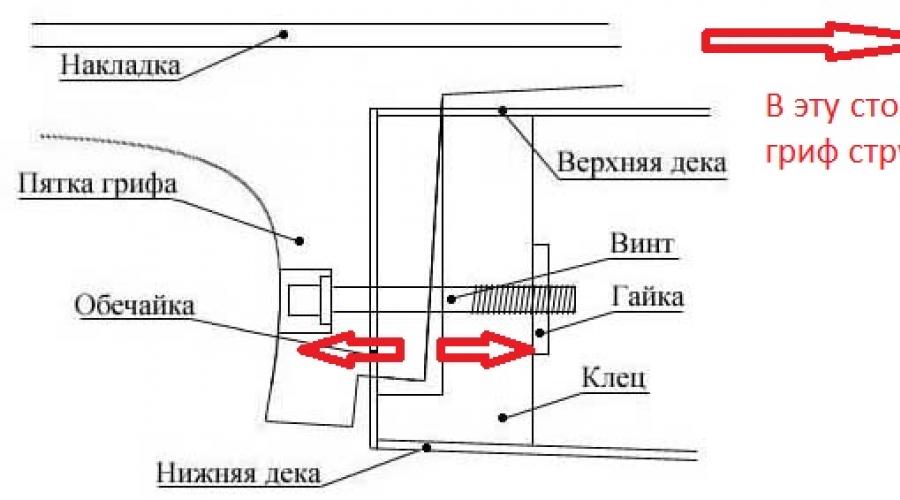
First, let's figure out what kind of guitar we're talking about. The diagram below shows the classic neck-to-body attachment. The distance between the strings and the neck is adjusted by loosening or tightening the neck screw. Therefore, on such a guitar, removing the strings, the neck will swing. With the strings stretched, theoretically the neck should not swing ... But if, for example, nylon strings are pulled, we will still face the swinging of the neck. 
Therefore, I prefer that the neck is fixed firmly and there is no wiggle with or without strings. To do this, set the optimal distance of the strings to the neck by unscrewing or tightening the screw. Then we try to determine as accurately as possible the distance indicated in the diagram: 
It appears that the distance between the outside of the heel of the neck and the deck is the same as the distance between the inside of the heel of the neck and the deck. Therefore, you can measure the outer part, and make the same height wedge made of wood or other suitable material. A wedge is needed to place it on the inside of the heel of the neck and twist the neck to a stationary state, while maintaining the optimal distance of the strings to the neck. But when installing the wedge, you will have to remove the neck, respectively, and the strings too. 
Some people think that this should not be done. But there are also many people who adjust the bar, put a wedge of the right size and secure the bar securely. I think that this is how the guitar becomes more practical and there is no fear that the neck suddenly sways and the guitar becomes instantly upset. I am happy to read the comments of knowledgeable people 🙂 If you liked the article, share it in the social. networks ...
Tuning an acoustic guitar is a delicate matter, but there are certain steps you can take to improve your playing experience. I find it most helpful to start with the nut, move on to the shape of the fretboard, then pay attention to the condition of the frets, tilt, and finally the bridge and saddle. This is the general algorithm, but since the elements are interconnected, when working with one one cannot ignore the rest. Below we will consider how a little separately the factor influencing the instrument.
Why do you need an anchor? How does he work? What are the types of anchors?
First, let's see how the anchor works in general. Truss - The rod inside the neck that compensates for the tension on the strings. It allows you to adjust the deflection of the neck. Before metal strings were used on guitars, the truss was not needed because the tension was not strong enough to flex the neck. When metal strings became the standard, it was necessary to compensate for the tension of the strings without losing the convenience of playing.The simplest truss rod is usually steel and is initially part of the neck. Here's a view of the heel of a Martin neck where we see a non-adjustable truss rod.

As you can see, the truss is T-shaped, and together with the sturdy mahogany neck gives good resistance to string tension. But if you need a neck thinner, then such an anchor will need to be made thicker and in practice this is not used, since the neck becomes heavier and the feeling when playing is not the same. Then they figured out how not to make the bar heavier, but to maintain control over its deflection.
There are two main types of adjustable anchors: contracting and flexing... Each of them can act both in one direction (bends the neck "back" in relation to the tension of the strings, and are used in the vast majority of guitars), and in two directions simultaneously (rarely used by small companies).
Flexing The truss rod works simply: the bar flexes as the truss rod flexes. It consists of two parallel elements, one of which we push (or push, depending on which side of the neck the adjustment nut is on) to bend the other. This system is used in most modern guitars in Asia, Martin's and many others. (with a 95% chance your guitar also has such an anchor-approx.):


The other end of the bending anchor

Contracting the anchor was first made by Gibson in the early 1920s. It actually squeezes the fretboard inward in the opposite direction to where the strings pull the fretboard. One end is rigidly secured to the neck, while the other has a nut and washer to adjust the tension. Let's take a look at a traditional compression anchor:

Notice how close the truss is to the back of the neck. This light-colored bar is inserted between the anchor and the escutcheon after the rod itself has been installed. When tightened, the truss rod compresses the back wall of the neck, which is narrower than the fretboard (in cross section). In addition, the pad itself is very rigid and does not compress. A relatively light squeeze is what is needed to reverse bend the neck, and therefore to resist the strings.
Gibson, Taylor and many other companies use this type of compression anchor.
And here is a version of the bi-directional compression anchor with nuts at both ends:

Depending on the direction of rotation of the truss rod, the nuts either compress the back of the neck or vice versa.
Where to turn the anchor?
The trunnion adjusting nut can be either on the headstock (like on Gibsons and Taylors) or on the heel of the neck inside the guitar body.On the headstock's head, such a nut cannot be overlooked:

(Typically, adjustments require either 6.5mm (1/4 ") or 8mm (5/16") wrenches.
If there is no nut on the headstock, then it can be seen through the socket of the guitar and requires a 5mm Allen key to adjust. This is what it looks like on a Martin guitar:

Some manufacturers hide this nut deeper, like, for example, Santa Cruz (in the photo I put a mirror in the guitar to see it):

Here the truss nut is in the bar close to the fretboard.
Some manufacturers do this in part to keep musicians from turning the truss rod themselves. Experience plays a key role in this setup, so it would be ideal to entrust the instrument to a guitar master. I hope you can reasonably assess your abilities and use this tuning guide.
Regardless of the type of truss rod, it only affects the flex of the neck, from the nut to where the mushroom is attached to the body. I repeat that the truss rod is intended to control precisely the deflection of the neck by bending it to the opposite side of the string tension.
Delusions
There are a few misconceptions about truss use, I think one of the most common is the trumpet adjustment, which is where the neck is attached to the body so further neck reset can be avoided. This is not true.The most common misconception is that the truss affects the pitch of the strings. Of course, after adjusting the anchor, the playing feel changes, but this is not the purpose of the adjustment. It is necessary to take it as a rule that after the truss is rebuilt, the convenience of playing and the height of the strings will only depend on. Plus, the timbre of the instrument changes a little, but this is only a side effect, and not the purpose of adjusting the rod.
The opinion that the bar should remain perfectly straight is also erroneous. It does not always depend on you, since the tree deforms under the influence of dryness or moisture. Quality instruments are made from properly dried wood, so the neck will hardly deform.
How much deflection should the bar have?
The "bulging" neck is often found:
If you just release the tension on the strings, it will straighten.
In general, "straightening" the bar is an interesting task. In practice, a perfectly straight neck will not be ideal for playing the instrument. For example, playing in zero position (open strings) or in first positions (anywhere from 1 to 5 frets), the strings will oscillate at b O a wider range than when we play in higher positions (anywhere from 6 frets and below). Then, in order to avoid string bouncing, as a rule, it is necessary to make the neck a little "convex", not shallow:

Thus, the neck will not be perfectly straight, but will have a slight deflection and the strings will be able to vibrate freely along the entire length of the neck.
Of course, some musicians tug the strings very gently and clamp them accordingly, while using instruments with a perfectly straight neck, but no one likes it when the neck is "convex":

With such a fretboard, the strings in low positions (from 0 to about 5 frets) will rattle like a bucket of nails.
Therefore, we are talking about the anchor as a device with which it is the deflection of the neck that is regulated.
How to determine neck deflection?
Let's determine what kind of deflection at the neck is now, that is, "convex" or "convex", roughly speaking. You need to take an instrument with stretched strings, “aim” with the neck and look at the edges of the frets along the entire length of the neck. Sometimes the bend can be quite insignificant and we cannot determine it using this method, but we can see if the frets are not clumsy :)Here's another method that I use: I simply clamp the third string on the first and fourteenth frets at the same time:

I usually do this in the traditional position for a musician (guitar on my knees), but for clarity, I took a photo with a guitar on my desktop.
If the guitar is in tune, the string forms a perfectly straight line.
Then I look at the distance from the top of the sixth fret to the bottom of the third string:

Do you see how far there is? You don't really need a ruler to measure. Just figure out which of the strings on your guitar would fit in there. The average thickness of the first string is 0.13 "is the ideal distance for the" average "guitarist... For bluegrass lovers (or just fans of a desperate battle - approx. per.) you need a larger distance, maybe even 0.26 inches, as the thickness of the third string.
How do you know if the deflection is correct?
Determining whether you have configured the anchor correctly can only be experienced.It's simple: play and tune the trumpet until the strings begin to rattle in both the low and high positions, in short, all over the neck.
If the guitar only rattles in low (0-5) positions, then you need to adjust the truss.
If it rattles only in high positions (from 6 frets and below), then the anchor will not help, it's a matter of the saddle.
In reality, everything is easier than easy. Gently twist the anchor and see what happens. As long as nothing is cracked or broken, you don't have to worry about not getting the right setup.
If your truss nut is on the heel of the bar, not on the head, then transition from a state where the bar is too "bulging"
The truss is a necessary part of any string instrument that uses steel strings: electric guitars, acoustic guitars, banjo, bass guitars, etc. Truss is not used in classical instruments (for example, in classical guitars with nylon strings). A steel string creates a lot more tension in the neck than, say, a nylon string. It is because of this that the wood of the neck needs reinforcement, which is done with an adjustable truss rod.
The truss rod was first patented by Thaddeus McHugh, an employee of Gibson, in 1921, although in fact the first attempts to create something similar were made back in 1908. The most important and obvious advantage of the truss rod is its ability to withstand high pressure and not bend. Also, thanks to the truss rod, it became possible to use lighter materials in the manufacture of guitar necks, as well as different neck profiles. So the irrigation shredders with their Ibanez now know who to thank.
Before the invention of the truss rod, the bars were made from durable and expensive woods, and it was necessary to foresee how the bar would behave when the fretboard was glued to it. All in all, a headache and expensive work.
In general, the anchor came and defeated all the problems. Well, almost everything :) Anchors are usually made of steel, although graphite and titanium have recently begun to be used. The truss rod is placed inside the neck of the guitar between the neck itself and the fretboard. Almost all modern anchors are adjustable. The special bolt is rotated with a guitar hex wrench, thereby changing the tension in the neck. When we loosen the truss rod, it allows the neck to flex away from the strings. This increases the distance from the strings to the neck and frets.
Likewise, when we tighten the truss rod, it straightens the neck, makes it more rigid. The strings are closer to the fretboard. The so-called low action is for those who like to saw and water on the guitar. Electric guitars should have a slightly curved neck by default. The depth of the bend is a personal matter for every guitarist. In addition to strengthening the neck, the truss rod is also important for tuning the instrument, or rather, adjusting it for each particular musician and his preferences. The pitch of the strings and the intonation of the guitar are directly controlled by the truss rod. Plus, over time, the bar tends to loosen and an anchor is just needed to pull it up a little in the right direction. In addition, we have the ability to eliminate the consequences of temperature, humidity, and, in general, the strings are tightly stretched, you must agree.
So, let's move on to setting up the anchor. On most guitars, the adjusting bolt is located on the headstock, usually under the cap. Although, it happens without her. We unscrew the lid. On some guitars, in particular on some Fenders, the trunnion adjustment bolt is located at the base of the neck where it connects to the body of the guitar. Fantastically convenient to adjust the truss on these guitars is only possible if you unscrew the neck from the guitar. At such times you understand why Kurt Cobain called Leo Fender a donkey.
The purpose of the adjustment is to achieve the required distance between the strings and frets, you need to understand that you should not completely trust only the height of the guitar bridge. If the strings are too close to the fretboard, the center of the fretboard may bend towards the strings, causing them to clink, brushing against adjacent frets.
The best way to figure out what you need is to twist it yourself, carefully, observing the consequences in the sound production. If your strings are rattling or too uncomfortable to play, or the guitar is not accurately intoning, then the trumpet most likely needs to be adjusted. The easiest and fastest way to check is to hold down the thick E string at the first fret (better to take a capo) and in the neck-body junction (about 17 frets). Now try pressing each string against the fretboard at the 6th fret. The best place to check deflection is in the center of the neck. If, when you press a string, you can clearly hear it touching a fret, everything is fine.
If there is no distinct sound, then the neck needs to be loosened. If, on the contrary, the sound is too clear and the distance from the string to the fret is greater than the thickness of the pick, you need to tighten the anchor.
Most guitars use hex bolts to adjust the truss rod, although they come in a range of inches and centimeters. Make sure your truss wrench fits perfectly on the guitar and won't strip the threads.
By turning the key clockwise, we tighten the anchor, counterclockwise we loosen it. If you think the key won't turn. So we must abruptly stop doing this! And urgently carry the guitar to the master, before it's too late. Over-tightening the truss rod can severely damage the neck of a guitar and can be very expensive to repair. It is also important to remember that you need to twist the anchor slowly, a maximum of a quarter of a turn. This will not cause trouble. In most cases, a couple of these turns is all that is needed.
Apart from the method described above for checking the correct deflection at the neck, this is actually a very subjective thing. You can buy special tools for measurements, or you can simply adjust the deflection by sensations. After all, you play your guitar.
Guitarists with a powerful pitch will sound better with a greater distance of the strings from the neck, their strings will vibrate better without touching adjacent frets. And guitarists who love speed sound best with the strings as close to the neck as possible. Understand what is more important to you, what is more convenient for you. The main thing to remember is that there is no need for sudden movements and your guitar will thank you more than once!
Acoustic Guitar Trussis a steel rod that is inserted into the neck and bends the wood so that the instrument can be played - above all, so that the strings sound when they are pressed.
What is a guitar truss for?
Many novice guitarists who do not understand how the instrument works generally misunderstand its structure a little. The neck of the guitar is not at all horizontally straight, as many people think. Moreover, it is not so much a perfectly flat bar as an arc on which the strings are stretched like a bowstring. If this part of the guitar were perfectly flat, then the strings would lie on it and it would be impossible to clamp them. The truss rod performs two tasks at once - it takes on the huge load that the stretched string exerts on the tree, and also keeps the neck in one position for more comfortable playing.


Accordingly, if changes occur with the guitar rod, this directly affects the convenience of the game, as well as the ability to perform songs in principle. With a curved neck directly relatedtwo very common problems:
- This is one of the reasons, - that is, they ring on the sills, and instead of giving an even, sonorous sound, they get along, and sometimes they don't play at all.
- It becomes very difficult to clamp the strings - it is especially felt at the 5th fret and higher. It becomes extremely difficult to play with the barre technique - the guitarist begins to spend much more effort than it takes. This situation is also directly related to the fact that the guitar truss is overtightened, and squeezes the neck much harder than required.
At the same time, the instrument may stop plotting and sound a little higher or lower than it should be.
How do you fix this? This is what this article is about.
Types of anchors for guitar
First of all, it is worth understanding what guitar rods are in general, and how they generally work. This is important because each type has its own adjustment mechanism.
Contracting
The most popular type of truss rod that is installed on almost every acoustic guitar. Its principle of operation is to squeeze the neck as you scroll the bar with the key. Conventionally, it consists of two parts - the first, static, which is precisely responsible for keeping the part of the tool in one position, and the second, which can be twisted, and which regulates the degree of how the tree is compressed.


Flexing
More complex construction, which is more typical for electric guitars, especially those made by Gibson. It also presents itself as a mechanism of two elements - a rod, which is fixed inside the tree, and a washer, which just regulates the compression force. This type of anchor is called compressive precisely because the rod pulls the tree in the direction opposite to the strings, which is why the force bend occurs.


How the anchor works
As mentioned above, the rod bends the instrument neck outward by force, creating an arc from the straight bar. The more it is tightened, the greater the degree of this arc, and the more. Accordingly, the distance to the strings is greater. And vice versa - the weaker it is, the lower the degree, and the less the strings are distant from the neck. In general, this is all - this is how the rod works inside the tree.
Anchor adjustment. Where to turn the nut?
Adjusting the guitar neckoccurs by rotating the nut, which controls the degree of deflection. On acoustic instruments, it is most often located inside the soundboard, under the block itself, in a special hole. This is done specifically so that inexperienced musicians do not try to fix problems on their own, and go to the master.

And this is true - it is recommended to first of all go to a person who understands what to do, instead of trying to fix the problem yourself. The reason is very simple - you can easily break the thread with your actions, or, even worse, damage the neck. Therefore, the ideal option for a beginner musician is to understand how , and prevent damage based on this information.
 In addition, less often, but on acoustic instruments, the truss rod may be at the top - on the head of the guitar. This is common with Gibson products or power tools.
Which way to turn the anchor?
 First, you need to understand what is wrong with you.To do this, take a guitar, hold down the first and eighteenth frets, and measure the distance between the strings and the neck in the region of the fifth-seventh frets. It should be about 0.3 millimeters. If the size is larger, then your neck is arched, which means that the tension on the strings is tighter. In this case, turn the nut clockwise.
If the instrument gets along, rings, and sounds more like a sitar or banjo, then this means that the tension of the rod is more than the strings can withstand. In this case, rotate counterclockwise.


Myths, guesses, delusions
On one of the guitar forums I read a topic where a person asked - to what extent should the truss rod be turned? And he was answered - until it clicks.
You can't do that. A click means that you at least ripped off the thread, or even broke the neck, and a crack went through it.
 It is necessary to twist the rod carefully, constantly checking the correctness of the deflection. This can be done simply by looking at the bar along the plane - as shown in the photo. So it will become perfectly clear how much it was bent in general, and how long to twist it. Often, it is enough to make a couple of turns to fix the whole situation, so remember - accuracy is above all.
In addition, before making repairs, it is imperative to remove or loosen the strings - therefore, a beginner should first find out , to do it without any problem.
How much deflection should the bar have?
 In fact, everyone has a different answer to this question. Someone is comfortable with playing with a slightly larger deflection than usual, someone with a smaller one. However, the standards for acoustic guitar say that the deflection should be such that the distance between the string and the neck at the fifth to seventh frets is no more than 0.3mm when the first and eighteenth frets are pressed simultaneously.
How to determine the shape of neck deflection
This aspect is also determined by how the strings are felt on the instrument.
- If they are hard to clamp, especially at high frets, then the bar has become "convex" - that is, bent outward.
- If the strings seem to lie on the neck, rattle and get along, then it is bent inward.

Alternatively, you can lay the guitar horizontally, tune it, and hold down the first and eighteenth frets at the same time. Then roughly measure the distance from the string to the fretboard at the 5-7th fret. It should be no more than 0.3mm.
Conclusion and procedure
Before, what is worth rememberingsetting the anchor – it is caution in everything. Do everything as carefully and thoroughly as possible, checking the consequences of each of your actions. And the actions are as follows:
- Determine the shape of the neck deflection;
- Remove or loosen the strings on the guitar;
- Twist the anchor in the direction that is required to correct the defect;
- Check the degree of curvature of the neck;
- If something is wrong, twist it again, depending on the desired result;
- Examination;
- If everything is in order, tighten the strings and be sure to let the instrument stand for a while and accept the changes. It is advisable to give a time limit per day for everything to fall into place.
Also worth noting, that loosen or increase the tension a little with a margin - that is, a little more, or a little less, since the strings will also affect the tension, and how well the bar will fit with the rod.
In addition, so that such problems arise as rarely as possible - you need to understandhow to choose an acoustic guitar, since a lot depends on the quality of the tool, as well as its material.
To properly tune an electric guitar, you need special knowledge. From the article you will learn: what, how, in what order you need to do in order to properly tune the electric guitar and avoid possible troubles.
Guitarists need them to diversify their performance and achieve unusual or powerful sounds, as well as to simplify the placement of fingers while playing. If you have any problems with the setup process, there is a separate one on our website.
In this article, the tuning will be indicated from the sixth string to the first. Some settings are easier to remember this way.
Setup steps
The deep tuning of the instrument consists of four stages. Need to adjust:
- anchor rod, or anchor;
- the height of the strings;
- scale;
- the pitch of the strings.
The fourth point - the pitch tuning of the strings - will not be dealt with here. There is a separate section on this on our website.
Complete tuning of an electric guitar is a complex, painstaking and responsible process. It is better to start it only after the usual setting has already been mastered. If not, it is wiser to contact the master.
Complete tool tuning requires complex and step-by-step adjustment of all elements. When the guitar is properly tuned, it sounds as good as possible and is comfortable to play.
Required tools
In addition to the guitar itself, you will need the following accessories:
- slotted screwdriver (the smaller the better);
- crosshead screwdriver;
- a hex key from the guitar;
- for some guitar models - like Fender or Ibanez - another little key from the instrument.
Setting up an anchor rod
Truss - 4-6mm thick metal bar inside the neck. The truss rod resists external loads on the wooden part: string tension, temperature and humidity changes.
The essence of the setting: to give the neck an optimal natural curve. The optimal position of the neck ensures comfortable sound production when playing, gives the strings a full sound without fast decay or unnecessary rattling.
Correct anchor position
What is the ideal bar position? It should not bend too much. But the strings cannot lie on it: their fixation points - on the nut and on the bridge - are above the level of the frets.
The anchor is adjusted with an anchor nut. If it is too loose, the beating path of the strings will move away from the frets and neck. What does this affect? Several problems arise at once:
- excessive ringing and bouncing when playing;
- uneven height of the strings throughout the neck, which technically complicates the performance;
- disturbed scale setting, which means - inaccurate sound of the instrument itself.
If you tighten the nut, you get a kind of "hump". The strings will hit the neck as its midpoint is higher than the two extremes. Then the strings will not be able to vibrate normally, so the sound fades out too quickly.
When setting up an anchor rod, the desired balance is sought on each specific instrument. Strive for minimal deflection. As for the sound, a slight bounce with a strong attack is acceptable.
How to tell if our neck has a normal deflection? To do this, we clamp the sixth - thickest - string in two places: at the first fret and in the place where the neck is attached to the guitar body (usually this is the seventeenth fret). Then at the seventh fret - in the place where the deflection is most pronounced - try to press the string against the iron nut. She should almost lie on top of it. Allowed 0.2-0.3 mm distance. But not less.
Adjustment technique
Tighten or loosen the anchor nut to adjust the anchor. It is usually located on the headstock. Sometimes - for example, with Fenders - at the base.
Sequencing:
- unscrew the cap with a screwdriver;
- Insert the hex key into the nut, looking down at the headstock.
- turn the key.
Where to turn? When we turn the key to the right, that is, clockwise, we tighten the anchor nut. When we turn left, the opposite is true.

How and how much to twist? Be very careful not to break the instrument. Do no more than a quarter of a turn at a time, or better, rotate 30 °.
Attention! If you hear a crackling sound while adjusting, stop immediately. Slowly return the nut to its original position. Be sure to show the tool to the master.
Carefully! As you decrease neck deflection, the tension on the strings increases at the same time. Therefore, so that some string does not accidentally break and injure you (especially take care of your eyes), first loosen the strings, and then tighten the anchor nut.
If you are loosening the truss rod, then be sure to tighten the strings and adjust their sound according to the tuner.
The correct pitch of the strings above the neck of the guitar
The height of the strings is adjusted using a slotted screwdriver or hexagon. Depending on your bridge model, you will need to operate either a pair of bolts or individual saddles for each string.
The height of the strings above the 12th fret is measured: between the string and the metal fret nut. Standard recommendations: for the 1st string - 1-1.5 mm, for the 6th string - 1.5-2.5 mm, since the string is thicker.

What values should you choose? Be guided by your preferences: for fast playing, make the string heights less (1 mm for the 1st string and 1.5 for the 6th string), for powerful riffs and sound - more (1.5 mm for the first string and up to 2.5 mm for the 6th). In this way, you will adjust the amplitude of the beat of the strings, which determines the speed of the performance and the strength of the sound.
Tip: It is convenient to measure the height of the strings with a pick or two folded together.
Electric Guitar Scale Tuning
Scale is the beat length of the string. It covers the distance from where the string sits on the fretboard to where the string sits on the bridge. The longer the beat of the string, the lower the note sounds, and vice versa.

Why adjust the scale? So that the instrument sounds accurately and cleanly when played, that is, does not out of tune, corresponds to the absolute pitch of sounds throughout the neck.
Fine-tuning the scale is a key point in the sound of an instrument. Without it, even the most expensive electric guitars won't sound good.
With the help of what is the scale regulated? On the bridge, in the place where the string is fixed, there are sliders and bolts. Turning the slider clockwise or counterclockwise adjusts the string length.

How to adjust the scale? We build up each string sequentially. First, we tune according to the tuner and check the sound in the open position.
Then we clamp the string at the 12th fret: it will be the same sound, only an octave higher. If there is an overestimation of the sound, then increase the length of the string, if understatement - vice versa.
We adjust with a slotted or Phillips screwdriver: insert it into the corresponding bolt and gently turn it in the desired direction. We achieve the perfect result.
We do everything very carefully so as not to disrupt the thread.
Tune the instrument exactly to the tuner. Otherwise your guitar will sound out of tune. This will be especially audible when you play full chords, clamping all the strings, and when you play fast.
Finally, be sure to do the pitch tuning of the strings.
Now you know how to tune your electric guitar properly. And if you have any questions or have any difficulties, then consult with the teachers of our school. And let your guitar always sound clean, powerful and bright.